Page is loading ...

Tools/Outils/Herramientas
Important Information
CAUTION: Risk of personal injury or product damage. Handle with care.
Product can break, chip or cause injury if handled carelessly. Get help lifting the
lavatory.
Observe all local plumbing and building codes.
NOTE: You may require different, more specialized tools to install this lavatory to
countertop materials other than wood or wood composites.
NOTE: Do not use adhesives or adhesive sealants with this product. Only use
silicone sealant.
Due to the nature of undercounter installations, Kohler Co. recommends that
undercounter lavatory installations be performed by trained and experienced
installers.
Use the template supplied with the lavatory.
Install so future removal from underneath the countertop is possible. This will
avoid countertop damage.
Informations importantes
ATTENTION: Risque de blessure corporelle ou d’endommagement du produit.
Manipuler avec précaution. Le produit peut se casser, se fendre ou causer des
blessures s’il est manipulé sans précaution. Demander de l’aide pour soulever le
lavabo.
Respecter tous les codes de plomberie et de bâtiment locaux.
REMARQUE: Des outils plus spécialisés peuvent être nécessaires pour installer le
lavabo sur des matériaux de comptoirs autres que ceux en bois ou en bois
composites.
REMARQUE: Ne pas utiliser de matériaux d’étanchéité ni d’adhésifs avec ce produit.
N’utiliser que du mastic à la silicone.
Jigsaw
Scie sauteuse
Sierra caladora eléctrica
Keyhole Saw
Scie cylindrique
Serrucho de calar
• Template/Gabarit/Plantilla
• Silicone Sealant/Joint en silicone/
Sellador de silicona
• Rags/Chiffons/Trapos
• Setting Tool
Outil de pose
Herramienta de fijación
• (4) #10 x 1-1/4" Wood Screws
(4) Vis à bois #10 x 1-1/4"
(4) Tornillos para madera del #10 x 1-1/4"
Plus/Plus/Más:
1120096-2-A 2 Kohler Co.

1. Preparation
If possible, install the drain to the lavatory before installing the lavatory.
Install the water supplies and drain piping according to the roughing-in
information.
Verify cabinet clearance beneath the countertop to accommodate lavatory basin,
faucet valving, and drain piping.
Cut out the template where indicated for the countertop opening. Cut along the
inside of the cutting line.
Position the template on the countertop to ensure clearance between the lavatory,
faucet, and backsplash.
Trace around the template on the countertop with a pencil.
Mark the faucet hole centerline on the countertop.
Préparation
Si possible, installer le drain au lavabo avant d’installer celui-ci.
Installer l’alimentation d’eau et la tuyauterie du drain selon l’information du plan
de raccordement.
Vérifier le dégagement du meuble sous le comptoir afin d’accommoder le bassin
du lavabo, les valves du robinet, et la tuyauterie du drain.
Découper le gabarit à l’emplacement de l’ouverture du comptoir. Découper le long
de la ligne intérieure du découpage.
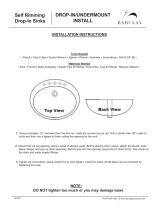
Cut along the inside line.
Découper le long de la ligne intérieure.
Corte sobre el interior de la línea.
Trace the cut-out.
Tracer la découpe.
Trace la abertura.
1
2
3
Verify cabinet clearance.
Vérifier le dégagement
du meuble.
Verifique el espacio libre
del gabinete.
1120096-2-A 4 Kohler Co.

Préparation (cont.)
Placer le gabarit sur le comptoir de façon à assurer un dégagement entre le
lavabo, le robinet et le dosseret.
Tracer au crayon le gabarit sur le comptoir.
Marquer l’axe central de l’orifice du robinet sur le comptoir.
Preparación
Si es posible, instale el desagüe en el lavabo antes de instalar el lavabo.
Instale las tuberías de suministro de agua y de desagüe conforme a la información
del diagrama de instalación.
Verifique que haya suficiente espacio en el gabinete debajo de la cubierta para el
lavabo, las válvulas de la grifería y la tubería del desagüe.
Corte la plantilla por la líneas que indican la abertura de la cubierta. Corte por el
interior de la línea de corte.
Coloque la plantilla sobre la cubierta para asegurarse de que haya suficiente
espacio entre el lavabo, la grifería y el protector contra salpicaduras.
Trace el contorno de la plantilla sobre la cubierta con un lápiz.
Marque en la cubierta la línea central del orificio para la grifería.
2. Installation
Cut out the countertop opening by carefully following the pencil line traced from
the template.
NOTE: Use the provided screws (wood screws are not provided) and anchors for
countertops with a minimum 1″ (2.5 cm) thickness. Use appropriate anchors and
fasteners (not provided) for thinner countertops.
For Wood Countertops
Mark and pre-drill the wood screw holes at the locations shown on the template.
Marble
Marbre
Mármol
Setting Tool/Outil de pose/Herramienta de fijación
Anchor/Ancrage/Anclaje
Clamp/Pince/Grapa
Anchor Screw
Vis d'ancrage
Tornillo de anclaje
Wood Screw
Vis à bois
Tornillo para madera
Foam Padding
Coussinet de mousse
Material protector de espuma
Apply sealant.
Appliquer du joint d'étanchéité.
Aplique sellador.
Kohler Co. 5 1120096-2-A

Installation (cont.)
Waterproof any exposed areas of wood.
For Marble/Stone Countertops
Position the countertop upside down on foam padding to protect the surface.
Mark and drill 3/8″ holes 5/8″ (1.6 cm) deep at the locations shown on the
template.
Using a setting tool and hammer, secure the anchors.
For All Installations
If the countertop has not been installed, install it at this time.
Drill the faucet holes according to the faucet installation instructions.
Install the faucet and drain according to the manufacturer’s instructions.
NOTE: Do not use adhesives or adhesive sealants with this product. Only use
silicone sealant.
Apply a continuous bead of silicone sealant to the top surface of the lavatory rim
where it will contact the countertop.
For Marble/Stone Countertops: Install the lavatory to the countertop with the
clamps and anchor screws provided.
For Wood Countertops: Install the lavatory to the countertop with the clamps and
wood screws (not provided).
For Other Countertop Materials: Refer to the countertop manufacturer’s
instructions for recommended fasteners.
NOTICE: Risk of product damage. Do not overtighten the clamps. Overtightening
may cause irreparable damage to the lavatory.
Position the lavatory squarely under the cutout before tightening the clamps.
Draw the lavatory rim up against the countertop until it is snug. Do not
overtighten.
Immediately wipe away any excess sealant and fill any voids as needed. Allow
the sealant to set for 30 minutes before proceeding.
Connect and tighten the trap to the drain. Complete the water supply connections
to the faucet according to the instructions packed with the faucet.
Run water into the lavatory and check for leaks.
Installation
Découper l’ouverture du comptoir en suivant avec précaution la ligne tracée du
gabarit.
REMARQUE: Utiliser les vis et les dispositifs d’ancrage fournis (les vis à bois ne sont
pas fournies) pour comptoirs d’une épaisseur minimale de 1″ (2,5 cm). Utiliser des
ancrages et des fixations (non-fournis) pour des comptoirs plus minces.
Pour des comptoirs en bois
Marquer et percer les trous pilotes des vis à bois aux emplacements illustrés sur le
gabarit.
1120096-2-A 6 Kohler Co.

Instalación (cont.)
Impermeabilice todas las áreas expuestas de la madera.
Para cubiertas de mármol/piedra
Coloque la cubierta boca abajo sobre material protector de espuma para proteger
la superficie. Marque y taladre orificios de 3/8″ con una profundidad de 5/8″ (1,6
cm) en los sitios designados en la plantilla.
Utilice una herramienta de fijación y un martillo para fijar los anclajes.
Para todas las instalaciones
Si no se ha instalado la cubierta, instálela en este momento.
Taladre los orificios para la grifería según las instrucciones de instalación de la
grifería.
Instale la grifería y el desagüe según las instrucciones del fabricante.
NOTA: No utilice adhesivos ni selladores adhesivos con este producto. Sólo utilice
sellador de silicona.
Aplique una tira continua de sellador de silicona en la superficie superior del
borde del lavabo donde hará contacto con la cubierta.
Para cubiertas de mármol/piedra: Instale el lavabo en la cubierta utilizando las
grapas y tornillos de anclaje provistos.
Para cubiertas de madera: Instale el lavabo en la cubierta utilizando las grapas y
tornillos para madera (no provistos).
Para cubiertas de otro material: Consulte las instrucciones del fabricante de la
cubierta para los herrajes recomendados.
AVISO: Riesgo de daños al producto. No apriete demasiado las grapas. Si se aprieta
demasiado puede causar daño irreparable al lavabo.
Coloque el lavabo bien encuadrado debajo de la abertura antes de fijar las grapas.
Empuje el borde del lavabo hacia arriba contra la cubierta hasta que quede bien
ajustado. No apriete demasiado.
Limpie inmediatamente el exceso de sellador y rellene los espacios vacíos según
sea necesario. Antes de continuar, deje que el sellador se seque por 30 minutos.
Conecte y apriete la trampa al desagüe. Termine de realizar las conexiones del
suministro de agua a la grifería según las instrucciones incluidas con la grifería.
Haga correr agua en el lavabo y verifique que no haya fugas.
Care and Cleaning
For best results, keep the following in mind when caring for your KOHLER product:
•
Always test your cleaning solution on an inconspicuous area before applying to
the entire surface.
•
Wipe surfaces clean and rinse completely with water immediately after applying
cleaner. Rinse and dry any overspray that lands on nearby surfaces.
•
Do not allow cleaners to soak on surfaces.
•
Use a soft, dampened sponge or cloth. Never use an abrasive material such as a
brush or scouring pad to clean surfaces.
•
Be careful not to leave staining materials in contact with the surface for extended
periods of time.
•
The ideal cleaning technique is to rinse thoroughly and blot dry any water from
the surface after each use.
1120096-2-A 8 Kohler Co.

Care and Cleaning (cont.)
For detailed cleaning information and products to consider, visit www.kohler.com/clean.
To order Care & Cleaning information, call 1-800-456-4537.
Entretien et nettoyage
Pour de meilleurs résultats, prendre ce qui suit en considération lors de l’entretien de
votre produit KOHLER:
•
Toujours tester la solution de nettoyage sur une surface la moins évidente avant
de l’appliquer sur la totalité de la surface.
•
Essuyer les surfaces et rincer complètement avec de l’eau immédiatement après
l’application du nettoyant. Rincer et sécher tout éclaboussement sur les surfaces
avoisinantes.
•
Ne pas laisser les nettoyants sur les surfaces.
•
Utiliser une éponge ou un chiffon doux et humide. Ne jamais utiliser de matériau
abrasif tel qu’une brosse ou une éponge à récurer pour nettoyer les surfaces.
•
Faire attention de ne pas laisser de matériaux qui tachent en contact avec la
surface pendant de longues périodes.
•
La technique idéale de nettoyage est de bien rincer et de sécher toute eau de la
surface après chaque usage.
Pour l’information détaillée de nettoyage et des produits à considérer, visiter
www.kohler.com/clean. Pour commander des informations d’entretien et de nettoyage,
composer le 1-800-456-4537.
Cuidado y limpieza
Para obtener los mejores resultados, tenga presente lo siguiente al limpiar su producto
KOHLER:
•
Siempre pruebe la solución de limpieza en un área oculta antes de aplicarla a toda
la superficie.
•
Limpie con un trapo las superficies y enjuague completa e inmediatamente con
agua después de aplicar el limpiador. Enjuague y seque las superficies cercanas
que se hayan rociado.
•
No deje por tiempo prolongado los limpiadores en las superficies.
•
Utilice una esponja o trapo suave y húmedo. Para limpiar las superficies nunca
utilice materiales abrasivos como cepillos o estropajos de tallar.
•
Tenga cuidado de no dejar sustancias que manchen, en contacto con la superficie
por periodos prolongados.
•
La técnica de limpieza ideal es enjuagar completamente y secar dando toques
suaves el agua de la superficie después de cada uso.
Para obtener información detallada de limpieza y los limpiadores a considerar, visite
www.kohler.com/clean. Para solicitar información sobre el cuidado y la limpieza, llame
al 1-800-456-4537.
Warranty
Kohler Co. warrants the cast iron components of products manufactured after February
10, 2000, to be free of defects in material and workmanship during normal residential
use for as long as the original consumer purchaser owns his or her home. Gloss
reduction, scratching, staining and alkaline etching of the finish over time due to use,
cleaning practices or water or atmospheric conditions, are not manufacturing defects but
are indicative of normal wear and tear. This warranty applies only for KOHLER Cast
Iron products installed in the United States of America, Canada or Mexico (North
America).
Kohler Co. 9 1120096-2-A

Warranty (cont.)
If a defect is found in normal residential use, Kohler Co. will, at its election, repair,
replace or make appropriate adjustment. Damage caused by accident, misuse, or abuse is
not covered by this warranty. Improper care and cleaning will void the warranty. Proof
of purchase (original sales receipt) must be provided to Kohler Co. with all warranty
claims. Kohler Co. is not responsible for labor charges, installation, or other incidental or
consequential costs. In no event shall the liability of Kohler Co. exceed the purchase
price of the product.
If the cast iron product is used commercially or is installed outside of North America,
Kohler Co. warrants the cast iron product to be free from defects in material and
workmanship for one (1) year from the date the product is installed, with all other terms
of this warranty applying except duration. All other components other than the
enameled cast iron carry Kohler Co.’s one-year limited warranty unless otherwise
specified.
If you believe that you have a warranty claim, contact Kohler Co., either through your
Dealer, Plumbing Contractor, Home Center or E-tailer, or by writing: Kohler Co., Attn.:
Customer Care Center, 444 Highland Drive, Kohler, WI 53044, USA. Please be sure to
provide all pertinent information regarding your claim, including a complete description
of the problem, the product, model number, color, finish, the date the product was
purchased and from whom the product was purchased. Also include your original
invoice. For other information, or to obtain the name and address of the service and
repair facility nearest you call 1-800-4-KOHLER (1-800-456-4537) from within the USA
and Canada, and 001-800-456-4537 from within Mexico, or visit www.kohler.com within
the USA, www.ca.kohler.com from within Canada, or www.mx.kohler.com in Mexico.
Kohler Co. and/or seller are providing this warranty in lieu of all other warranties,
expressed or implied, including but not limited to the implied warranties of
merchantability and fitness for a particular purpose. Kohler Co. and/or seller disclaims
any liability for special, incidental or consequential damages.
Some states/provinces do not allow limitations on how long an implied warranty lasts,
or the exclusion or limitation of special, incidental or consequential damages, so these
limitations and exclusions may not apply to you. This warranty gives the consumer
specific legal rights. You may also have other rights, which vary, from state/province to
state/province. This warranty is to the original consumer purchaser only, and excludes
product damage due to installation error, product abuse, or product misuse, whether
performed by a contractor, service company or the consumer.
This is Kohler Co.’s exclusive written warranty.
Garantie
Kohler garantit que les composants en fonte des produits fabriqués après le 10 février
2000 sont exempts de tout défaut de matériel et de fabrication lors d’un usage normal
domestique, aussi longtemps que l’acquéreur d’origine reste le propriétaire de son
habitation. Les ternissements, les fissures, les taches et les attaques alcalines sur la
finition au fil du temps; les pratiques de nettoyage ou les conditions atmosphériques ou
de l’eau ne sont pas considérés comme défauts de fabrication, mais plutôt comme signes
d’usure normale. Cette garantie s’applique uniquement aux produits en fonte Kohler
installés aux États-Unis d’Amérique, au Canada ou au Mexique (Amérique du Nord).
Si un défaut est décelé en cours d’usage normal domestique, Kohler Co. décidera, à son
choix, de réparer, de remplacer ou d’effectuer les réglages appropriés. Un
endommagement causé par un accident, mauvais usage ou mauvais traitement n’est pas
couvert par cette garantie. Un entretien et un nettoyage inadéquats annuleront cette
garantie. Une preuve d’achat (ticket de caisse original) doit être présentée à Kohler Co.
avec tous les recours en garantie. Kohler Co. n’est pas responsable des coûts de
main-d’œuvre, d’installation ou d’autres frais particuliers, accessoires ou indirects. La
responsabilité de Kohler Co. n’excédera en aucun cas le prix d’achat du produit.
1120096-2-A 10 Kohler Co.
/