Page is loading ...

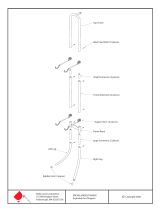
These instructions will detail how to assemble one (1) of the ve (5) sections that make up the frame of the JumpPod® Trampoline.
Once you have assembled one section of the frame, you can simply repeat this process to complete additional sections.
When all ve sections are complete, connect them together to complete the trampoline.
These instructions may differ from the instruction book, but this method tends to allow for easier assembly.
Additionally, this method makes it easier for one person to put together the trampoline by themselves.
We recommend to have an additional person to help with assembly.
Version 05282008
JumpPod® (JP1514)
Trampoline Section Instructions

The easiest to put the trampoline together is in ve individual sections.
Assuming the Pod Connector (Key #4) isn’t already attached to Key #1, set down the Pod connector.
Next is key #1, the top rail with six holes. The pod connector slides onto the end of this top rail.
2
“Underside”
“Top of Tube”
Key #1
4 Spring holes on top
2 Spring holes on the bottom
(6 Spring holes total)

Next you can slide key #2, the Socket connector with ve spring holes, onto the end of key #1.
3
Note, the support sleeve end of key number two goes onto the open end of key #1,
“Underside”“Top of Tube”
Key #2
3 Spring holes on top
2 Spring holes on the bottom
(5 Spring holes total)

The last step is to attach key #3 to the end of key #2.
Now, repeat this step with the other top rails, making a total of ve top rail sections.
“Underside”“Top of Tube”
You now have assembled one section of top rails.
Key #3
5 Spring holes on top
2 Spring holes on the bottom
(7 Spring holes total)

5
Join the three pieces so that the screw holes line up.
With a Philips-head screwdriver, screw self tapping screws into the screw holes.
Next, you will need to assemble the leg bases. This will require two J-legs and one leg center. These are key #5
and Key #6 in your users manual. Lay out the two leg sides and one leg center so that it makes a W shape.
You have now completed one leg base. Repeat this step with the remaining four leg bases.

Now insert one end of the leg assembly into the pod connector on one of your top rail sections.
6
Please note that the other end of the leg assembly does not line up with the t-connector. Pull the free end of the leg
assembly until it lines up with the t-connector. Once both sides are in, push down rmly on the leg assembly to
ensure a tight t. The tension of the leg assembly helps hold the pieces together.
Repeat this step with the remaining four leg assemblies.

7
When all the legs are complete, arrange them on the ground in a circle with the legs facing upwards.

Diagram 1
Diagram 1: Now take two sections of completed legs and ip them over and rotate them 180º.
Diagram 2: Next, connect these two sets of legs together at the T-connector of one and the open tube of the other.
Diagram 5 : Finally, ip over, rotate, and connect the nal
leg set to complete the ring of the trampoline frame.
Diagram 5
Diagram 2
Diagram 3 Diagram 4
Diagram 3 & Diagram 4: Now, ip over, rotate, and connect the next three leg sets to the complete previous sets.
8
/