Page is loading ...

HARNESS
Fit Guide
TIPS FOR FITTING YOUR NEW VACUUM
Super Coach Pro™ 6
Super Coach Pro 10

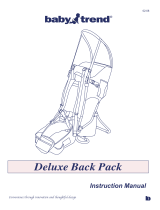
1. Upper harness should sit between shoulder blades
for most comfortable fit. The unit was shipped with
the upper harness in the middle position. If you
are a tall user, you will need to move the position
up. If you are a shorter user, you will need to move
the position down (See side view of vacuum and
harness Figure A).
El arnés superior debe apoyar entre los omóplatos
para tener un calce más confortable. La unidad fue
despachada con el arnés superior en la posición
media. Si usted es alto, tendrá que mover la posición
hacia arriba. Si no es tan alto, tendrá que mover la
posición hacia abajo (Ver vista lateral de aspiradora y
arnés Figure A).
Pour un confort optimal, le harnais supérieur devrait
reposer entre les omoplates. Sur cet appareil, le harnais
est présentement à la position médiane. Si vous êtes une
personne de grande taille, remontez le harnais. Si vous
êtes une personne de plus petite taille, baissez le harnais
(voir l’aspirateur et le harnais vus de côté Figure A).
2. To move the upper harness, loosen the tension-
ing straps (Figure B). Then using a #3 Phillips
screwdriver, unthread the screw from the unit. It is
located in center of upper harness (Figure B). The
upper pad should be secured by screwing it all the
way in.
Para mover el arnés superior, afloje las correas de
tensión (Figure B). Luego, y usando un destornil-
lador Phillips #3, afloje el tornillo de la unidad. Se
encuentra en el medio del arnés superior (Figure B).
La plataforma superior debe ser garantizado por ator-
nillarlo todo hacia adentro.
Pour remonter le harnais, desserrez les courroies de
serrage (Figure B). À l’aide d’un tournevis à tête étoilée
#3, dévissez la vis située au centre du harnais supérieur
(Figure B). Il est situé dans le centre de harnais supéri-
eure. Le pavé supérieur doit être fixé par vissage tout le
chemin po.
Figure B
Tensioning Straps
Upper Harness
Pivoting Bar
Adjustable Harness
Location
Figure A
HARNESS HEIGHT ADJUSTMENT / AJUSTE DE LA ALTURA DEL
ARNÉS / AJUSTEMENT DE LA HAUTEUR DU HARNAIS
pro-team.com / 866.888.2168
Adjustable
Harness
Locations

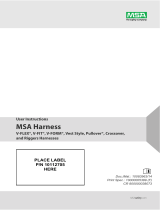
Figure E
Figure D
Figure F
Figure G
Figure C
Upper
Harness
Buckle
1. Loosen the shoulder straps and the waist belt. Lift the vacuum and
slide your arms through the straps (Figure C). The upper harness
can also be adjusted by tightening or loosening the upper harness
buckles for a custom fit.
Afloje las correas de los hombros y las correas de la cintura. Levante
la aspiradora y meta los brazos entre las correas (Figure C). El arnés
superior también puede ajustarse ajustando o aflojando sus hebillas
para tener un calce personalizado.
Desserrez les bandoulières et le ceinturon. Soulevez l’aspirateur et
placez les sangles sur vos épaules (Figure C). Pour un ajustement sur
mesure, resserrez ou desserrez les boucles sur le harnais.
2. Connect the waist strap (Figure D).
Conecte las correas de la cintura (Figure D).
Bouclez le ceinturon (Figure D).
3. Tighten the waist belt by grabbing the ends of the straps and pull-
ing each end toward each other and then directly outward from the
center of the body. It is very important that the weight of the unit
be concentrated on your hips rather than your shoulders (Figure E).
Ajuste la correa de cintura tomando los extremos de las correas y ti-
rando de cada extremo hacia el otro y luego directamente hacia afuera
desde el centro del cuerpo. Es muy importante que el peso de la unidad
se concentre en sus caderas y no en sus hombros (Figure E).
Resserrez la ceinture en agrippant les extrémités des courroies et en les
tirant l’une vers l’autre, puis vers l’extérieur. Il est très important que
le poids de l’appareil repose sur vos hanches plutôt que vos épaules
(Figure E).
4. Adjust the shoulder straps so that the unit fits comfortably, but the
weight is still concentrated on your hips (Figure F).
Ajuste las correas de los hombros para que la unidad se acomode bien,
pero con el peso siempre concentrado en las caderas (Figure F).
Ajustez les bandoulières de manière à ce que le port de l’appareil soit
confortable, mais que son poids soit toujours concentré sur vos hanches
(Figure F).
5. Connect the sternum strap buckle and slide the strap up or down on
the sewn-in wire support for the best fit (Figure G).
Enganche la hebilla de la correa del esternón y deslice la correa hacia
arriba o abajo sobre el soporte de alambre cosido para obtener el mejor
calce (Figure G).
Pour un ajustement optimal, fermez la boucle de la courroie de sternum
et glissez la courroie vers le haut ou le bas sur le support métallique
(Figure G).
WEARING THE BACKPACK VACUUM /
USo DE LA ASpIRADoRA TIpo MocHILA / poRT DE L’ASpIRATEUR DoRSAL
pro-team.com / 866.888.2168

• The weight of the vacuum should be evenly distributed on your hips.
El peso de la aspiradora debe distribuirse uniformemente sobre las caderas.
Le poids de l’aspirateur devrait être réparti uniformément sur vos hanches.
• Adjust the padded waist belt and shoulder straps for a custom fit.
Ajuste el cinturón acolchado y las correas de los hombros para un ajuste personalizado.
Réglez le ceinturon rembourré et les bandoulières pour un confort optimal.
• The areas on the harness that touch the user are made from breathable mesh material
to keep the operator cool.
Las áreas del arnés que están en contacto con el usuario están hechas de un material de
malla respirable para que el operador no sufra calor.
Les sections du harnais qui touchent l’utilisateur sont faites de tissu maillé qui respire afin
que l’opérateur n’ait pas trop chaud.
• The on/off switch is conveniently located on the waist belt of the backpack vacuum.
The switch box is secured to the waist belt with Velcro® running through the top and
bottom of switch box and then to the inside of the waist belt.
El interruptor de encendido/apagado está convenientemente ubicado sobre la correa de
cintura de la aspiradora de mochila. La caja de interruptor está asegurada a la correa de
cintura con Velcro® que se extiende por la parte superior e inferior de la caja de interruptor
y luego hasta el interior de la correa de cintura.
L’interrupteur En M./Arrêt (On/Off) est situé sur la sangle ceinture de l’aspirateur dorsal. Le
boîtier de l’interrupteur est fixé à la sangle ceinture par une bande Velcro® passant par le
haut et le bas du boîtier puis par la sangle ceinture.
• Use the proper attachments for the job. ProTeam has attachments to perform most
jobs without requiring you to bend over or getting into difficult positions.
Use los accesorios adecuados para el trabajo.
ProTeam tiene accesorios para realizar la mayoría
de los trabajos sin que deba doblarse o adoptar
posiciones difíciles.
Utilisez les accessoires convenant au travail à effectuer.
ProTeam offre des accessoires adaptés à la plupart des
travaux et conçus pour vous éviter de vous pencher ou
d’adopter une position inconfortable.
• The padded articulating harness design pro-
vides increased range of motion during detail
and overhead work reducing operator fatigue
and increasing productivity.
El diseño articulado y acolchado del arnés posibilita
un mayor rango de movimiento durante trabajos
de detalle y elevados, reduciendo el cansancio del
operador y aumentando la productividad.
Le harnais articulé et matelassé permet à
l’opérateur de bouger librement lorsqu’il nettoie
des endroits difficiles d’accès ou en hauteur, ce
qui réduit la fatigue de l’opérateur et accroît la
productivité.
BACKPACK ERGONOMICS /
ERGoNoMÍA DE LA MocHILA / ERGoNoMIE DE L’ASpIRATEUR DoRSAL
866.888.2168 pro-team.com
ProTeam, and Super Coach Pro are trademarks of ProTeam, Inc. ©
2012-2013 ProTeam, Inc. All rights reserved. ProTeam, Inc., P.O.
Box 7385 Boise, Idaho 83707
The American Lung Association and ProTeam
are partners in an educational campaign about
Indoor Air Quality issues. The American Lung
Association does not endorse products.
SP6865-1 Rev. 9/13
/