Roland GP609 Owner's manual

Category
Musical Instruments
Type
Owner's manual
Owners Manual
Before using this unit, carefully read “USING THE UNIT SAFELY” and “IMPORTANT NOTES” (leaet “USING THE UNIT SAFELY and Owner’s Manual (p. 30)). After reading, keep the
document(s) including those sections where it will be available for immediate reference.
Copyright © 2017 ROLAND CORPORATION
° Play the Piano
˙
Play various sounds
This piano contains a wide variety of tones (sounds). You can freely select and perform using these tones.
For a list of the tones, refer to “Tone List at the end of this manual.
˙
Play two layered tones (Dual Play)
You can layer two tones on a single key.
˙
Play dierent tones with your left and right hands (Split Play)
You can divide the keyboard into left and right zones, and select a dierent tone for each zone.
˙
Save your performance settings (Registration)
You can save tone settings and settings for Dual Play or Split Play, and recall them easily.
page
8
page
9
page
9
page
16
° Practice Songs
˙
Sound a metronome
You can sound a metronome.
˙
Practice along with the built-in songs
This piano contains numerous built-in songs.
For the song titles, refer to “Internal Song List” at the end of this manual.
˙
Recording the Song You’re Practicing
You can record your own playing.
page
10
page
11
page
12
° Adjust Your Piano
˙
Adjust the keyboard touch
You can adjust the touch sensitivity of the keyboard to match your own playing style.
˙
Match the pitch to other instruments
When playing together with other instruments, you can match this pianos reference pitch to that of the other
instruments (Master Tuning).
˙
Create your own piano (Piano Designer)
You can customize the sound to your own taste by adjusting the sonic elements of the grand piano sound.
page
8
page
24
page
15
° Simply opening or closing the fallboard turns the power on/o
page
5
Provision of Bluetooth functionality
Please be aware that depending on the country in which you purchased the piano, Bluetooth functionality might not be included.
The Bluetooth logo appears
when you turn on the power.
If Bluetooth functionality is included
1. When you open the fallboard, the power turns on
automatically.
When you close the fallboard, the power turns o automatically.
2. Use the [Volume] buttons to adjust the volume.
2
°
Easy Quick Guide
Selecting and Playing Songs
You can perform along with a song.
Selecting a song
12 3
1. Press the [Song] button.
Category
Tempo
Time signature
Measure
Song name
2. Use the [K] [J] buttons to select a category.
Category Explanation
USB Memory
Songs saved on a USB ash drive
Internal Memory
Songs saved in internal memory
Listening
Internal songs
Piano songs recommended for listening
Masterpieces
Piano Masterpieces
Songs corresponding to the included
collection of scores, “Roland Classical
Piano Masterpieces.
Easy Piano
Famous popular songs and classical
compositions
Songs corresponding to the included
collection of scores, “Let’s Enjoy Piano.
Scales
Scales in all keys
(major scales, minor scales)
Songs corresponding to the included
collection of scores, “Let’s Enjoy Piano.
Hanon
The Virtuoso Pianist No.1–20
Beyer
Vorschule im Klavierspiel Op.101
No.1–106
Burgmüller
25 Études faciles et progressives Op.100
Czerny100
100 Übungsstücke Op.139
3. Use the [–] [+] buttons to select a song.
MEMO
For details on the internal songs, refer to “Internal Song List at the end of
this manual.
Playing a song
1 2
1. Press the [s] button.
The song plays.
2. Press the [s] button once again.
The song stops.
Song operations
Return to the beginning of
the song
Press the [u] button.
Play/stop
Press the [s] button.
Rewind
Press the [x] button.
Fast-forward
Press the [y] button.
Play all songs in the
selected category
(All Song Play)
Hold down the [Song] button and press the
[s] button.
Change the song tempo Press the [Slow] [Fast] buttons.
page
11
Selecting a Tone
This piano lets you enjoy performing with a variety of piano tones and
other tones.
1 2
1. Press one of the tone buttons.
Select a tone group.
Button Explanation
[Piano] button Grand piano tones
[E. Piano] button Electric piano tones
[Organ] button Organ tones
[Strings] button
The tones of string instruments such as
violins, as well as other instruments used in
orchestras.
[Other] button
Selects a variety of sounds such as bass or
accompaniment sounds.
2. Use the [–] [+] buttons to select a tone.
MEMO
For more about the tones, refer to Tone List” at the end of this manual.
Using the Metronome
You can perform while hearing a metronome.
1 2
1. Press the [Metronome] button.
2. Press the [Slow] [Fast] buttons.
The metronome tempo changes.
page
10
page
8
3
Easy Quick Guide . . . . . . . . . . . . . . . . . . . . . . . . . . . . . . . . . . . . . . . . . 2
Selecting a Tone . . . . . . . . . . . . . . . . . . . . . . . . . . . . . . . . . . . 2
Using the Metronome . . . . . . . . . . . . . . . . . . . . . . . . . . . . . . 2
Selecting and Playing Songs . . . . . . . . . . . . . . . . . . . . . . . . . 2
Main Specications . . . . . . . . . . . . . . . . . . . . . . . . . . . . . . . . . . . . . . . 3
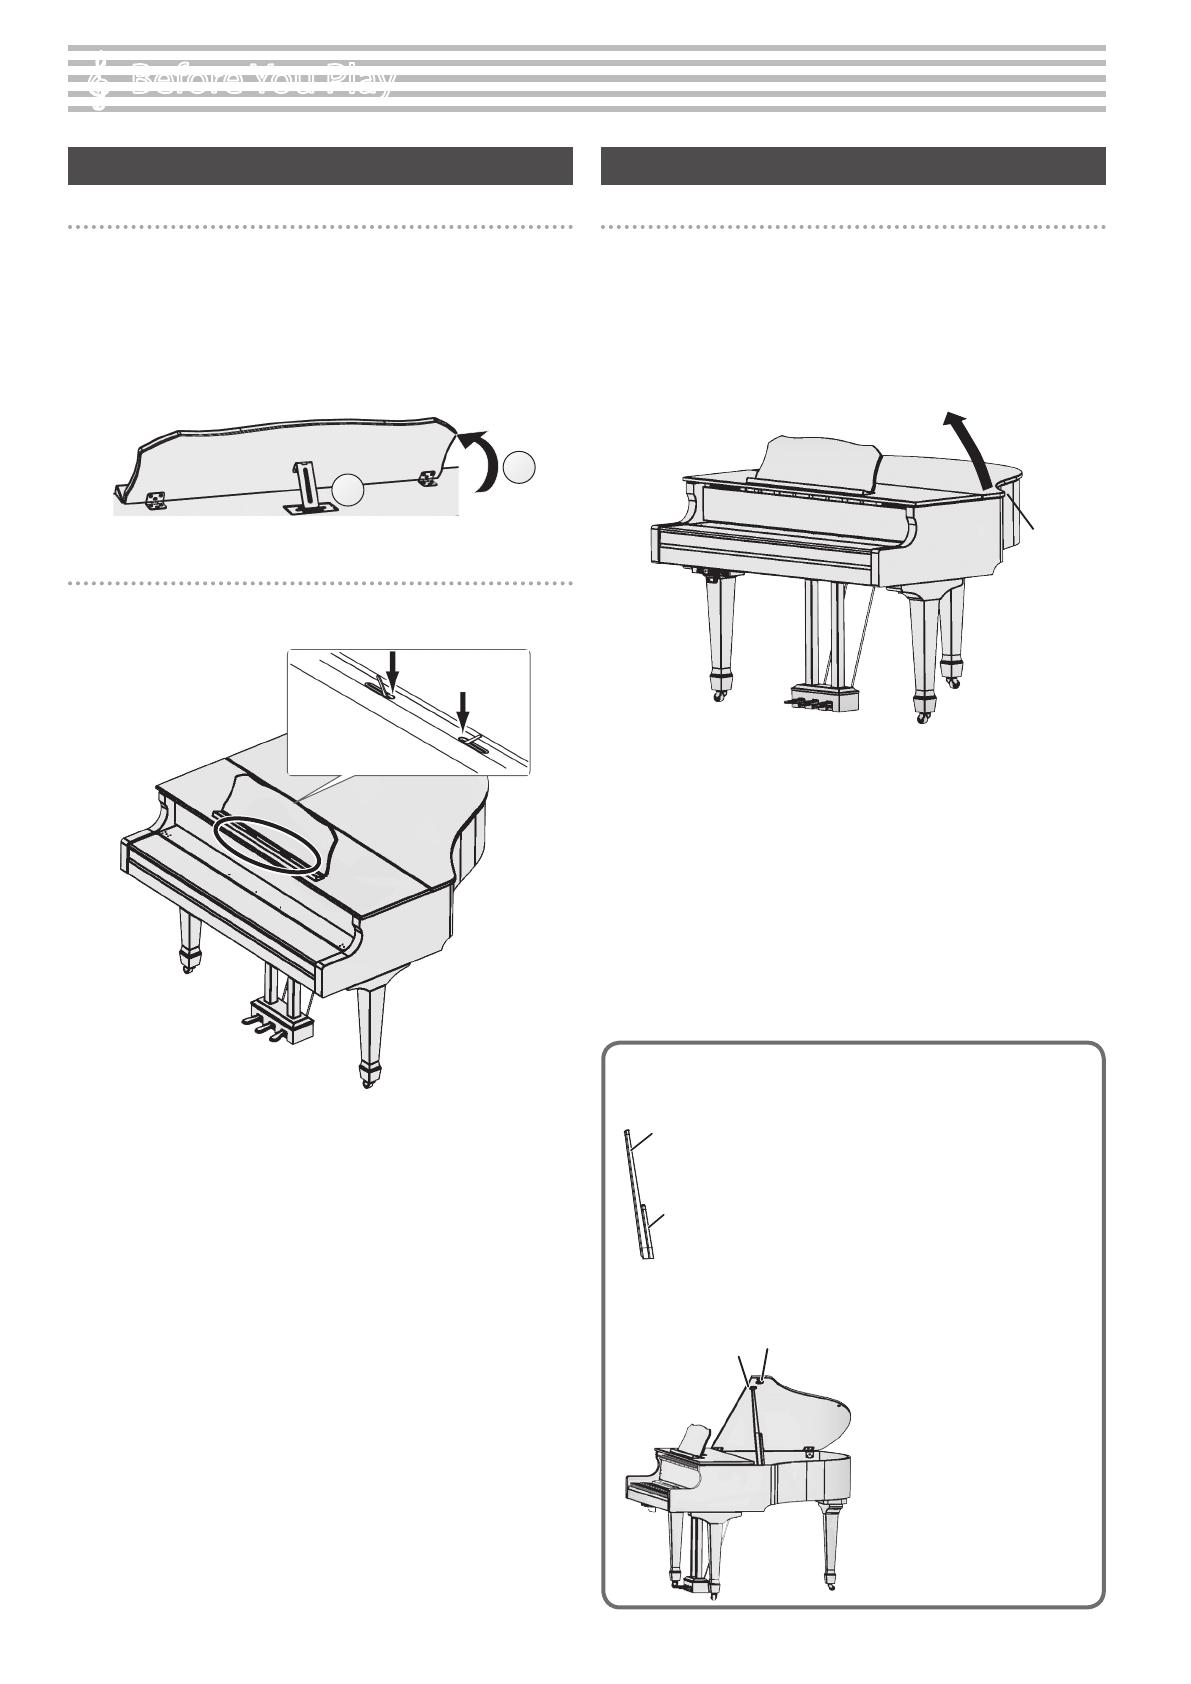
Using the Music Rest . . . . . . . . . . . . . . . . . . . . . . . . . . . . . . . 4
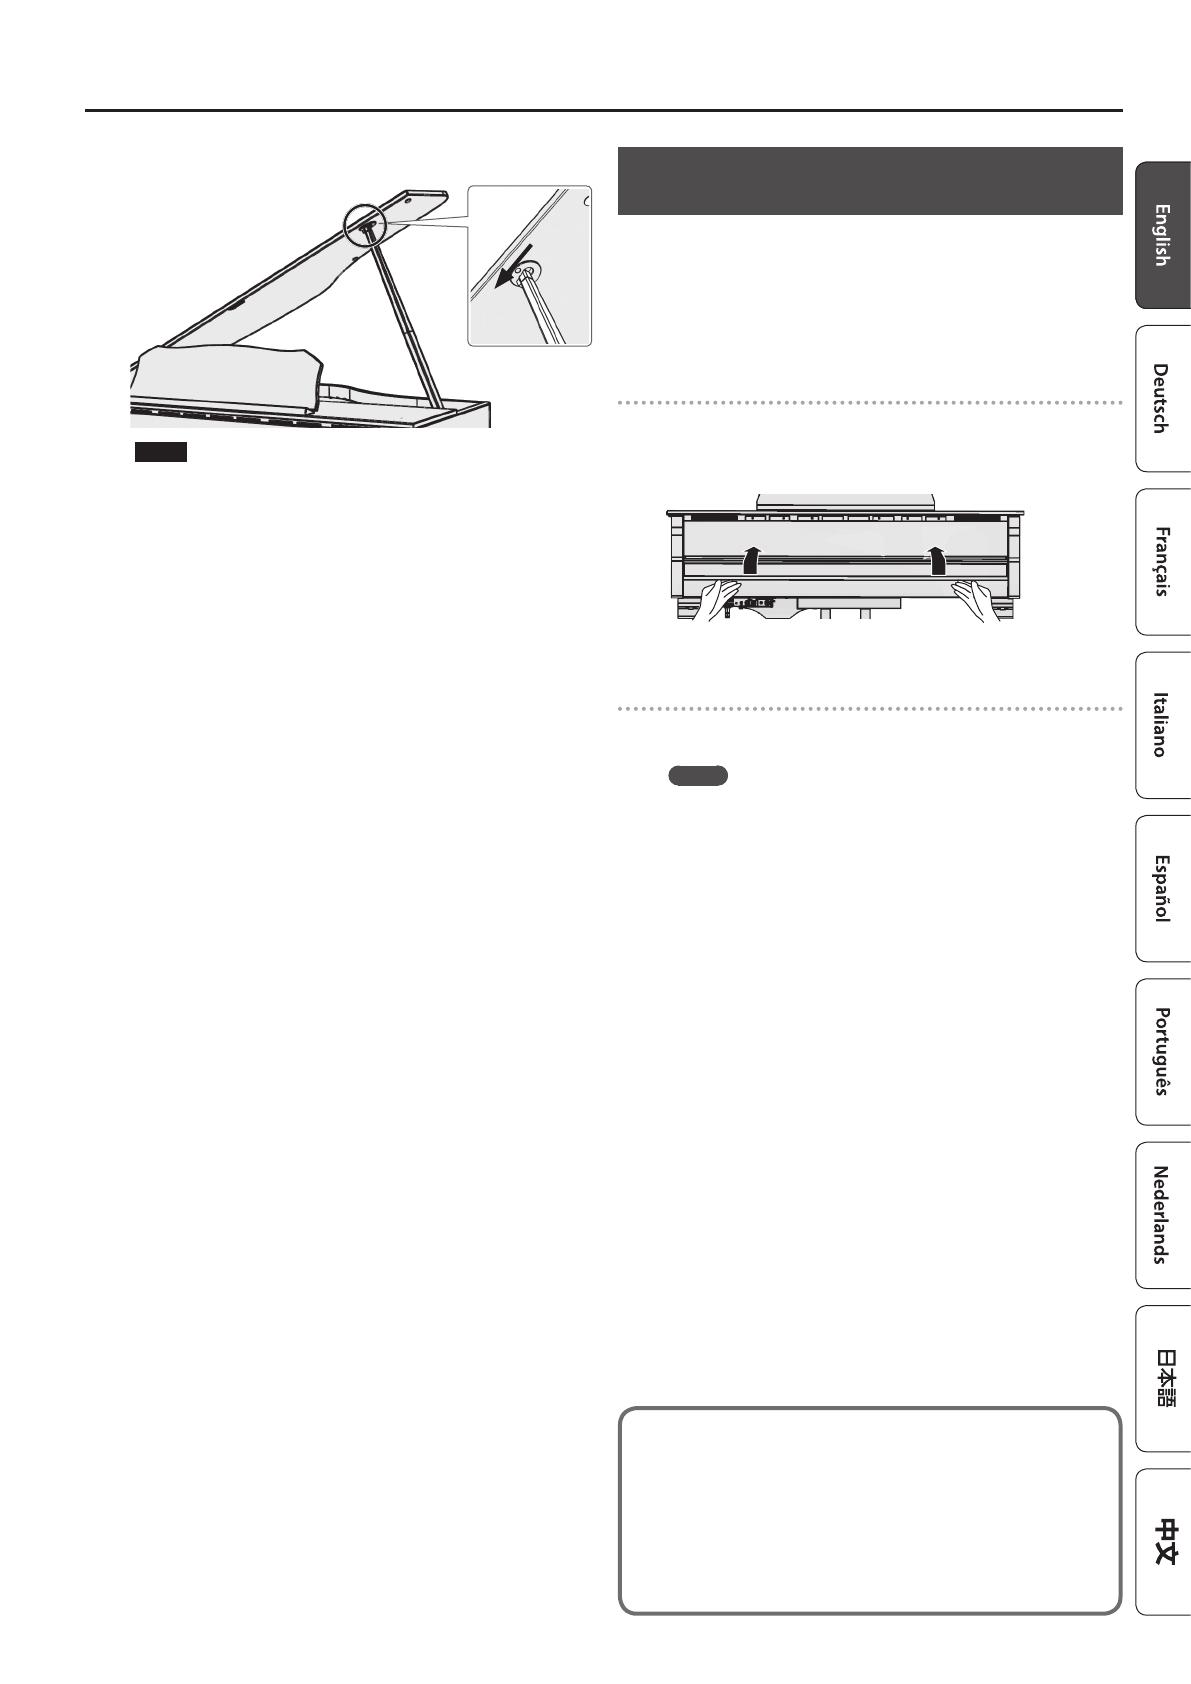
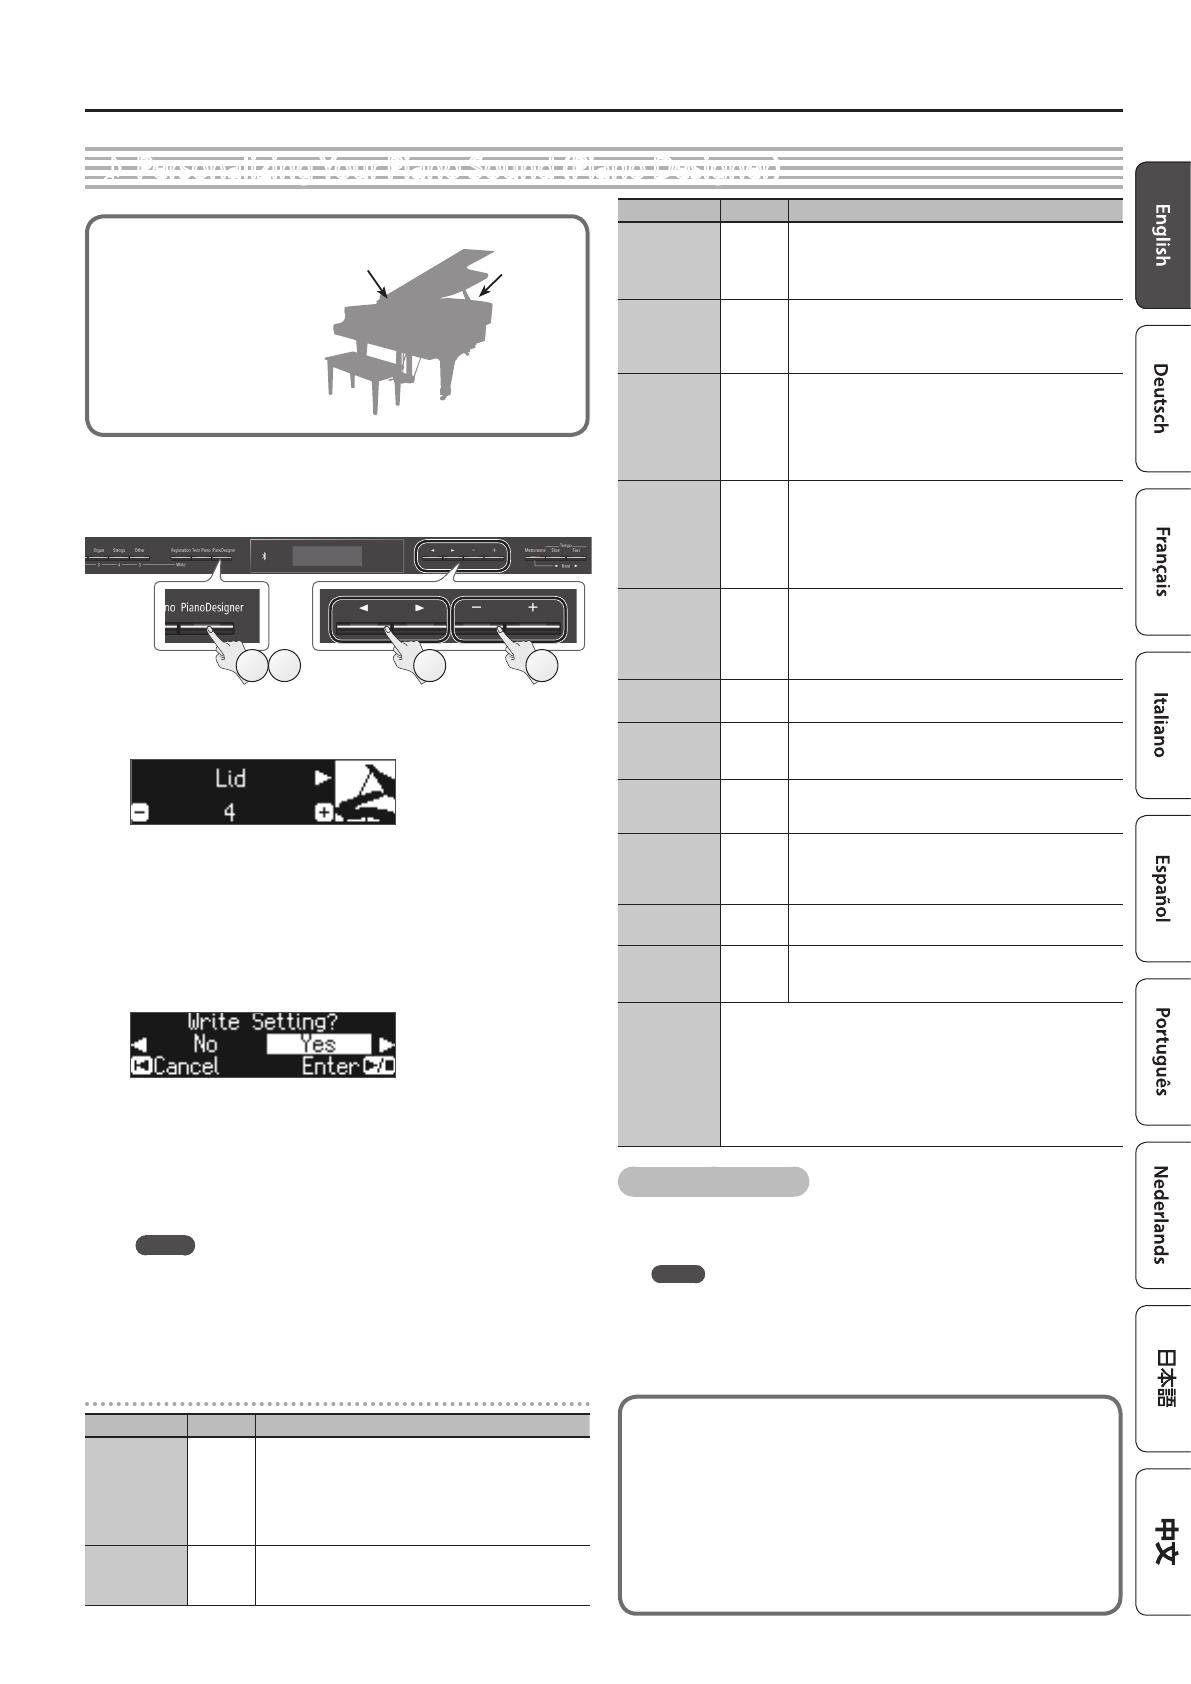
Opening/Closing the Lid . . . . . . . . . . . . . . . . . . . . . . . . . . . . 4
Turning the Power On/O
(Opening/Closing the Fallboard) . . . . . . . . . . . . . . . . . . . . . 5
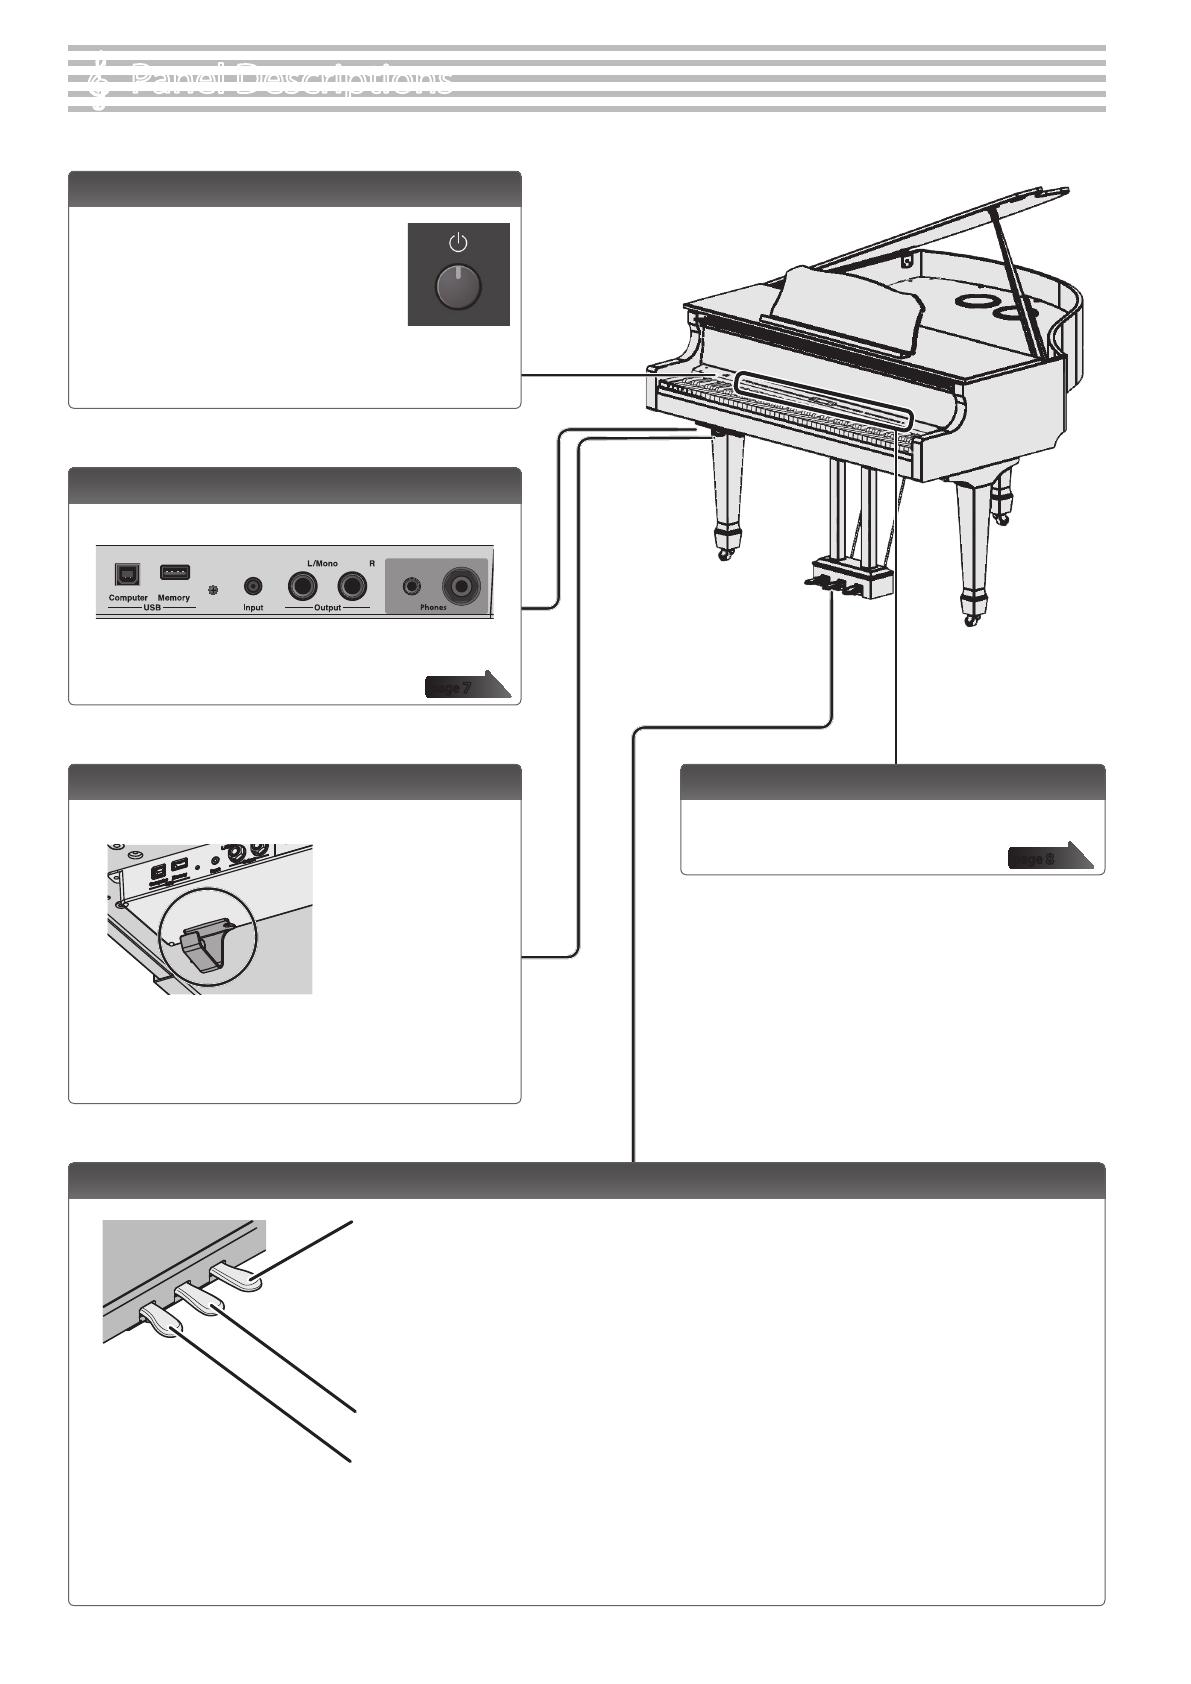
Panel Descriptions . . . . . . . . . . . . . . . . . . . . . . . . . . . . . . . . . . . . . . . . 6
Connecting Your Equipment . . . . . . . . . . . . . . . . . . . . . . . . . . . . . . 7
Operation Guide . . . . . . . . . . . . . . . . . . . . . . . . . . . . . . . . . . . . . . . . . . 8
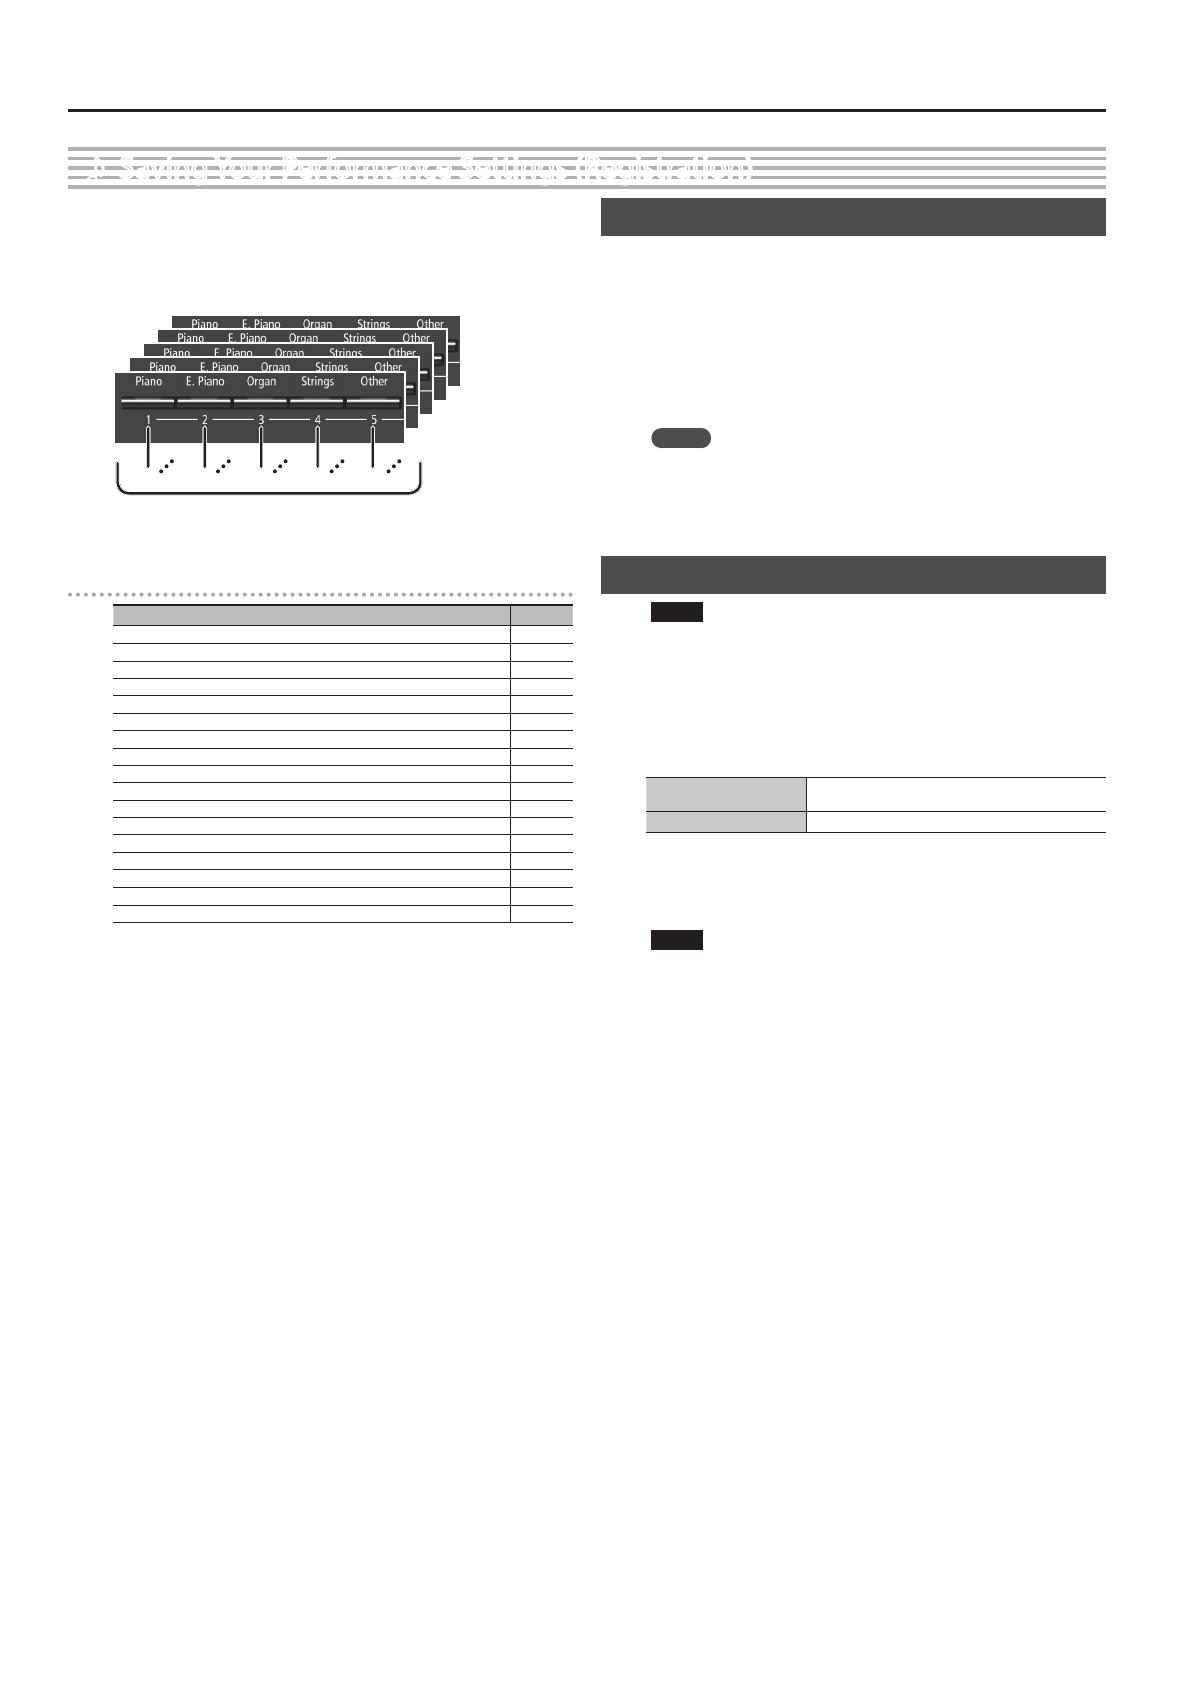
Selecting a Tone . . . . . . . . . . . . . . . . . . . . . . . . . . . . . . . . . . . 8
Adjusting the Overall Volume . . . . . . . . . . . . . . . . . . . . . . . . 8
Adding Reverberation to the Sound (Ambience) . . . . . . . 8
Adjusting the Brightness of the Sound (Brilliance) . . . . . . 8
Making Various Settings (Function Mode) . . . . . . . . . . . . . 8
Changing the Playing Feel of the Keyboard (Key Touch) . 8
Transposing the Pitch (Transpose) . . . . . . . . . . . . . . . . . . . . 8
Dividing the Keyboard for Two People (Twin Piano) . . . . 9
Saving Your Performance Settings (Registration) . . . . . . . 9
Playing Dierent Tones with the Left and Right Hands . . 9
Creating Your Own Piano Tone (Piano Designer) . . . . . . . . 9
Layering Two Sounds (Dual Play) . . . . . . . . . . . . . . . . . . . . . 9
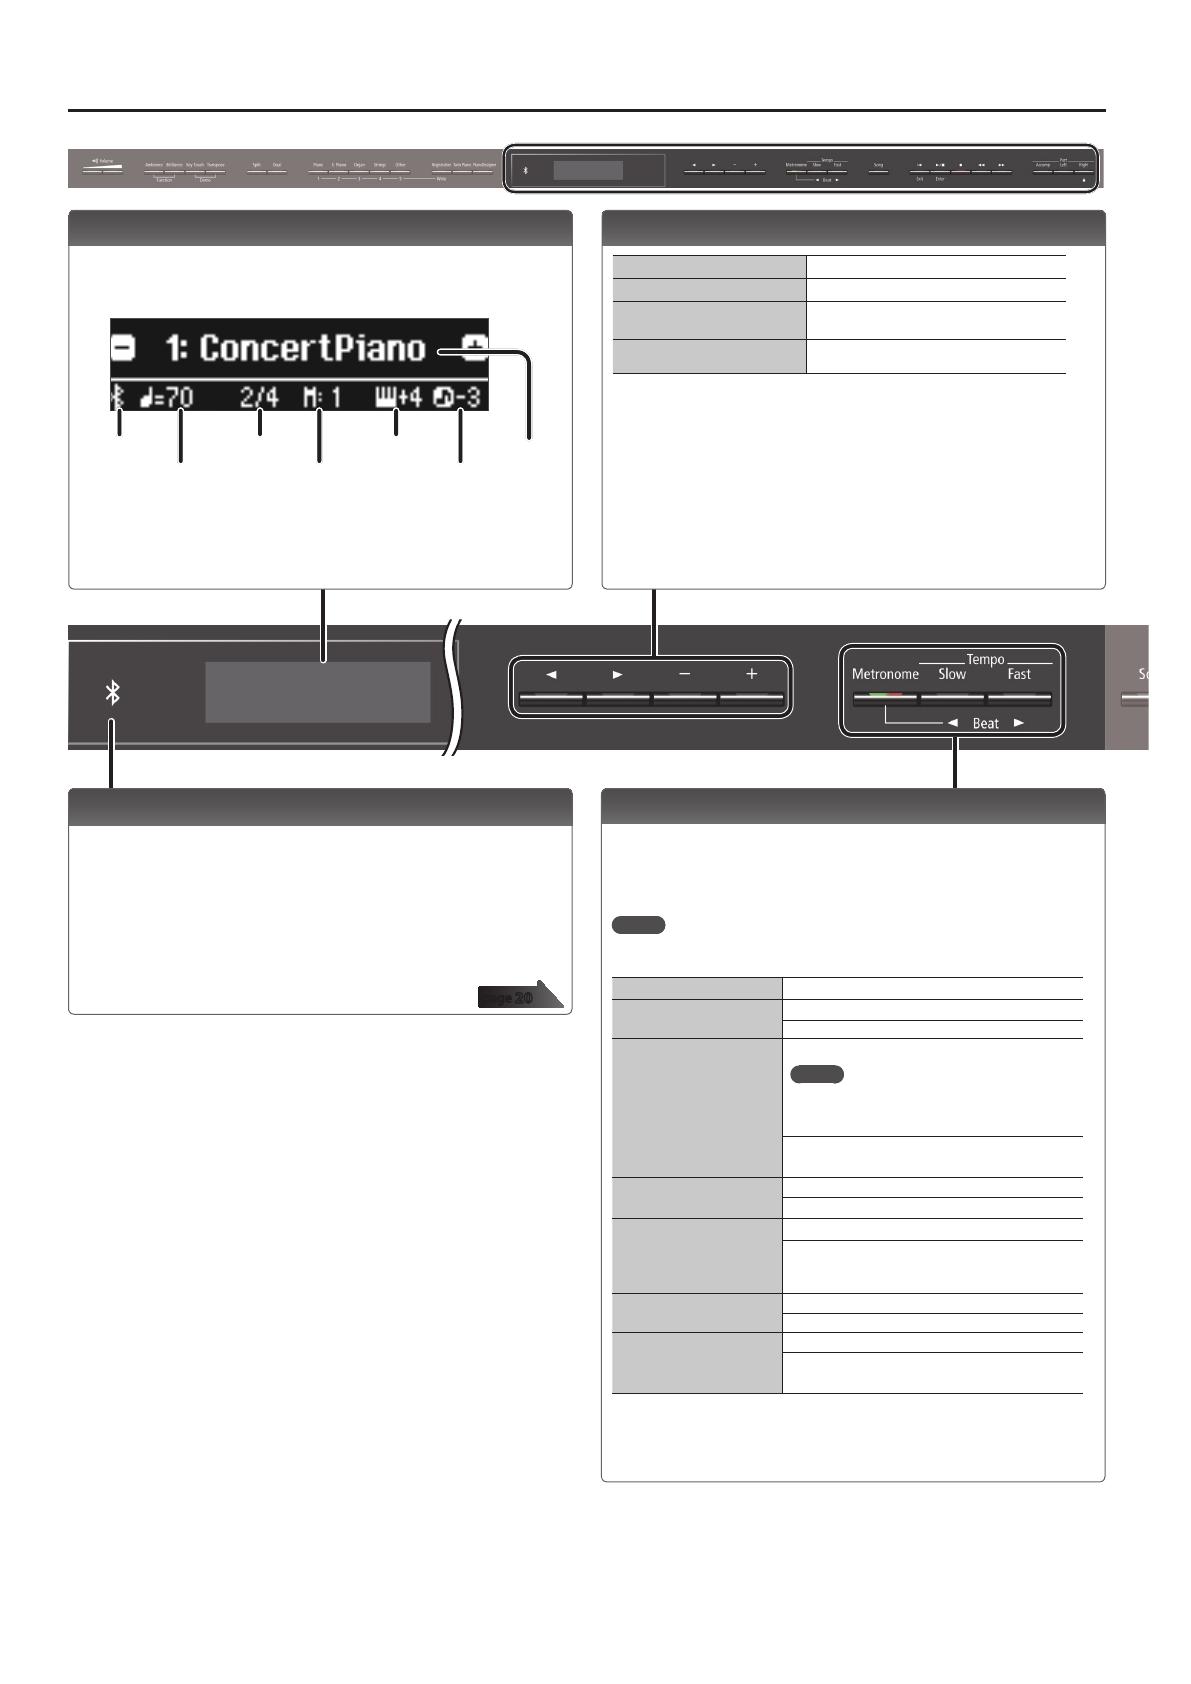
Display . . . . . . . . . . . . . . . . . . . . . . . . . . . . . . . . . . . . . . . . . . . 10
Using the Bluetooth Function . . . . . . . . . . . . . . . . . . . . . . . . 10
Selecting an Item/Editing a Value . . . . . . . . . . . . . . . . . . . . 10
Sounding the Metronome . . . . . . . . . . . . . . . . . . . . . . . . . . . 10
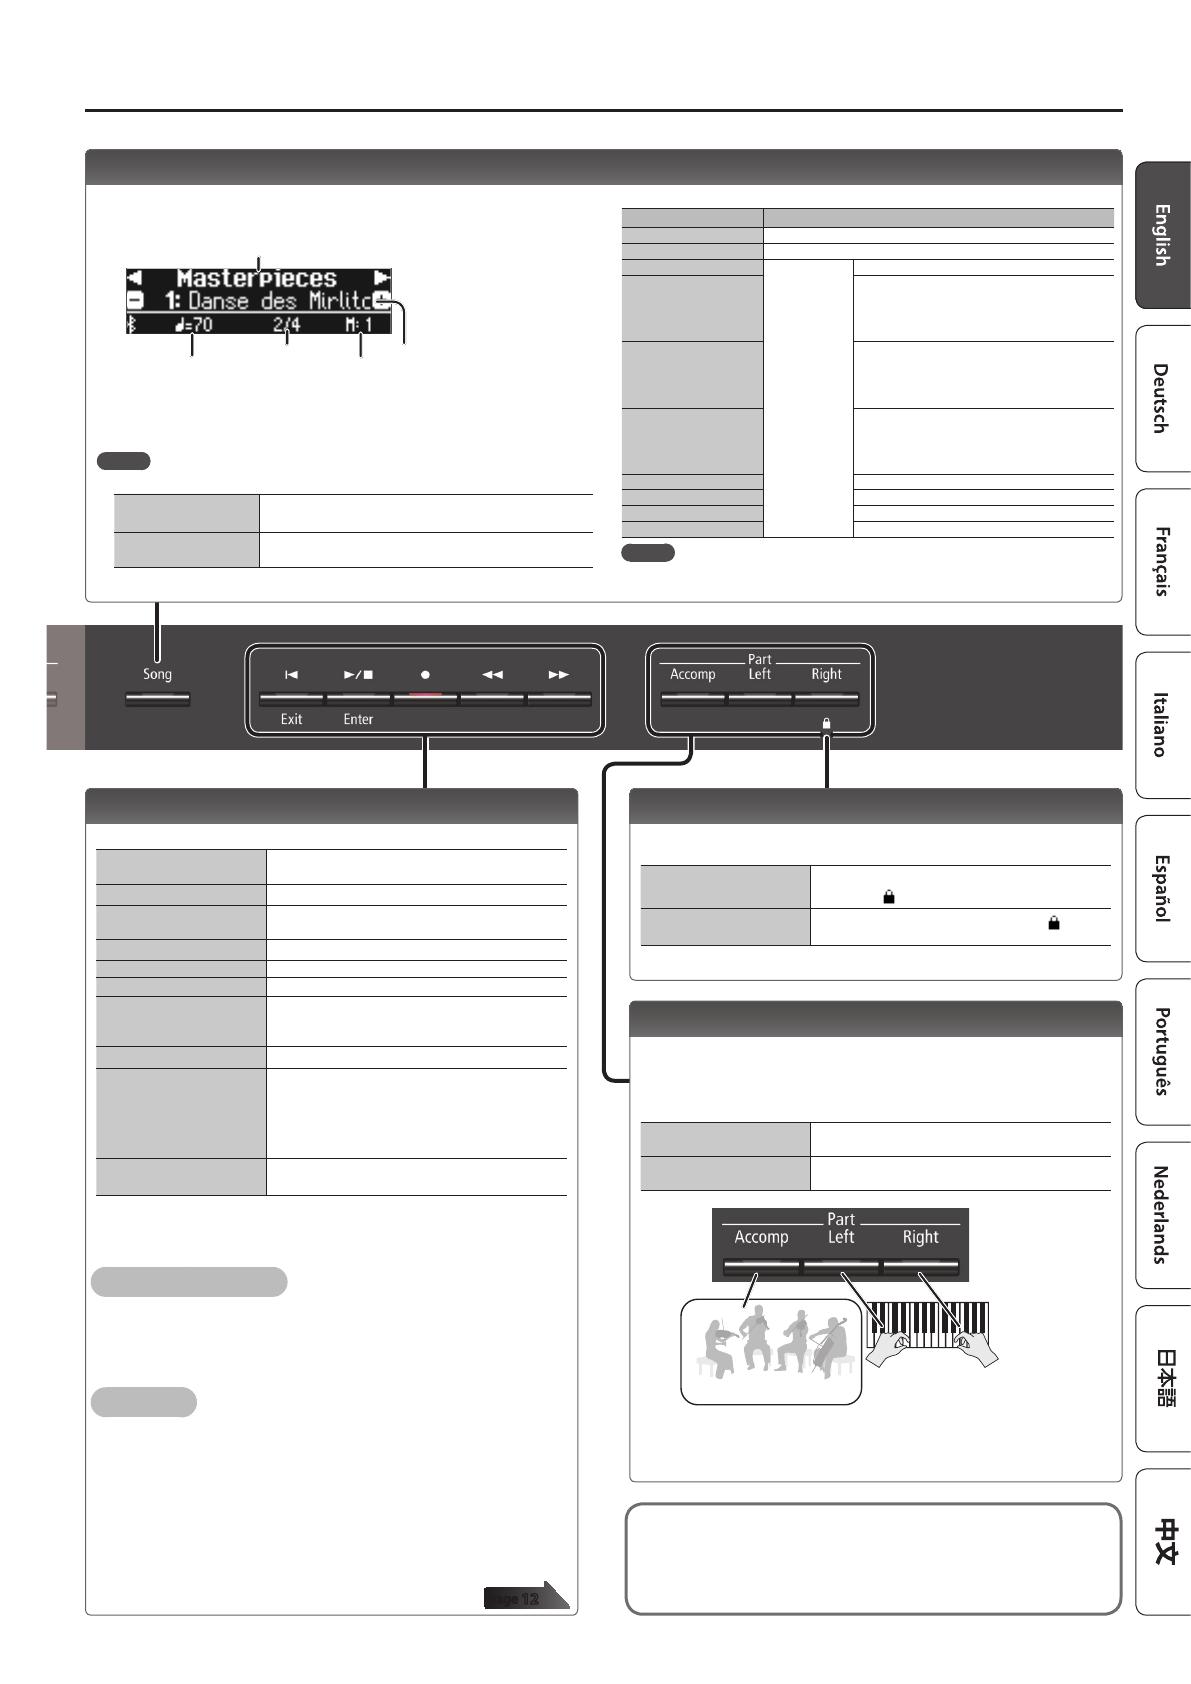
Selecting a Song . . . . . . . . . . . . . . . . . . . . . . . . . . . . . . . . . . . 11
Playing Back or Recording . . . . . . . . . . . . . . . . . . . . . . . . . . . 11
Disabling the Buttons (Panel Lock) . . . . . . . . . . . . . . . . . . . 11
Selecting the Part(s) to Play (Part Mute) . . . . . . . . . . . . . . . 11
Advanced Operation . . . . . . . . . . . . . . . . . . . . . . . . . . . . . . . . . . . . . 12
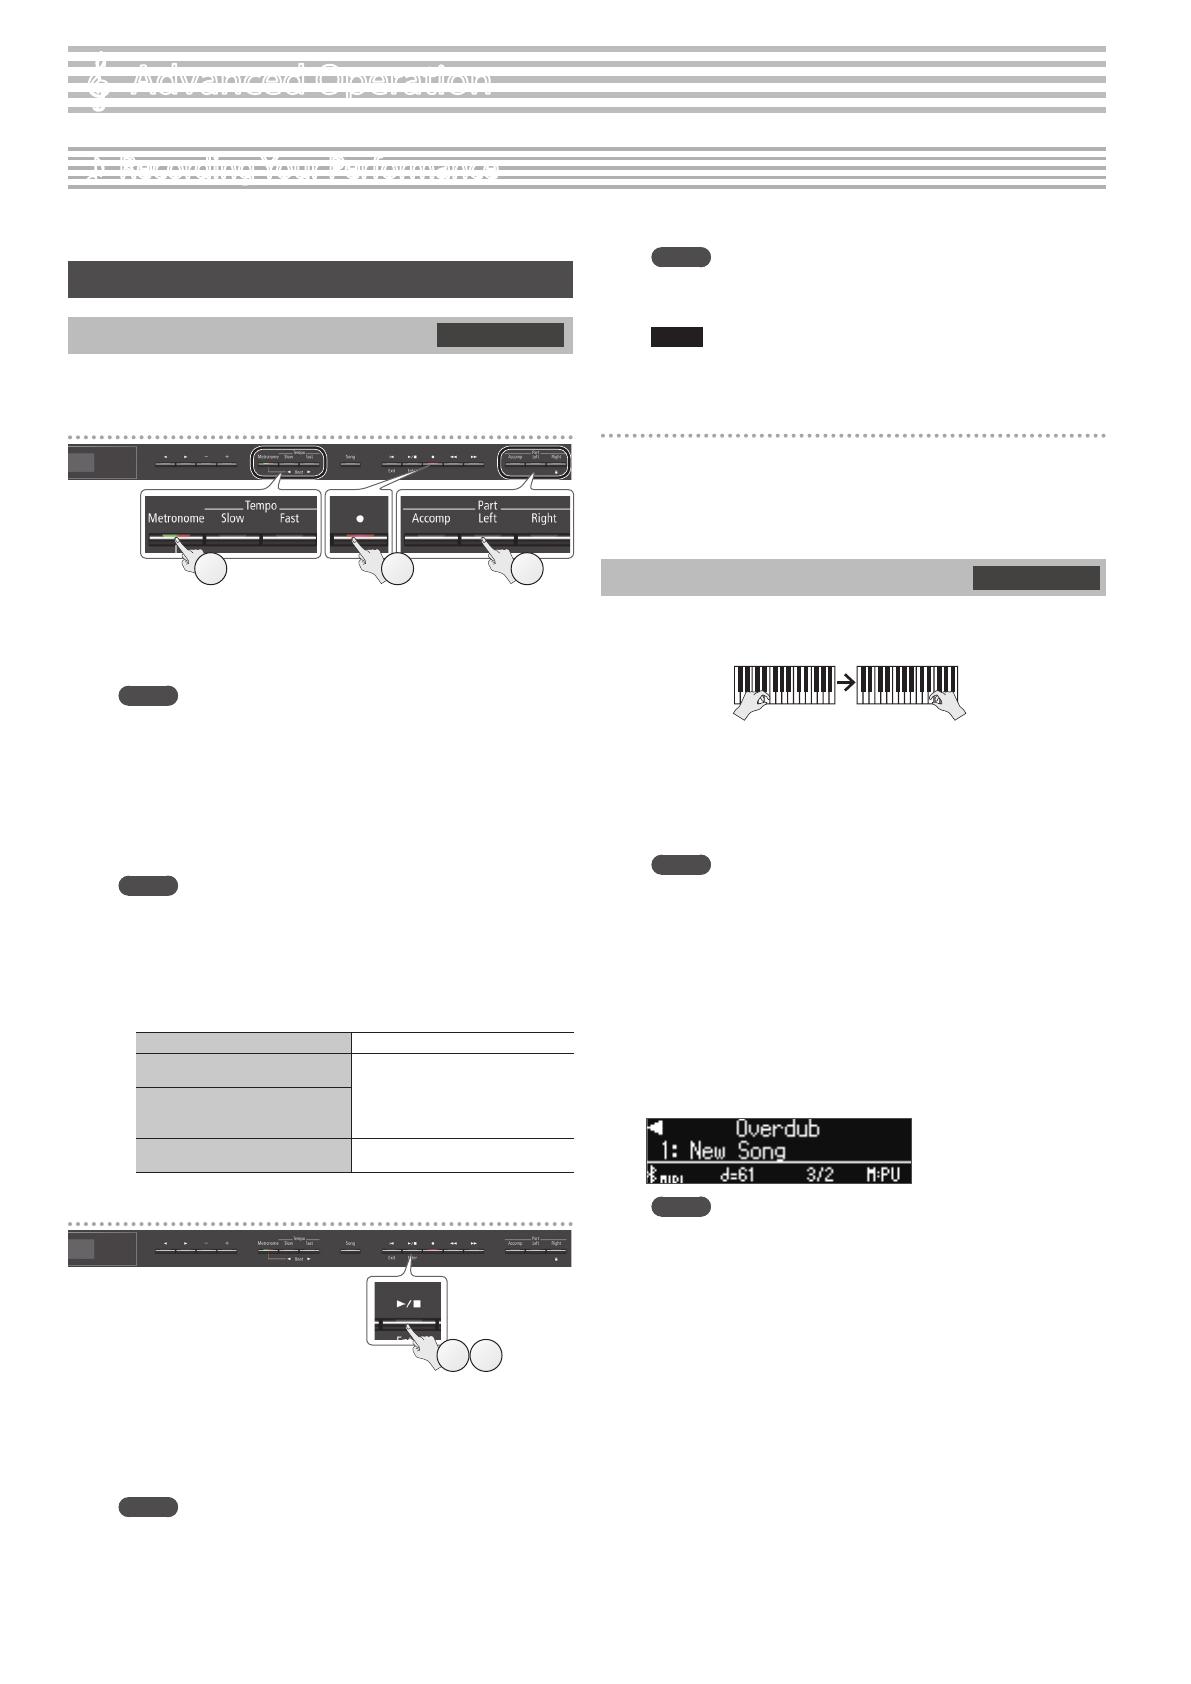
Recording Your Performance . . . . . . . . . . . . . . . . . . . . . . . . . . . . . . 12
Recording . . . . . . . . . . . . . . . . . . . . . . . . . . . . . . . . . . . . . . . . . 12
Recording a New Song . . . . . . . . . . . . . . . . . . . . . . . . . . . . . . 12
Overdubbing a Recorded Performance . . . . . . . . . . . . . . . 12
Recording Audio to USB Flash Drive . . . . . . . . . . . . . . . . . . 13
Deleting a Saved Song (Delete Song) . . . . . . . . . . . . . . . . . 13
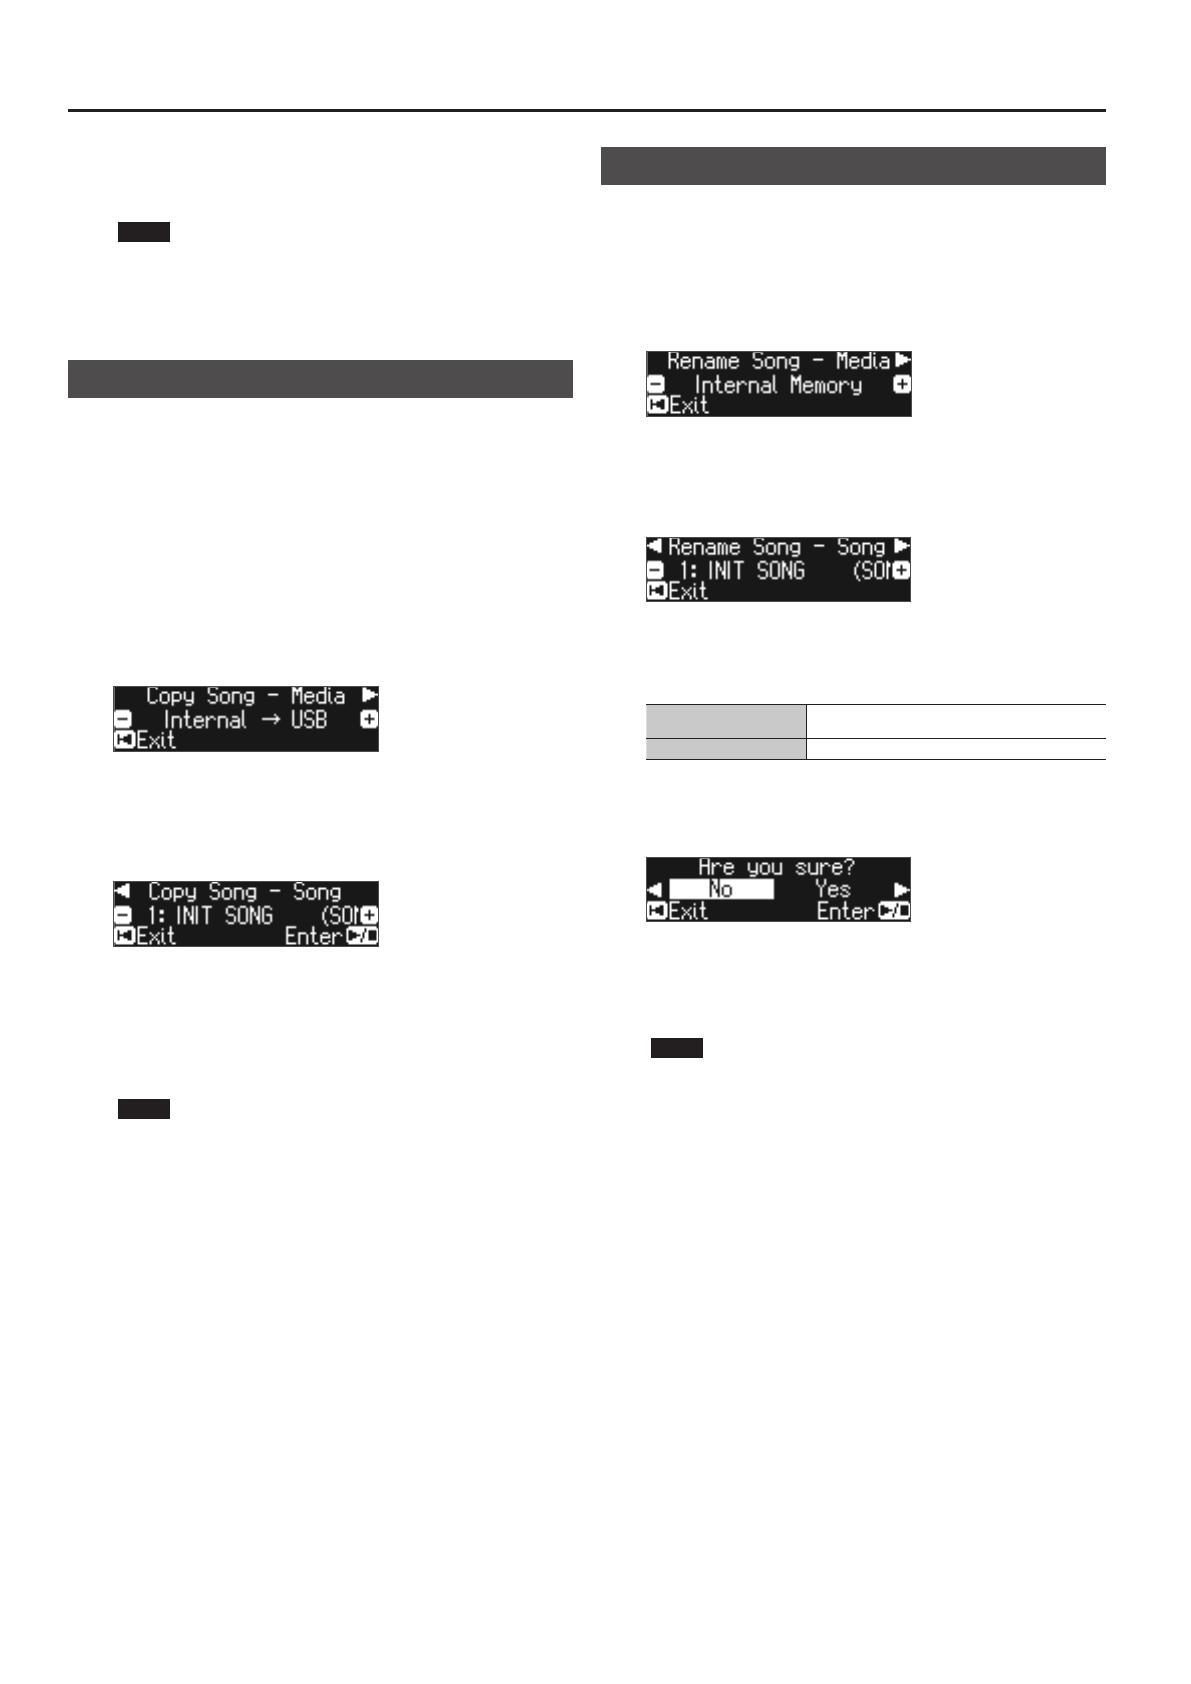
Copying a Saved Song (Copy Song) . . . . . . . . . . . . . . . . . . 14
Renaming a Song (Rename Song) . . . . . . . . . . . . . . . . . . . . 14
Personalizing Your Piano Sound (Piano Designer) . . . . . . . . . . . . 15
Saving Your Performance Settings (Registration) . . . . . . . . . . . . 16
Recalling a Registration . . . . . . . . . . . . . . . . . . . . . . . . . . . . . 16
Saving Current Settings into a Registration . . . . . . . . . . . . 16
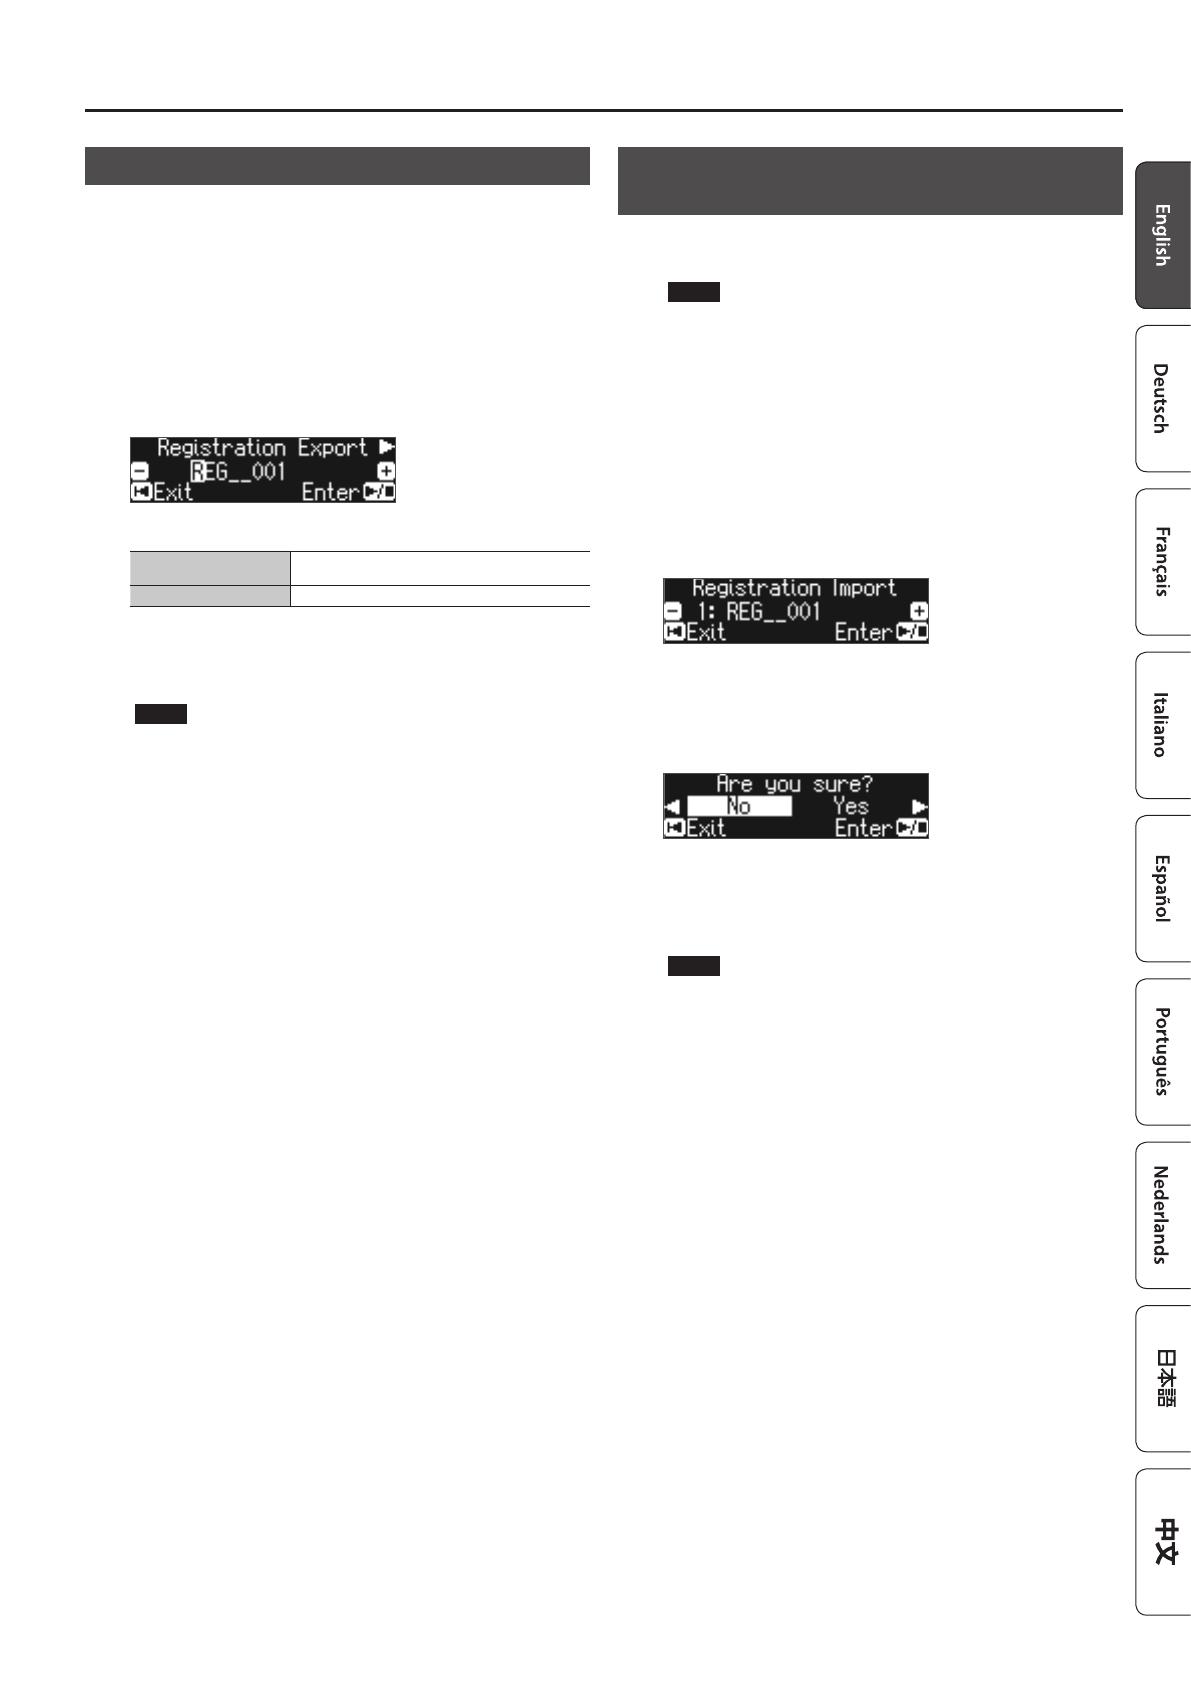
Saving a Registration Set (Registration Export) . . . . . . . . . 17
Loading a Saved Registration Set (Registration Import) . 17
Loading/Saving Piano Setups . . . . . . . . . . . . . . . . . . . . . . . . . . . . . 18
Saving Piano Settings (Piano Setup Export) . . . . . . . . . . . . 18
Loading Piano Settings (Piano Setup Import) . . . . . . . . . . 18
Convenient Functions . . . . . . . . . . . . . . . . . . . . . . . . . . . . . . . . . . . . 19
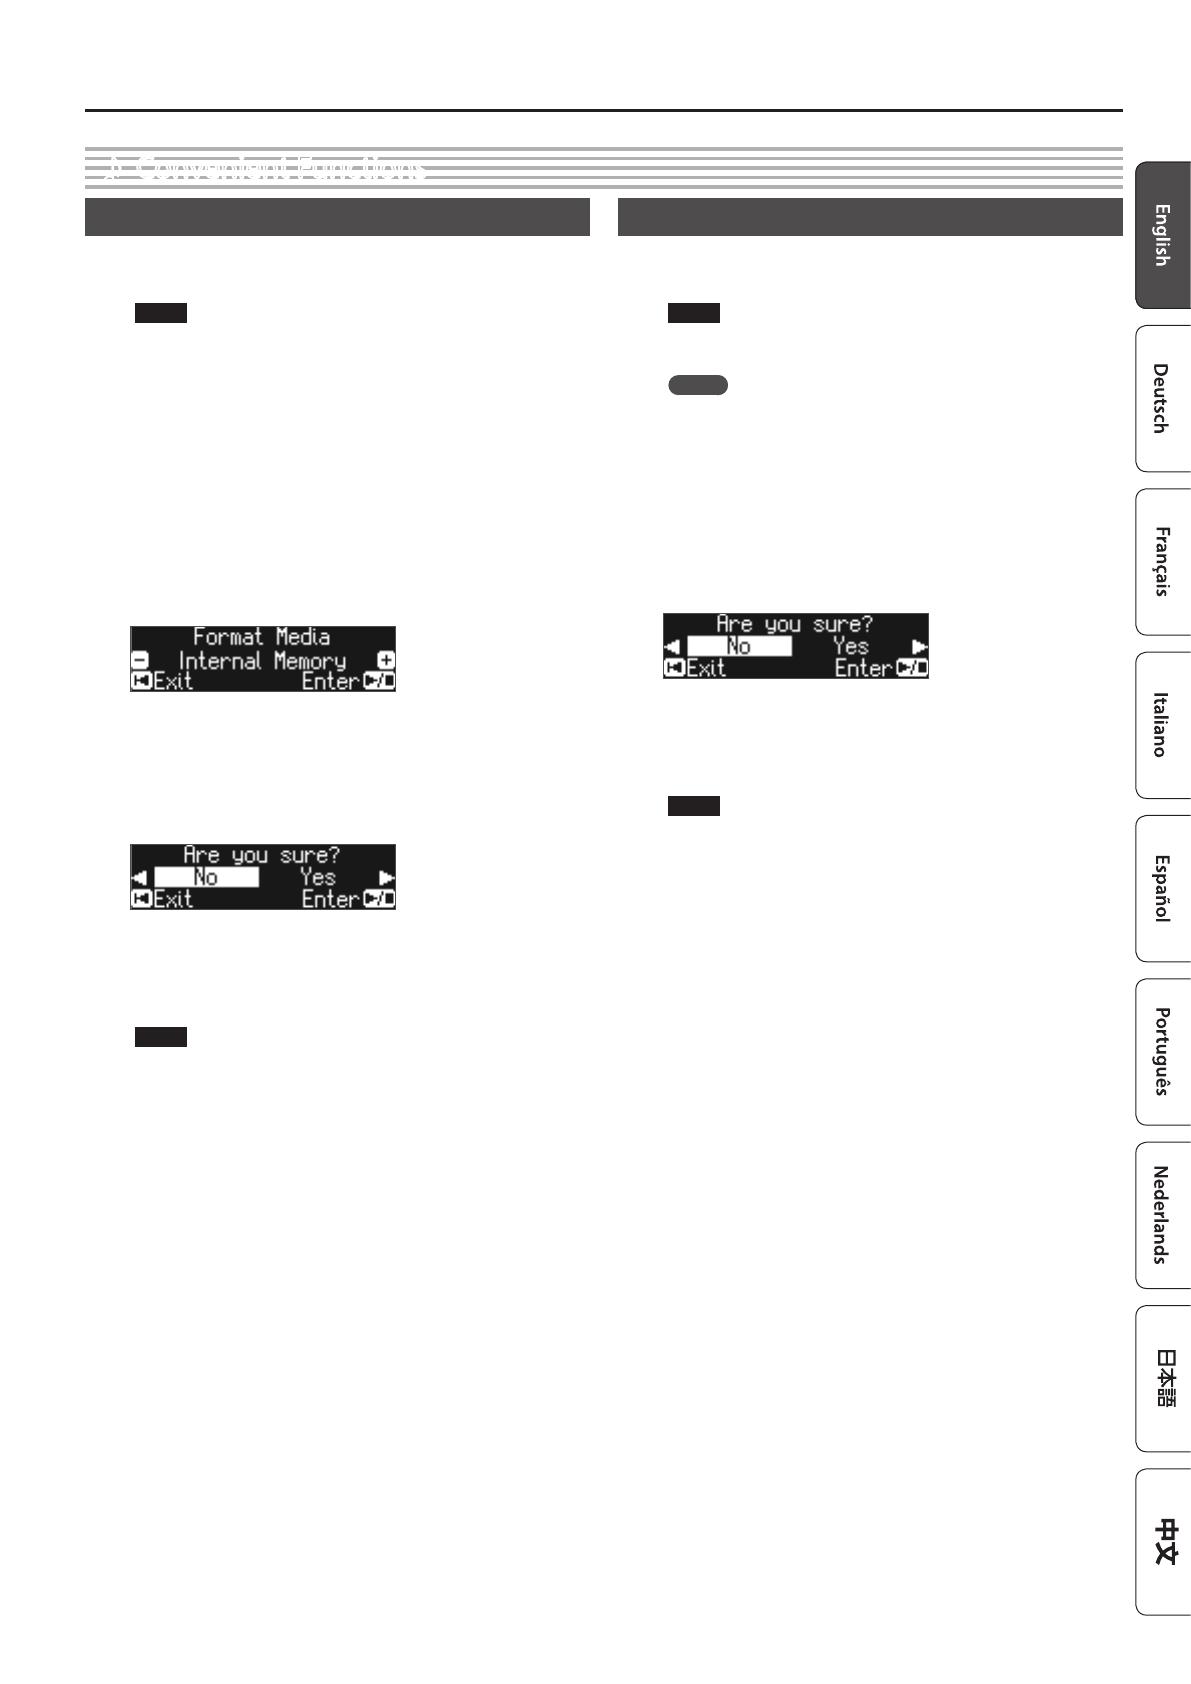
Initializing the Memory (Format Media) . . . . . . . . . . . . . . . 19
Restoring the Factory Settings (Factory Reset) . . . . . . . . . 19
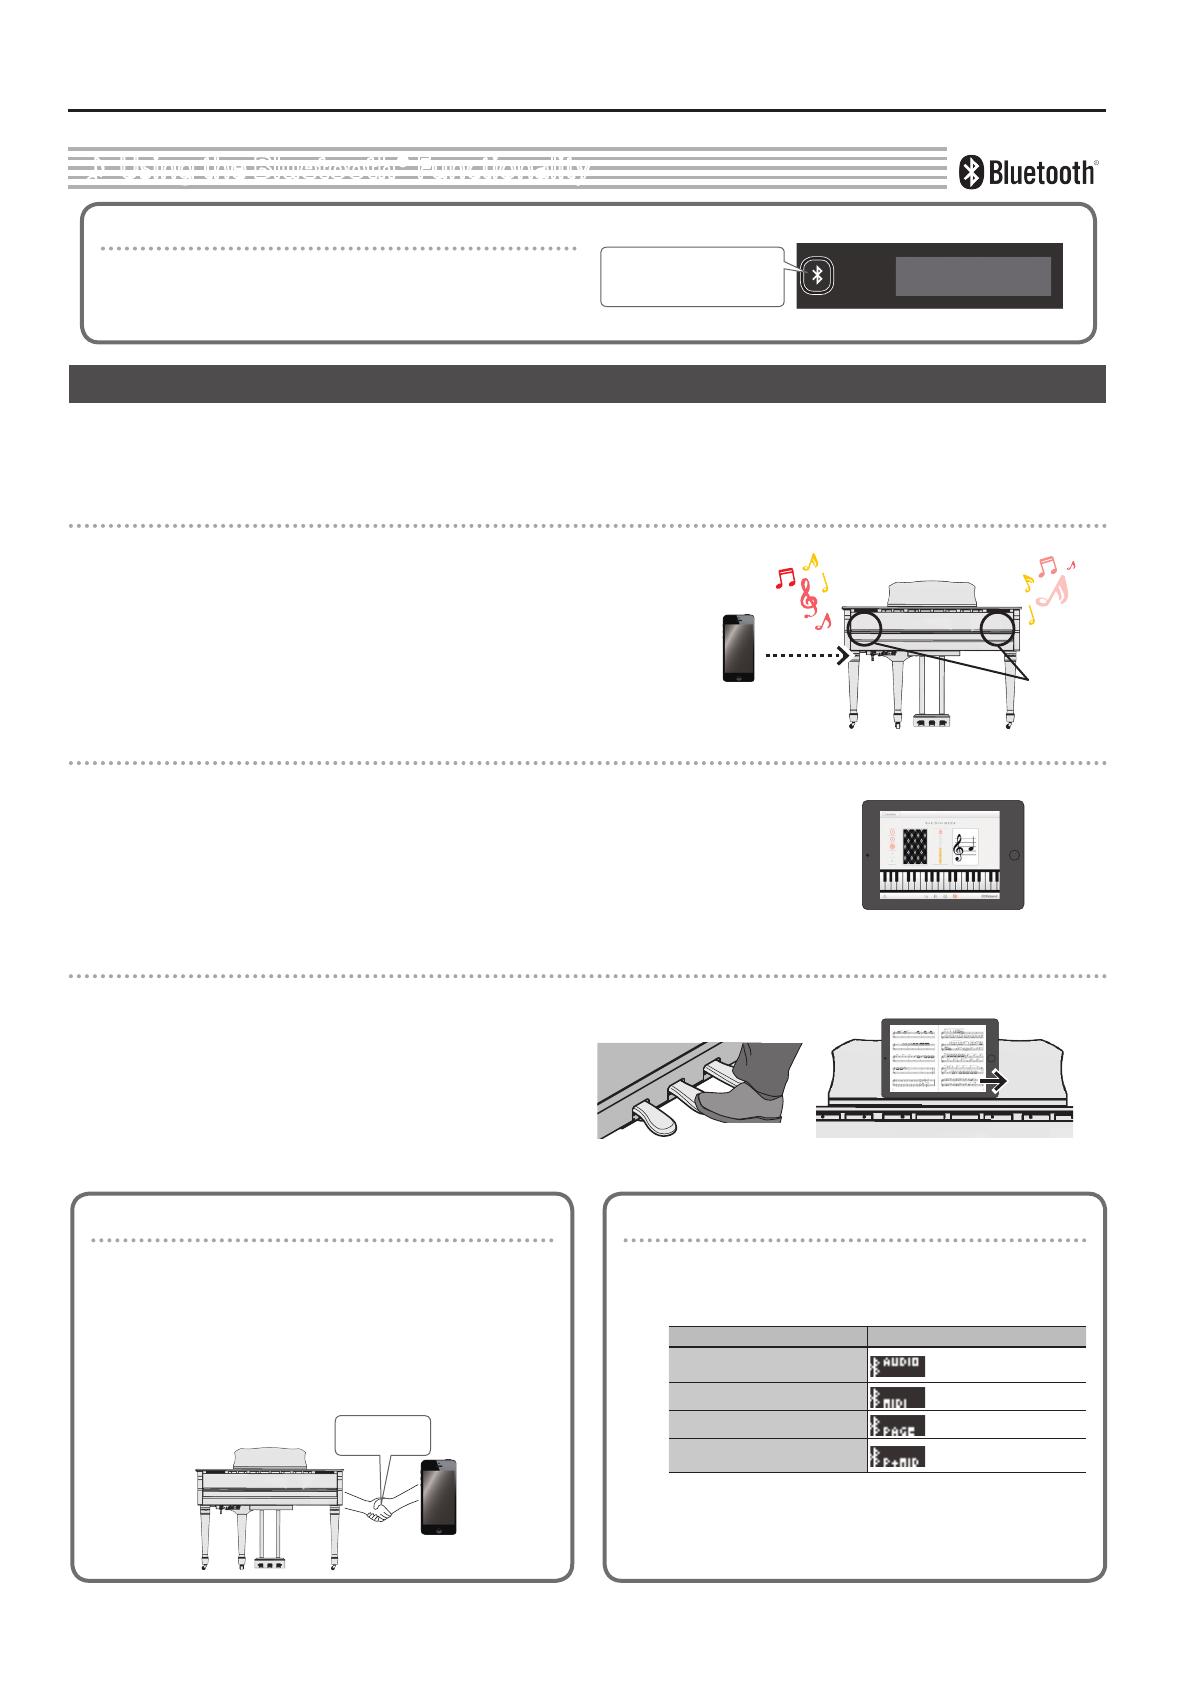
Using the Bluetooth® Functionality . . . . . . . . . . . . . . . . . . . . . . . . 20
Heres What You Can Do . . . . . . . . . . . . . . . . . . . . . . . . . . . . . 20
Listening to Music Through the Pianos Speakers . . . . . . . 21
Making Initial Settings (Pairing) . . . . . . . . . . . . . . . . . . . . . . 21
Connecting an Already-Paired Mobile Device . . . . . . . . . . 21
Playing Back Audio . . . . . . . . . . . . . . . . . . . . . . . . . . . . . . . . . 21
Using the Piano with an App . . . . . . . . . . . . . . . . . . . . . . . . 22
Example Apps That Can Be Used with the Piano . . . . . . . . 22
Making Settings (Pairing) . . . . . . . . . . . . . . . . . . . . . . . . . . . 22
Using the Pedals to Turn Pages on a Music Score App . . . 23
Making Initial Settings (Pairing) . . . . . . . . . . . . . . . . . . . . . . 23
Connecting an Already-Paired Mobile Device . . . . . . . . . . 23
Turning Pages . . . . . . . . . . . . . . . . . . . . . . . . . . . . . . . . . . . . . 23
Various Settings . . . . . . . . . . . . . . . . . . . . . . . . . . . . . . . . . . . . . . . . . . 24
Various Settings (Function Mode) . . . . . . . . . . . . . . . . . . . . . . . . . . 24
Basic Operations in Function Mode . . . . . . . . . . . . . . . . . . . 24
Matching the Pitch with Other Instruments
(Master Tuning) . . . . . . . . . . . . . . . . . . . . . . . . . . . . . . . . . . . . 24
Changing the Tuning Method (Temperament) . . . . . . . . . 24
Specifying the Tonic Note (Temperament Key) . . . . . . . . . 24
Adjusting the Song (SMF) Volume (Song Volume SMF) . . 24
Adjusting the Song (Audio) Volume
(Song Volume Audio) . . . . . . . . . . . . . . . . . . . . . . . . . . . . . . . 24
Adjusting the Volume of an Audio Playback Device
(Input Volume) . . . . . . . . . . . . . . . . . . . . . . . . . . . . . . . . . . . . . 24
Specifying the Keyboard’s Tone When Playing Back a
Song (SMF Play Mode) . . . . . . . . . . . . . . . . . . . . . . . . . . . . . . 25
Selecting the Format for Recording (Recording Mode) . . 25
Changing How the Pedal Eects Are Applied
(Damper Pedal Part) . . . . . . . . . . . . . . . . . . . . . . . . . . . . . . . . 25
Changing How the Pedals Work (Center Pedal) . . . . . . . . . 25
Changing the Eect of the Pedal (Left Pedal) . . . . . . . . . . 25
Using a Pedal to Switch Registrations (Reg. Pedal Shift) . 25
Adjusting the Brightness of the Display
(Display Contrast) . . . . . . . . . . . . . . . . . . . . . . . . . . . . . . . . . . 25
Specifying a Maximum Volume (Volume Limit) . . . . . . . . 26
Preventing Doubled Notes When Connected to a
Sequencer (Local Control) . . . . . . . . . . . . . . . . . . . . . . . . . . . 26
MIDI Transmit Channel Settings (MIDI Transmit Ch) . . . . . 26
Changing the Language Displayed in the Screen
(Language) . . . . . . . . . . . . . . . . . . . . . . . . . . . . . . . . . . . . . . . 26
Turning O the Power When You Close the Fallboard
(Power O by the Lid) . . . . . . . . . . . . . . . . . . . . . . . . . . . . . . . 26
Making the Power Automatically Turn o After a Time
(Auto O) . . . . . . . . . . . . . . . . . . . . . . . . . . . . . . . . . . . . . . . . . 26
Settings That Are Saved by Auto Memory Backup
(Auto Memory Backup) . . . . . . . . . . . . . . . . . . . . . . . . . . . . . 26
Troubleshooting . . . . . . . . . . . . . . . . . . . . . . . . . . . . . . . . . . . . . . . . . . 27
Error Messages . . . . . . . . . . . . . . . . . . . . . . . . . . . . . . . . . . . . . . . . . . . 29
USING THE UNIT SAFELY . . . . . . . . . . . . . . . . . . . . . . . . . . . . . . . . . . 30
IMPORTANT NOTES . . . . . . . . . . . . . . . . . . . . . . . . . . . . . . . . . . . . . . . 30
°
Contents
Sound Generator Piano Sound: SuperNATURAL Piano Modeling
Keyboard
PHA-50 Keyboard: Wood and Plastic Hybrid Structure, with Escapement and
Ebony/Ivory Feel (88 keys)
Bluetooth
Audio: Bluetooth Ver 3.0 (Supports SCMS-T content protection)
MIDI, Turning music sheet: Bluetooth Ver 4.0
Power Supply AC Adaptor
Power
Consumption
18W (13W–44W)
Dimensions
Top opened:
1,445 (W) x 1,501 (D) x 1,569 (H) mm
56-15/16 (W) x 59-1/8 (D) x 61-13/16 (H) inches
Top closed:
1,445 (W) x 1,501 (D) x 996 (H) mm
56-15/16 (W) x 59-1/8 (D) x 39-1/4 (H) inches
Weight 148 kg / 326 lbs 5 oz
Accessories
Owners Manual, Leaet “Leaet For a Dealer or a Qualied Professional
Installer, Leaet “USING THE UNIT SAFELY, “Roland Classical Piano
Masterpieces, Roland Piano Arrange Collections “Lets Enjoy Piano,
Maintenance Set, Key Cover, Caster Cups, Power Cord, Headphone Hook, Cord
clamps
Options
(sold separately)
Headphones, USB Flash Memory (*1)
*1: Use a commercially available USB ash drive or a USB ash drive sold by
Roland. However, we cannot guarantee that all commercially available USB
ash drives will work with this unit.
* This document explains the specications of the product at the time that the
document was issued. For the latest information, refer to the Roland website.
Main Specications
Roland GP609: Digital Piano
4
°
Before You Play
Using the Music Rest
Raising the music rest
1.
Gently raise the music rest.
* When raising the music rest, take care not to pinch your ngers
between the moving part and the body of the unit. In places
where small children are present, make sure that an adult
provides supervision and guidance.
2. Fit the latch into one of the slots so that the music rest is at
the desired angle.
1
2
Using the music holders
You can use the holders to hold pages in place. When not using the
holders, leave them folded down.
Push
Opening/Closing the Lid
Opening the lid
* The lid must be opened or closed by an adult.
* When opening the lid, take care not to pinch your ngers
between the moving part and the body of the unit. In places
where small children are present, make sure that an adult
provides supervision and guidance.
1. Use both hands to rmly grasp the right side of the lid
(toward the high notes: position A in the illustration), and
slowly raise it.
A
* When opening the lid, take care not to open it too far. An angle
of about 30 degrees is appropriate. Opening the lid signicantly
beyond this angle may damage the piano, or cause the lid to fall.
Before you open the lid, make sure that no one is in the direction
toward which the lid opens.
* Do not transport the piano with the lid opened. Doing so may
cause the lid stick to come out of its socket, allowing the lid to fall.
2. Using one hand to support the lid, raise the lid stick and t
it into its socket.
* When raising the lid stick, please be careful not to get your
ngers pinched between the movable part and the panel. In
places where small children are present, make sure that an adult
provides supervision and guidance.
About the lid sticks and sockets
The piano has two lid sticks of diering lengths. These lid sticks allow you to
vary the openness of the lid.
Long lid stick
Short lid stick
The lid sticks t in the sockets as follows.
5 Long lid stick: inner socket (location B)
5 Short lid stick: outer socket (location C).
B
C
5
Contents
3. Move the tip of the lid stick to lock it.
NOTE
5 The lid stick must be locked into the socket to prevent the
lid from falling. Do not release the lid until the lid stick is
completely locked.
5 Close the lid when the piano is not being used.
* To close the lid, reverse the procedure by which you opened it.
Turning the Power On/O (Opening/Closing the
Fallboard)
* Before turning the unit on/o, always be sure to turn the volume
down. Even with the volume turned down, you might hear some
sound when switching the unit on/o. However, this is normal
and does not indicate a malfunction.
You can turn the power on/o simply by opening/closing the
fallboard.
Turning the power on
1.
Minimize the volume of the connected devices.
2. Open the fallboard.
To open the fallboard, use both hands to lift it.
3. Use the [Volume] buttons to adjust the volume.
Turning the power o
1.
Close the fallboard.
To close the fallboard, use both hands to gently lower it.
MEMO
5 By pressing the [L] button you can turn the power on/o
while leaving the fallboard open (p. 6).
5 You can specify that the power not turn o even when you
close the fallboard (p. 26).
* When opening or closing the fallboard, take care not to pinch
your ngers between the moving part and the body of the unit.
In places where small children are present, make sure that an
adult provides supervision and guidance.
* When turning o the power, do not disconnect the power cord
while the Phones jack “Phones” indicator is lit.
Concerning the Auto O function
The power to this unit will be turned o automatically after a predetermined
amount of time has passed since it was last used for playing music, or its
buttons or controls were operated (Auto O function).
If you do not want the power to be turned o automatically, disengage the
Auto O function (p. 26).
5 Settings that are not saved will be lost when the power is turned o. If you
have any settings that you want to keep, you should save them beforehand.
5 To restore power, turn the power on again.
6
°
Panel Descriptions
[L] Button
The power turns on/o when you open/close
the fallboard.
If you want to turn the power on/o with the
fallboard left open, press the [L] button.
To turn the power o, long-press the [L]
button.
* Never disconnect the power cord while the screen
indicates “Don’t disconnect the power.
Headphone Hook
Whenever you are not using the headphones, you can hang
them on the headphone hook.
* Don’t hang anything other than headphones on this hook, and don’t
apply excessive force to it. Doing so may damage the headphone hook.
Damper Pedal
Use this pedal to sustain the sound. While this pedal is held down, notes will be sustained for an extended time even if you
release your ngers from the keyboard.
This reproduces the following features of an acoustic piano’s damper pedal.
5 A change in feel as you press the pedal, initially light but becoming heavier as you continue pressing
5 The sound of the dampers releasing the strings, and the sound of strings adjacent to the ones for the notes actually
played resonate sympathetically, resulting in a rich, resounding tone.
5 The distinctive decay added by “half-pedaling, in which the core of the sound ends quickly while leaving only a rich
spaciousness and resonance
Sostenuto Pedal
The notes you are pressing when this pedal is depressed will be sustained.
Soft Pedal
This pedal is used to make the sound softer. Playing with the soft pedal depressed produces a sound that is not as strong
as when otherwise played with the equivalent strength. This is the same function as the left pedal of a grand piano. The
softness of the tone can be varied subtly by the depth to which you press the pedal.
Pedal
Front Panel
To operate the piano, use the buttons to select an item
shown in the screen.
* When operating the pedal, take care not to pinch your ngers between the moving part and the body of the unit. Pay special attention to this when using the unit where
children are present.
page
8
Bottom Panel
Connect headphones and USB ash drive.
page
7
7
°
Connecting Your Equipment
Phones Jacks
Here you can connect stereo headphones.
This piano has two headphone jacks,
two people can also use headphones
simultaneously.
A Headphones 3D Ambience eect will be
applied, producing the sensation that the
sound is emanating from the piano itself
even when using headphones.
* The Headphones 3D Ambience eect applies only to piano sounds;
it does not apply to other sounds.
* You can also turn the Headphones 3D Ambience eect o (p. 8).
* You can use the [Ambience] button to adjust the Headphones 3D
Ambience eect.
Input Jack
By connecting an audio player or other audio playback device here,
you can play back the sound of the audio playback device via this
piano.
Use the Input Volume (p. 24) to adjust the volume of the
device that’s connected to the Input jack.
Output Jacks
If you connect these jacks to amplied speakers, the sound of this
piano will be heard through them.
* Before turning o the power of the unit, you
must rst turn o the power of the devices that
are connected to the Output jacks.
* To prevent malfunction and equipment failure, always turn down the volume, and turn o all the units before making any connections.
USB Memory Port
You can do the following things using a USB ash
drive.
5 WAVE les or MIDI les (SMF) data copied from your
computer can be played back by this piano.
5 You can make audio recordings of your performances on
this piano.
5 The audio recordings of songs that you’ve made can be
played on your computer.
* Never turn o the power or disconnect a USB ash drive or the
power cord while the USB memory access indicator is blinking.
* Use a commercially available USB ash drive or a USB ash drive
sold by Roland. However, we cannot guarantee that all commercially
available USB ash drives will work with this unit.
USB Computer Port
If you use a commercially available
USB cable to connect this pianos USB
Computer port to your computer’s USB
port, you’ll be able to do the following
things.
5 SMF data played back by MIDI-compatible software can be sounded
by the piano.
5 MIDI data can be transferred between the piano and your sequencer
software, opening up a wide range of possibilities for music
production and editing.
8
°
Operation Guide
Adjusting the Overall Volume
You can adjust the speaker volume
when using the internal speakers, or the
headphone volume when headphones are
connected.
Adjusting the volume 0–100 (default value: 50)
Basic operations
Select a setting item
Use the [K] [J] buttons.
Edit the value of an item Use the [–] [+] buttons.
Restore the default value Press the [–] [+] buttons simultaneously.
Transposing the Pitch (Transpose)
The keyboard or song can be transposed in semitone steps.
For example if a song is in the key of E major but you want to
play it using the ngering of the C major scale, you would set
the keyboard transpose setting to “4.
If you play C E G0It will sound E G B
Kbd Transpose
-6–0–5 (default value: 0)
MEMO
You can also change the keyboard transpose
setting by holding down the [Transpose] button
and pressing the note that will be the tonic
(root note) of the transposed key.
Song Transpose -12–0–12 (default value: 0)
Adding Reverberation to the Sound (Ambience)
The reverberation that is characteristic of a performance in a concert
hall can be added to the sound.
Adjusting the
reverberation (Ambience)
Higher values produce deeper ambience; lower
values produce shallower ambience.
* If Headphones 3D Ambience is on, you can
adjust the depth of the Headphones 3D
Ambience eect.
0–10 (default value: 2)
Headphones 3D Ambience
(when using headphones)
You can apply a Headphones 3D Ambience eect
that creates the impression that the sound is being
heard from the piano itself even when you’re using
headphones.
O, On (default value: On)
* The reverberation eect is not applied to audio les.
Adjusting the Brightness of the Sound (Brilliance)
You can adjust the brightness of the sound when you play the
keyboard or when you play back a song.
Adjusting the brightness
of the sound
-10–0–10 (default value: 0)
Making Various Settings (Function Mode)
You can make detailed settings for this piano.
1. Simultaneously press the [Ambience] button and [Brilliance]
button.
2. Use the [K] [J] buttons to select the item that you want to set.
3. Use the [–] [+] buttons to edit the setting.
page
24
Changing the Playing Feel of the Keyboard (Key Touch)
You can change the playing feel (touch) of the keyboard.
Adjusting the key touch
Default
value (50)
This setting is closest to the key touch of
an acoustic piano.
1–100
Higher values make the keyboard feel
heavier.
Fixed (Fix)
Notes sound at a xed volume regardless
of your playing dynamics.
Fix, 1–100 (default value: 50)
Hammer Response
Adjusts the time from when you play the key until
the piano sound is heard. Higher values produce a
greater delay.
O, 1–10 (default value: 1)
In addition to piano sounds, this piano lets you enjoy performing with
many other sounds.
These sounds are called Tones. There are ve groups of tones; each
tone button selects a group.
MEMO
For more about the tones, refer to Tone List” at the end of this manual.
To select a tone
Press a tone button (e.g., [Piano]) and then use the
[–] [+] buttons.
Viewing the display
Tempo
Time signature
Measure
Tone name
Keyboard transposition
Song
transposition
Auditioning the tones (Tone Demo)
1. Hold down the [Key Touch] button and press the [Transpose] button.
2. Select a tone.
You can hear a tone demo in each tone group.
3. To end the tone demo, press the [u] (Exit) button.
Tone groups
Button Explanation
[Piano] button Grand piano tones
[E. Piano] button Electric piano tones
[Organ] button
Organ tones
* If you’ve selected an organ sound that provides
a rotary eect (*1), such as a Combo Jz. Org or a
Ballad Organ, pressing the [Organ] button will
switch the speed of the rotary eect.
[Strings] button
The tones of string instruments such as violins, as
well as other instruments used in orchestras.
[Other] button
Selects a variety of sounds such as bass or
accompaniment sounds.
MEMO
You can use the [K] [J] buttons to select sounds
of the next category.
*1 Rotary is an eect which simulates the sound of rotating speakers. There is a
choice of two settings: Fast and Slow.
Selecting a Tone
9
Operation Guide
Creating Your Own Piano Tone (Piano Designer)
You can create your own piano tone by customizing the elements of
the grand piano sound to your taste.
1. Press the [Piano Designer] button.
2. Use the [K] [J] buttons to select the item that
you want to edit.
3. Use the [–] [+] buttons to edit the value.
MEMO
Piano Designer can be used to customize the sound only for [Piano] button
tones.
page
15
Playing Dierent Tones with the Left and Right Hands
(Split Play)
You can play dierent tones in the areas at the left and right of a
specied key. For example, you can use your left hand to play a bass
tone and use your right hand to play a piano tone.
This feature is called “Split Play, and the point at which the keyboard
is divided is called the “split point.
Turning Split on Turn the [Split] button on.
Changing the right-hand
tone and left-hand tone
1. Use the [K] [J] buttons to select “right-hand tone”
or “left-hand tone.
2. Press a tone button.
3. Use the [–] [+] buttons.
Split Point
Changes the split point.
MEMO
You can also specify the split point by holding
down the [Split] button and pressing the key
where you want to split the keyboard.
B1–B6 (default value: F#3)
Balance
Changes the volume balance of Split Play.
9:1–9:9–1:9 (default value: 9:9)
Left Shift
Changes the pitch of the left-hand tone in units of
one octave.
-2–0–2 (default value: 0)
Left-hand tone Right-hand tone
Split point (Power-up default): F#3
F#3
* If you select a sound from the [Piano] button as the left-hand tone, it might
sound dierent than usual.
Layering Two Sounds (Dual Play)
You can play two tones simultaneously from a single key. This
function is called “Dual Play.
Turning Dual on
Turn the [Dual] button on.
MEMO
You can also use Dual Play by pressing two
tone buttons simultaneously.
Changing tone 1 and
tone 2
1. Use the [K] [J] buttons to select “tone 1” or
“tone 2.
2. Press a tone button.
3. Use the [–] [+] buttons.
Balance
Adjusts the volume balance (tone 1: tone 2) for
Dual Play.
9:1–9:9–1:9 (default value: 9:4)
Tone 2 Shift
Changes the pitch of tone 2 in units of one
octave.
-2–0–2 (default value: 0)
* Depending on the combination of tones, the eect might not apply to tone 2,
causing the sound to appear dierently than usual.
* If you select a sound from the [Piano] button as tone 2, it might sound dierent
than usual.
Dividing the Keyboard for Two People (Twin Piano)
You can divide the keyboard into left and right areas so that two
people can play the same range of pitches.
Turning Twin Piano on
Turn the [Twin Piano] button on.
Changing the Twin
Piano tone
1. Press a tone button.
2. Use the [–] [+] buttons.
Changing the way
the sound is heard
(Mode)
Pair
Notes played in the right area are louder in
the right speaker; notes played in the left
area are louder in the left speaker.
When using headphones, you’ll be able to
hear the other person’s playing.
Individual
Notes played in the right area are heard only
from the right speaker; notes played in the
left area are heard only from the left speaker.
When using headphones, you won’t be able
to hear the other persons playing.
The damper pedal
for the left area
The damper pedal
for the right area
Conventional
keyboard
Twin Piano
divide point
C4 C5 C6 C7 C8C3C2C1
C4 C5 C6C3C4 C5C3 C6
Saving Your Performance Settings (Registration)
You can save tone settings and performance settings such as Dual
Play or Split Play, and easily recall them when you wish.
page
16
Reading the note name (e.g., C4)
The alphabetical indication for settings such as Split Point shows
the name of the note.
For example, the indication “C4” means “the fourth ‘C’ from the left
edge of the keyboard.
C4 C5 C6 C7 C8C3C2C1
10
Operation Guide
Using the Bluetooth Function
Sound from a Bluetooth-equipped audio player can be played
through the piano, or you can use the piano in conjunction with an
app that you’ve installed on your mobile device.
When you turn on the power of this instrument, the Bluetooth
indicator lights.
When pairing is taking place, or when connected or disconnected, the
Bluetooth indicator blinks.
Display
This shows information such as the tone name, song name, tempo,
and time signature. The K” “ J, and “-, “+” indications shown in the
screen indicate the buttons used to operate the various functions.
Tempo
Time signature
Measure
Tone name or
song name
Bluetooth
connection
status
Keyboard
transposition
Song
transposition
Sounding the Metronome
You can sound a metronome while you perform. You can also change
the tempo and time signature of the metronome.
If a song is playing, the metronome sounds at the tempo and time
signature of that song.
MEMO
Use the [K] [J] buttons to select the item that you want to set.
Use the [-] [+] buttons to change the value of an item.
Sound the metronome Turn the [Metronome] button on.
Change the tempo
Use the [Slow] [Fast] buttons.
10–500
Beat
Changes the time signature of the metronome.
MEMO
You can also change the time signature by
holding down the [Metronome] button and
use the [Slow] [Fast] buttons.
2/2, 3/2, 2/4, 3/4, 4/4, 5/4, 6/4, 7/4, 3/8, 6/8, 8/8,
9/8, 12/8 (default value: 4/4)
Down beat
Sounds a down beat.
O, On (default value: On)
Pattern
Changes the pattern of the metronome.
O, Eighth note, Eighth-note triplet, Shue,
Sixteenth note, Quarter-note triplet, Quarter
note, Dotted eighth (default value: O)
Volume
Changes the volume of the metronome.
O, 1–10 (default value: 5)
Tone
Changes the tone of the metronome.
Click, Electronic, Voice (Japanese), Voice (English)
(default value: Click)
Selecting an Item/Editing a Value
Select a setting item
Use the [K] [J] buttons.
Edit the value of an item Use the [–] [+] buttons.
Change a value consecutively Hold down the [–] button or [+] button.
Return to the default value
Hold down the [–] button and [+] button
simultaneously.
page
20
11
Operation Guide
Selecting a Song
Disabling the Buttons (Panel Lock)
By disabling the buttons other than the [L] button and the [Volume]
buttons, you can prevent unintended operation.
Lock the panel
Hold down the [Right] button until the screen
shows the “
symbol.
Unlock the panel
Hold down the [Right] button until the
symbol disappears, or turn o the power.
Playing Back or Recording
Heres how to play back or record a song.
Return to the beginning of
the song
Press the [u] button.
Play/stop
Press the [s] button.
Enter record-ready
condition
While stopped, press the [t] button.
Record
In record-ready condition, press the [s] button.
Rewind
Press the [x] button.
Fast-forward
Press the [y] button.
Play all songs in the
selected category
(All Song Play)
Hold down the [Song] button and press the [s]
button.
Change the song tempo Press the [Slow] [Fast] buttons.
Play back the song
at a constant tempo
(Tempo Mute)
Hold down the [s] button and press the [Slow]
button or [Fast] button.
To clear the tempo mute function, hold down the
[s] button once again and press the [Slow]
button or [Fast] button.
Sound a count-in (*1)
Hold down the [Metronome] button and press the
[s] button.
*1 A series of sounds rhythmically played to indicate the tempo before a song
starts is called a count-in. If you sound a count-in, it will be easier for you to
synchronize your own performance to the tempo of the playback.
To make a new recording
1. Select the tone that you want to play.
2. Press the [t] button.
3. Press the [s] (Play/Stop) button to start recording.
4. Press the [s] (Play/Stop) button to stop recording.
To overdub
1. Select the song to be dubbed.
2. Press the [t] button.
3. Press the cursor [J] (right) button.
4. Press the button of the part that you want to record, making it
blink.
5. Press the [s] (Play/Stop) button to start recording.
6. Press the [s] (Play/Stop) button to stop recording.
Selecting the Part(s) to Play (Part Mute)
This pianos songs consist of three parts: accompaniment, left hand,
and right hand.
You can mute a specic part so that it will not sound; only the parts
that you want to hear will play.
Let a part play
Make the button light for parts that you want to
play.
Mute a part
Make the button go dark for parts that you want
to mute.
Accompaniment
part
Left-hand
part
Right-hand
part
* Some songs don’t contain a left-hand part or an accompaniment part. If so,
pressing the corresponding part button does not make it light.
* The Part Mute function is not available when playing an audio le.
You can select songs in the Song screen.
1. Press the [Song] button to access the Song screen.
Category
Tempo
Time signature
Measure
Song name
2. Use the [K] [J] buttons to select a category.
3. Use the [–] [+] buttons to select a song.
4. Press the [s] button to play the song.
MEMO
To select a song from a folder on a USB ash drive, proceed as follows.
Enter the folder
Use the [–] [+] buttons to select the folder, and press the
[s] (Enter) button.
Exit the folder
Use the [–] button to select “(up)” and then press the
[s] (Enter) button.
Category list
Category Explanation
USB Memory Songs saved on a USB ash drive
Internal Memory Songs saved in internal memory
Listening
Internal songs
Piano songs recommended for listening
Masterpieces
Piano Masterpieces
Songs corresponding to the included
collection of scores, “Roland Classical Piano
Masterpieces.
Easy Piano
Famous popular songs and classical
compositions
Songs corresponding to the included
collection of scores, “Let’s Enjoy Piano.
Scales
Scales in all keys
(major scales, minor scales)
Songs corresponding to the included
collection of scores, “Let’s Enjoy Piano.
Hanon The Virtuoso Pianist No.1–20
Beyer Vorschule im Klavierspiel Op.101 No.1–106
Burgmüller 25 Études faciles et progressives Op.100
Czerny100 100 Übungsstücke Op.139
MEMO
For details on the internal songs, refer to “Internal Song List at the end of
this manual.
Song formats that can be played by this piano
The piano can play back data in the following formats.
5 SMF formats 0/1
5 Audio les: WAV format, 44.1 kHz, 16-bit linear
page
12
12
You can play back a recorded performance to check your playing, or
play along with a recorded performance.
Recording
Recording a New Song
* If you want to record with Twin Piano turned on, set SMF Play
Mode (p. 25) to “External.
Getting ready to record
32 3
1. Select the tone that you want to play (p. 8).
2. You can sound the metronome if you like (p. 10).
You can specify the tempo and time signature of the metronome.
MEMO
The metronome tempo and time signature are stored in the song,
so that the song can play back with the same tempo and time
signature.
3. Press the [t] button.
The [t] button lights, the [s] button blinks, and this piano enters
record-standby mode.
If you decide to cancel recording, press the [t] button once again.
MEMO
If you want to record the left hand and right hand separately,
press the part button of the part that you want to record (left-
hand or right-hand), making it blink.
* If you don’t select a part at this time, your performance is
recorded to the following buttons.
When playing a single tone [Right] button
When playing dierent tones with
the left and right hands (Split Play)
[Right] button and [Left] button
When dividing the keyboard into
left and right regions that play the
same range of pitches (Twin Piano)
When playing two tones layered
(Dual Play)
[Right] button and [Accomp] button
Starting your recording and saving it
1 2
1. Press the [s] button.
After a two-measure count is sounded (the measure number in the
lower right of the display indicates “-2” and then “-1”), recording
starts.
When the count begins, the [t] button and [s] button light.
MEMO
If you play the keyboard without pressing the [s] button,
recording starts immediately. In this case, a count is not sounded.
2. Press the [s] button.
Recording stops, and your performance is automatically saved.
MEMO
5 You can delete the song that you recorded (p. 13).
5 You can rename the song that you recorded (p. 14).
NOTE
Never turn o the power while “Saving... is shown in the display.
Listening to the recorded performance
After you record, the newly recorded song is selected.
1. Press the [s] button.
Playback starts from the beginning of your recorded performance.
Overdubbing a Recorded Performance
You can record your right-hand (or left-hand) performance by
overdubbing it onto the previously recorded left-hand (or right-hand)
performance.
* When overdubbing dierent tones, set the SMF Play Mode (p. 25)
to “External.
1. Select the recorded data of the performance that you want
to overdub (p. 11).
MEMO
If you want to rerecord only a portion of the song, use the [x]
[y] buttons to move to the measure at which you want to start
recording.
2. Press the [t] button.
The [t] button lights, the [s] button blinks, and the piano enters
record-standby mode.
In this case, New Song is selected.
If you decide to cancel recording, press the [t] button once again.
3. Press the cursor [J] (right) button.
The recorded data of step 1 is selected.
MEMO
The tempo and time signature of the overdubbed performance
will be the same as the settings of the recorded data you selected.
4. Press the part button of the part that you want to record
(left-hand or right-hand), making it blink.
Parts whose button is lit will play back during recording.
5. Start recording as described in “Starting your recording
and saving it” (p. 12).
SMF recording
SMF recording
Left-hand part Right-hand part
˙
Recording Your Performance
°
Advanced Operation
13
Advanced Operation
Recording Audio to USB Flash Drive
If you want to record your piano performance and listen to it on your
computer or audio player, or to create a CD, you can record it as audio
to a USB ash drive.
* The acoustic projection eect is not reproduced for an audio-
recorded song.
* Acoustic projection is an eect that plays dierent sounds from
each of this pianos multiple speakers in order to reproduce the
depth and spatial sense of a pianos sound. This eect is applied
when you play the keyboard, and when you play back a song that
was recorded as SMF.
Getting ready to record
353 4
1. Connect your USB ash drive to the USB Memory port
(p. 7).
* Audio data can’t be stored in the pianos internal memory.
2. Select the tone that you want to play (p. 8).
3. Hold down the [t] button and press the [+] button to
select “Audio.
MEMO
You can also specify this via the Function mode “Recording Mode”
setting (p. 25).
4. Press the [t] button.
The [t] button lights, the [s] button blinks, and this piano enters
record-standby mode.
If you decide to cancel recording, press the [t] button once again.
NOTE
Never turn o the power or disconnect the USB ash drive during
recording.
5. You can sound the metronome if you like (p. 10).
Starting your recording and saving it
1 2
1. Press the [s] button.
Recording starts.
When recording starts, the [t] button and [s] button light.
2. Press the [s] button.
Recording stops, and your performance is automatically saved.
MEMO
5 You can delete the song (p. 13).
5 You can change the name of the song (p. 14).
Listening to the recorded performance
After you record, the newly recorded song is selected.
1. Press the [s] button.
Playback starts from the beginning of your recorded performance.
Converting an SMF-recorded song to audio
A song that you previously recorded as SMF can be converted to
audio data so that you can play it back on your computer or use
it to create a CD.
1. Select the song that you want to convert to audio (p. 11).
2. Getting ready for audio recording (“Getting ready to record”
(p. 13)).
1. Connect your USB ash drive.
2. Hold down the [t] button and use the [+] button to select
Audio.
3. Press the [t] button.
3. Press the cursor [J] (right) button to select the song of step 1.
4. Press the [s] button to start audio recording (“Starting your
recording and saving it” (p. 13)).
* During recording, any sounds that you produce by playing the keyboard or
that are input to the unit via the USB port, the Input jack, or Bluetooth audio
are included in the audio that is recorded during this conversion. Muted
parts are not recorded.
* Depending on the SMF, it might not be possible to convert it into the
identical audio as when the song was recorded.
Deleting a Saved Song (Delete Song)
Heres how to delete a song that you saved on an internal memory or
USB ash drive.
* If you want to delete a song on the USB ash drive, connect your
USB ash drive to the USB Memory port before you continue.
MEMO
If you want to delete all songs that have been saved to internal
memory, initialize the memory (p. 19).
1. Press the [Ambience] button and [Brilliance] button
simultaneously.
2. Use the [K] [J] buttons to select “Delete Song, and then
press the [s] (Enter) button.
The Delete Song screen appears.
3. Use the [–] [+] buttons to select the memory location
(internal memory or USB ash drive) that contains the song
you want to delete.
4. Press the cursor [J] (right) button.
5. Use the [–] [+] buttons to select the song that you want to
delete.
6. Press the [s] (Enter) button.
A conrmation message appears.
If you decide to cancel, press the [u] (Exit) button.
Audio recording
14
Advanced Operation
7. Use the cursor [J] (right) button to select “Yes, and then
press the [s] (Enter) button.
The deletion is executed.
NOTE
Never turn o the power or disconnect the USB ash drive while
the screen indicates “Executing...
8. Simultaneously press the [Ambience] button and
[Brilliance] button to exit Function mode.
Copying a Saved Song (Copy Song)
Songs that have been saved in internal memory can be copied to USB
ash drive. Alternatively, songs stored on a USB ash drive can be
copied to internal memory.
* Audio les cannot be copied.
* If a USB ash drive is not connected, you won’t be able to perform
this operation.
1. Press the [Ambience] button and [Brilliance] button
simultaneously.
2. Use the [K] [J] buttons to select “Copy Song, and then
press the [s] (Enter) button.
The Copy Song screen appears.
3. Use the [–] [+] buttons to select the copy-source and copy-
destination memory locations (internal memory or USB
ash drive).
4. Press the cursor [J] (right) button.
5. Use the [–] [+] buttons to select the song that you want to
copy.
If you decide to cancel, press the [u] (Exit) button.
6. Press the [s] (Enter) button.
The copy is executed.
NOTE
Never turn o the power or disconnect the USB ash drive while
the screen indicates “Executing...
7. Simultaneously press the [Ambience] button and
[Brilliance] button to exit Function mode.
Renaming a Song (Rename Song)
Heres how to rename a previously-saved song.
1. Press the [Ambience] button and [Brilliance] button
simultaneously.
2. Use the [K] [J] buttons to select “Rename Song, and then
press the [s] (Enter) button.
The Rename Song screen appears.
3. Use the [–] [+] buttons to select the media (internal
memory or USB ash drive) that contains the song that you
want to rename.
4. Press the cursor [J] (right) button.
5. Use the [–] [+] buttons to select the song that you want to
rename, and then press the cursor [J] (right) button.
6. Rename the song.
[K] [J] buttons
Select the position at which you want to change
the character.
[–] [+] buttons Change the character.
If you decide to cancel, press the [u] (Exit) button.
7. Press the [s] (Enter) button.
A conrmation message appears.
If you decide to cancel, press the [u] (Exit) button.
8. Use the cursor [J] (right) button to select “Yes, and then
press the [s] (Enter) button.
The song is renamed.
NOTE
Never turn o the power or disconnect the USB ash drive while
the screen indicates “Executing...
9. Simultaneously press the [Ambience] button and
[Brilliance] button to exit Function mode.
15
Advanced Operation
What is Piano Designer?
This piano allows you to
personalize your piano sound by
adjusting various factors that aect
the sound, such as the pianos
strings, the resonance produced
using the pedals, and the sound of
the hammers striking the strings.
This function is called “Piano
Designer.
String
Resonance
Hammer Noise
Adjusting the piano
sound to your taste
* Piano Designer can be used to customize the sound only for
tones of the [Piano] button.
* Your settings are saved for each tone of the [Piano] button.
1 2 34
1. Press the [Piano Designer] button.
The Piano Designer screen appears.
2. Use the [K] [J] buttons to select the item that you want to
edit.
3. Use the [–] [+] buttons to adjust the value.
4. When you’re nished using Piano Designer, press the
[Piano Designer] button or [u] (Exit) button.
A conrmation message appears.
If you decide to cancel, press the [u] (Exit) button.
5. Use the cursor [J] (right) button to select “Yes, and then
press the [s] (Enter) button.
The Piano Designer settings are saved.
If you decide to exit without saving the settings, use the [K] button
to select “No and then press the [s] (Enter) button.
MEMO
If you install the dedicated app on your iPad or other mobile
device, you can use the screen of your mobile device to edit the
“Piano Designer” settings in a more visual and intuitive way.
(Refer to “Using the Piano with an App (p. 22).)
Items that you can edit in Piano Designer
Items Value Explanation
Lid 0–6
Adjusts the extent to which the lid of the grand piano
is open.
The sound will become more mellow as you close the
lid of the piano in the screen. The sound will become
brighter as you open the lid of the piano in the screen.
Key O Noise O, 1–10
Adjusts the action noise that is heard when you release
a key.
Higher settings produce a louder action noise.
Items Value Explanation
Hammer Noise -2–0–2
Adjusts the sound produced when the hammer of an
acoustic piano strikes the string.
Higher settings will produce a louder sound of the
hammer striking the string.
Duplex Scale O, 1–10
Adjusts the sympathetic vibrations of an acoustic pianos
Duplex Scale.
Higher settings will make the sympathetic vibration
louder.
Full Scale String
Res.
O, 1–10
Adjusts the resonant sound of an acoustic piano (the
sound produced by the strings of previously-pressed
keys vibrating in sympathy with newly played notes, or
the sound of other strings vibrating in sympathy with
the notes you play while pressing the damper pedal).
Higher settings produce louder sympathetic resonance.
Damper
Resonance
O, 1–10
Adjusts the overall resonance of the acoustic piano
when its damper pedal is pressed (the sound of
other strings vibrating in sympathy when you press
the damper pedal, and the resonance of the entire
instrument).
Higher settings produce louder sympathetic resonance.
Key O
Resonance
O, 1–10
Adjusts sympathetic vibrations such as an acoustic
piano’s key-o sound (the subtle sound that occurs
when you release a note).
Higher settings produce greater tonal change during
the decay.
Cabinet
Resonance
O, 1–10
Adjusts the body resonance of the grand piano itself.
Higher values will produce a larger body resonance.
Soundboard
Type
1–5
Selects how the soundboard of the acoustic piano will
resonate.
You can choose from ve dierent types of resonance.
Damper Noise O, 1–10
This adjusts the damper noise of the acoustic piano
sound (the sound of the damper releasing the strings
when you press the damper pedal).
Single Note
Tuning (*1)
-50–0–
+50
Species a method of tuning (stretch tuning) that is
distinctive to the piano, in which the high register is
tuned slightly sharper and the low register is tuned
slightly atter.
Single Note
Volume (*1)
-50–0
Adjusts the volume of each key.
Lower settings decrease the volume.
Single Note
Character (*1)
-5–0–+5
Adjusts the tonal character of each key.
Higher settings produce a harder sound, and lower
settings produce a softer tone.
Reset Setting
Here’s how the Piano Designer settings of the selected sound can be
returned to their factory-set state.
1. Press the [s] (Enter) button.
If you decide to cancel, press the [u] (Exit) button.
2. Use the cursor [J] (right) button to select “Yes, and
then press the [s] (Enter) button.
The settings return to their factory-set state.
(*1) Single Note settings
1. Select a Single Note item, and press the [s] (Enter) button.
2. Play the key that you want to edit, and use the [–] [+] buttons to
adjust the settings for that key.
MEMO
You can use the [K] [J] buttons to move to a dierent Single Note item.
3. Press the [u] (Exit) button to return to the previous screen.
˙
Personalizing Your Piano Sound (Piano Designer)
What is the duplex scale?
The Duplex Scale is a system of sympathetically vibrating strings sometimes
included in grand pianos.
These sympathetically vibrating strings are not struck directly with hammers,
but sound by vibrating in sympathy with the vibrations of other strings. By
resonating with the overtones, these strings add richness and brilliance to the
sound. These sympathetic strings are added only to the high register above
approximately C4. Since they do not have a damper (a mechanism that stops
them from sounding), they will continue sounding even after you play a note and
then release it to stop the sound of the string that was actually struck.
16
Advanced Operation
˙
Saving Your Performance Settings (Registration)
Tone settings and settings such as Dual Play or Split Play can be saved
and recalled easily. Such settings are called a “registration.
You can save a total of 25 registrations, ve each in buttons [1]–[5].
These 25 registrations are collectively called a “registration set.
=
Registration set
25 registrations
1-1 2-1 3-1 4-1 5-1
1-5 2-5 3-5 4-5 5-5
Settings that are saved in a registration
Setting Page
Ambience p. 8
Rotary Speed p. 8
Key Touch p. 8
Transpose p. 8
The selected tone (including Split or Dual tones) p. 8
Split on/o p. 9
Split point p. 9
Left Shift p. 9
Dual on/o p. 9
Tone 2 Shift p. 9
Balance (Split, Dual) p. 9
Twin Piano on/o p. 9
Twin Piano Mode p. 9
Damper Pedal Part p. 25
Center Pedal p. 25
Left Pedal p. 25
MIDI Transmit Ch p. 26
Recalling a Registration
1. Press the [Registration] button.
2. Press a number button ([1] to [5]) to choose the location
where the desired registration is saved.
3. Press the [–] [+] buttons to select the registration variation.
The settings change accordingly.
You can press the cursor [J] (right) button to edit the selected
registration.
MEMO
5 You can also use a pedal to recall registrations (p. 25).
5 If you press the [Registration] button to exit the Registration
screen, you will return to the state prior to recalling the
registration.
Saving Current Settings into a Registration
NOTE
When you save a registration into a location, it will overwrite any
registration already stored at that location.
1. While holding down the [Registration] button, press a
button from [1] to [5] to select a registration and then press
the [–] [+] buttons to select a registration variation.
2. Rename the registration.
[K] [J] buttons
Select the position at which you want to change
the character.
[–] [+] buttons Change the character.
If you decide to cancel, press the [u] (Exit) button.
3. Press the [s] (Enter) button.
The registration is saved.
NOTE
Never turn o the power while the screen indicates “Executing...
17
Advanced Operation
Saving a Registration Set (Registration Export)
You can save all registrations held in registration memory into a
registration set on a USB ash drive.
1. Connect your USB ash drive to the USB Memory port
(p. 7).
2. Press the [Ambience] button and [Brilliance] button
simultaneously.
3. Use the [K] [J] buttons to select “Registration Export, and
then press the [s] (Enter) button.
The Registration Export screen appears.
4. Rename the registration set.
[K] [J] buttons
Select the position at which you want to change
the character.
[–] [+] buttons Change the character.
If you decide to cancel, press the [u] (Exit) button.
5. Press the [s] (Enter) button.
The settings are saved.
NOTE
Never turn o the power while the screen indicates “Executing...
6. Simultaneously press the [Ambience] button and
[Brilliance] button to exit Function mode.
Loading a Saved Registration Set (Registration
Import)
Heres how a registration set that’s saved on a USB ash drive can be
loaded into the [Registration] button.
NOTE
When you load a registration set, the registrations that were
saved in the [Registration] button are overwritten and lost. If you
don’t want to lose these registrations, save them to a USB ash
drive.
1. Connect your USB ash drive to the USB Memory port
(p. 7).
2. Press the [Ambience] button and [Brilliance] button
simultaneously.
3. Use the [K] [J] buttons to select “Registration Import, and
then press the [s] (Enter) button.
The Registration Import screen appears.
4. Use the [–] [+] buttons to select the registration set that
you want to load.
5. Press the [s] (Enter) button.
A conrmation message appears.
If you decide to cancel, press the [u] (Exit) button.
6. Use the cursor [J] (right) button to select “Yes, and then
press the [s] (Enter) button.
The settings are loaded.
NOTE
Never turn o the power while the screen indicates “Executing...
7. Simultaneously press the [Ambience] button and
[Brilliance] button to exit Function mode.
18
Advanced Operation
˙
Loading/Saving Piano Setups
The piano settings that you make can be used on another GP609 unit
if you save your settings on a USB ash drive and then load them into
the other GP609.
* Only piano settings that were created on an GP609 can be loaded.
Settings that are saved as piano settings
Setting Page
Speaker volume p. 8
Headphone volume p. 8
Ambience p. 8
Headphones 3D Ambience p. 8
Brilliance p. 8
Key Touch p. 8
Hammer Response p. 8
Piano Designer settings p. 15
Master Tuning p. 24
Temperament p. 24
Temperament Key p. 24
Volume Limit p. 26
Saving Piano Settings (Piano Setup Export)
1. Connect your USB ash drive to the USB Memory port
(p. 7).
2. Press the [Ambience] button and [Brilliance] button
simultaneously.
3. Use the [K] [J] buttons to select “Piano Setup Export, and
then press the [s] (Enter) button.
The Piano Setup Export screen appears.
4. Rename the piano settings.
[K] [J] buttons
Select the position at which you want to change
the character.
[–] [+] buttons Change the character.
5. Press the [s] (Enter) button.
The settings are saved.
NOTE
Never turn o the power or disconnect the USB ash drive while
the screen indicates “Executing...
6. Simultaneously press the [Ambience] button and
[Brilliance] button to exit Function mode.
Loading Piano Settings (Piano Setup Import)
1. Connect your USB ash drive to the USB Memory port
(p. 7).
2. Press the [Ambience] button and [Brilliance] button
simultaneously.
3. Use the [K] [J] buttons to select “Piano Setup Import, and
then press the [s] (Enter) button.
The Piano Setup Import screen appears.
4. Use the [–] [+] buttons to select the piano settings that you
want to load.
5. Press the [s] (Enter) button.
A conrmation message appears.
If you decide to cancel, press the [u] (Exit) button.
6. Use the cursor [J] (right) button to select “Yes, and then
press the [s] (Enter) button.
The settings are loaded.
NOTE
Never turn o the power or disconnect the USB ash drive while
the screen indicates “Executing...
7. Simultaneously press the [Ambience] button and
[Brilliance] button to exit Function mode.
19
Advanced Operation
˙
Convenient Functions
Initializing the Memory (Format Media)
Heres how to erase all of the les that you saved in internal memory or
on a USB ash drive (sold separately).
NOTE
5 When you initialize, all registrations or data that you saved in
internal memory or on a USB ash drive are lost.
5 If you want settings other than the internal memory settings
to be returned to their factory-set state, execute a Factory
Reset (p. 19).
1. If you want to initialize a USB ash drive, connect the USB
ash drive to the USB Memory port (p. 7).
2. Press the [Ambience] button and [Brilliance] button
simultaneously.
3. Use the [K] [J] buttons to select “Format Media, and then
press the [s] (Enter) button.
The Format Media screen appears.
-
If you decide to cancel, press the [u] (Exit) button.
4. Use the [–] [+] buttons to select the media (Internal
Memory or USB Memory) that you want to format.
5. Press the [s] (Enter) button.
A conrmation message appears.
If you decide to cancel, press the [u] (Exit) button.
6. Use the cursor [J] (right) button to select “Yes, and then
press the [s] (Enter) button.
The memory is formatted.
NOTE
Never disconnect the USB ash drive or turn o the power while
the screen indicates “Executing...
7. Simultaneously press the [Ambience] button and
[Brilliance] button to exit Function mode.
Restoring the Factory Settings (Factory Reset)
Heres how to restore all registrations and internally saved settings to
the factory-set condition. This function is called “Factory Reset.
NOTE
Factory Reset erases all settings that you have stored, and returns
them to the factory-set condition.
MEMO
Executing this function does not erase the data in internal
memory or on a USB ash drive (sold separately). If you want to
erase all the data from internal memory or from a USB ash drive,
refer to “Initializing the Memory (Format Media)” (p. 19).
1. Press the [Ambience] button and [Brilliance] button
simultaneously.
2. Use the [K] [J] buttons to select “Factory Reset, and then
press the [s] (Enter) button.
A conrmation message appears.
If you decide to cancel, press the [u] (Exit) button.
3. Use the cursor [J] (right) button to select “Yes, and then
press the [s] (Enter) button.
The memory is reset to its factory values.
NOTE
Never turn o the power while the screen indicates “Executing...
4. Turn the power o, then on again (p. 4).
20
Advanced Operation
˙
Using the Bluetooth® Functionality
Provision of Bluetooth functionality
Please be aware that depending on the country in which you
purchased the piano, Bluetooth functionality might not be
included.
The Bluetooth logo appears
when you turn on the power.
If Bluetooth functionality is included
Heres What You Can Do
Bluetooth functionality wirelessly connects this piano to a mobile device such as your smartphone or tablet (subsequently referred to as the “mobile
device”), allowing you to do the following.
Music played back by the mobile device can be heard through the pianos speakers.
You can play back music data that’s saved on your iPhone or other mobile device, and wirelessly listen to it through the pianos speakers.
0 “Listening to Music Through the Piano’s Speakers” (p. 21)
You can use apps to expand your piano enjoyment.
You can install apps (such as Roland’s “Piano Partner 2” or “Piano Designer”) on your mobile device, and use them in conjunction with the piano.
0 “Using Apps with the Piano (p. 22)
You can connect a music score viewing app, and use the pedals to turn pages.
You can view electronic scores (in a score viewing app such as “piaScore”) on your iPad or other mobile device, and use the pedals to turn pages.
0 “Using the Pedals to Turn Pages in a Score Viewing App” (p. 23)
Speakers
App “Piano Partner 2” note-guessing game
Page-turning
Connection status between this piano and the mobile device
Depending on the functionality of the mobile device thats
connected, the following icons are shown in the lower left of the
screen.
Function Displayed icon
Listening to music from the
mobile device
(AUDIO)
Linking with an app
(MIDI)
Using the pedals to turn pages
(PAGE)
Page turning and linking with
an app
(P+MID)
* If you have trouble making connections, refer to the Troubles with Bluetooth functionality (p. 28).
Pairing
In order to use Bluetooth functionality, you must rst perform
an action called “pairing, which connects the piano to the
mobile device in a one-to-one relationship.
“Pairing is the procedure of registering (mutually authenticating)
your mobile device with the piano.
To perform pairing, use the procedure that’s appropriate for each
function.
Paring
  • Page 1 1
  • Page 2 2
  • Page 3 3
  • Page 4 4
  • Page 5 5
  • Page 6 6
  • Page 7 7
  • Page 8 8
  • Page 9 9
  • Page 10 10
  • Page 11 11
  • Page 12 12
  • Page 13 13
  • Page 14 14
  • Page 15 15
  • Page 16 16
  • Page 17 17
  • Page 18 18
  • Page 19 19
  • Page 20 20
  • Page 21 21
  • Page 22 22
  • Page 23 23
  • Page 24 24
  • Page 25 25
  • Page 26 26
  • Page 27 27
  • Page 28 28
  • Page 29 29
  • Page 30 30
  • Page 31 31
  • Page 32 32

Roland GP609 Owner's manual

Category
Musical Instruments
Type
Owner's manual

Ask a question and I''ll find the answer in the document

Finding information in a document is now easier with AI