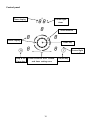
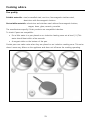
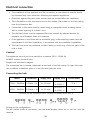
Caple C900I is a modern induction hob with a range of features designed to make cooking easier and more efficient. It has four induction zones, each with a power boost function for rapid heating. The hob also features a timer, автоматическое отключение, and a keep-warm function. The control panel is easy to use, with touch controls and a clear display. The hob is also easy to clean, with a smooth ceramic glass surface. Overall, the Caple C900I is a versatile and user-friendly induction hob that is perfect for any kitchen.
Caple C900I is a modern induction hob with a range of features designed to make cooking easier and more efficient. It has four induction zones, each with a power boost function for rapid heating. The hob also features a timer, автоматическое отключение, and a keep-warm function. The control panel is easy to use, with touch controls and a clear display. The hob is also easy to clean, with a smooth ceramic glass surface. Overall, the Caple C900I is a versatile and user-friendly induction hob that is perfect for any kitchen.


-
 1
1
-
 2
2
-
 3
3
-
 4
4
-
 5
5
-
 6
6
-
 7
7
-
 8
8
-
 9
9
-
 10
10
-
 11
11
-
 12
12
-
 13
13
-
 14
14
-
 15
15
-
 16
16
-
 17
17
-
 18
18
-
 19
19
-
 20
20
-
 21
21
-
 22
22
-
 23
23
-
 24
24
-
 25
25
-
 26
26
-
 27
27
-
 28
28
-
 29
29
-
 30
30
-
 31
31
-
 32
32


Caple C900I is a modern induction hob with a range of features designed to make cooking easier and more efficient. It has four induction zones, each with a power boost function for rapid heating. The hob also features a timer, автоматическое отключение, and a keep-warm function. The control panel is easy to use, with touch controls and a clear display. The hob is also easy to clean, with a smooth ceramic glass surface. Overall, the Caple C900I is a versatile and user-friendly induction hob that is perfect for any kitchen.
Ask a question and I''ll find the answer in the document
Finding information in a document is now easier with AI
Related papers
Other documents
-
Artusi AID784 User manual
-
Küppersbusch EKI8940.1F Instructions for Use and Installation
-
Bertazzoni P304IAE User manual
-
Smeg SAI613B User manual
-
 AWARD APPLIANCES H304 Induction Ceramic Hob Operating instructions
-
Foster Elettra.IS.4 User manual
-
Foster 7322 230 User manual
-
-
Beko BCTI30410 User manual
-
Smeg PI964P User manual
