Register your product and get support at
HR7627
HR7628
HR7629
www.philips.com/welcome
Specifications are subject to change without notice
© 2014 Koninklijke Philips N.V.
All rights reserved.
10 11 12
P
0
1
2
English
1 Important
Congratulations on your purchase and welcome to Philips! To fully benet from the support
that Philips offers, register your product at www.philips.com/welcome.
Read this user manual carefully before you use the appliance, and save the user manual for
future reference.
Danger
• Do not immerse the motor unit in water nor rinse
it under the tap.
Warning
• Never use your ngers or an object to push
ingredients into the feeding tube while the appliance
is running. Only use the pusher.
• Before you connect the appliance to the power,
make sure that the voltage indicated on the bottom
of the appliance corresponds to the local power
voltage.
• Never connect this appliance to a timer switch, to
avoid a hazardous situation.
• Do not use the appliance if the power cord, the
plug, protecting cover, rotating sieve or any other
parts are damaged or has visible cracks.
• If the power cord is damaged, you must have it
replaced by Philips, a service center authorized
by Philips, or similarly qualied persons to avoid a
hazard.
• This appliance shall not be used by children. Keep
the appliance and its cord out of reach of children.
• This appliance can be used by persons with reduced
physical, sensory or mental capabilities or lack of
experience and knowledge if they have been given
supervision or instruction concerning use of the
appliance in a safe way and if they understand the
hazards involved.
• For their safety, do not allow children to play with
the appliance.
• Never let the appliance run unattended.
• If food sticks to the wall of the blender jar or bowl,
switch off the appliance and unplug it. Then use a
spatula to remove the food from the wall.
• Be careful when you are emptying the bowl, handle
or clean the discs, the blade units and the juicer
sieve. The cutting edges are very sharp.
• Do not touch the blades, especially when the
appliance is plugged in. The blades are very sharp.
• If the blades get stuck, unplug the appliance before
you remove the ingredients that block the blades.
• Be careful if hot liquid is poured into the food
processor or blender as it can be ejected out of the
appliance due to a sudden steaming.
• This appliance is intended for household use only.
Caution
• Never switch off the appliance by turning the
blender jar, the bowl, or their lids. Always switch off
the appliance by turning the speed selector to 0 or
OFF.
• Unplug the appliance immediately after use.
• Always wait until the moving parts stop running,
then switch off and unplug the appliance before
opening the lid and reaching into any of the parts
that move in use.
• Always switch off and unplug the appliance if it is left
unattended, and before assembling, disassembling,
cleaning and changing accessories, or approaching
parts that move in use.
• Thoroughly clean the parts that come into contact
with food before you use the appliance for the rst
time. Refer to the instructions and table for cleaning
given in this manual.
• Never use any accessories or parts from other
manufacturers that Philips does not specically
recommend. If you use such accessories or parts,
your guarantee becomes invalid.
• Do not exceed the maximum level indication on
the bowl or the jar. Follow the quantities, processing
time and speed as indicated in the user manual.
• Let hot ingredients cool down (< 80ºC) before
processing them.
• Always let the appliance cool down to room
temperature after each batch that you process.
• Certain ingredients such as carrots may cause
discolorations on the surface of the parts. This
does not have a negative effect on the parts. The
discolorations usually disappear after some time.
• Noise level: Lc = 85 dB [A]
Electromagnetic elds (EMF)
This Philips appliance complies with all applicable standards and regulations regarding
exposure to electromagnetic elds (EMF). If handled properly and according to the
instructions in this user manual, the appliance is safe to use based on scientic evidence
available today.
Recycling
Your product is designed and manufactured with high quality materials and
components, which can be recycled and reused.
When you see the crossed-out wheel bin symbol attached to a product, it means
the product is covered by the European Directive 2002/96/EC:
Never dispose of your product with other household waste. Please inform yourself
about the local rules on the separate collection of electrical and electronic products.
The correct disposal of your old product helps prevent potentially negative
consequences on the environment and human health.
2 Introduction
Congratulations on your purchase and welcome to Philips! To fully benet from the support
that Philips offers, register your product at www.philips.com/welcome.
This appliance is equipped with a built-in safety lock. You can only switch on the appliance
after you correctly assemble the following parts on the motor unit:
• the food processor bowl and its lid, or
• the blender jar and its lid (HR7628, HR7629 only), or
• the citrus press (HR7629 only)
If these parts are assembled correctly, the built-in safety lock is unlocked.
For recipes to use with your food processor, go to www.philips.com/kitchen
3 Food processor
Warning
• Never use your ngers or an object to push ingredients into the feeding tube while the appliance is
running. Only use the pusher.
Blade unit
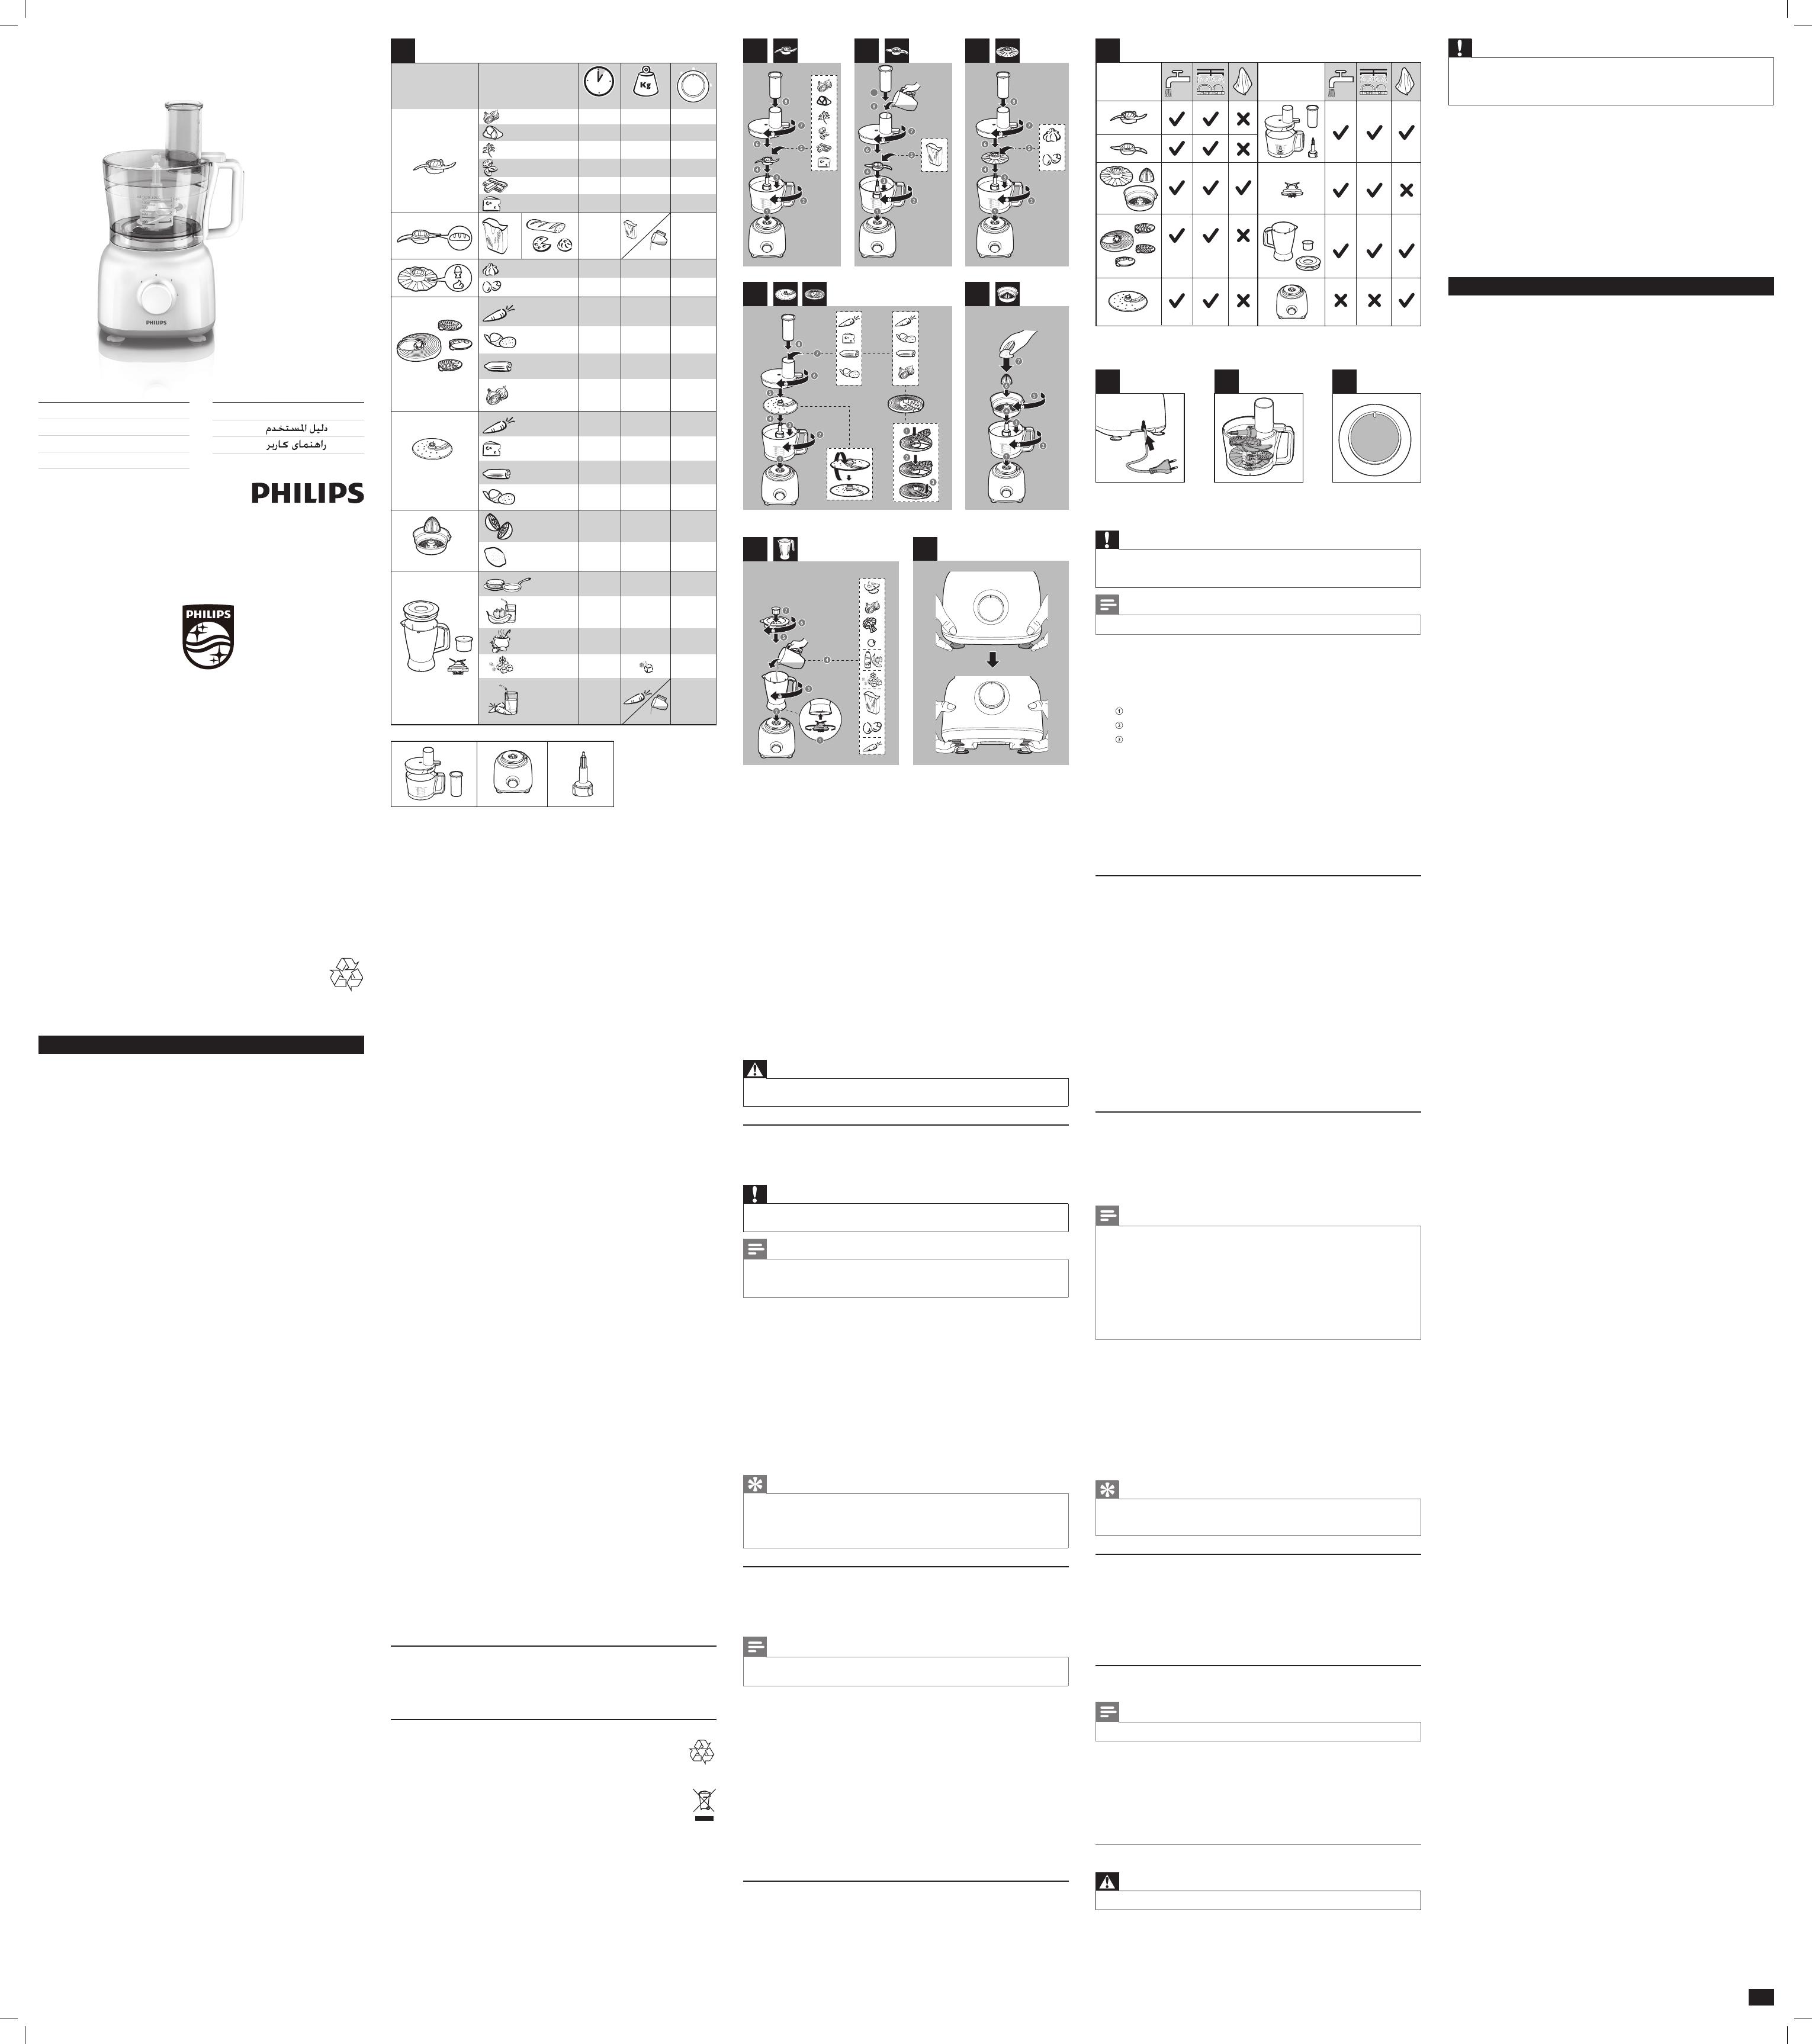
Before you start, make sure you assemble according to Fig. 2.
You can use the blade unit to chop, mix, blend, or puree ingredients. You can also use it to
mix and blend cake batters.
Caution
• Do not use the blade unit to chop hard ingredients, like coffee beans, turmeric, nutmeg, and ice
cubes, as this may cause the blade to get blunt.
Note
• Do not let the appliance run too long when you chop (hard) cheese or chocolate. Otherwise these
ingredients become too hot, start to melt, and turn lumpy.
• Precut large pieces of food into pieces of approx. 3 x 3 x 3 cm.
1 Turn the the bowl clockwise to x it on the motor unit, and then put the tool holder in
the bowl.
» When the bowl is xed correctly, you hear a click.
2 Put the blade unit on the tool holder.
3 Put the ingredients in the bowl.
4 Put the lid on the bowl, and then turn the lid clockwise to x it.
» When the lid is assembled correctly, you hear a click and the lid is xed to the bowl
handle.
5 Put the pusher into the feeding tube.
6 Connect the power plug to the power supply.
7 Check the preparation time, the maximum amount and the speed setting required for
the ingredients in Table 1. Turn the knob to the desired speed setting.
8 After use, turn the knob to 0, and then unplug the appliance.
Tip
• When you chop onions, turn the knob to P a few times to prevent the onions from becoming too
nely chopped.
• How to remove food that sticks to the blade or to the inside of the bowl? 1. Switch off the appliance,
and then unplug it. 2. Remove the lid from the bowl. 3. Remove the ingredients from the blade or
from the side of the bowl with a spatula.
Kneading accessory
Before you start, make sure you assemble according to Fig. 3.
You can use the kneading accessory to knead yeast dough for bread and pizzas. You need to
adjust the amount of liquid to form the dough according to the humidity and temperature
condition.
Note
• Do not use the kneading accessory to blend cake batters. Use the blade unit for this job.
• Always put the kneading accessory in the bowl before you add the ingredients.
1 Turn the the bowl clockwise to x it on the motor unit, and then put the tool holder in
the bowl.
» When the bowl is xed correctly, you hear a click.
2 Put the kneading accessory on the tool holder.
3 Put the ingredients in the bowl.
4 Put the lid on the bowl, and then turn the lid clockwise to x it.
» When the lid is assembled correctly, you hear a click and the lid is xed to the bowl
handle.
5 Put the pusher into the feeding tube.
6 Connect the power plug to the power supply.
7 Turn the knob to the 1 position.
8 Check the preparation time, the maximum amount and the speed setting required for
the ingredients in Table 1.
9 After use, turn the knob to 0, and then unplug the appliance.
Discs and Inserts
Before you start, make sure you pick your desired disc from following and assemble
according to Fig. 4 and Fig. 5.
• Emulsifying disc
• Insert for ne (HR7627 and HR7628 only)
• Insert for granulating (HR7627 and HR7628 only)
• Reversible slicing / shredding disc (coarse) (HR7629 only)
Caution
• Be careful when you handle the slicing blade of disc. It has a very sharp cutting edge.
• Never use the disc to process hard ingredients, like ice cubes.
• Do not exert too much pressure on the pusher when you press ingredients into the feed tube.
Note
• Precut large ingredients into chunks that t in the feeding tube.
1 Turn the bowl clockwise to x it on the motor unit, and then put the tool holder in the
bowl.
» When the bowl is xed correctly, you hear a click.
2 Put the disc on the shaft. For inserts (HR7627 and HR7628 only), place an insert in the
insert holder as indicated below, then place the insert holder with insert on the shaft.
Place the opening of the insert over the shaft of the insert holder.
Push the opening of the insert over the projection on the shaft.
Press the insert onto the insert holder until it locks in position with a click.
3 Put the lid on the bowl, and then turn the lid clockwise to x it.
» When the lid is assembled correctly, you hear a click and the lid is xed to the bowl
handle.
4 Put the ingredients into the feeding tube with the pusher. Fill the feeding tube evenly for
the best results. When you have to process a large amount of ingredients, process small
batches and empty the bowl between batches.
5 Connect the power plug to the power supply.
6 Check the preparation time, the maximum amount and the speed setting required for
the ingredients in Table 1. Select the speed that matches the color of the accessory.
7 After use, turn the speed selector to 0, and then unplug the appliance.
Citrus press (HR7629 only)
Before you start, make sure you assemble according to Fig. 6.
You can use the citrus press to squeeze citrus fruits.
1 Turn the the bowl clockwise to x it on the motor unit, and then put the tool holder in
the bowl.
» When the bowl is xed correctly, you can hear a click .
2 Put the sieve for citrus press on the tool holder in the bowl. Make sure that the
projection on the sieve is locked in the slot of the bowl handle.
» When the sieve is xed correctly, you can hear a click .
3 Put the cone on the sieve.
4 Connect the power plug to the power supply.
5 Check the maximum amount required for the ingredients in Table 1. Turn the knob to
speed 1.
» The cone starts rotating.
6 Press the citrus fruit onto the cone.
7 Stop pressing from time to time to remove the pulp from the sieve. When you nish
pressing or when you want to remove the pulp, turn the knob to 0 and remove the bowl
from the appliance with the sieve and cone on it.
Blender (HR7628 and HR7629 only)
Before you start, make sure you assemble according to Fig. 7.
The blender is intended for:
• Blending uids, like dairy products, sauces, fruit juices, soups, mixed drinks, and shakes.
• Mixing soft ingredients, like pancake batter.
• Pureeing cooked ingredients, like baby food.
• Crushing ice.
Note
• Do not exert too much pressure on the handle of the blender jar.
• Never open the lid to put your hand or any object in the jar while the blender is running.
• Always assemble the sealing ring onto the blade unit before you attach the blade unit to the blender jar.
• To add liquid ingredients during processing, pour them into the blender jar through the feeding hole.
• Precut solid ingredients into small pieces before you process them.
• If you want to prepare a large quantity, process small batches of ingredients instead of a large
quantity at once.
• To avoid spillage: When you process a liquid that is hot or tends to foam (for example, milk), do not
put more than 1 liter of liquid in the blender jar.
• If you are not satised with the result, switch off the appliance and stir the ingredients with a spatula.
Remove some of the contents to process a smaller quantity or add some liquid.
1 Turn the blade unit on the blender jar.
2 Place the blender jar on the motor unit and turn it clockwise to x it.
» When the jar is xed correctly, you hear a click.
3 Put the ingredients in the blender jar within the maximum level indication.
4 Place the lid on the blender jar, and then turn it clockwise to x it.
5 Connect the power plug to the power supply.
6 Check the preparation time, the maximum amount and the speed setting required for
the ingredients in Table 1. Turn the knob to the desired speed setting. To crush ice, turn
the knob to P. Press the button again to stop.
7 After use, turn the knob to 0, and then unplug the appliance.
Tip
• How to remove the ingredients that stick to the side of the blender jar? 1. Switch off the appliance,
and then unplug it. 2. Open the lid, and then use a spatula to remove the ingredients from the side of
the jar. 3. Keep the spatula at least 2 cm from the blade.
Mini Chopper accessory (Optional)
You can order a mini chopper (under service code number 9965 100 57198/9965 100 52997)
from your Philips dealer or a Philips service center as an extra accessory.
You can use the mini chopper to chop coffee beans, peppercorns, nuts, herbs etc. Use speed
2 and process for 30 sec. Do not exceed the maximum level indicated on the mini chopper.
For best results when processing beef, please use refrigerated beef cubes. Use max of 100g
beef cubes at speed P for 5 sec.
Quick cleaning
You can follow the following steps to clean the food processor bowl and blender jar easier.
Note
• Make sure that the blade is assembled in the bowl if you clean the food processor bowl.
1 Pour lukewarm water (not more than 0.5 liters) and a few drops of washing-up liquid
into the food processor bowl or blender jar.
2 Place the lid on the food processor bowl or blender jar, and then turn it clockwise to x it.
3 Turn the knob to P. Let the appliance run for 30 seconds or until the food processor
bowl or blender jar is clean.
4 After use, turn the knob to 0, and then unplug the appliance.
5 Detach the blender jar or food processor bowl and rinse it with clean water.
Cleaning and storage
Warning
• Before you clean the appliance, unplug it.
5
6
4 min 1 kg 1
20 sec 500 g1
30 sec 500 g
1
30 sec 200 g
1
30 sec 2 pcs
1
30 sec 500 g
1
(HR7629)
(HR7629)
1 min1
1 min1
1 min1
P
P x 9
(HR7628, HR7629)
6 x
1
(MAX)
(MAX)
(MAX)
(MAX)
5 x 1 sec 500 gP
5 x 1 sec 500 g P/2
30 sec 50 gP
60 sec 250 g2
45 sec 250 g2
30 sec 200 g2
2-3 min 500 g
360 ml
350 ml
4 pcs
1
1
1
30 sec
500
g1
30 sec 500 g1
(HR7627, HR7628)
60-180 sec
60-180 sec
P
0
1
2
30 sec 300 g1
400 g
3 min
600 ml
2
30 sec 2 pcs 1
NL Gebruiksaanwijzing
AR
FA
EN User manual
DE Benutzerhandbuch
FR Mode d’emploi
IT Manuale utente
Caution
• Make sure that the cutting edges of the blades and discs do not come into contact with hard objects.
This may cause the blade to get blunt.
• The cutting edges are sharp. Be careful when you clean the blade unit of the food processor, the
blade unit of the blender and the discs.
1 Clean the motor unit with a moist cloth.
2 Clean the other parts in hot water (< 60ºC) with some washing-up liquid or in a
dishwasher.
3 Store the product in a dry place.
4 Guarantee and service
If you have a problem, need service, or need information, see www.philips.com/support or
contact the Philips Consumer Care Center in your country. The phone number is in the
worldwide guarantee leaet. If there is no Consumer Care Center in your country, go to
your local Philips dealer.
Deutsch
1 Wichtig!
Herzlichen Glückwunsch zu Ihrem Kauf und willkommen bei Philips! Um den Support, den
Philips bietet, vollständig zu nutzen, registrieren Sie Ihr Produkt unter
www.philips.com/welcome.
Lesen Sie diese Bedienungsanleitung vor dem Gebrauch des Geräts aufmerksam durch und
bewahren Sie sie für eine spätere Verwendung auf.
Achtung!
• Tauchen Sie die Motoreinheit niemals in Wasser.
Spülen Sie sie auch nicht unter ießendem Wasser
ab.
Warnung
• Verwenden Sie nie Ihre Finger oder einen
Gegenstand, um Zutaten in die Einfüllöffnung zu
schieben, während das Gerät läuft. Verwenden Sie
ausschließlich den Stopfer.
• Bevor Sie das Gerät an eine Steckdose anschließen,
überprüfen Sie, ob die auf der Unterseite des Geräts
angegebene Spannung mit der Netzspannung vor
Ort übereinstimmt.
• Um Gefährdungen zu vermeiden, sollten Sie das
Gerät nie an einen Zeitschalter anschließen.
• Verwenden Sie das Gerät nicht, wenn das Netzkabel,
der Stecker, die Schutzabdeckung, das drehende Sieb
oder andere Teile beschädigt sind oder sichtbare
Risse aufweisen.
• Ist das Netzkabel defekt, darf es nur von einem
Philips Service-Center, einer von Philips autorisierten
Werkstatt oder einer ähnlich qualizierten Person
durch ein Original-Ersatzkabel ausgetauscht werden,
um Gefährdungen zu vermeiden.
• Dieses Gerät sollte nicht von Kindern verwendet
werden. Halten Sie das Gerät und das Netzkabel
außerhalb der Reichweite von Kindern.
• Dieses Gerät kann von Personen mit verringerten
physischen, sensorischen oder psychischen
Fähigkeiten oder Mangel an Erfahrung und Kenntnis
verwendet werden, wenn sie bei der Verwendung
beaufsichtigt wurden oder Anweisung zum sicheren
Gebrauch des Geräts erhalten und die Gefahren
verstanden haben.
• Erlauben Sie Kindern zu ihrem Schutz nicht, mit dem
Gerät zu spielen.
• Lassen Sie das eingeschaltete Gerät niemals
unbeaufsichtigt.
• Wenn Zutaten innen am Mixbecher haften
bleiben, schalten Sie das Gerät aus, und ziehen
Sie den Stecker aus der Steckdose. Lösen Sie die
Zutaten dann mithilfe eines Teigschabers von der
Becherwand.
• Seien Sie vorsichtig, wenn Sie den Behälter leeren
oder die Scheiben, die Klinge und das Entsaftersieb
handhaben oder reinigen. Die Klingen sind sehr
scharf.
• Berühren Sie die Messer nicht, besonders wenn
das Gerät an das Stromnetz angeschlossen ist. Die
Messer sind sehr scharf.
• Wenn die Messer blockiert sind, ziehen Sie stets
den Netzstecker aus der Steckdose, bevor Sie die
blockierenden Zutaten entfernen.
• Seien Sie vorsichtig, wenn heiße Flüssigkeiten in die
Küchenmaschine oder den Mixer gegossen werden,
da diese durch unvermittelt auftretenden Dampf
herausspritzen können.
• Dieses Gerät ist nur für den Gebrauch im Haushalt
bestimmt.
Vorsicht
• Schalten Sie das Gerät nie durch Drehen des
Mixbechers, der Schüssel oder deren Deckel aus.
Stellen Sie zum Ausschalten des Geräts immer den
Geschwindigkeitsregler auf 0 oder OFF.
• Ziehen Sie nach Gebrauch sofort den Netzstecker
aus der Steckdose.
• Erst, wenn alle beweglichen Teile zum Stillstand
gekommen sind, das Gerät ausgeschaltet und der
Netzstecker gezogen wurde, sollten Sie den Deckel
abnehmen und Teile anfassen, die sich bei Gebrauch
bewegen.
• Schalten Sie das Gerät stets aus, und ziehen Sie den
Netzstecker bei längerem Stillstand und bevor Sie es
zusammensetzen, auseinandernehmen, reinigen und
Zubehör austauschen oder wenn Sie Teile anfassen,
die sich bei Gebrauch bewegen.
• Reinigen Sie vor dem ersten Gebrauch des Geräts
alle Teile, die mit Lebensmitteln in Kontakt kommen.
Befolgen Sie die Anweisungen, und halten Sie sich an
die Reinigungstabelle in der Bedienungsanleitung.
• Verwenden Sie niemals Zubehör oder Teile, die von
Drittherstellern stammen bzw. nicht von Philips
empfohlen werden. Wenn Sie diese(s) Zubehör
oder Teile verwenden, erlischt Ihre Garantie.
1/2
3140 035 28922
