SRF-V1BT [GB] 4-587-914-14(1)
Troubleshooting
Should any problems persist after
you have made the following checks,
consult your nearest Sony dealer.
General
Display is dim, or no indication is
displayed.
• The unit is being used in extremely
high or low temperatures or in a place
with excessive moisture.
The volume cannot be turned up
when the unit is powered by the
built-in battery.
• When the remaining battery level gets
low (when the battery icon is empty),
the maximum volume level is limited to
“22.” Charge the unit by connecting the
AC adaptor (supplied).
The volume level is low in the
“Bluetooth” function or the
“AUDIO IN” function compared with
the volume level when listening to
the radio.
• Adjust the volume on the connected
device.
The unit enters standby mode
automatically.
• By default, this unit is set to enter
standby mode automatically after
about 15 minutes of no operation or
audio signal output. See
“Auto power off” in “Setting Menu
Options” for details.
Radio
Very weak or interrupted sound, or
unsatisfactory reception.
• If you are in a building, listen near a
window.
• Extend the antenna and adjust the
length and the angle for best reception.
• If a mobile phone is placed close to the
unit, a loud noise may be heard from
the unit. Keep the phone away from
the unit.
A desired station cannot be received
when a preset button is pressed.
• Make sure you have selected the
desired band (FM or AM) before you
press the preset button. One station for
each band can be set to each button.
• You may have held down the preset
button to which the station was
assigned, causing the station to be
replaced by a new one. Assign the
desired station again.
• Preset buttons cannot be used when
the setting menu is displayed.
• If you have moved to another region,
assign the new station to a preset
button.
BLUETOOTH
There is no sound.
• Make sure that this unit is not too far
from the BLUETOOTH device, or that
this unit is not receiving interference
from a wireless LAN, another 2.4 GHz
wireless device, or a microwave oven.
• Check that the BLUETOOTH connection
was completed properly between this
unit and the BLUETOOTH device.
• Perform pairing again. (See
“Connecting with a BLUETOOTH
device.”)
• Keep away from metal objects or
surfaces.
• Make sure that the BLUETOOTH
function is activated on the
BLUETOOTH device.
The sound skips or the
correspondence distance is short.
• If a device that generates
electromagnetic radiation, such as a
wireless LAN, other BLUETOOTH
device(s), or a microwave oven is
nearby, move away if possible. Or use
the device and the unit away from such
sources.
• Remove any obstacle between this unit
and the device or move the device and
the unit away from the obstacle.
• Locate this unit and the device as close
to each other as possible.
• Re-position this unit.
• Try using the BLUETOOTH device in
another position.
A connection cannot be established.
• Depending on the device to be
connected, it may require some time to
start communication.
• Perform pairing again. (See steps 2 and
3 of “Connecting with a BLUETOOTH
device.”)
• To listen to music on a device that does
not have a BLUETOOTH function, such
as a PC without BLUETOOTH function,
connect the device to the AUDIO IN
jack on the unit. (See “Listening to
Music from an External Device” for
details.)
• A BLUETOOTH connection with two
BLUETOOTH devices cannot be
established at the same time.
Pairing fails.
• Bring the BLUETOOTH device closer to
the unit.
• Make sure that the BLUETOOTH
function is activated on the
BLUETOOTH device.
• If the BLUETOOTH connection cannot
be established after pairing is
completed, perform step 3 of
“Connecting with a BLUETOOTH
device.”
• Delete the model name of this unit
from the BLUETOOTH device and
perform pairing again. (See steps 2 and
3 of “Connecting with a BLUETOOTH
device.”)
Pairing using the NFC function fails.
• Try pairing manually. (See “Connecting
with a BLUETOOTH device.”) Some
NFC-compatible smartphones may not
be paired using the NFC function of this
unit, depending on the features or
specifications of the device.
• Relaunch “NFC Easy Connect” and move
the smartphone slowly over the
N-Mark.
• Check that the smartphone meets the
compatibility requirements. (See
“Compatible smartphones” in
“Connecting by One-touch (NFC).”)
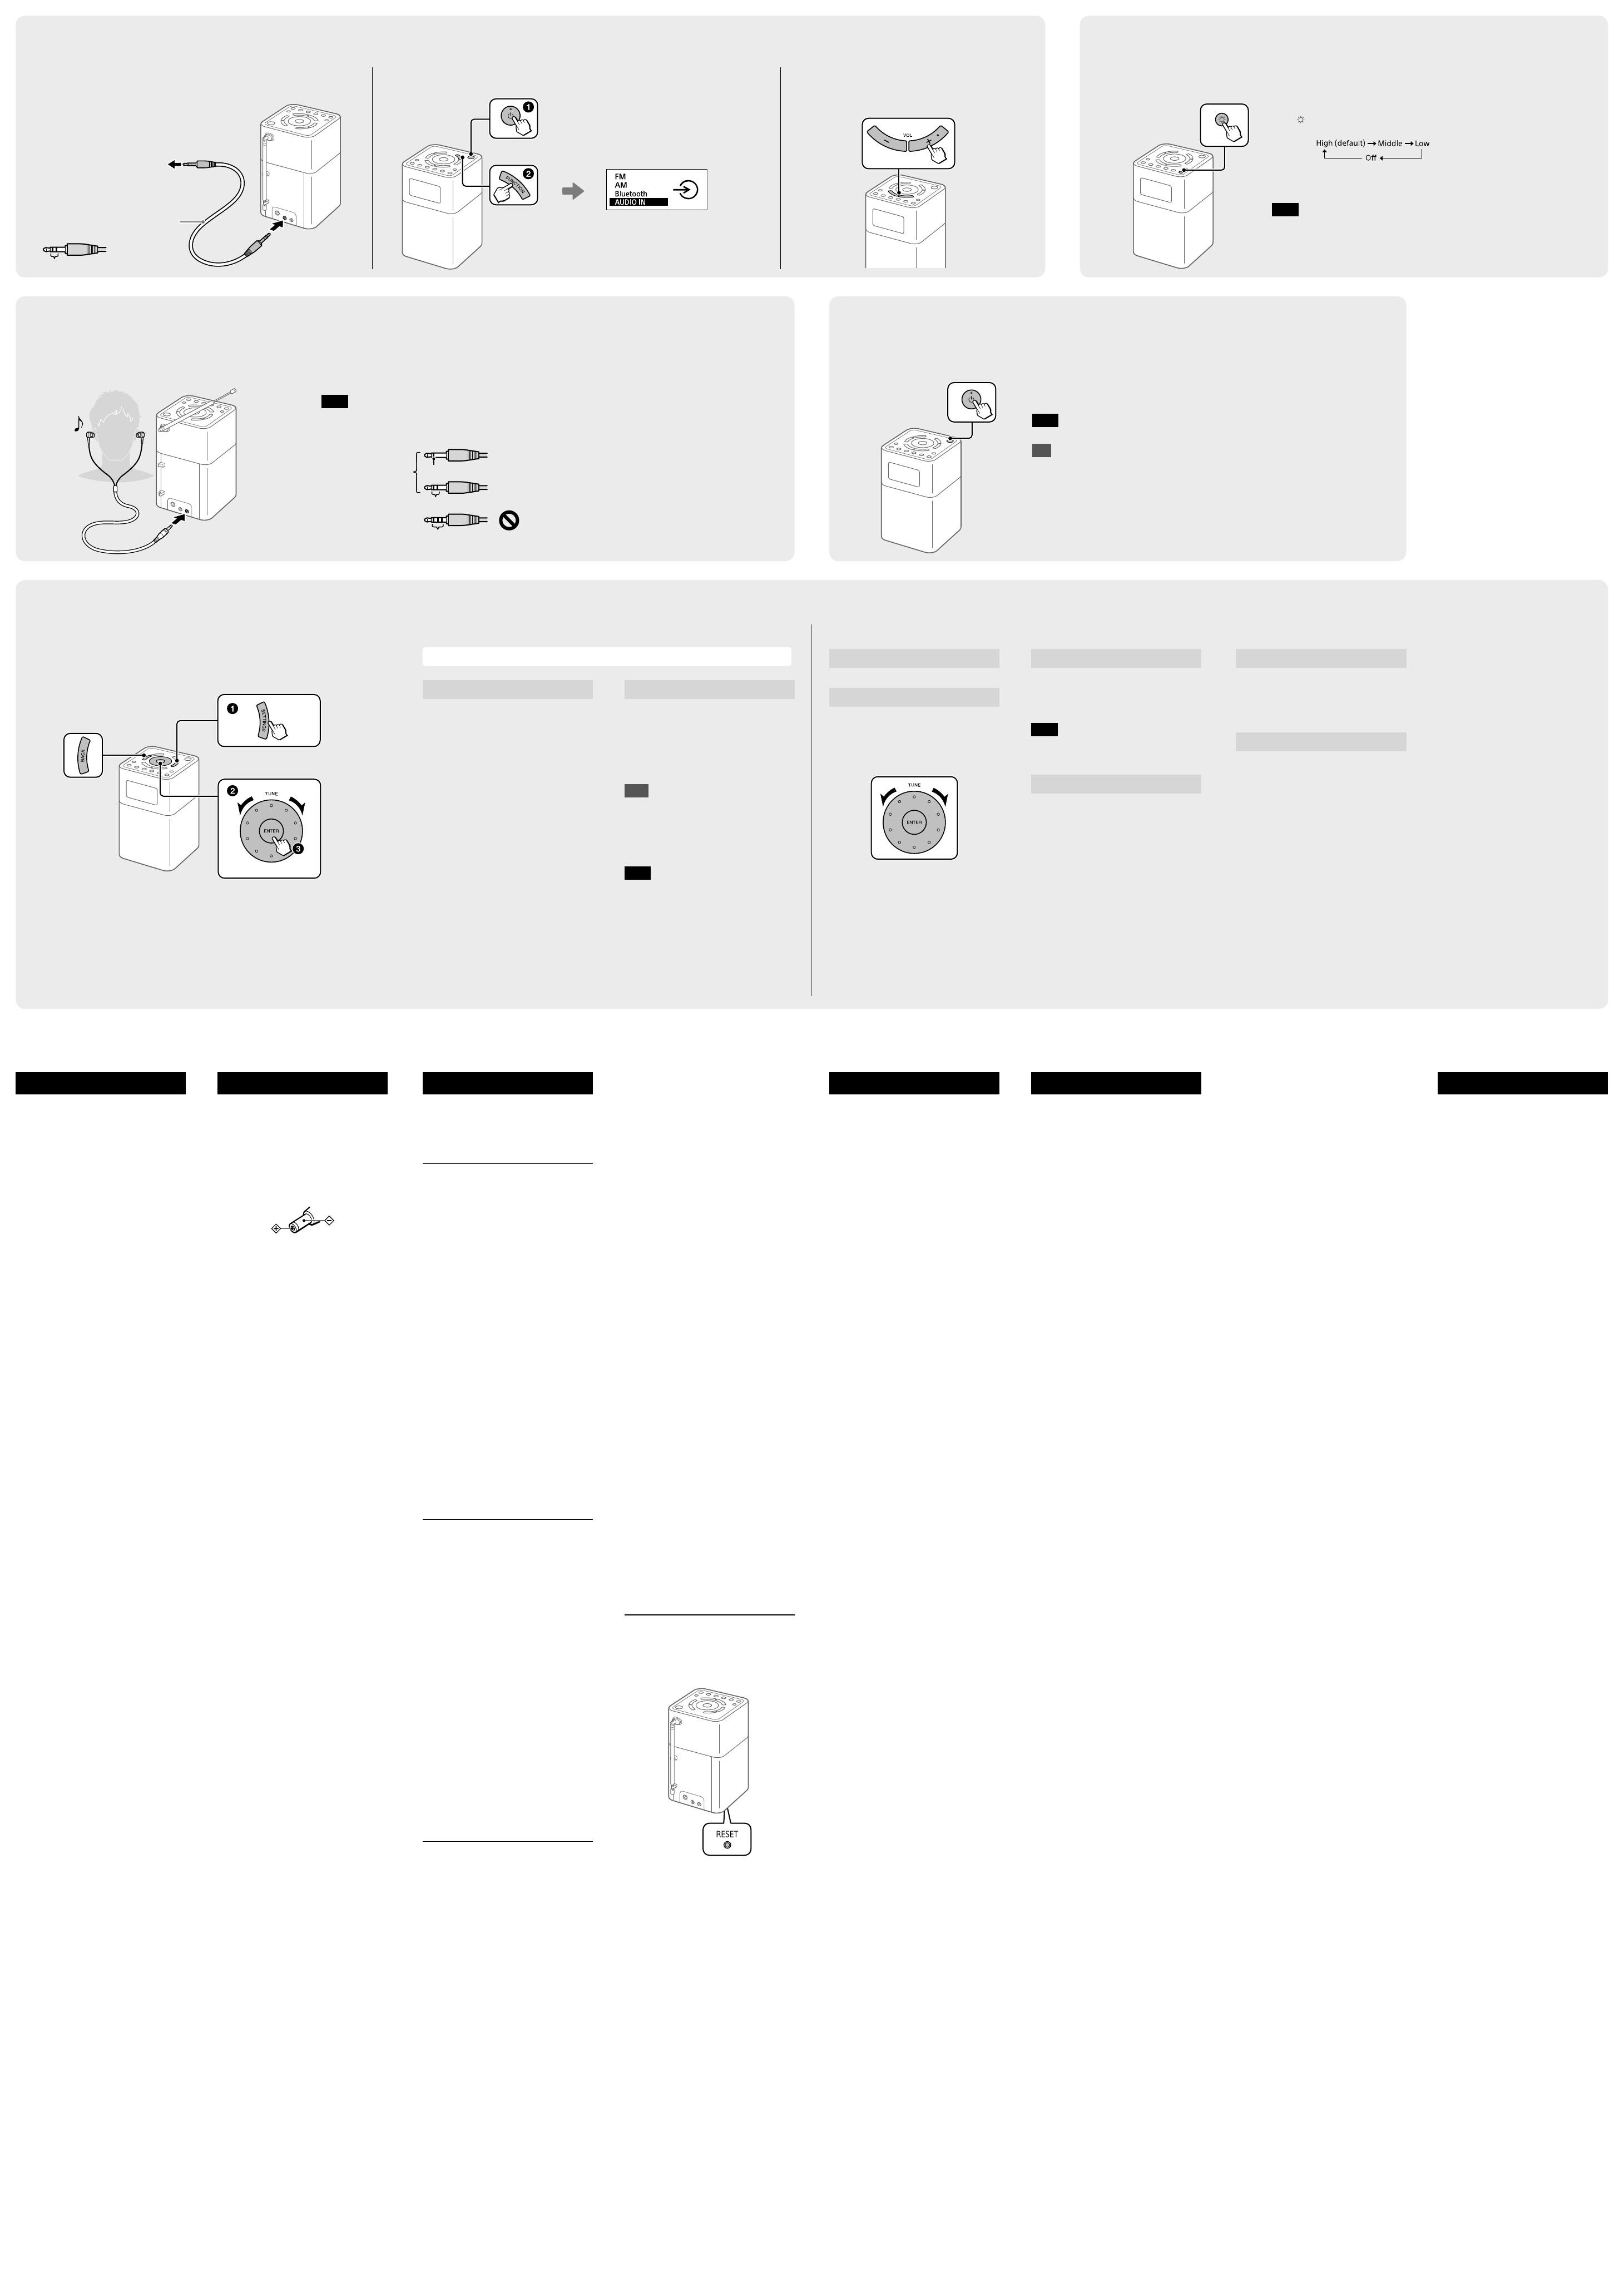
If the unit still does not operate
properly
Try pressing RESET on the bottom using a thin
rod. The unit will restart, retaining the
user-configured settings.
If maintenance service is performed
All user-configured settings, such as preset
radio stations, the sleep timer, and the clock,
may be initialized.
Please note your settings in case you need to
configure them again.
WARNING
Do not expose the appliance to
naked flame sources (for example,
lighted candles).
Excessive sound pressure from
earphones and headphones can
cause hearing loss.
Precautions
• Operate the unit only on the power
sources specified in “Specifications.”
For AC operation, use only the supplied
AC adaptor. Do not use any other type
of AC adaptor.
• Failure to use the supplied AC adaptor
may cause the unit to malfunction, as
the polarity of the plugs of other
manufacturers may be different.
• When operating the unit on the built-in
battery, it is recommended that you
remove the AC adaptor from the wall
outlet and the DC IN jack. Disconnect
the plug of the external power source
before operating the unit.
• Avoid exposure to temperature
extremes, direct sunlight, moisture,
sand, dust or mechanical shock. Never
leave in a car parked in the sun.
• Do not expose the unit to strong
impact or excessive force. A glass
material is used for the display in some
models. If the glass chips or cracks, it
may cause injury. In that case, stop
using the unit immediately and make
sure not to touch the damaged parts.
• Should any solid object or liquid fall
into the unit, disconnect the AC
adaptor, and have the unit checked by
a qualified personnel before operating
it any further.
• Since a strong magnet is used for the
speakers, keep personal credit cards
using magnetic coding or spring-
wound watches away from the unit to
prevent possible damage from the
magnetism.
• To clean the casing, use a soft dry cloth.
Do not use any type of solvent, such as
alcohol or benzine, which may damage
the finish.
• Do not operate the unit with wet hands
since it may cause a short circuit.
• Make sure not to splash water on the
unit. This unit is not waterproof.
• When you do not use the unit for a
long time, charge the battery every 6
months.
• Under certain circumstances, especially
when the air is very dry, it is not
uncommon to experience a discharge
of static electricity, or shock, when your
body comes in contact with another
object, in this case the ear buds
touching your ear(s). The energy from
this natural discharge is extremely
small and is not emitted by your
product but rather a natural
environmental occurrence.
• Listening with this unit at high volume
may affect your hearing. For traffic
safety, do not use this unit while driving
or cycling.
If you have any questions or
problems concerning your unit,
please consult your nearest Sony
dealer.
Messages
No preset
• No station in the selected band (FM or AM)
has been preset to the pressed button.
Specifications
Operating temperature range
5°C – 35°C
Time display
24-hour system or 12-hour system
Frequency range
FM: 87.5 MHz – 108 MHz
(0.05MHz step)
AM: 531 kHz – 1,602 kHz
(9kHz step)
Intermediate frequency
FM: 128 kHz
AM: 45 kHz
Speaker
Approx. 45 mm dia., 4 Ω, stereo
Audio power output
2.5 W + 2.5 W (when the unit is
powered by the supplied AC
adaptor)
1.5 W + 1.5 W (when the unit is
powered by the built-in battery)
BLUETOOTH
Communication System
BLUETOOTH Specification version
4.1
Output
BLUETOOTH Specification Power
Class 2
Maximum output power
3 dBm
Maximum communication range
Line of sight approx. 10 m*
1
Frequency band
2.4 GHz band
(2.4000 GHz - 2.4835GHz)
Modulation method
FHSS
Compatible BLUETOOTH Profiles*
2
A2DP
(Advanced Audio Distribution Profile)
AVRCP
(Audio/Video Remote Control Profile)
Supported Codec*
3
SBC*
4
Transmission range (A2DP)
20 Hz - 20,000 Hz
(Sampling frequency 44.1 kHz)
*
1
The actual range will vary depending on
factors such as obstacles between devices,
magnetic fields around a microwave oven,
static electricity, reception sensitivity,
antenna’s performance, operating system,
software application, etc.
*
2
BLUETOOTH standard profiles indicate the
purpose of BLUETOOTH communication
between devices.
*
3
Codec: Audio signal compression and
conversion format
*
4
Subband Codec
NFC
Operating frequency
13.56 MHz
Input
AUDIO IN jack
(ø 3.5mm, stereo mini jack)
Output
(headphones) jack
(ø 3.5 mm, stereo mini jack)
Power requirements
Built-in lithium-ion rechargeable
battery
Power
DC 5.8 V 2.0 A (using the supplied
AC adaptor connected to AC 100 V –
240 V, 50 Hz/60 Hz power supply) or,
using built-in lithium-ion battery
Basic Operations:
Setting Menu Options
Listening through Headphones
Connect headphones that have a stereo or monaural* mini plug (not supplied).
Listening to Music from an External Device
Note
Use headphones with a stereo (3-pole) or monaural (2-pole) mini plug. No sound is heard
when using other types of plugs.
Usage life of lithium-ion battery
BLUETOOTH: Approx. 32 hours*
1
FM: Approx. 31 hours*
1
AM: Approx. 15.5 hours*
1
*
1
When the specified music source is used and
the volume level of the unit is set to the
following
— BLUETOOTH: 20
— FM: 25
— AM: 30
BLUETOOTH: Approx. 15 hours*
2
FM: Approx. 25.5 hours*
2
AM: Approx. 15.5 hours*
2
*
2
When the specified music source is used and
the volume level of the unit is set to
maximum
Power consumption
At the standby mode
0.6W or less
(when the brightness of the display
is set high and the BLUETOOTH
standby mode is set to on)
At the off mode
0.2W or less
Dimensions
Approx. 106 mm 172 mm 117mm
(W/H/D) including projecting parts
and controls
Mass
Approx. 880 g
Supplied accessories
AC adaptor (AC-E5820) (1)
Warranty (1) (Europe only)
Design and specifications are
subject to change without notice.
License and Trademark Notice
• The BLUETOOTH word mark and
logos are owned by the Bluetooth
SIG, Inc. and any use of such marks
by Sony Corporation is under license.
• The N Mark is a trademark or
registered trademark of NFC Forum,
Inc. in the United States and in other
countries.
• Android™ and Google Play™ are
trademarks of Google Inc.
• Other trademarks and trade names
are those of their respective owners.
In this manual, ™ and
®
marks are
not specified.
1
Connect the external device to the unit.
2
Turn on the unit, and select the “AUDIO IN” function.
3
Start playback on the connected
device and adjust the volume.
Portable digital music
player, etc.
To AUDIO IN
To (headphones)
To go back to the upper menu level
Press BACK.
To exit the setting menu
Press SETTINGS again.
Press repeatedly.
The unit automatically switches
to the selected function in about
2 seconds.
Setting to Off Mode
You can set the unit to off mode to reduce the power consumption if you do not use the unit.
Press and hold for about 2 seconds to set to off mode.
The display turns off.
Note
The On Timer function is disabled in off mode.
Tip
When pressing while the unit is turned on, the unit enters standby mode. In standby mode,
the backlight of the display can be turned on if desired and the On Timer function is enabled.
* When listening to stereo sound using
monaural headphones, you will hear
sound from the left channel only.
1 ring
2 rings
Other types of plugs
cannot be used.
Compatible plug types
3 or more rings
Monaural* mini plug
Stereo mini plug
Bluetooth pairing
See “Connecting with a BLUETOOTH
device.”
On timer
See “Setting the On Timer.”
Sound
You can adjust the sound level.
Treble: Adjusts the level of high-
pitched sound.
Bass: Adjusts the level of low-pitched
sound.
BLUETOOTH options
BLUETOOTH options can be set when the “Bluetooth” function is selected.
Other options
Time
Time setting: Sets the clock. See
“Getting Started” for details.
12H/24H: Select the clock display
mode, 12-hour clock or 24-hour clock.
Note
The clock will be reset if the AC adaptor is
unplugged and the built-in battery is
completely exhausted.
Beep
Select “On” to activate the beep sound
when you operate the unit.
Bluetooth standby
When the BLUETOOTH standby mode
is set to “On,” the unit enters waiting
mode for a BLUETOOTH connection
even when the unit is in standby
mode. When making a BLUETOOTH
connection from a BLUETOOTH device,
the unit turns on automatically.
Tips
• Set the BLUETOOTH standby mode to “Off” to
reduce the power consumption when the
unit is in standby mode.
• The power indicator lights up in umber while
the unit is in standby mode, and when the
BLUETOOTH standby mode is turned on.
Note
If the AC adaptor is unplugged, the BLUETOOTH
standby mode is disabled.
Auto power off
When “Auto power off” is set to
“Enable (15min),” the unit enters
standby mode automatically in about
15 minutes if there is no operation or
audio signal output.
Initialize
Select “OK” to initialize the unit to the
factory default settings. All settings,
such as preset radio stations and the
pairing registration information, will be
deleted.
Setting the Brightness of the Display
Note
When the unit is powered by the built-in battery, the backlight of the display
turns off in about half a minute after operation.
Press repeatedly to select the desired brightness.
Audio connection cable without
resistor (not supplied)
2 rings
Stereo mini plug

