PowerBass STA-10 Owner's manual
- Category
- Car audio amplifiers
- Type
- Owner's manual
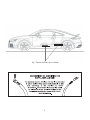
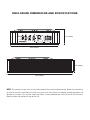
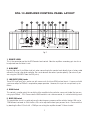
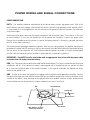
PowerBass STA-10: Experience exceptional bass with a built-in high-powered Class D amplifier, adjustable controls for sonic integration, and a remote subwoofer level control for convenient adjustments from the driver's seat.
PowerBass STA-10: Experience exceptional bass with a built-in high-powered Class D amplifier, adjustable controls for sonic integration, and a remote subwoofer level control for convenient adjustments from the driver's seat.


-
 1
1
-
 2
2
-
 3
3
-
 4
4
-
 5
5
-
 6
6
-
 7
7
-
 8
8
-
 9
9
-
 10
10
-
 11
11
-
 12
12
-
 13
13
-
 14
14
-
 15
15
-
 16
16
-
 17
17
-
 18
18
-
 19
19
-
 20
20


PowerBass STA-10 Owner's manual
- Category
- Car audio amplifiers
- Type
- Owner's manual
PowerBass STA-10: Experience exceptional bass with a built-in high-powered Class D amplifier, adjustable controls for sonic integration, and a remote subwoofer level control for convenient adjustments from the driver's seat.
Ask a question and I''ll find the answer in the document
Finding information in a document is now easier with AI
Related papers
-
PowerBass STA-8 Owner's manual
-
PowerBass PS-AWB121T Owner's manual
-
-
PowerBass PS-ADF110T Owner's manual
-
-
-
-
-
PowerBass BTA-8 Owner's manual
-
Other documents
-
MadBoy BOSS-10 Specification
-
Boss Audio BAB8 User manual
-
SSL USS500 User manual
-
Wet Sounds HT-AS-10 Owner's manual
-
AMC SUB200 User manual
-
 Boss Audio Systems BASS1500 Owner's manual
-
Cadence QSA-8.2 User manual
-
 Boss Audio Systems BPS80 User manual
-
 PYLE Audio PLBASS10 User manual
-


