American Standard 5020A65G.020 Installation guide
- Type
- Installation guide

TOP MOUNT
760237-100 Rev. A 6/17
Product names listed herein are trademarks of AS America, Inc.
© AS America, Inc. 2017
Thank you for selecting American Standard – the
benchmark of fine quality for over 100 years. To
ensure this product is installed properly, please read
these instructions carefully before you begin. (Certain
installations may require professional help.) Also be
sure your installation conforms to local codes.
NOTE: Pictures may not exactly depict toilet seat
and components.
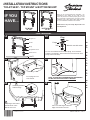
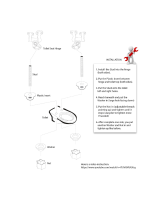
INSTALLATION INSTRUCTIONS
3A
1A
2A
TOILET SEAT -
TOP MOUNT & BOTTOM MOUNT
4A
Insert plugs into seat
holes in bowl.
5A
6A
Snap hinges with washer
pad into holes on the
bottom of the seat.
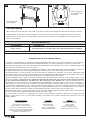
For ease of installation of black rubber plugs, insert steel bolt
(capture a few threads), and wet the lower area with some water
(soapy water works best).
NOTE: FLANGE MUST REMAIN ABOVE THE SURFACE.
DO NOT ALLOW PLUG TO FALL THROUGH!
Plug
Bolt
Flange
Bulb
Wet this area with water
S A V E FOR FU TURE US E
B
IF YOU
HAVE...
TOILET
TOP MOUNT
1A - 10A
BOTTOM MOUNT
1B - 9B
Hinge Cover
Screws
Hinge
Hinge Washer Pad
Rubber Screw
Hinge
Hinge
Washer
Pad
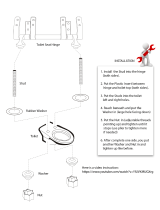
Install Hinge Washer
Pad into Hinge.
A
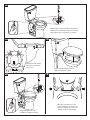
Place seat with hinges onto bowl.
Align seat with front of bowl.

760237-100 Rev. A 6/17
- 2 -
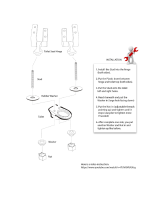
7A
Push down
together
Push ONLY until bulb
goes through.
Open the seat and cover. Push both inside
buttons to release seat and cover. Pull the seat
and cover upwards to take it off the hinges.
10A
Place Hinge Cover over the Hinges.
Place seat back on
bowl and click seat
onto hinges.
8A
BOTTOM MOUNT
2B
Install Hinge Washer Pad into Hinge.
1B
Put screws into seat hinge and tighten using a screwdriver.
9A
TOILET
Hinge Cover
Screws
Hinge
Hinge Washer Pad
Nut
Washer
Bowl Plug
Hinge
Hinge
Washer Pad

760237-100 Rev. A 6/17
- 3 -
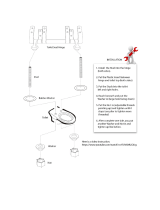
4B
3B
5B
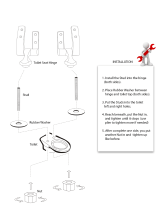
With the bolts installed, thread the winged nuts,
rubber washers and rubber plugs on to the bolts.
Finger tighten only so that hinge can still turn.
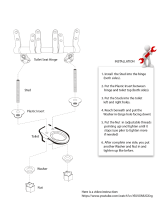
Open the seat and cover. Push
both inside buttons to release seat
and cover. Pull the seat and cover
upwards to take it off the hinges.
7B
6B
While holding the nut, use a
screwdriver to tighten the hinge.
Snap hinges with washer
into holes on the bottom
of the seat.
Place seat with hinges onto bowl.
Align seat with front of bowl.

AS AMERICA, INC. ONE YEAR LIMITED WARRANTY
If inspection of this AS America, Inc. (“American Standard”) plumbing product, within one year after its initial purchase, confirms that it
is defective in materials or workmanship, American Standard will repair or, at its option, exchange the product for a similar model.
This limited warranty applies only to the original purchaser and installation of these products. In the event of a limited warranty claim,
proof of purchase will be required—save sales receipt.
This limited warranty does not apply to local building code compliance. Since local building codes vary considerably, the purchaser of
this product should check with a local building or plumbing contractor to insure local code compliance before installation.
This limited warranty is void if the product has been moved from its initial place of installation; if it has been subjected to faulty
maintenance, abuse, misuse, accident or other damages; if it was not installed in accordance with American Standard's instructions; or
if it has been modified in a manner inconsistent with the product as shipped by American Standard.
American Standard's option to repair or exchange the product under this limited warranty does not cover any labor or other costs of
removal or installation. IN NO EVENT WILL AMERICAN STANDARD BE LIABLE FOR THE COST OF REPAIR OR REPLACEMENT
OF ANY INSTALLATION MATERIALS, INCLUDING BUT NOT LIMITED TO, TILES, MARBLE ETC. American Standard will not be
responsible for any other incidental or consequential damages attributable to a product defect or to the repair or exchange of a
defective product, all of which are expressly excluded from this limited warranty. This limited warranty does not cover any liability for
consequential or incidental damages, all of which are hereby expressly disclaimed, or the extension beyond the duration of this limited
warranty of any implied limited warranties, including those of merchantability or fitness for an intended purpose. (Some states or
provinces do not allow the exclusion or limitation of implied limited warranties, so this exclusion may not apply to you.)
This limited warranty gives you specific legal rights. You may have other statutory rights that vary from state to state or from province to
province, in which case this limited warranty does not affect such statutory rights.
For service under this warranty, it is suggested that a claim be made through the contractor or dealer from or through whom the
product was purchased, or that a service request (including a description of the product model and of the defect) be sent to the
following address:
In the United States:
American Standard Brands
1 Centennial Ave
Piscataway, New Jersey 08854
Attention: Director of Consumer Affairs
For residents of the United States, warranty
information may also be obtained by calling the
following toll free number: (800) 442-1902
www.americanstandard-us.com
In Canada:
AS Canada ULC
5900 Avebury Rd.
Mississauga, Ontario
Canada L5R 3M3
Toll Free: (800) 387-0369
www.americanstandard.ca
In Mexico:
Customer Service Manager
AS Maquila, S.A. de C.V.
Via Morelos #330
Col. Santa Clara
Ecatepec 55540 Edo. Mexico
www.americanstandard.com.mx
760237-100 Rev. A 6/17
- 4 -
REPLACEMENT KIT
*
Includes a set of seat bumpers and all hardware needed for installation of seats.
760234-100.XXX
*SEAT MOUNTING KIT: INCLUDES BOTH TOP & BOTTOM MOUNTING HARDWARE
PART NUMBER DESCRIPTION
9B
8B
Place Hinge Cover
over the Hinges.
Place seat back on
bowl and click seat
onto hinges.
Care and Cleaning
When cleaning your toilet seat wash it with a mild, soapy water: rinse the seat thoroughly with clear water and dry with a soft cloth.
Avoid detergents, disinfectants, or cleaning products in aerosol cans. Never use abrasive scouring powders on your seat. Some
bathroom chemicals and cosmetics may damage the seat’s finish. After installation, check the tightness of the bolts from time to
time to ensure a tight fit.
-
 1
1
-
 2
2
-
 3
3
-
 4
4


American Standard 5020A65G.020 Installation guide
- Type
- Installation guide
Ask a question and I''ll find the answer in the document
Finding information in a document is now easier with AI
Related papers
-
American Standard 5365110.020 Installation guide
-
-
-
-
-
American Standard 714AA151.020 Installation guide
-
American Standard 5350110.021 Installation guide
-
-
-
Other documents
-
 TOPSEAT 6TSTE9999CP 000 Installation guide
-
 TOPSEAT 6TSTR9999CP Operating instructions
-
Barclay Products SCSEL-BQ Installation guide
-
Mayfair 830CHSLB 000 User manual
-
Zurn Z5956SS-AM Installation guide
-
 TOPSEAT 6TSTR9999CP User manual
-
 TOPSEAT 6TS3E1900CP Installation guide
-
 TOPSEAT 6TSTE9999CP Operating instructions
-
 TOPSEAT 6TSTR9999SL Installation guide
-
 TOPSEAT 6TS2E2112SL Operating instructions


