(36216W\OXV&;
(36216W\OXV&;
EPSON Stylus CX3200 Parts
User Replaceable Parts
Accessories
Ink Cartridges
Media
Description Part number
Paper support 1211889
Cover, entrance 1154295
Ink cartridge Part number
Black T040120
Color T041020
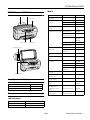
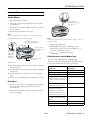
Paper support
Control panel
Scanner lid
Output tray
Transportation lock
Document table
Feeder guard
Paper name Size Part number
EPSON Premium Bright
White Paper
Letter (8.5 x 11 inches) S041586
EPSON Photo Quality Ink
Jet Paper
Letter (8.5 x 11 inches) S041062
A4 (8.3 x 11.7 inches) S041061
Legal (8.5 x 14 inches) S041067
EPSON Photo Quality Ink
Jet Cards
A6 (4.1 x 5.8 inches) S041054
EPSON Photo Paper or
EPSON Glossy Photo Paper
4 x 6 inches, with
perforated edges
S041134
S041671
4 x 6 inches, non-
perforated, borderless
S041458
Letter (8.5 x 11 inches) S041141
S041271
S041649
A4 (8.3 x 11.7 inches) S041140
Panoramic
(8.3 x 23 inches)
S041145
EPSON Matte Paper
Heavyweight
Letter (8.5 x 11 inches) S041257
8 x 10 inches,
borderless
S041467
EPSON Double-Sided Matte
Paper
Letter (8.5 x 11 inches) S041568
EPSON All Purpose Glossy
Paper
Letter (8.5 x 11 inches) S041654
EPSON Premium Glossy
Photo Paper
Letter (8.5 x 11 inches) S041286
S041667
4 x 6 inches, borderless S041682
5 x 7 inches, borderless S041464
8 x 10 inches,
borderless
S041465
EPSON Premium Semigloss
Photo Paper
Letter (8.5 x 11 inches) S041331
EPSON Ink Jet
Transparencies
Letter (8.5 x 11 inches) S041064
EPSON Photo Quality Self
Adhesive Sheets
A4 (8.3 x 11.7 inches) S041106
EPSON Iron-On Transfer
Paper
Letter (8.5 x 11 inches) S041153
S041155
EPSON Photo Stickers
®
Kit
(CD-ROM/stickers)
EPSON Photo Stickers
(refill)
A6 (4.1 x 5.8 inches)
A6 (4.1 x 5.8 inches)
S041144-KIT
S041144
EPSON Glossy Photo
Greeting Cards
Letter (8.5 x 11 inches);
perforated edges
S041606

(36216W\OXV&;
(36216W\OXV&;
Specifications
Printing
Printing method On-demand ink jet
Nozzle
configuration Monochrome (black) 144 nozzles
Color (cyan, magenta, yellow), 144 nozzles
(48 nozzles per color × 3)
Print resolution Up to 5760
×
720 dpi on various papers
using Photo RPM
Print direction Bidirectional with logic seeking
Control code ESC/P Raster
EPSON Remote
Paper
Note:
Since the quality of any particular brand or type of paper may be
changed by the manufacturer at any time, EPSON cannot guarantee
the quality of any non-EPSON brand or type of paper. Always test a
sample of paper stock before purchasing large quantities or printing
large jobs.
Single sheets
Size A4 (8.3 × 11.7 inches)
A5 (5.8 × 8.3 inches)
A6 (4.1 × 5.8 inches)
B5 (7.2 × 10.1 inches)
Letter (8.5 × 11 inches)
Half-letter (5.5 × 8.5 inches)
Legal (8.5 × 14 inches)
Executive (7.3 × 10.5 inches)
Paper type Plain bond paper, special paper distributed
by EPSON
Thickness
(plain bond paper) 0.003 to 0.004 inch (0.08 to 0.11 mm)
Weight
(plain bond paper) 17 lb (64 g/m²) to 24 lb (90 g/m²)
Envelopes
Size 132 × 220 (5.2 × 8.7 inches)
No. 10 (4.1 × 9.5 inches)
DL (4.3 × 8.7 inches)
C6 (4.5 × 6.4 inches)
Paper type Plain bond paper, air mail
Thickness 0.006 to 0.02 inch (0.16 to 0.52 mm)
Weight 12 lb (45 g/m²) to 20 lb (75 g/m²)
Ink Jet Cards
Size A6 (4.1 × 5.8 inches)
Paper type Special paper distributed by EPSON
Iron-On Transfer Paper, Transparencies, and Glossy Paper
Size Letter (8.5 × 11 inches)
Paper type Special paper distributed by EPSON
Self Adhesive Sheets
Size A4 (8.3 × 11.7 inches)
Paper type Special paper distributed by EPSON
Photo Paper and Glossy Photo Paper
Size Letter (8.5 × 11 inches)
4 × 6 inches (101.6 × 152.4 mm)
A4 (8.3 × 11.7 inches)
Panoramic (8.3 × 23 inches)
Paper type Special paper distributed by EPSON
Premium Glossy Photo Paper
Size Letter (8.5 × 11 inches)
4 × 6 inches (101.6 × 152.4 mm)
5 × 7 inches (127 × 178 mm)
8 × 10 inches (203 × 254 mm)
Paper type Special paper distributed by EPSON
Photo Stickers
Size A6 (4.1 × 5.8 inches) with 16 frames
Paper type Special paper distributed by EPSON
Matte Paper Heavyweight and Double-Sided Matte
Size Letter (8.5 × 11 inches)
8 × 10 inches (203 × 254 mm; Matte Paper
Heavyweight only)
Paper type Special paper distributed by EPSON
Note:
Poor quality paper may reduce the print quality and cause paper jams
or other problems. If you have print quality problems, switch to a
higher grade paper.
Do not load curled or folded paper.
Use paper under normal conditions:
Temperature: 59 to 77 °F (15 to 25 °C)
Humidity: 40 to 60% RH
Store Photo Quality Self Adhesive Sheets under the following
conditions:
Temperature: 59 to 86 °F (15 to 30 °C)
Humidity: 20 to 60% RH

(36216W\OXV&;
(36216W\OXV&;
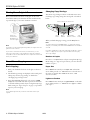
Printable Area
Single sheets or cards
Envelopes
A: The minimum top margin is 0.12 inch (3.0 mm).
B-L: The minimum left margin is 0.12 inch (3.0 mm).
B-R: The minimum right margin is 0.12 inch (3.0 mm).
C: The minimum bottom margin is 0.49 inch
(12.5 mm).
* You can extend the minimum bottom margin to
0.12 inch (3 mm), however print quality may decline
in the expanded area. Before printing large jobs using
an extended margin setting, print a single sheet to
confirm printout quality.
** When printing with the BorderFree or Borderless
feature, the print quality may drop in the top and
bottom areas of the printout, or the area may be
smeared.
Note:
Always load paper into the sheet feeder with the short edge first.
Load envelopes flap edge left with the flap side down.
Ink Cartridges
Black Ink Cartridge (T040120)
Color Black
Print capacity* 600 pages/A4 (ISO/IEC 10561 Letter
Pattern at 360 dpi, 5% duty)
Temperature Storage: –4 to 104 °F (–20 to 40 °C)
1 month at 104 °F (40 °C)
Transit: –22 to 140 °F (–30 to 60 °C)
1 month at 104 °F (40 °C)
120 hours at 140 °F (60 °C)
Freezing:** 3.2 °F (–16 °C)
Dimensions Width: 1.1 inches (28.1 mm)
Depth: 2.6 inches (66.85 mm)
Height: 1.5 inches (38.5 mm)
Color Ink Cartridge (T041020)
Color Cyan, magenta, and yellow
Print capacity* 300 pages (A4, 360 dpi, 5% duty
each color)
Temperature Storage: –4 to 104 °F (–20 to 40 °C)
1 month at 104 °F (40 °C)
Transit: –22 to 140 °F (–30 to 60 °C)
1 month at 104 °F (40 °C)
120 hours at 140 °F (60 °C)
Freezing:** –0.4 °F (–18 °C)
Dimensions Width: 1.7 inches (43.2 mm)
Depth: 2.6 inches (66.85 mm)
Height: 1.5 inches (38.5 mm)
* The figure given is based upon continuous printing after ink
cartridge replacement. The actual print capacity may vary,
depending on how often you use the print head cleaning function
and how often you turn this product on.
** Ink thaws and is usable after approximately 3 hours at 77 °F
(25 °C).
Caution:
EPSON recommends the use of genuine EPSON ink cartridges
only. Other products not manufactured by EPSON may cause
damage to this product not covered by EPSON's warranties.
Do not use an ink cartridge if the date on the package has expired.
Do not refill the ink cartridges. This product calculates the amount
of ink remaining using an IC chip on the ink cartridge. Even if the
cartridge is refilled, the amount of ink remaining will not be
recalculated by the IC chip and the amount of ink available for use
will not change.
A
B-L B-R
C
Normal BorderFree**

(36216W\OXV&;
(36216W\OXV&;
Scanning
Scanner type Flatbed color image scanner
Photoelectric
device Color CCD line sensor
Effective pixels 5,100 × 7,020 pixels at 600 dpi, 100%
Document size 8.5 × 11.7 inches (216 × 297 mm)
Letter or A4 size (reading area selectable
with software)
Scanning
resolution 600 dpi (main)
1200 dpi (sub)
Output resolution 50 to 4800 dpi (adjustable in one-dpi
increments), 7200 dpi, and 9600 dpi
Color separation RGB color filters on CCD
Image data 16 bits per pixel per color internal
8 bits per pixel per color external
Gamma correction User defined 1 level
Interface USB
Light source White cold cathode fluorescent lamp
Reliability 30,000 cycles of carriage movements
(main unit MCBF)
Lamp 10,000-hour life
Mechanical
Paper feed method Friction
Paper path Sheet feeder, rear entry
Sheet feeder
capacity About 100 sheets at 17 lb (64 g/m²)
Dimensions Width: 18.7 inches (475 mm)
Depth: 15.3 inches (389 mm)
Height: 9.25 inches (235 mm)
Weight 16.5 lb (7.5 kg) without the ink cartridges
Electrical
Input voltage range 99 to 132V
Rated frequency
range 50 to 60 Hz
Input frequency
range 49.5 to 60.5 Hz
Rated current 0.5 A
Power
consumption Approx. 22 W (ISO10560 Letter pattern)
Approx. 6.5 W in sleep mode
Approx. 0.3 W in power-off mode
Note:
Check the label on the back of this product for the voltage
information.
Environmental
Temperature Operation: 50 to 95 °F (10 to 35 °C)
Storage: –4 to 104 °F (–20 to 40 °C)
1 month at 104 °F (40 °C)
Transit:* –4 to 140 °F (–20 to 60 °C)
120 hours at 140 °F (60 °C)
Humidity Operation: 20 to 80% RH
Storage:* 5 to 85% RH
* Stored in shipping container without condensation
Standards and Approvals
Safety UL 1950
CSA C22.2 No.950
EMC FCC part 15 Subpart B class B
CSA C108.8 Class B

(36216W\OXV&;
(36216W\OXV&;
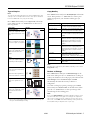
Loading Paper
Single Sheets
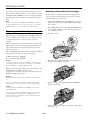
1. Flip the feeder guard forward.
2. Insert your paper against the right edge of the sheet feeder,
beneath the tab.
3. Pinch the left edge guide and slide it against the paper (but
not too tightly).
4. Flip the feeder guard back over the paper.
Note:
Make sure you didn’t insert the paper in front of the feeder guard.
5. Open the output tray and its extension.
Also be sure to:
❏
Load the printable side face-up. It’s often whiter or brighter
than the other side.
❏
Load letterhead or preprinted paper into the Stylus CX3200
top edge first.
❏
Don’t load paper above the tab or arrow on the left edge
guide.
❏
Load up to approximately 50 sheets of plain paper at a time.
Envelopes
1. Load up to 10 envelopes at a time, flap edge left, printable
side up against the right edge of the sheet feeder and
beneath the tab.
2. Pinch the left edge guide and slide it against the envelopes
(but not too tightly).
Note:
For best results, press each envelope flat before loading, or load one
envelope at a time.
3. Select the following settings:
❏
Plain paper
as the Type or Media Type setting
❏
The correct envelope size as the Size (Windows
®
) or
Paper Size (Macintosh
®
) setting
❏
Landscape
as the Orientation setting
Selecting the Correct Media Type
Select the correct
Type
(Windows) or
Media Type
(Macintosh) setting so your printer knows what kind of paper
you’re using and adjusts the ink coverage accordingly.
Slide the left
edge guide
against the
paper, but not
too tightly
Insert paper against the
right edge, beneath the tab
Open the output tray
and extension
Flip the feeder
guard back over
the paper
For this paper . . .
Select this Type or Media
Type setting . . .
Plain paper sheets or envelopes Plain paper
EPSON Premium Bright White Paper Bright White Paper
EPSON Iron-On Transfer Paper 360 dpi Ink Jet Paper
EPSON Photo Quality Ink Jet Paper
EPSON Photo Quality Ink Jet Cards
EPSON Photo Quality Self Adhesive
Sheets
Photo Quality Ink Jet Paper
EPSON Matte Paper Heavyweight
EPSON Double-Sided Matte Paper
Matte Paper - Heavyweight
EPSON Photo Paper
EPSON Glossy Photo Paper
EPSON All Purpose Glossy Paper
EPSON Photo Quality Glossy Paper
EPSON Glossy Photo Greeting Cards
Glossy Photo Paper
EPSON Premium Glossy Photo Paper
EPSON Premium Semigloss Photo
Paper
Premium Glossy Photo Paper
EPSON Photo Stickers Photo Quality Glossy Film
EPSON Ink Jet Transparencies Ink Jet Transparencies
Load envelopes
printable side up, and
flap edge left

(36216W\OXV&;
(36216W\OXV&;
Placing Your Original Document
Place your document face-down on the glass, in the corner
shown below. Move your document about 0.1 inch from the
top and side edge so your entire document is scanned.
Note:
If you place your document against the guides, the edges next to the
guides won’t be scanned.
If you need to scan a thick document, such as a book, you can
remove the scanner lid to scan. Gently press down the original to
keep it flat on the document table. Be sure to replace the scanner lid
when you’re finished.
Stand-Alone Copying
Basic Copying
1. Place your document face-down on the glass, as shown to
the left.
2. The default copy settings are displayed on the control panel.
Change any necessary copy settings, as described in
“Changing Copy Settings” below.
3. Press the
Color Copy
button (for color copies) or
B&W
Copy
button (for black and white copies). Your document
is scanned and then printed. If you’re using the
2-up
Copy
Mode setting (see “Type of Copies” on page 7), repeat these
steps for your second page.
Note:
Your copied image size may not be the exact same size as your
original.
Changing Copy Settings
The current copy settings are shown on the LCD screen. You
can change copy settings using the control panel, as described
below.
When you finish changing a setting, press the
Stop
button.
Note:
To clear a setting, press the
Reset
button. To clear all the setting
changes you’ve made, press and hold the
Reset
button for at least 3
seconds.
If you’ll be changing the Copy mode setting (as described in “Type of
Copies” on page 7), select your Copy mode before selecting any
other copy settings.
Number of Copies
Press the
+
or
-Copies
buttons. (If you’re using the
2-up
Copy
Mode setting (see “Type of Copies” below), you can’t select the
number of copies.)
Paper Size
Press a
Menu
button until you see
Paper size
on the LCD
screen. Then press the
+
or
-Value
buttons to select the size of
the paper you loaded, either
Letter
,
4×6
,
5×7
, or
A4
(8.3 × 11.7 inches).
Lighten or Darken
Press a
Menu
button until you see
Lighter/Darker
on the LCD
screen. Then press the
+
or
-Value
buttons to lighten or darken
your copies.
Move the
document in
about 0.1 inch
from the edges
Current settings are shown here
Menu
buttons
Copies/Value
buttons (+ and -)
Stop
button
Reset
button

(36216W\OXV&;
(36216W\OXV&;
Type of Copies
Note:
The Copy mode settings determine the options available with other
settings on the control panel. Not all of the other options described
here are available with every Copy mode setting.
Press a
Menu
button until you see
Copy mode
on the LCD
screen. Then press the
+
or
-Value
buttons to select one of
these copy modes:
* If you notice reduced print quality at the bottom of your copy, try
using the Standard Margins setting.
Copy Quality
Press a
Menu
button until you see
Quality&Paper
on the LCD
screen. Then press the
+
or
-Value
buttons to select a print
quality appropriate for your document and the paper you
loaded.
Note:
Not all of these settings may be available, depending on the current
Copy mode
setting.
Reduce or Enlarge
Press a
Menu
button until you see
Reduce/Enlarge
on the
LCD screen. Then press the
+
or
-Value
buttons to enlarge or
reduce your document to fit on the paper you loaded. Or select
Auto Fit Page
to have the EPSON Stylus CX3200
automatically determine the necessary reduction or
enlargement.
To reduce or enlarge by a precise percentage, press a
Menu
button until you see
Zoom In/Out
on the LCD screen. Then
press the
+
or
-Value
buttons to select a percentage of the
scanned image for the resulting print.
Note:
If you select
Auto Fit Page
as the Reduce/Enlarge setting to copy a
document with white or very light colored edges, the original size
may not be recognized correctly, creating an incorrect size copy. If
this occurs, select
100%
as the Reduce/Enlarge setting and use the
Zoom In/Out setting to adjust the size of your copy.
Copy mode Results
Standard Margins
Copies your original with an 0.55-
inch margin at the bottom of the
page
Border Free
Sizes your original as necessary
to fit to the edges of your paper*
Small Margins
Copies your original with only an
0.05-inch border around the
edges*
Mirror
Inverts your original horizontally
for printing on transfer paper
Repeat
Copies an image multiple times
on one sheet
(Works best with originals that
are business-card size or smaller)
2-up
Copies two originals onto one
sheet
Minimize Margins
Copies your original with only an
0.1-inch border around the
edges*
5
5
5
Quality&Paper setting Use when you’ve loaded. . .
Plain Paper–Econ Plain paper or Premium Bright White Paper
for quick copying with draft print quality
Plain Paper–Norm Plain paper or Premium Bright White Paper
for text copying with normal print quality
Plain Paper–Fine Plain paper or Premium Bright White Paper
for text and graphics copying with high print
quality
PQIJ Paper–Fine Photo Quality Ink Jet Paper, Cards, or Self-
Adhesive sheets for copying with high print
quality (also for Plain paper or Premium
Bright White Paper for improved image
quality)
PQIJ Paper–Photo Photo Quality Ink Jet Paper, Cards, or Self-
Adhesive sheets for copying with photo
print quality (also for Plain paper or Premium
Bright White Paper for improved image
quality)
Photo Paper Photo Paper, Glossy Photo Paper, Photo
Quality Glossy Paper, Glossy Photo
Greeting Cards, or All Purpose Glossy Paper
Premium Glossy Premium Glossy Photo Paper
Matt Paper HW Matte Paper Heavyweight or Double-Sided
Matte Paper

(36216W\OXV&;
(36216W\OXV&;
Using EPSON Smart Panel (Windows
and OS 8.6 to 9.x Only)
Smart Panel is an easy, step-by-step interface for scanning,
copying, printing, and more. You can use it to launch a variety
of programs on your computer, as described below, or use it
with the EPSON Stylus CX3200
Scan
button for automatic
scanning and copying.
To start Smart Panel, double-click the Smart Panel icon on
your desktop. Alternately, if you’re running Windows, click
Start > All Programs
or
Programs > EPSON Smart Panel >
EPSON Smart Panel
.
Note:
For details on using all the Smart Panel features, click the
?
button in
Smart Panel or see the on-screen Smart Panel User Guide.
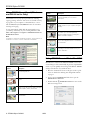
Using EPSON Scan to File in Mac OS X
EPSON Scan to File launches EPSON TWAIN and saves the
scanned images to files automatically. It generates sequential file
names so you can quickly scan an image with different TWAIN
settings and select the one you like the most.
1. Place the document face-down on the glass, in the top, left
corner as described in “Placing Your Original Document”
on page 6.
2. Open your OS X
Applications
folder, then open the
EPSON Scan to File
folder.
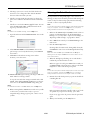
3. Double-click the
EPSON Scan to File
icon. You see the
File Save Settings screen:
Smart Panel
options Description
Scan to Web
Scans an image and uploads it to EPSON’s
photo-sharing web site.
Photo Print
Scans and prints photos in various sizes and
layouts.
Scan for Creativity
Scans a photo into ArcSoft
TM
PhotoImpression
TM
where you can edit, retouch, enhance, and print
it with templates, frames, and borders.
Scan to File
Scans an image or document directly to a file on
your hard drive.
Copy
Scans and prints an image or document with the
power and flexibility of a conventional
photocopier.
Scan to OCR
Scans text documents and converts them into
editable text files on your computer with great
accuracy.
Scan to E-mail
Scans an image or document and attaches it to
an e-mail so you can send it right away.
(Requires a MAPI-compliant e-mail program.
AOL
®
is not MAPI-compliant.)
Scan to Application
Scans and image or document and lets you
choose which program it launches for handling
the scanned file.
Copy to Fax
When you install your own fax software, scans
your image or document and faxes it to your
chosen destination.
Smart Panel
options Description

(36216W\OXV&;
(36216W\OXV&;
4. The images you scan are saved to the folder listed in the
Location box. To change the folder, click the
Choose
button and select the folder you want.
5. The files are named with the prefix
img
. To change the
prefix, enter a different three-character name in the Prefix
box.
6. The files are saved in the
JPEG (*.jpg)
file format. You can
select the TIFF, Multi-TIFF, or PICT format from the
Type drop-down menu instead.
Note:
For details on the available settings, click the
Help
button.
7. Open the File menu and click
Select Scanner
. You see this
window:
8. Select
EPSON TWAIN 5
and click
Select
. (You need to
perform steps 7 and 8 only the first time you run EPSON
Scan to File.)
9. Click
Next
on the File Save Settings screen. After a
moment, you see this screen:
10. EPSON TWAIN begins scanning your image in Full Auto
Mode. Wait for scanning to finish.
To stop the scan and select settings in manual mode, click
Cancel
. Then click the
Manual mode
button on the next
screen. You see the EPSON TWAIN settings dialog box.
Note:
For detailed information on EPSON TWAIN, click the
Help
button.
11. When scanning finishes, EPSON Scan to File saves your file
to the location you selected. It’s ready to open in a
compatible image editing program, print, e-mail, or use as
you like.
Cleaning the Print Head
If your printouts are unexpectedly light, or dots or lines are
missing, you may need to clean the print head. This unclogs the
nozzles so they can deliver ink properly. Print head cleaning
uses ink, so clean it only if quality declines.
Note:
You can also use a printer software utility to clean the print head right
from your computer. Select the
?
or
Help
button on your printer
settings window for instructions running the utility.
1. Make sure the EPSON Stylus CX3200 is turned on but not
printing, and the
Error
light is off. (If the
Error
light is
flashing or on, you may need to replace an ink cartridge; see
“Replacing an Ink Cartridge” on page 10 for details.)
2. Press a
Menu
button until you see
Head Cleaning
on the
LCD screen.
3. Press the
Color Copy
button.
Cleaning takes about 30 seconds, during which the Stylus
CX3200 makes some noise and the
On
light flashes briefly.
Caution:
Never turn off the EPSON Stylus CX3200 while the
On
light is
flashing, unless the Stylus CX3200 hasn’t moved or made noise for
more than 5 minutes.
4. When the
On
light stops flashing, run a nozzle check to
confirm the print head nozzles are clean.
Make sure paper is loaded, press a
Menu
button until you
see
Nozzle Check
on the LCD screen, and press the
Color
Copy
button. The nozzle check pattern prints.
Note:
You can also use a printer software utility to print a nozzle check right
from your computer. Select the
?
or
Help
button on your printer
settings window for instructions running the nozzle check utility.
5. Examine the nozzle check pattern you print. It should look
something like this:
Each staggered line should be complete, with no gaps in the
dot pattern. If your printout looks okay, you’re done.
If you see any gaps in the dot pattern, clean the print head
again.
6. When you’re finished, press the
Stop
button.

(36216W\OXV&;
(36216W\OXV&;
If you don’t see any improvement after cleaning three or four
times, check the solutions in the User’s Guide. You can also turn
the EPSON Stylus CX3200 off and wait overnight—this allows
any dried ink to soften—and then try cleaning the print head
again.
Note:
When you don’t turn on your EPSON Stylus CX3200 for a long time,
the print quality can decline. It’s a good idea to turn on your Stylus
CX3200 at least once a month to maintain good print quality.
Replacing an Ink Cartridge
If the
Error
light on the EPSON Stylus CX3200 is flashing and
you see an ink low or ink out message on the LCD screen and
your computer monitor, you need to replace one of the
cartridges.
When a cartridge is more than six months old, you may need to
replace it if printouts don’t look their best. If the quality doesn’t
improve after cleaning and aligning the print head, you can
replace the cartridge.
Use these EPSON ink cartridges within six months of installing
them and before the expiration date on the package:
❏
Black ink cartridge: T040120
❏
Color ink cartridge: T041020
Caution:
To ensure good results, use genuine EPSON ink cartridges and do
not refill them. Other products may cause damage to your EPSON
Stylus CX3200 not covered by EPSON’s warranty.
When you need new ink cartridges, contact your dealer, or call
the EPSON Store at (800) 873-7766 or visit
www.epsonstore.com (U.S. sales only). In Canada, please call
(800) 463-7766 for dealer referral.
Warning:
Keep ink cartridges out of the reach of children and do not drink the
ink.
If ink gets on your hands, wash them thoroughly with soap and
water. If ink gets in your eyes, flush them thoroughly with water.
Caution:
To avoid damaging the EPSON Stylus CX3200, never move the
print head by hand.
You cannot print if either ink cartridge is empty. Leave the empty
cartridge installed in the EPSON Stylus CX3200 until you have
obtained a replacement. Otherwise the ink remaining in the print
head nozzles may dry out.
Removing and Installing Ink Cartridges
Be sure you have a new ink cartridge before you begin. Once
you start the ink cartridge replacement procedure, you must
complete all the steps in one session.
1. Make sure the EPSON Stylus CX3200 is turned on and not
printing. The control panel tells you which ink cartridge is
low or empty.
2. Press a
Menu
button until you see
Change Cartridge
,
then
press the
Color Copy
button. The ink cartridges move to
the replacement position.
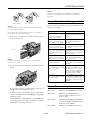
3. Lift up the scanner.
4. Pull up the ink cartridge clamp. (The color cartridge is on
the right and the black is on the left.)
5. Lift the cartridge out of the EPSON Stylus CX3200 and
dispose of it carefully.
6. Unwrap the new ink cartridge. Then remove only the yellow
tape seal on top.

(36216W\OXV&;
(36216W\OXV&;
Caution:
You must remove the yellow tape from the top of the cartridge or
you will permanently damage it.
Don’t touch the green circuit board on the back of the cartridge; you
may inhibit normal operation and printing.
7. Lower the new cartridge into its holder and rest the tabs on
the hooks in the back.
Caution:
Don’t place the cartridge under the hooks; you may damage the
clamp when you close it.
8. Press down firmly on the ink cartridge clamp until it snaps
in place.
If you need to replace the other ink cartridge, repeat steps 4
through 8 before continuing with step 9.
9. Carefully lower the scanner and press it down until it clicks
into place. The EPSON Stylus CX3200 begins charging the
ink delivery system.
The
On
light flashes and the EPSON Stylus CX3200 makes
noise. Charging takes about 30 seconds. When it’s finished,
the
On
light stops flashing and stays on.
Caution:
Never turn off the EPSON Stylus CX3200 while the
On
light is
flashing, unless it hasn’t moved or made noise for more than
5 minutes.
Control Panel Error Messages
Here is a list of control panel error messages and what you can
do when you see them.
Related Documentation
CPD-14881 EPSON Stylus CX3200 Start Here sheet
CPD-14882 EPSON Stylus CX3200 Macintosh
Software Installation/Requirements and
Notices booklet
CPD-14880 EPSON Stylus CX3200 CD-ROM with
User’s Guide (HTML) and EPSON Smart
Panel User’s Guide (HTML)
PL-CX3200 EPSON Stylus CX3200 Parts Price List
Black cartridge Color cartridge
Hooks
Error message Solution
No color or black ink cartridge – –
>
Press the Color Copy button to
install a new ink cartridge.
The indicated ink cartridge is not
installed. See page 9 to install a
cartridge.
Color or black ink out – – >
Press the Color Copy button to
begin replacing the ink cartridge.
The indicated ink cartridge is out of
ink. See page 9 to replace the
cartridge.
Ink cartridge error – – >
Press the Color Copy button to
begin replacing the ink cartridge.
There is something wrong with the
ink cartridge. See page 9 to replace
the cartridge.
Paper jam or misfeed – – >
Press the Color Copy button and
clear the paper jam by hand if
necessary.
Paper is jammed. Press the Color
Copy button to clear the jam.If it is
still jammed, check the solutions in
the User’s Guide.
Paper out – – >
Load paper in the sheet feeder
and press the Color Copy button.
Load paper in the sheet feeder,
then press the Color Copy button
to continue printing.
Scanner unit open – – >
Close the scanner unit.
Carefully close the scanner and
press it down until it clicks securely
into place.
Scanner error – – >
See your documentation and call
service if necessary.
Press the
On button to turn off the
EPSON Stylus CX3200. Unlock the
transportation lock, if necessary.
Turn on your Stylus CX3200 again. If
the error message still appears,
contact your dealer or EPSON.
Printer error – – >
See your documentation and call
service if necessary.
Press the On button to turn off the
EPSON Stylus CX3200, then press
it to turn it back on. If the message
still appears, contact your dealer or
EPSON.
-
 1
1
-
 2
2
-
 3
3
-
 4
4
-
 5
5
-
 6
6
-
 7
7
-
 8
8
-
 9
9
-
 10
10
-
 11
11


Ask a question and I''ll find the answer in the document
Finding information in a document is now easier with AI
Related papers
-
Epson WorkForce WF-3530 User manual
-
Epson Stylus CX3200 Operating instructions
-
Epson CX3200 User manual
-
-
-
-
Epson Stylus CX5400 User manual
-
-
-