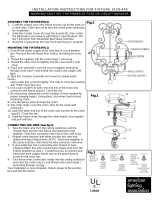
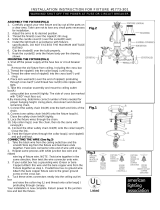
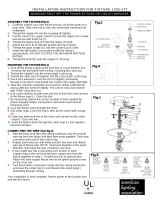
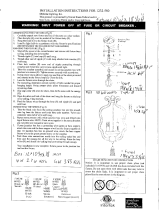
Livex Lighting 2167-07 is an outdoor ceiling light fixture that provides ample illumination for your outdoor space. It features a classic design with a black finish that complements various exterior décor styles. This fixture is easy to assemble and install, allowing you to enhance your outdoor ambiance quickly.
The Livex Lighting 2167-07 is crafted from durable materials to withstand outdoor elements, ensuring longevity. It accommodates multiple bulbs (not included), giving you the flexibility to customize the brightness according to your preference. The adjustable chain allows you to tailor the hanging height, accommodating different ceiling heights and creating the desired ambiance.

-
 1
1
Livex Lighting 2167-07 Installation guide
- Type
- Installation guide
- This manual is also suitable for
Livex Lighting 2167-07 is an outdoor ceiling light fixture that provides ample illumination for your outdoor space. It features a classic design with a black finish that complements various exterior décor styles. This fixture is easy to assemble and install, allowing you to enhance your outdoor ambiance quickly.
The Livex Lighting 2167-07 is crafted from durable materials to withstand outdoor elements, ensuring longevity. It accommodates multiple bulbs (not included), giving you the flexibility to customize the brightness according to your preference. The adjustable chain allows you to tailor the hanging height, accommodating different ceiling heights and creating the desired ambiance.
Ask a question and I''ll find the answer in the document
Finding information in a document is now easier with AI
Related papers
-
Livex Lighting 4037-91 Operating instructions
-
Livex Lighting 4398-02 Installation guide
-
Livex Lighting 6420-71 Operating instructions
-
Livex Lighting 4055-91 Operating instructions
-
Livex Lighting 20247-07 Installation guide
-
Livex Lighting 20237-04 Installation guide
-
Livex Lighting 20253-04 Installation guide
-
Livex Lighting 7302-91 Installation guide
-
Livex Lighting 50503-01 Operating instructions
-
Livex Lighting 2164-04 Operating instructions
Other documents
-
 Minka Lavery 3129-479 Installation guide
-
AF Lighting 7051-1H Installation guide
-
 Minka Lavery 1773-301 Installation guide
-
 Minka Lavery 3122-301 Installation guide
-
 Minka Lavery 3121-333 Installation guide
-
 Minka Lavery 1355-177 Installation guide
-
Triarch 39665 User manual
-
Filament Design CLI-MEN2183-07 Installation guide
-
 Minka Lavery 1232-580 Installation guide
-
Princess 142385 Datasheet


