
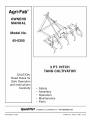
Agri-Fab ®
OWNERS
MANUAL
Model No.
45-0355
CAUTION
Read Rules for
Safe Operation
and Instructions
Carefully
3 PT. HITCH
TANG CULTIVATOR
• Safety
• Assembly
• Operation
• Maintenance
• Parts
SpeedEPart
the fastest way topurchase parts www.speedepart.com
FORM NO. 48973
PRINTED IN USA (REV. 4/04)

SAFETY RULES
Remember, any power equipment can cause injury if operated improperly or if the user does not understand how to
operate the equipment. Exercise caution at all times when using power equipment.
,_ LOOK FOR THIS SYMBOL TO POINT OUT
IMPORTANT SAFETY PRECAUTIONS. IT
MEANS - ATTENTION! BECOME ALERT!
YOUR SAFETY IS INVOLVED.
CAUTION: VEHICLE BRAKING AND
_ STABILITY MAY BE AFFECTED BY TH E
ADDITION OF AN ACCESSORY OR AN
ATTACHMENT. BE AWARE OF CHANG-
ING CONDITIONS ON SLOPES.
1. Read this owner's manual before using this equip-
ment.
2. Do not allow children to operate the tow vehicle or the
tine cultivator.
3. Do not allow adults to operate the tow vehicle or the
tine cultivator without proper instruction.
4. Do not allow anyone to ride on the tow vehicle or the
tine cultivator.
5. Before lowering the tine cultivator, make sure no one
is near the area of operation.
6. Lower the tine cultivator when leaving the tow
vehicle unattended.
CARTONCONTENTS
7. Wear appropriate footwear when using the tine culti-
vator. The tip of each tang on the cultivator is pointed
and sharp!
8. Tow vehicle braking and stability may be affected by
the tine cultivator. Drive slowly with the tine cultivator
in the transport position. Stay off steep slopes.
9. Stop and inspect the equipment for damage after
striking an object. Repair any damage before con-
tinuing operation.
10. Keep all nuts and bolts tight and be sure that the
equipment is in safe operating condition.
11. Before attaching or removing the tine cultivator, park
and lock the tow vehicle in a safe condition.
1. Cross Brace
2. Depth Gauge Bar (2)
3. Weight Bracket
4. Mast Extension Strap (2)
5. CultivatorTang (9)
6. Tang Support Strap (9)
7. Mast Side (2)
8. Mast Lift Strap (2)
9. Support Bracket
10. Cultivator Frame Assembly
11.Parts Package (see page 3)
1
\
7
4
/
lO

\
A
/
H
\
B
N
\
I 1
K
J
L
/
\
J
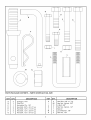
PARTS PACKAGE CONTENTS - PARTS SHOWN ACTUAL SIZE
KEY QTY. DESCRIPTION KEY
A 2 Category 1 Pin H
B 1 Pivot Pin I
C 1 Haircotter Pin, 1/8" J
D 2 Hex Bolt, 3/8" x 2-1/4" Lg. K
E 2 Hex Bolt, 1/2" x 1-1/2" Lg. L
F 2 Hex Bolt, 1/2" x 2-3/4" Lg. M
G 1 Hex Bolt, 1/2" x 3-1/2" Lg. N
QTY.
2
26
11
5
1
2
2
DESCRIPTION
Hex Bolt, 3/8" x 1" Lg.
Hex Nut, Nylock, 3/8"
U-Bolt, 3/8"
Hex Nut, Nylock, 1/2"
Spacer
Lock Washer, 7/8"
Hex Nut, 7/8"

ASSEMBLY
TOOLS REQUIRED FOR ASSEMBLY
(2) 3/4" Wrenches
(2) 9/1 6" Wrenches
(2) 1-1/8" Wrenches or Adjustable Wrenches
(1) 1-5/16" Wrench or 12" Adjustable Wrench
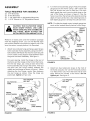
_ CAUTION: THE CULTIVATOR TANGS
HAVE SHARP POINTS. USE CARE
WHEN HANDLING AND ASSEMBLING
THE TANGS. WEAR GLOVES FOR
EXTRA PROTECTION AGAINST CUTS.
Remove all loose parts and the hardware package
from the shipping carton. Lay out and identify each
part and the hardware as shown on pages 2 and 3. Be
sure the carton is empty before it is discarded.
1 ,
Attach nine cultivator tangs and tang support straps
to the cultivator frame assembly using one 3/8" U-
bolt and two 3/8" Nylock hex nuts for each tang. Be
sure to install a tang support strap between each
tang and the frame assembly. See figure 1.
For even spacing, install five tangs on the rear of
the frame and four tangs on the front of the frame.
For the rear tangs, put a tang at each end of the
frame assembly and a tang in the center. Then put
the other two rear tangs midway between the
middle and end tangs as shown in figure 1. When
attaching the front tangs, center them between
the rear tangs as shown. Once the tangs are
positioned, tighten all hex nuts.
CULTIVATOR
TANG
318"NYLOCK
HEX NUT
6
TANG
SUPPORT
STRAP I
FRONT
(FOUR TANGS)
CULTIVATOR
FRAME ASSEMBLY
BACK
(FIVE TANGS)
FIGURE 1
2,
Turn the frame assembly upright. Attach two depth
gauge bars to the frame using a 3/8" U-bolt and
two 3/8" Nylock hex nuts for each bar. Put each
depth gauge bar next to each outside tang on the
rear of the frame as shown in figure 2. Use the
holes in each bar that will give the desired working
depth, if known at this time. Use matching holes in
both depth gauge bars to keep the cultivator level.
NOTE: For effective depth control a depth gauge bar
must not be located directly behind a front tang.
DEPTH
_GAUGE
BAR
WORKING
DEPTH
3/8"
U-BOLT I
\ i
3/8" NYLOCK
_ _] HEX NUT
GAUGE BAR
FIGURE 2
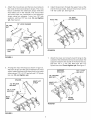
,
Attach two mast extension straps to the front of
the frame using two 1/2" x 2-3/4" hex bolts and two
1/2" Nylock hex nuts. Point the bent end of each
strap toward the outside of the frame. Do not
tighten yet. See figure 3.
MAST EXTENSION
STRAP (RIGHT
SIDE)
FIGURE 3

4. Attach the cross brace and the two mast sides to
the ends of the mast extension straps. The cross
brace is between the extension straps while the
mast sides are on the outside. The cross brace
and mast sides are connected to the extension
straps using two category 1 pins, two 7/8" lock
washers, and two 7/8" hex nuts. Do not tighten
yet. See figure 4.
7/8" LOCK WASHER
7/8"HUTHEX\
CROSS STRAP
BRACE
/
CATEGORY
1 PIN
MAST
SIDE
6. Install the pivot pin through the upper hole at the
end of the mast sides. Secure the pivot pin with a
1/8" hair cotter pin. See figure 6.
PIVOT PIN
FIGURE 6
FIGURE4
5.
Arrange the mast lift straps as shown in figure 5.
Place the straps and the spacer between the mast
sides, fastening them to the lower hole in the mast
sides using a 1/2" x 3-1/2" hex bolt and 1/2" Nylock
hex nut. Do not tighten yet.
I/2"NYLOCK
HEX NUT
MAST LIFT
STRAP
FIGURE5
7.
Attach the lower end of each mast lift strap to the
outside of the welded frame braces and attach the
support bracket to the inside of the frame braces.
Use two 1/2" x 1-1/2" hex bolts and two 1/2"
Nylock hex nuts. Do not tighten yet. See figure 7.
SUPPORT
BRACKET
1/2" NYLOCK
HEX NUT_
MAST LIFT
STRAP
112" x 1-112"
j,_ HEX BOLT
FRAME
BRACES
FIGURE 7

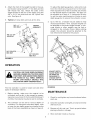
,
Attach the front of the weight bracket to the sup-
port bracket using two 3/8" x 1" hex bolts and two
3/8" Nylock hex nuts. Attach the sides of the
weight bracket to the rear of the frame using two
3/8" x 2-1/4" hex bolts and two 3/8" Nylock hex
nuts. See figure 8.
9. Tighten all loose bolts and nuts at this time.
318" x 1" _'_
HEX BOLT
WEIGHT
318" x 2-114"
HEX BOLT Ij
3/8" NYLOCK
HEX NUT
3/8" NYLOCK
HEX NUT
FIGURE 8
OPERATION
&
CAUTION: USE CARE WHEN WORKING
AROUND A RAISED CULTIVATOR. KEEP
YOUR FEET AND HANDS FROM UNDER
THE TANGS AT ALL TIMES. SERIOUS
INJURY CAN RESULT SHOULD THE
CULTIVATOR DROP UNEXPECTEDLY.
.
To adjust the depth gauge bars, remove the nuts
from the U-bolt securing each bar to the frame.
Then reposition the U-bolt in another set of holes
for the desired depth of cultivation. The bars can
be adjusted up or down in 1" increments. Be sure
to use the same matching pairs of holes in each
depth gauge bar to ensure the cultivator is level.
Up to 160 Ibs. of weight may be added to help
increase penetration. 40 lb. suitcase weights can
be attached to the center weight bracket, or con-
crete blocks or other weights may be tied or
strapped to the cultivator frame. Before adding
weight, the cultivator should be attached to the
tow vehicle and lowered to the ground.
ADJUST DEPTH
GAUGE BARS UP
OR DOWN AS
REQUIRED TO
CHANGE DEPTH
OF CULTIVATION
The tine cultivator is used to loosen soil and other
types of landscape material.
1 ,
Before starting, make sure the material to be
cultivated, such as dirt, is dry enough by squeez-
ing some in your hand. If it forms a ball that doesn't
crumble, the material may be too wet to cultivate.
2,
The cultivator can be set for various depths of
cultivation. To change the cultivation depth, raise
or lower the two depth gauge bars located on the
back of the frame assembly as shown in figure 9.
FIGURE 9
MAINTENANCE
1. Check for and tighten any loose hardware before
each use.
2. Clean the cultivator and lightly oil only bare metal
after each use.
3. Remove all dirt and rust. Touch up paint before
placing cultivator in storage.
4. Store cultivator inside a dry area.

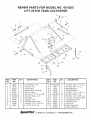
REPAIR PARTS FOR MODEL NO. 45-0355
3 PT. HITCH TANG CULTIVATOR
v
17
23
23 2
REF. PART QTY.
NO. NO.
1
2
3
4
5
6
7
8
9
10
11
12
48982
48970
25154
25167
25180
43343
712-3083
25158
48979
25169
46526
48978
DESCRIPTION REF. PART
NO. NO.
QTY. DESCRIPTION
2
2
1
1
2
1
5
2
2
2
1
1
Lock Washer, 7/8"
Hex Nut, 7/8"
Cross Brace
Spacer, Mast Lift Strap
Mast Lift Strap
Haircotter Pin, 1/8" x 2-3/8"
Hex Nut, Nylock, 1/2"
Mast Side
Category 1 Pin
Mast Extension Strap
Hex Bolt, 1/2" x 3-1/2" Lg.
Pivot Pin, 3-3/4" Lg.
13 HA180132
14 43001
15 25191
16 25192
17 43020
18 HA21362
19 43510
20 64772
21 25170
22 43022
23 46853
24 24238
48973
2 Hex Bolt, 3/8" x 2-1/4" Lg.
2 Hex Bolt, 3/8" x 1" Lg.
1 Weight Bracket
1 Support Bracket
2 Hex Bolt, 1/2" x 1-1/2" Lg.
26 Hex Nut, Nylock, 3/8"
2 Hex Bolt, 1/2" x 2-3/4" Lg.
1 Cultivator Frame Assembly
9 Tang Support Strap
9 Cultivator Tang
11 U-Bolt, 3/8"
2 Depth Gauge Bar
1 Owners Manual
Spee#EPartthe as,es,topurchasewww.speedepart.com

SpeedEPart_ _ _ to._._e_ www.speedepart.com
REPAIR PARTS
Agri-Fab, Inc.
303 West Raymond
Sullivan, IL. 61951
217-728-8388
www.agri-fab.com
-
 1
1
-
 2
2
-
 3
3
-
 4
4
-
 5
5
-
 6
6
-
 7
7
-
 8
8


Ask a question and I''ll find the answer in the document
Finding information in a document is now easier with AI
Related papers
-
Agri-Fab 45-0355-131 User manual
-
-
-
-
-
-
Craftsman 24205 User manual
-
-
-
Other documents
-
 Walker Edison Furniture Company HD48UBGLAG Installation guide
-
-
-
Bolens 247.29773 User manual
-
-
-
Duncan 710 Agvance User manual
-
-
-
DR ROTO-HOGTM User manual
