ROBINHOOD DWG12P6FWH User manual
- Category
- Dishwashers
- Type
- User manual
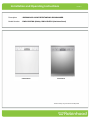
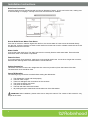
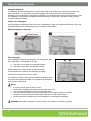
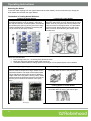
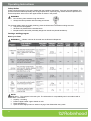
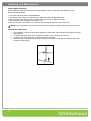
ROBINHOOD DWG12P6FWH is a freestanding dishwasher with a variety of features to make dishwashing easier. It has 6 programs to choose from, including a quick wash and an intensive wash for heavily soiled dishes. The delay start function allows you to set the dishwasher to start washing at a later time, so you can run it overnight or while you're away from home. The extra function button lets you add extra features to your wash cycle, such as extra drying or a sanitize option.
ROBINHOOD DWG12P6FWH is a freestanding dishwasher with a variety of features to make dishwashing easier. It has 6 programs to choose from, including a quick wash and an intensive wash for heavily soiled dishes. The delay start function allows you to set the dishwasher to start washing at a later time, so you can run it overnight or while you're away from home. The extra function button lets you add extra features to your wash cycle, such as extra drying or a sanitize option.


-
 1
1
-
 2
2
-
 3
3
-
 4
4
-
 5
5
-
 6
6
-
 7
7
-
 8
8
-
 9
9
-
 10
10
-
 11
11
-
 12
12
-
 13
13
-
 14
14
-
 15
15
-
 16
16
-
 17
17
-
 18
18
-
 19
19
-
 20
20
-
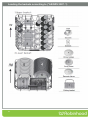 21
21
-
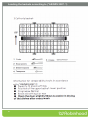 22
22
-
 23
23
-
 24
24


ROBINHOOD DWG12P6FWH User manual
- Category
- Dishwashers
- Type
- User manual
ROBINHOOD DWG12P6FWH is a freestanding dishwasher with a variety of features to make dishwashing easier. It has 6 programs to choose from, including a quick wash and an intensive wash for heavily soiled dishes. The delay start function allows you to set the dishwasher to start washing at a later time, so you can run it overnight or while you're away from home. The extra function button lets you add extra features to your wash cycle, such as extra drying or a sanitize option.
Ask a question and I''ll find the answer in the document
Finding information in a document is now easier with AI