Jegs Transmission Temperature Gauge Installation guide

Type
Installation guide

Jegs Transmission Temperature Gauge accurately measures and displays transmission temperature, helping to prevent costly repairs by alerting you to potential issues. Its 2 1/16" diameter and interchangeable bezels allow for a customized fit in your vehicle. Installation options include drilling a hole in the dash or console, using a gauge pod, or a mounting panel. The included sensor can be installed in the transmission oil pan or return line. The gauge features backlighting for easy visibility at night and is compatible with 12V electrical systems.

Jegs Transmission Temperature Gauge accurately measures and displays transmission temperature, helping to prevent costly repairs by alerting you to potential issues. Its 2 1/16" diameter and interchangeable bezels allow for a customized fit in your vehicle. Installation options include drilling a hole in the dash or console, using a gauge pod, or a mounting panel. The included sensor can be installed in the transmission oil pan or return line. The gauge features backlighting for easy visibility at night and is compatible with 12V electrical systems.

Installation Guide
Transmission Temperature Gauge
555-41405 (Black), 555-41407 (White), & 555-41409 (Silver)
2 1/16 in. Diameter
Table of Contents
1
Parts List..............................................................02
Read Before Installation......................................03
Notes..................................................................03
Wiring................................................................04
Lighting..............................................................04
Mounting...........................................................04
Sensor................................................................05
Bezel..................................................................05
Final Assembly.................................................05
Parts List
2
1Transmission Temperature Gauge [ 2 1/16 in.]
2
Silver Bezel
3
4
Spade Connector & Sleeve
Sensor
Mounting Bracket Hardware
7
8
5
6
Gauge Light Socket, Bulb, & Wiring
Gauge Mounting Bracket
Black Bezel
1
2
3
4
5
6
8
7
Read Before Installation Notes
Thank you for your purchase of this JEGS Transmission
Temperature gauge. Before installation, please be
sure to verify that all of the components have been
received. Reference the parts list on the previous
page. If any components are missing or damaged
please contact customer service at: 1.800.345.4545.
Installation of this gauge requires working with your
vehicle’s electrical system as well as adding a sensor
to the transmission. If you are not comfortable with
these processes contact a trusted service shop to
perform the installation.
If you are having issues, or have questions
regarding the installation of this gauge, please contact
our technical support department at: 1.800.345.4545.
Return Information: Before modifying any of the
parts of this transmission temperature gauge, please
trial fit all components. Once this kit has been
modified, or wires cut it will not be accepted
for return.
Please read these instructions completely before
performing the installation.
Always wear personal protective equipment (PPE)
Let the engine and transmission cool before
starting the installation
Make sure the ignition is off and disconnect the
(-) negative battery cable
This 2 1/16 in. gauge mounts in a 2 1/16 in. hole
Carefully choose the gauge mounting position to
ensure that it does not impair visibility or interfere
with driving
Check behind mounting hole location for wires
and hoses before drilling
3
Installation
4
Wiring
With the sending unit installed in the transmission,
run a length of wire from it to the gauge. Securely
fasten the wire so that it is away from heat sources
and moving parts.
Install the included female spade connector,
on the sending unit end of the wire. Connect to
sending unit.
At the gauge end of the wire, install an eyelet
terminal and secure it to the gauge’s (S) post
with the included nut.
Run a second wire from the gauge’s (I) terminal
to either the ignition switch, or an ignition-on
source. Use an eyelet terminal on the gauge end
with the supplied securing nut.
With a third wire, connect the gauge’s (G) terminal
to a frame or body ground. Use an eyelet terminal
on the gauge end with the supplied securing nut.
Notes:
As a safety precaution, the 12V+ connection
should be fused. We recommend using a 1 Amp,
fast-acting type cartridge fuse.
Use 20 AWG stranded or heavier wire.
Do not over-tighten the securing nut, doing so
may damage the gauge.
Lighting
This gauge is back-lit. The supplied light assembly
snaps into the socket hole on the back of the gauge.
Wiring
Connect the white wire to a 12V dash light. Doing
this makes the light come on when the lights are
turned on.
Connect the black wire to a frame or body ground.
Mounting
This gauge can be installed by drilling a hole into the
dash or console, using a gauge pod, or by using a
mounting panel.
1. Dashboard/Console:
Drill a 2 1/16 in. hole into the selected location.
Clean cut edges to remove burrs.
Paint edges to prevent rusting.
Insert gauge and secure with supplied bracket
and hardware
2. Gauge Pod
Press fit into a 2 1/16 in. gauge pod
3. Mounting panel:
Select the desired position, drill mounting
holes and secure panel with hardware.
Insert gauge and secure with supplied bracket
and hardware.
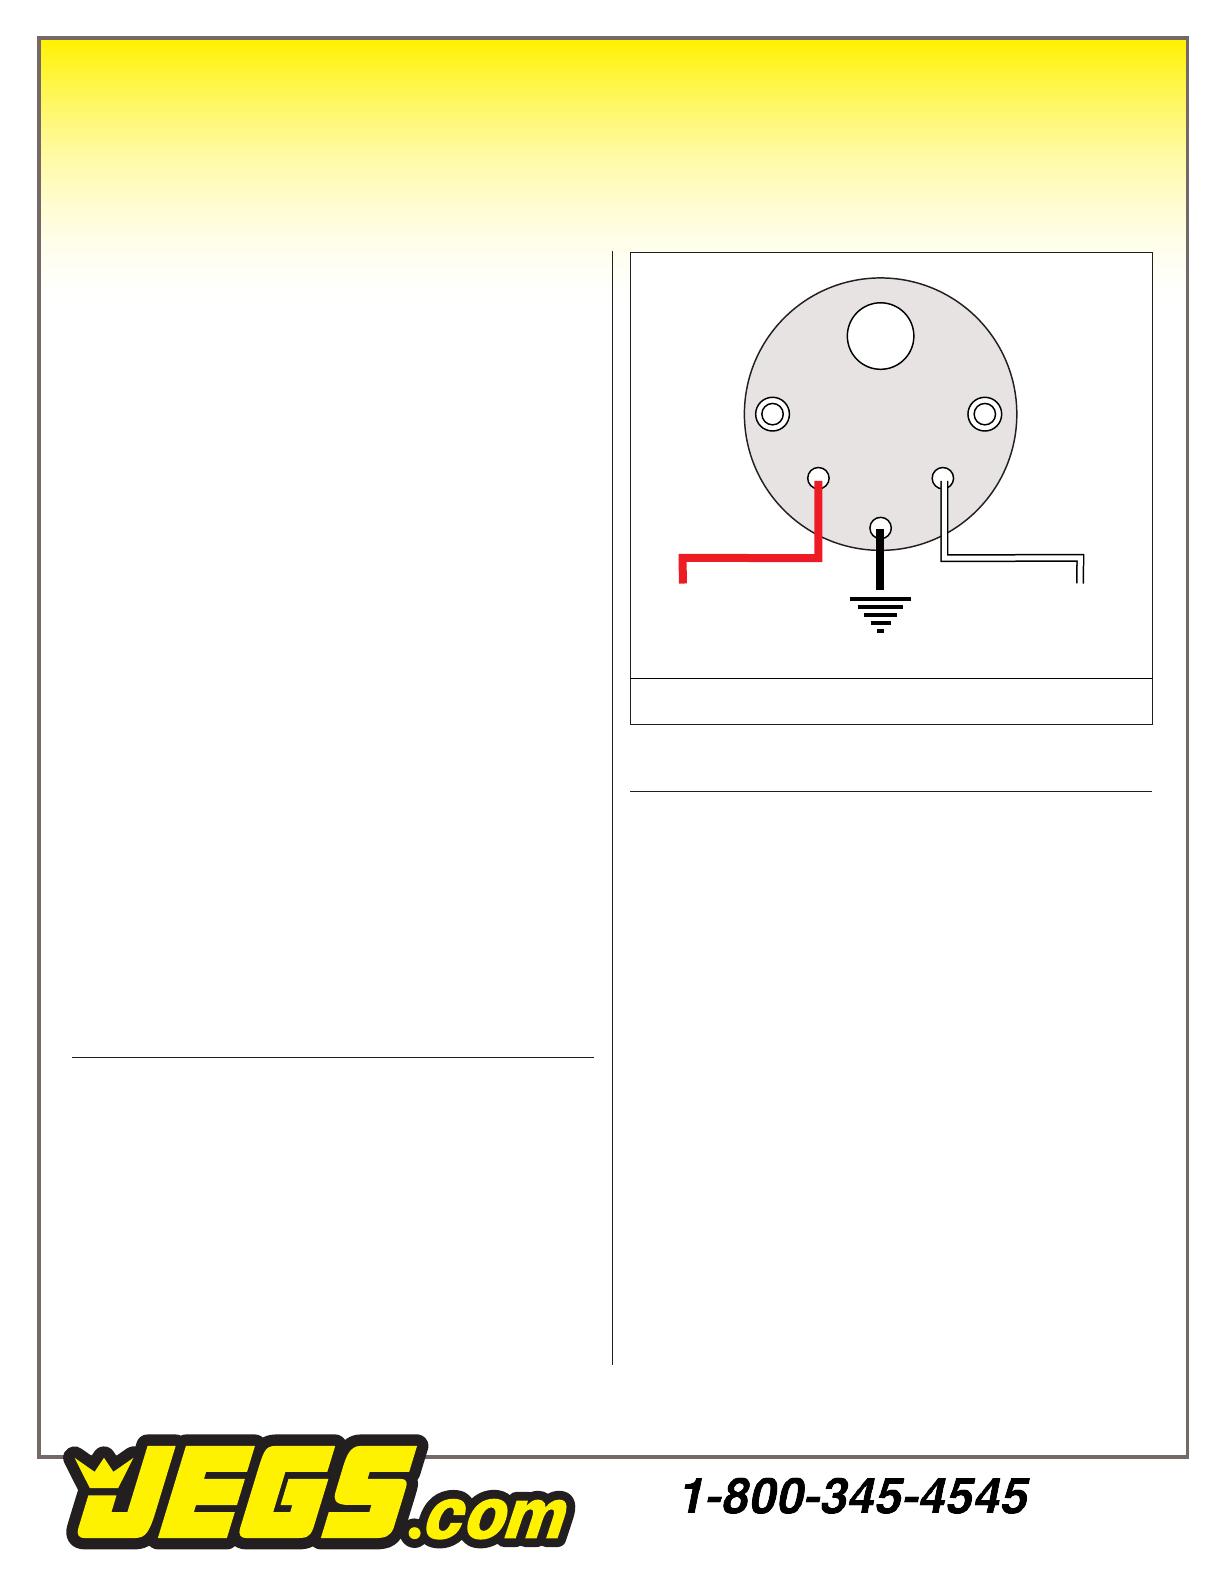
I: 12V ACC (Ignition) G: Common Ground S: Signal Input
SI
G
To Sender
Ground
To a 12V terminal on
the ignition switch or a
switched 12V source
Wiring Continued
Bezel
This gauge is supplied with two interchangeable
bezels, in additional to the permanently mounted
bezel. The stock bezel is a polished stepped design.
The others are rounded in silver and black.
To install these bezels, apply an adhesive to the
inside of the bezel and firmly press it in place on the
gauge. See the image below.
5
Sensor
When installing the sensor there are two methods
to choose from.
1. Transmission Oil Pan
Drill a hole in the side of the pan, making
sure there is clearance for the sensor both
internally and externally.
Depending on the type of pan you can either
tap the existing metal, or weld/braze a bung
in place.
Bolt sensor into place using a small amount
of teflon sealing compound on the threads.
2. Transmission Oil Return Line
Locate the oil return line and cut the steel
tube in a convenient location.
Select a properly sized tee-fitting and install
with compression nuts
Bolt sensor into the top of the tee-fitting using
a small amount of teflon sealing compound
on the threads.
Connect to terminal
(S) on gauge.
Sender is grounded
through the threads
Final Assembly
After having completed the wiring and gauge
installation, reconnect the (-) battery terminal.
Turn on the ignition and the gauge should read the
transmission temperature.
Turn on the dash lights to make sure the gauge
illuminates.
Start the vehicle and check for leaks at the sensor
installation location.
  • Page 1 1
  • Page 2 2
  • Page 3 3
  • Page 4 4
  • Page 5 5
  • Page 6 6

Jegs Transmission Temperature Gauge Installation guide

Type
Installation guide

Jegs Transmission Temperature Gauge accurately measures and displays transmission temperature, helping to prevent costly repairs by alerting you to potential issues. Its 2 1/16" diameter and interchangeable bezels allow for a customized fit in your vehicle. Installation options include drilling a hole in the dash or console, using a gauge pod, or a mounting panel. The included sensor can be installed in the transmission oil pan or return line. The gauge features backlighting for easy visibility at night and is compatible with 12V electrical systems.

Ask a question and I''ll find the answer in the document

Finding information in a document is now easier with AI