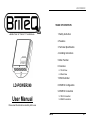
Briteq LD-POWER 240 Owner's manual
- Category
- Floodlights
- Type
- Owner's manual
Briteq LD-POWER 240
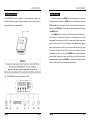
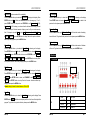
The LD-POWER 240 is a powerful and versatile DMX lighting controller that offers a wide range of features and capabilities. With its 240-watt power output, it can control up to 48 passive lighting fixtures with different LED emitters. The LD-POWER 240 also comes with a built-in clock for editing your shows, and it can store up to 30 shows (with different time periods per day).
Some of the key features of the LD-POWER 240 include:
- 7 Channel modes for controlling fixtures with different LED emitters
- 3 Chase groups with 8 chases each (3 editable chases per group)
- Built-in clock for editing shows
Briteq LD-POWER 240
The LD-POWER 240 is a powerful and versatile DMX lighting controller that offers a wide range of features and capabilities. With its 240-watt power output, it can control up to 48 passive lighting fixtures with different LED emitters. The LD-POWER 240 also comes with a built-in clock for editing your shows, and it can store up to 30 shows (with different time periods per day).
Some of the key features of the LD-POWER 240 include:
- 7 Channel modes for controlling fixtures with different LED emitters
- 3 Chase groups with 8 chases each (3 editable chases per group)
- Built-in clock for editing shows


-
 1
1
-
 2
2
-
 3
3
-
 4
4
-
 5
5
-
 6
6
-
 7
7
-
 8
8


Briteq LD-POWER 240 Owner's manual
- Category
- Floodlights
- Type
- Owner's manual
Briteq LD-POWER 240
The LD-POWER 240 is a powerful and versatile DMX lighting controller that offers a wide range of features and capabilities. With its 240-watt power output, it can control up to 48 passive lighting fixtures with different LED emitters. The LD-POWER 240 also comes with a built-in clock for editing your shows, and it can store up to 30 shows (with different time periods per day).
Some of the key features of the LD-POWER 240 include:
- 7 Channel modes for controlling fixtures with different LED emitters
- 3 Chase groups with 8 chases each (3 editable chases per group)
- Built-in clock for editing shows
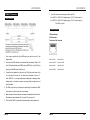
Ask a question and I''ll find the answer in the document
Finding information in a document is now easier with AI
Related papers
-
Briteq STAGE PAINTER 12 Owner's manual
-
-
-
-
-
JBSYSTEMS LIGHT Led Colorbank BRITEQ Owner's manual
-
-
-
-
Other documents
-
ACME LED-4TC User manual
-
-
-
 Elumen8 Stage Par 220 User manual
-
 Elumen8 Stage Par 220 User manual
-
-
 Solution Splendor 90 CM-90 User manual
-
JBSYSTEMS LIGHT BT-36LI Owner's manual
-
CHAUVET DJ Obey 4 Reference guide
-


