Page is loading ...

BEFORE YOU BEGIN
Read these instructions completely and carefully.
• IMPORTANT – Save these instructions
for local inspector’s use. Observe all governing
codes and ordinances.
• Note to Installer – Be sure to leave these
instructions with the Consumer.
• Note to Consumer – Keep these instructions with
your Owner’s Manual for future reference.
Installation
Instructions
WARMING DRAWER CUSTOM
PANEL ACCESSORY KIT
ZXD27B
ZXD30B
TOOL AND MATERIALS REQUIRED
• Phillips screwdriver
• Drill and appropriate bits
(Brad point recommended for drilling through
wood panels)
• Custom panel
• Custom handle (optional)
• Adhesive recommended for metal to wood
• Adhesive recommended for plastic to wood
PARTS SUPPLIED
• Lamp Jewel
• Metal mounting panel
This kit contains a mounting panel to support a
trimless custom drawer front up to 3/4” thick. The
tubular handle can be reinstalled onto the custom
panel with longer screws (not provided). Or, the
original handle can be replaced with a custom
handle of your choice. (Handle is not supplied.)
Choose a custom handle to match or complement
cabinetry hardware.
IMPORTANT: The warming drawer should be
installed according to the installation instructions
packed with the product. The original drawer front
will be removed and replaced with a custom panel.
• Cut edges of the drawer panel will be seen and
must be finished for best appearance.
• The custom drawer front panel, both raised and
flat design, should be constructed in the same
manner as typical cabinet doors.
• Order the custom drawer panel from the cabinet
manufacturer. Be sure to provide the exact
dimensions so that the panel is constructed
accurately.
• Order the optional custom handle to complement
or match surrounding cabinetry handles.
PREPARE DRAWER FOR
PANEL INSTALLATION
• Open the drawer fully.
• Turn the warming drawer off.
STEP 1
For installation of 27″ and 30″ wide
warming drawer custom panel and
custom handle.
REMOVE ORIGINAL
DRAWER FRONT
• Remove the two screws on each side and the
one screw at the bottom of the drawer edge.
• Remove the two screws on the inside of the
drawer at the top. Retain all screws.
– Support the drawer front as you remove
screws to prevent the possibility of falling.
STEP 2
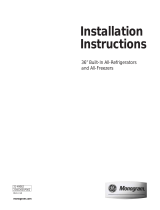
PREPARE CUSTOM PANEL
• The custom panel must be sized to fit the
dimensions shown for your model.
• Drill a 5/16” diameter hole through the
appearance side of the panel. This hole will
allow the indicator “ON” light to be visible
through the custom panel. The cut edges will
be covered by the overlap of the lamp jewel.
– A Brad point drill bit is recommended.
STEP 3
A
10-1/2"
1-13/16"
1-3/4"
Drill 5/16" Dia.
Through Custom
Panel For Lamp Jewel
A = 26-3/4” for 27” Wide Models
A = 30” for 30” Wide Models

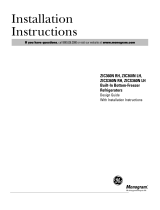
SECURE CUSTOM PANEL
TO METAL MOUNTING
PANEL
• Lay the custom panel, appearance side down,
on a clean surface.
• Place the flat side of the metal panel onto the
back side of the custom panel, with the
mounting flanges facing up.
• Align the lamp hole in the panel with the
mounting panel.
• Check top, bottom and side overlap dimensions
from the metal panel to wood panel edge as
shown.
STEP 4
3/16"
1/4"
7/32"
1/4"
Top
Bottom
Align Holes
Handle
Attachment Holes
Pub. No. 49-8969-2
Dwg. No. 164D3333P196
977-0298-000 06-04 JR
NOTE: Product improvement is a continuing endeavor at
General Electric. Therefore, materials, appearance and
specifications are subject to change without notice.
FOR PANELS LESS THAN
3/4” THICK
• Separate the custom panel and metal panel.
• Apply a few horizontal beads of adhesive to the
metal panel. Avoid adhesive within 1” of lamp
hole area and outer edges.
FOR 3/4” (OR GREATER)
THICK PANELS
3/4” thick panels may be secured to the metal
panel with screws.
• Use the metal panel as a template. Position the
metal panel over the back side of the custom
panel and drill pilot holes. Drill pilot holes sized
to match screws being used (screws not
provided).
CAUTION: Select screw length
carefully to avoid penetration of the finished side.
STEP 5A
STEP 5
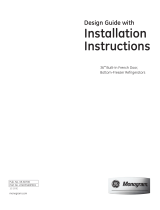
INSTALL LAMP JEWEL
Turn the assembly appearance side up.
• Use plastic to wood adhesive to secure the lamp
jewel to the front of the wood panel. On the side
with the bulge, (see illustration) apply a small
bead of adhesive around the outside edge.
Place the jewel into the drilled hole.
STEP 6
Insert
Jewel
Appearance
Side
This Side
Against
Wood
REINSTALL ORIGINAL
HANDLE OR OPTIONAL
CUSTOM HANDLE
A custom handle (not supplied) may be installed.
• Drill pilot holes through the front of the custom
panel and through the metal panel to match the
chosen handle.
NOTE: The handle screws should be installed
through the metal panel, the custom panel and
into the custom or original handle.
STEP 7
INSTALL ASSEMBLED
PANEL TO THE DRAWER
• Install the custom panel assembly to the exposed
drawer front using the original 7 screws.
STEP 8
Custom Handle
or Original Handle
Back side of Appearance Panel with Support Panel
/