Page is loading ...

i
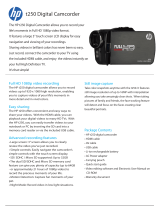
ac300w
Action Cam
User Manual

ii
Table of Contents
About this manual................................................... v
Copyright ................................................................. v
Precautions ........................................................... vii
Operating conditions .......................................... viii
Notes on Waterproof Case .................................... ix
Before You Start .................................................... xii
1 Introducing the Camera ...................... 1
1.1 System Requirements ................................... 1
1.2 Features ......................................................... 1
1.3 Unpacking the Camera ................................. 2
1.4 About the Camera ......................................... 4
1.4.1 Camera Views ....................................... 4
1.4.2 Button Functions .................................... 5
1.4.3 LED Indicators ....................................... 6
2 Getting Started .................................... 7
2.1 Installing the Micro SD Card ........................ 7
2.1.1 Removing the Micro SD card ................. 8
2.2 Installing the Battery ..................................... 8
2.2.1 Removing the battery ............................. 9
2.3 Charging the Battery ................................... 10
2.4 Turning ON/ OFF the Camera ..................... 11
2.5 OLED Screen ............................................... 12
2.6 Changing Modes ......................................... 14
2.7 Connecting to TV (HDMI Cable) ................. 15

iii
2.8 Connecting to PC (Micro USB Cable) ........ 15
3 Capturing Videos and Photos .......... 16
3.1 Recording Videos ........................................ 16
3.2 Taking Photos .............................................. 16
3.2.1 WiFi ..................................................... 17
3.2.2 Burst Shooting ..................................... 17
3.2.3 Time Lapse Shooting ........................... 18
3.2.4 Self-Timer ............................................ 18
3.2.5 Loop Recording ................................... 19
4 Adjusting the Settings ...................... 21
4.1 Video Resolution ......................................... 23
4.2 Photo ............................................................ 26
4.3 Timer ............................................................ 28
4.4 Shooting Interval ......................................... 29
4.5 Up/Down ....................................................... 31
4.6 Loop ............................................................. 32
4.7 Delete ........................................................... 35
4.8 OSD Up/Down .............................................. 37
4.9 LED ............................................................... 38
4.10 Brightness ................................................... 39
4.11 Beep ............................................................. 40
4.12 Auto-Off ........................................................ 41
4.13 Date and Time .............................................. 42
4.14 RF ................................................................. 43
4.15 Factory Default ............................................ 45

iv
5 Using the Accessories ...................... 46
5.1 Waterproof Case .......................................... 46
5.1.1 Using the Waterproof Case .................. 46
5.1.2 Changing the T Tip Adapter ................. 48
5.1.3 Changing the Housing Back Door ........ 49
5.2 Velcro Strap ................................................. 49
5.3 Assembling the Camera Accessories........ 49
5.4 RF Watch Remote Control .......................... 51
Appendix ................................................... 53
Specifications ....................................................... 53
Troubleshooting .................................................... 55
FCC Statement ...................................................... 55
Radiation Exposure Statement ............................ 55

v
Preface
Congratulations and thank you on your purchase of this advanced
Action Cam. Ensure that you read this manual carefully and keep it
in a safe place for future reference.
About this manual
This manual is designed to demonstrate the features of your HP
Action Cam ac300w. All information presented is as accurate as
possible but is subject to change without notice. HP shall not be
liable for technical or editorial errors or omissions contained herein.
For the latest
reversion, visit www.hp.com/support.
Copyright
© Copyright 2014.
All rights reserved. No part of this publication may be reproduced,
transmitted, transcribed, stored in a retrieval system or translated
into any language or computer language, in any form or by any
means, electronic, mechanical, magnetic, optical, manual or
otherwise, without the prior written permission of the manufacturer.

vi
FCC Statement
Modifications not approved by the party responsible for compliance
could void user’s authority to operate the equipment.
This equipment has been tested and found to comply with the limits
for Class B digital device, pursuant to part 15 of the FCC Rules.
These limits are designed to provide reasonable protection against
harmful interference in a residential installation. This equipment
generates and can radiate radio frequency energy and, if not
installed and used in accordance with the instructions, may cause
harmful interference to radio or television reception, which can be
determined by turning the equipment on and off.
The user is encouraged to try to correct the interference by one or
more of the following measures:
Reorient or relocate the receiving antenna.
Increase the separation between the equipment and the
receiver.
Connect the equipment into an outlet on a circuit different from
that to which the receiver is connected.
Consult the dealer or an experienced radio/TV technician for
help.
Radiation Exposure Statement
The product comply with the FCC portable RF exposure limit set
forth for an uncontrolled environment and are safe for intended
operation as described in this manual. The further RF exposure
reduction can be achieved if the product can be kept as far as
possible from the user body or set the device to lower output power if
such function is available.

vii
Precautions
General precautions
Do not store the product in dusty, dirty, or sandy areas, as its
components may be damaged.
Do not store the product in a hot environment. High
temperatures can shorten the life of electronic devices, damage
batteries and warp or melt certain plastics.
Do not store the product in cold areas. When the product
warms up to its normal temperature, moisture can form inside,
which may damage the electronic circuits.
Do not attempt to open the casing or attempt your own repairs.
High-voltage internal components create the risk of electric
shock when exposed.
Do not drop or knock the product. Rough handling may damage
the internal components.
Do not use harsh chemicals, cleaning solvents or strong
detergents to clean the product. Wipe the product with a slightly
damp soft cloth.
Do not open the battery cover while an image is being recorded.
Doing so will not only make storage of the current image
impossible, it can also corrupt other image data already stored
on file.
If the product or any of its accessories are not working properly,
contact the appropriate support team on the warranty flyer or re
seller. The personnel there will assist you and if necessary,
arrange for the product to be repaired.

viii
Operating conditions
This camera is designed for use in temperatures ranging from
-10°C to 50°C (14°F to 122°F).
Do not use or keep the camera in the following areas:
- In areas subject to direct sunlight
- In areas subject to high humidity or dust
- Near air conditioners, heaters, or other areas subject to
temperature extremes
- Inside of a closed vehicle, especially one parked in the sun.
- In areas subject to strong vibration
Battery Information
Use only the type of battery that came with your camera. Using
any other type of battery may damage the equipment and
invalidate the warranty.
Do not short the battery terminals. The battery could overheat.
Do not attempt to split or peel the outer casing.
Remove the battery if the camera is not going to be used for a
long time. If the battery is left unused for more than 3 months,
you need to charge the battery before use.

ix
Notes on Waterproof Case
Waterproof Case performance
The waterproof case performance is equivalent to
IPX8
(60m/1hr).
Underwater time limit: Do not use the waterproof case
underwater for more than 60 minutes and 60 meters to ensure
water resistance.
The waterproof case is not dust-proof.
The camera and other accessories are not waterproof unless
enclosed by the waterproof case.
When using the camera in cold or humid environments or when
going underwater, use the anti-fog insert to prevent fogging.
The anti-fog insert only provides a certain degree of prevention,
results vary depending on the actual environment. The anti-fog
insert is not for long-term use, it must be replaced regularly.
Notes before going underwater:
(Do the following actions indoors. Do not do these actions on sandy
or dusty environment or near the water’s edge.)
Check if the area surrounding the waterproof case lock is clean,
do not allow dirt or sand or foreign objects around it.
Ensure that the waterproof case is closed.
Ensure that the waterproof case has no cracks or scratches. If
the waterproof case has been dropped, contact your dealer for
a replacement.

x
Notes for general use:
Avoid opening or closing the waterproof case near the water’s
edge (sea, lake, beach, lake, etc.). Do not open or close the
waterproof case lock with wet hands, or hands with sand or
dust.
The accessories (batteries, etc.) used with the camera are not
water resistant, be careful in using them.
Do not drop the waterproof case to ensure waterproof
durability.
Do not place the waterproof case in temperatures above 40°C
or below 0°C to ensure waterproof durability.
Do not attempt to make alterations on the waterproof case or
seal the vents yourself, doing so may damage its ability to
maintain the camera waterproof.
When using the camera
The waterproof properties of the waterproof case apply to fresh
water and saltwater only; they do not apply to cleaning
substances, chemicals, or water from spas, etc. Any such
liquids should be wiped off immediately.
Do not immerse the waterproof case in water at a depth greater
than 60 meters.
Do not subject the waterproof case to highly pressurized water.
Do not immerse in water for longer than 60 minutes. After 60
minutes of use in water, allow the waterproof case to dry for at
least 10 minutes.
Do not immerse in water warmer than 40°C (104°F).
Do not open or close the waterproof case lock with wet hands.
Do not open the waterproof case lock next to water or a pool.
The waterproof case is not dust-proof.
Do not bump or knock the waterproof case underwater,
otherwise the lock may open.

xi
Notes on waterproof case maintenance
The waterproof of sealing material is replaceable for a fee. The
material should be replaced once a year to maintain its water
resistance.
After using the waterproof case
Be sure to come ashore within 60 minutes after going
underwater, this will maintain the appearance, quality and
water resistance of the waterproof case.
After taking pictures underwater, clean the waterproof case
with running tap water. Do not use any soapy water, mild
detergents, alcohol or similar liquids to clean the case.
Wipe off water drops on the waterproof case with a soft lint-free
cloth (avoid fiber). Be sure to wait until the waterproof case is
completely dry before opening the waterproof case lock.
After removing the camera from the waterproof case, soak the
waterproof case in a bucket of clean water for about 10 minutes.
After 10 minutes, wipe the waterproof case dry with a lint-free
cloth. Place the waterproof case in a well ventilated cool place
to dry naturally (do not place under direct sunlight).
Other notes
If water accidentally enters the camera or any problem occurs
when it is in water, please get it out of the water immediately
and take proper actions. Dry the camera and send it for repair,
if required.
Information is subject to change without notice. Refer to the
important notes in the manual supplied with the camera.

xii
Before You Start
Take some test shots before you use your camera.
Before taking pictures with this camera, test the camera beforehand
to ensure that it functions properly. Any additional loss caused by the
malfunction of this product (such as costs of photography or any loss
of benefit generated by the photography) is not the responsibility of
the manufacturer and no compensation will be given for it.
Copyright information
Take care to observe "No Photography" notices in certain locations.
In these cases, you cannot record any live performance,
improvisation or exhibits, even for personal purposes. Any transfer
of pictures or memory card data must be conducted under the
constraints of copyright law.

1
1 Introducing the Camera
Read this section to learn about the features and functions of the
camera. This chapter also covers system requirements, package
contents, and descriptions of the hardware components.
1.1 System Requirements
The camera requires a PC with the following specifications for full
HD 1080p 30fps and 720p 60fps playback:
Windows
®
8 /Windows
®
7 /Vista / XP (SP2) / MAC OS X 10.5
and later
Intel
®
/ AMD Dual-Core CPU and later
At least 1 GB of RAM or higher
At least DirectX 9 video card, DirectX 10 is recommended
Standard USB 1.1 port and later
At least 2GB or greater available hard disk space
1.2 Features
The camera offers a variety of features and functions including:
Full HD 1080p (60fps.)
H.264 Video Clip
143° Wide Angle Lens
WLAN 802.11 b/g/n
2.4GHz RF remote control
16 Megapixel Photos
Sports Camera functionality
Li-ion Rechargeable Battery
External Waterproof Case/Standard Mounts/Watch Remote
Smartphone App [HP Xcam! app from AppStore (iOS) or HP
Xcam! 5.0 from Google Play (Android OS)]
Note:
A USB 1.1 port will enable you to transfer files to and from your
host PC, but transfer speeds will be faster with a USB 2.0 port.

2
1.3 Unpacking the Camera
The following items should be present in the package. If any item is
missing or appears damaged, contact your dealer immediately.
Camera
Li-ion Battery
Quick Start Guide
CD-ROM
Micro USB Cable
Wrist Remote watch
USB Pogo Pin
cable

3
Standard Accessories
Waterproof Case
Vented Housing
Backdoor
Waterproof Housing
Backdoor
T Tip Adapter
Flat Adhesive
Socket
Curved Adhesive
Socket
Secure Tether
Velcro Strap
Swivel T Tip
Anti-fog Inserts
Safety Lock
bike mount

4
1.4 About the Camera
Refer to the following illustrations to familiarize yourself with the
buttons and controls of this camera.
1.4.1 Camera Views
Power/Status
LED 1
Lens
Speaker
HDMI port
Shutter button
Power/Status/
Battery LED 2
Power / Mode
button
OLED screen
Micro SD
card slot
Battery compartment
cover
Power/Status LED 4
Microphone
jack
Micro USB
port
Microphone
Power/Status
LED 3

5
1.4.2 Button Functions
Power / Mode
Button
Press and hold for 3 seconds to turn the
camera on or off.
Press to switch to different modes: Video,
Photo, WiFi, Burst, Time Lapse,
Self-timer, and Set mode.
In Set mode, press to scroll through menu
items.
Shutter Button
In Video mode, press to start/stop video
recording.
In Photo mode, press to take a photo.
In Set mode, press to select an item.

6
1.4.3 LED Indicators
The camera has four LED indicators.
The Power/Status LEDs are located on top, on the bottom, and on
the back of the camera. These LEDs are designed for users to see
the status of the camera whichever way the camera is held or
mounted.
LED
Color
Description
Power / Status
LED
Green
Power up
Green Blinking
Taking photos/ WiFi initial
setup is complete and
connection is in progress
Red Blinking
Video recording in progress
Red Blinking
Rapidly
Self-timer
Battery LED
Red Blinking
Battery is charging
Off
Full charge

7
2 Getting Started
Read this section to learn how to start using the camera. This
section covers basic functions such as switching on, installing the
battery and micro SD card, and configuring preliminary settings. See
later chapters for advanced functions.
2.1 Installing the Micro SD Card
A micro SD card is required to capture photos and videos. The
camera supports micro SDHC cards up to 32GB.
1. Insert the micro SD card into the card slot with the gold
contacts facing the front of the device.
2. Push the micro SD card until it clicks into place.
Warning: Do not remove the micro SD card while data is being
recorded. Doing so may corrupt the saved data and damage the
card.

8
2.1.1 Removing the Micro SD card
1. Turn off the camera.
2. With a fingertip, push the micro SD card to eject it from
the slot.
3. Remove the micro SD card.
2.2 Installing the Battery
Warning: Use only the supplied battery or a similar battery
recommended by the manufacturer or the dealer.
1. Push down the battery compartment cover to open it.
2. Align the battery contacts and then insert the battery into
the compartment with the ribbon underneath the battery.
/