ADVERTENCIA:
PARA REDUCIR EL RIESGO DE INCENDIO O DE SHOCK ELÉCTRICO, NO EXPONGA
ESTE ARTEFACTO A LA LLUVIA O LA HUMEDAD.
IMPORTANTE PARA SU SEGURIDAD
PRECAUCION: PARA REDUCIR EL RIESGO DE
SHOCK ELECTRICO, NO QUITE LA CUBIERTA (O
LA TAPA POSTERIOR). EL APARATO NO TIENE
ADENTRO PIEZAS QUE PUEDAN REPARARSE.
DEJE LA REPARACION AL PERSONAL DE
SERVICIO CALIFICADO.
PRECAUCION
RIESGO DE SHOCK
ELECTRICO NO ABRIR
ESTE SIMBOLO INDICA QUE EN ESTA
UNIDAD HAY VOLTAJE PELIGROSO LO
CUAL CONSTITUYE UN RIESGO DE
SHOCK ELECTRICO.
ESTE SIMBOLO INDICA QUE HAY
INSTRUCCIONES IMPORTAN ES DE
MANTENIMIENTO Y OPERACION EN
LA LITERATURA QUE ACOMPAÑA A
ESTE ARTEFACTO.
La nota importante está colocada en la parte trasera del gabinete.
1. Lea las instrucciones-Lea detenidamente todas las
instrucciones de seguridad y operación antes de usar el
aparato.
2. Conserve las instrucciones-Conserve las instrucciones de
seguridad y operación para consultas futuras.
3. Respete las advertencias-Observe estrictamente todas las
advertencias impresas en el aparato y las incluidas en el
manual de instrucciones.
4. Siga las instrucciones-Siga todas las instrucciones de
operación.
5. Limpieza-Desconecte el TV del tomacorriente mural
antes de limpiarlo. No use limpiadores líquidos ni
aerosol. Use un paño húmedo para la limpieza del
aparato.
EXCEPCION: Un producto diseñado para servicio
ininterrumpido y que por alguna razón, como ser la
posibilidad de pérdida del código de autorización para
un convertidor CATV, no debe ser desconectado por el
usuario para limpieza u otro propósito, puede no incluir
la advertencia en cuanto a no desconectar el aparato, en
la descripción del procedimiento de limpieza (5).
6. Enchufes-No use enchufes no recomendados por el
fabricante del TV, ya que podría ser peligroso.
7. Agua y humedad-No use este TV cerca del agua, por
ejemplo, cerca de una bañera o lavamanos, cerca del
fregadero de la cocina o lavandería, en un piso mojado,
cerca de una piscina, etc.
8. Accesorios-No instale este TV en un carro, soporte,
trípode o mesa inestables. El TV podría caerse, causando
serias lesiones a un niño o adulto, resultando también
severamente dañado. Uselo sólo el un carro, soporte,
trípode o mesa recomendados por el
fabricante, o vendidos con el TV.
Toda instalación del aparato debe
hacerse de acuerdo a las
instrucciones del fabricante,
empleando los accesorios de
instalación recomendados por el
mismo. La combinación de aparato
y carro deberán ser movida con cuidado. Las
detenciones bruscas, la fuerza excesiva y las superficies
disparejas podr n hacer que el aparato y el carro se
vuelquen
9. Ventilación-El gabinete del aparato tiene ranuras y
aberturas de ventilación que garantizan el
funcionamiento confiable del TV, evitando que se
recaliente. Estas aberturas no deberán ser bloqueadas ni
cubiertas. Para evitar bloquear las aberturas, nunca sitúe
el TV encima de una cama, sofá, alfombra u otra
superficie similar. Tampoco instale el TV cerca o encima
de un radiador o calefactor. El TV no debe ser instalado
en un mueble empotrado, como ser una repisa para
libros o bastidor, a menos que se pueda garantizar una
ventilación adecuada, o cuando las instrucciones del
fabricante así lo especifiquen.
10. Alimentación-Este TV sólo debe ser operado mediante
el tipo de fuente de alimentación especificado en la
etiqueta indicadora. Si no esté seguro del tipo de fuente
de alimentación que tiene en su casa, consulte a su
distribuidor o a la compañía de electricidad local. En el
caso de TV diseñados para funcionar a pilas o con otras
fuentes de alimentación, consulte el manual de
instrucciones respectivo.
11. Conexión a tierra o polarización-Este TV est equipado
con una clavija polarizada de corriente alterna (una
clavija que tiene una espiga m s ancha que la otra). Esta
clavija solamente podrá ser insertada en el tomacorriente
en una sola dirección. Esta es una medida de seguridad.
Si no pudiera insertar completamente la clavija en el
tomacorriente, vuelva a intentarlo invirtiendo la clavija.
Si aún no fuera posible insertar la clavija, tome contacto
con un electricista para que repare su tomacorriente
obsoleto. No modifique las características de seguridad
de la clavija polarizada.
12. Protección del cable de alimentación-Los cables de
alimentación deberán ser tendidos de manera tal que la
probabilidad de que sean pisados o aplastados por otros
objetos sea mínima. Preste especial atención a las
ADVERTENCIA DE CARRETA PORTATIL
S3126A
clavijas de los cables, a los receptáculos, y al punto por
donde salen del aparato.
13. Conexión a tierra de la antena exterior-Si conecta una
antena exterior o sistema de cable al TV, asegúrese de
conectar a tierra la antena o el sistema de cable para
tener una cierta protección contra alzas repentinas de
tensión y cargas de electricidad está tica. Las Artículo
810 del Código Nacional de Electricidad, ANSI/NFPA,
núm. 70, entrega información acerca de la manera
correcta de conectar a tierra el mástil y la estructura
soportante, tamaño de los conductores de puesta a tierra,
ubicación de la unidad de descarga de la antena,
conexión a los electrodos de tierra, y requisitos para el
electrodo de tierra. (Fig. A)
14. Tormentas eléctricas-Como medida adicional de
protección durante tormentas eléctricas, o cuando el
grabador de videocassettes permanezca sin uso durante
períodos prolongados de tiempo, desconéctelo del
tomacorriente mural y desconecte la antena o sistema de
cable. Esto evita que el TV resulte dañado por tormentas
eléctricas o sobretensiones en la línea de alimentación.
15. Líneas de alimentación-Un antena exterior no debe ser
instalada en la cercanía de líneas de alimentación aéreas
ni de otros circuitos de potencia para iluminación
eléctrica, o donde pueda caerse y hacer contacto con
tales líneas o circuitos. Al instalar un sistema de antena
exterior, tenga mucho cuidado de no tocar tales líneas o
circuitos de alimentación, ya que el contacto con ellos
podría ser fatal.
16. Sobrecarga-No sobrecargue los tomacorrientes murales
ni los cables de extensión, ya que esto podría causar
incendios o descargas eléctricas.
17. Entrada de objetos y líquidos-Nunca introduzca objetos
de ningún tipo por las aberturas de este TV, ya que
podría tocar peligrosos puntos de alta tensión o piezas
de cortocircuito, provocando incendios o descargas
eléctricas. Nunca derrame ningún tipo de líquido sobre
el TV
18. Servicio-No intente reparar el TV usted mismo; al abrir
o desmontar las cubiertas usted se expondrá a alta
tensión y a otros peligros. Solicite todo servicio a
personal calificado.
19. Daños que requieran reparación-En los siguientes casos,
desconecte el TV del tomacorriente mural y llame a un
técnico de servicio calificado:
a. Cuando el cable de alimentación o la clavija estén
dañados.
b. Si se ha derramado líquido sobre la unidad, o si algún
objeto ha caído dentro del TV.
c. Si el TV ha sido expuesto a la lluvia o al agua.
d. Cuando a pesar de haber seguido las instrucciones de
operación, el TV no funcione normalmente. Ajuste
solamente los controles mencionados en el manual de
instrucciones; el ajuste incorrecto de otros controles
podr causar daños a la unidad, la que por lo general
requerir de un prolongado trabajo de reparación (por un
técnico calificado) para que sus condiciones normales de
operación puedan ser restablecidas.
e. Si el TV se ha caído o si el gabinete se ha dañado.
f. Cuando el grabador de videocassettes muestre un
cambio notorio en su rendimiento.
20. Piezas de repuesto-Cuando sea necesario reemplazar
piezas, asegúrese de que el técnico de servicio emplee
las piezas de repuesto especificadas por el fabricante, o
piezas que tengan las mismas características que las
piezas originales. Las sustituciones no autorizadas
podrán causar incendios, descargas eléctricas y otros
problemas.
21. Revisión de seguridad-Al finalizar cualquier servicio de
mantenimiento o reparación de este TV, solicítele al
técnico que efectúe comprobaciones de seguridad para
determinar si el TV se encuentra o no en condiciones
óptimas de operación.
22. Calor-Esto producto TV deben colocarse fuera del
alcance de fuentes de calor tales como radiadores,
rejillas de calefacción, estufas o cualquier otro aparato
destinado a producir calor, incluyendo los
amplificadores.
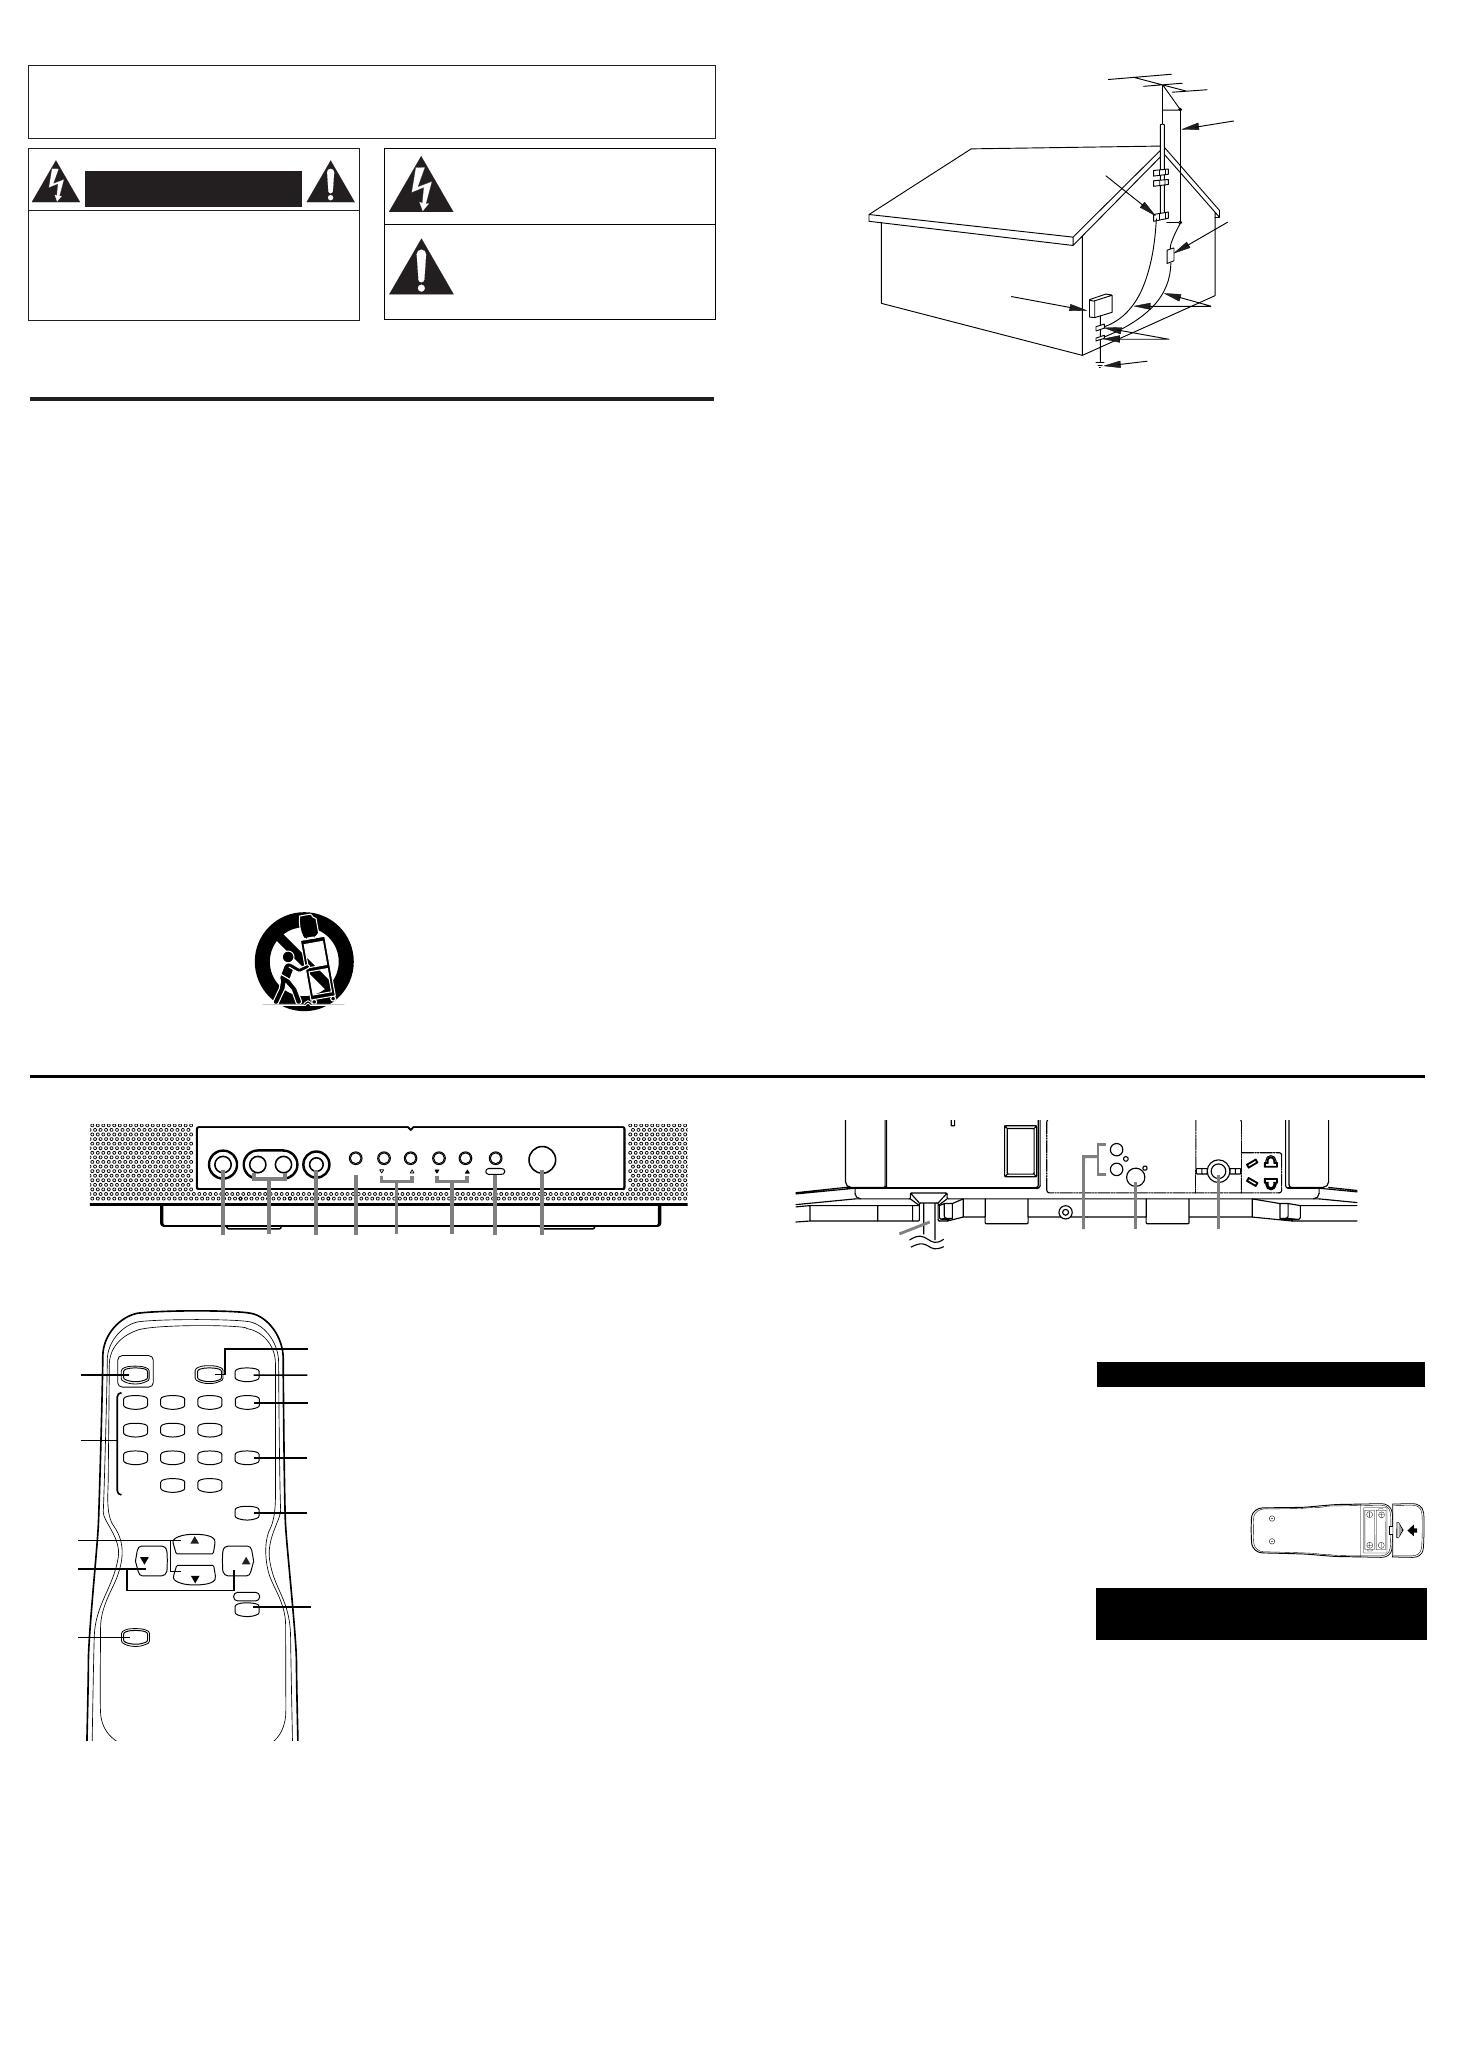
FIGURA A
EJEMPLO DE CONEXION A TIERRA DE LA ANTENA
SEGUN EL CODIGO NACIONAL ELECTRICO
Equipo de
servicio
eléctrico
Sujetador
a tierra
NEC - Código Nacional Eléctrico Sistema del electrodo a tierra
del servicio de alimentación
(NEC Art.250, PART H)
S2898A
Sujetadores a tierra
Conductores de puesta a tierra
(NEC Sección 810-21)
Unidad de descarga
de la antena
(NEC Sección 810-20)
Alambre
conductor
de la antena
CONTROLES DE OPERACIÓN Y SUS FUNCIONES
POWER
CHANNEL
VOLUME
MENU
HEADPHONEL-AUDIO-RVIDEO
56781234
AUDIO IN
L
R
S-VIDEO
ANT. IN
17162
18
- PANEL DELANTERO - - PANEL TRASERO -
1. Toma de entrada de vídeo (VIDEO)-
Conéctela a la toma de salida de vídeo de
una videocámara o videograbadora.
2. Tomas AUDIO (INPUT) L/R- Conéctelas a
las tomas de salida de audio de los canales
izquierdo/derecho de una videocámara o
videograbadora.
Nota: La toma AUDIO (INPUT) L es para la
entrada mono. El sonido se oye por ambos
altavoces. Utilice esta toma para el equipo
monofónico que se conecte.
3. Toma HEADPHONE- Para conectar el
casco auricular (no provisto) para escuchar
en privado.
4. Botón de menú (MENU)- Púlselo para
visualizar el menú en la pantalla del
televisor.
5. Botones de aumento/disminución del
volumen (VOLUME (VOL) K/L)-
Púlselos para controlar el nivel del volumen.
Pulse el botón de aumento del volumen
(VOL K) para determinar un modo de
ajuste del menú en la pantalla del televisor.
Pulse estos botones para seleccionar o
ajustar de un menú particular. (por ejemplo:
Selección de Idioma, Preajuste de Canales,
Selección de Subtítulos, Ajuste de Imagen,
Ajuste de V-CHIP)
6. Botones de aumento/disminución de
canales (CHANNEL (CH) K/L)- Púlselos
para seleccionar un canal memorizado.
Púlselos para seleccionar un modo de ajuste
del menú en la pantalla del televisor.
Pulse estos botones para seleccionar un
artículo que desee ajustar en el modo del
control de imagen.
7. Botón de alimentación (POWER)- Púlselo
para encender y apagar el televisor.
8. Ventanilla sensora de infrarrojos- Recibe
las señales de control infrarrojas
procedentes del mando a distancia.
9. Botones de números de canales- Pulse dos
dígitos para acceder directamente al canal
deseado. Recuerde pulsar "0" antes de pulsar
el número de un canal de un solo dígito.
Botón +100- Púlselo para seleccionar canales
de televisión por cable cuyo número sea igual
o superior al 100.
10.Botón de silenciamiento (MUTE)- Pulse el
botón MUTE para apagar el sonido del
programa de TV. (La visualización del nivel
del volumen cambia del color AZUL CLARO
a ROJO CLARO.) Pulse de nuevo el botón
MUTE o los botones de K o L del volumen
(VOL) para reponer el sonido.
11. Botón INPUT SELECT- Púlselo para
seleccionar el modo de entrada del televisor o
de un equipo externo (AUX1, AUX2).
(Consulte UTILIZACIÓN DE LAS TOMAS
DE ENTRADA DE AUDIO/VIDEO.)
12.Botón de retorno de canal (CHANNEL
RETURN)- Pulse este botón para volver al
canal previamente visto. Por ejemplo, al
pulsar el botón CHANNEL RETURN una
vez, la visualización de canales cambiará de
CH 3 (canal actual) a CH 10 (canal visto con
anterioridad), y al pulsarlo por segunda vez,
la visualización cambiará de CH 10 a CH 3.
13.Botón de visualización (DISPLAY)- Púlselo
para visualizar el número del canal en la
pantalla. Si lo pulsa de nuevo, el número del
canal desaparecerá.
14.Botón del temporizador para dormir
(SLEEP)- Pulse el botón SLEEP para
visualizar el temporizador para dormir y
activar la función. El tiempo tras el cual se
desactivará la función se determinará
mediante el número de veces que se pulse el
botón (0, 10, 20, 30.. 90, 0 minutos).
15.Botón de juego (GAME)- Púlselo para
seleccionar el modo de juegos.
Pulse este
botón de nuevo para salir de estos modos.
(Consulte UTILIZACIÓN DE LAS TOMAS
DE ENTRADA DE AUDIO/VIDEO y
AJUSTE DE IMAGEN.)
16.
Toma de entrada S-AUX (S-VIDEO)-
Conéctela a la toma de salida S-AUX de una
videocámara o una videograbadora utilizando
el cable S-AUX (no suministrado).
17.Toma de entrada de antena (ANT. IN)-
Conéctela a una antena, sistema de TV por
cable o sistema de TV por satélite.
18.Cable de alimentación de CA- Conéctelo
a una toma de CA estándar (120V/60Hz).
- CONTROL REMOTO -
POWER
123
456
789
0 +100
DISPLAY
VOL
CH
CH
VOL
SLEEP
CHANNEL
RETURN
6
9
4
3
10
13
12
11
14
MUTE
MENU
5
GAME
15
INPUT
SELECT
Nota: Antes de conectar el cable de
alimentación de CA a una toma de CA
estándar, quitelo del gancho para que no se
rompiera ningún hilo.
INSTALACION DE LAS PILAS
1) Quite deslizando la tapa del
compartimiento de las pilas en la unidad
del control remoto.
2) Inserte 2 pilas pequeñas "AA" en el
compartimiento de las pilas, en la posición
indicada por las marcas de polaridad (+ / -).
3) Instale la tapa.
UTILIZACIÓN DE LAS TOMAS
DE ENTRADA DE AUDIO/VIDEO
Cuando utilice las tomas de entrada
AUDIO/VIDEO, seleccione el modo "AUX1"
o “AUX2” pulsando el botón INPUT SELECT
del control remoto.
●
Para utilizar las tomas de la parte trasera del
televisor, seleccione "AUX1".
●
Para utilizar las tomas de la parte delantera
del televisor, seleccione "AUX2".
Nota:
●
También podrá establecer al mismo tiempo
el modo de juegos y el modo de entrada de
equipo externo pulsando el botón GAME
del mando a distancia. "GAME" aparecerá
en la pantalla del televisor. En este caso,
conecte la fuente externa a las tomas
AUDIO/VIDEO del panel delantero.
(Consulte AJUSTE DE IMAGEN.)


