
SANTO
Kühl-/Gefrierkombination electronic
Electronic Refrigerator/Freezer
Gebrauchsanweisung
Operating Instructions
818 34 57-00/4

48 818 34 57-00/4
Dear customer,
Before placing your new refrigerator/freezer into operation please read
these operating instructions carefully. They contain important
information for safe use, for installation and for care of the appliance.
Please keep these operating instructions for future reference. Pass them
on to possible new owners of the appliance.
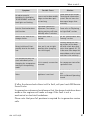
1
Notes which are important for your safety or for the proper function-
ing of the appliance are stressed with a warning triangle and/or with
signal words (Warning!, Caution!, Important!). Please observe the fol-
lowing carefully.
0 1. This symbol and numbered instructions guide you step by step in the
operation of the appliance.
2. .....
3
Supplementary information regarding operation and practical uses of
the appliance appear after this symbol.
2
Tips and notes concerning economical and environmentally sound use
of the appliance are marked with the cloverleaf.
Explanations of the technical terminology used in the operating
instructions can be found at the end in the section "Technical
Terminology".
The operating instructions contain instructions for the correction of
possible malfunctions by the user in the section "What to do if ...". If
these instructions should not be sufficient, please contact your local
AEG Service Force Centre.
P
r
i
nte
d
on paper manu
f
acture
d
w
i
t
h
env
i
ronmenta
ll
y soun
d
processes.
he who thinks ecologically acts accordingly ...

818 34 57-00/4 49
Contents
Important Safety Instructions . . . . . . . . . . . . . . . . . . . . . . . . . . . . . . . . . . . . 51
Environmental Information . . . . . . . . . . . . . . . . . . . . . . . . . . . . . . . . . . . . . . 53
Packaging . . . . . . . . . . . . . . . . . . . . . . . . . . . . . . . . . . . . . . . . . . . . . . . . . . . . . . 53
Old Appliances . . . . . . . . . . . . . . . . . . . . . . . . . . . . . . . . . . . . . . . . . . . . . . . . . . 54
Appliance Transport . . . . . . . . . . . . . . . . . . . . . . . . . . . . . . . . . . . . . . . . . . . . 54
Before Use . . . . . . . . . . . . . . . . . . . . . . . . . . . . . . . . . . . . . . . . . . . . . . . . . . . . . 55
Packaging . . . . . . . . . . . . . . . . . . . . . . . . . . . . . . . . . . . . . . . . . . . . . . . . . . . . . . 55
Fitting the Door Handles . . . . . . . . . . . . . . . . . . . . . . . . . . . . . . . . . . . . . . . . 56
Installation . . . . . . . . . . . . . . . . . . . . . . . . . . . . . . . . . . . . . . . . . . . . . . . . . . . . 57
Installation Location . . . . . . . . . . . . . . . . . . . . . . . . . . . . . . . . . . . . . . . . . . . . . 57
The refrigerator/freezer needs ventilation . . . . . . . . . . . . . . . . . . . . . . . . . . . 58
Appliance Alignment . . . . . . . . . . . . . . . . . . . . . . . . . . . . . . . . . . . . . . . . . . . . . 58
Electrical Connection . . . . . . . . . . . . . . . . . . . . . . . . . . . . . . . . . . . . . . . . . . . . 58
Installation of the carbon filter . . . . . . . . . . . . . . . . . . . . . . . . . . . . . . . . . . . . 59
Reversing The Door . . . . . . . . . . . . . . . . . . . . . . . . . . . . . . . . . . . . . . . . . . . . . 60
Appliance Description . . . . . . . . . . . . . . . . . . . . . . . . . . . . . . . . . . . . . . . . . . . 61
View of Appliance . . . . . . . . . . . . . . . . . . . . . . . . . . . . . . . . . . . . . . . . . . . . . . . 61
Freezer tray . . . . . . . . . . . . . . . . . . . . . . . . . . . . . . . . . . . . . . . . . . . . . . . . . . . . . 62
Cold Accumulation Block . . . . . . . . . . . . . . . . . . . . . . . . . . . . . . . . . . . . . . . . . 62
Control Panel . . . . . . . . . . . . . . . . . . . . . . . . . . . . . . . . . . . . . . . . . . . . . . . . . . . 63
Temperature setting buttons . . . . . . . . . . . . . . . . . . . . . . . . . . . . . . . . . . . . . . 63
Temperature Displays . . . . . . . . . . . . . . . . . . . . . . . . . . . . . . . . . . . . . . . . . . . . 64
MODE button . . . . . . . . . . . . . . . . . . . . . . . . . . . . . . . . . . . . . . . . . . . . . . . . . . . 64
Text display . . . . . . . . . . . . . . . . . . . . . . . . . . . . . . . . . . . . . . . . . . . . . . . . . . . . . 65
RESET button . . . . . . . . . . . . . . . . . . . . . . . . . . . . . . . . . . . . . . . . . . . . . . . . . . . 65
Prior to Initial Start-Up . . . . . . . . . . . . . . . . . . . . . . . . . . . . . . . . . . . . . . . . . 66
Initial Start-Up . . . . . . . . . . . . . . . . . . . . . . . . . . . . . . . . . . . . . . . . . . . . . . . . . 66
Temperature Adjustment . . . . . . . . . . . . . . . . . . . . . . . . . . . . . . . . . . . . . . . . 67
Operating modes . . . . . . . . . . . . . . . . . . . . . . . . . . . . . . . . . . . . . . . . . . . . . . . 68
Switching the Appliance Off . . . . . . . . . . . . . . . . . . . . . . . . . . . . . . . . . . . . . 70

Contents
50 818 34 57-00/4
Control and Information Systems . . . . . . . . . . . . . . . . . . . . . . . . . . . . . . . . . 72
Power cut warning . . . . . . . . . . . . . . . . . . . . . . . . . . . . . . . . . . . . . . . . . . . . . . 72
“Open door” warning . . . . . . . . . . . . . . . . . . . . . . . . . . . . . . . . . . . . . . . . . . . . . 72
Temperature warning . . . . . . . . . . . . . . . . . . . . . . . . . . . . . . . . . . . . . . . . . . . . 73
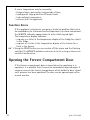
Function Errors . . . . . . . . . . . . . . . . . . . . . . . . . . . . . . . . . . . . . . . . . . . . . . . . . . 74
Opening the Freezer Compartment Door . . . . . . . . . . . . . . . . . . . . . . . . . . 74
Interior Accessories . . . . . . . . . . . . . . . . . . . . . . . . . . . . . . . . . . . . . . . . . . . . . 75
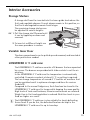
Storage Shelves . . . . . . . . . . . . . . . . . . . . . . . . . . . . . . . . . . . . . . . . . . . . . . . . . 75
Variable Inner Door . . . . . . . . . . . . . . . . . . . . . . . . . . . . . . . . . . . . . . . . . . . . . . 75
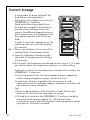
LONGFRESH 0 °C cold zone . . . . . . . . . . . . . . . . . . . . . . . . . . . . . . . . . . . . . . . 75
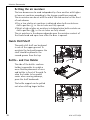
Quick Chill Shelf . . . . . . . . . . . . . . . . . . . . . . . . . . . . . . . . . . . . . . . . . . . . . . . . 76
Bottle- and Can Holder . . . . . . . . . . . . . . . . . . . . . . . . . . . . . . . . . . . . . . . . . . . 76
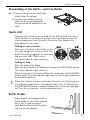
Dismantling of the Bottle- and Can Holder . . . . . . . . . . . . . . . . . . . . . . . . . . 77
Quick chill . . . . . . . . . . . . . . . . . . . . . . . . . . . . . . . . . . . . . . . . . . . . . . . . . . . . . . 77
Bottle Holder . . . . . . . . . . . . . . . . . . . . . . . . . . . . . . . . . . . . . . . . . . . . . . . . . . . 77
Correct storage . . . . . . . . . . . . . . . . . . . . . . . . . . . . . . . . . . . . . . . . . . . . . . . . . 78
Freezing . . . . . . . . . . . . . . . . . . . . . . . . . . . . . . . . . . . . . . . . . . . . . . . . . . . . . . . 81
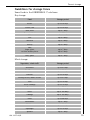
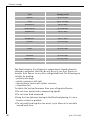
Frozen Storage . . . . . . . . . . . . . . . . . . . . . . . . . . . . . . . . . . . . . . . . . . . . . . . . . 82
Storage Goods Symbols/Freezing Calendar . . . . . . . . . . . . . . . . . . . . . . . . . 82
Preparation of Ice Cubes . . . . . . . . . . . . . . . . . . . . . . . . . . . . . . . . . . . . . . . . 83
Energy Saving Advice . . . . . . . . . . . . . . . . . . . . . . . . . . . . . . . . . . . . . . . . . . . 83
Defrosting . . . . . . . . . . . . . . . . . . . . . . . . . . . . . . . . . . . . . . . . . . . . . . . . . . . . . 84
Freezer Compartment Defrosting . . . . . . . . . . . . . . . . . . . . . . . . . . . . . . . . . . . 84
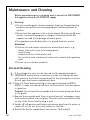
Maintenance and Cleaning . . . . . . . . . . . . . . . . . . . . . . . . . . . . . . . . . . . . . . 86
Internal Cleaning . . . . . . . . . . . . . . . . . . . . . . . . . . . . . . . . . . . . . . . . . . . . . . . . 86
External Cleaning . . . . . . . . . . . . . . . . . . . . . . . . . . . . . . . . . . . . . . . . . . . . . . . . 87
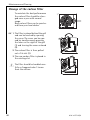
Change of the carbon filter . . . . . . . . . . . . . . . . . . . . . . . . . . . . . . . . . . . . . . . 88
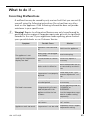
What to do if ... . . . . . . . . . . . . . . . . . . . . . . . . . . . . . . . . . . . . . . . . . . . . . . . . 89
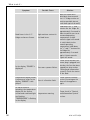
Correcting Malfunctions . . . . . . . . . . . . . . . . . . . . . . . . . . . . . . . . . . . . . . . . . . 89
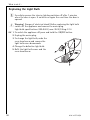
Replacing the Light Bulb . . . . . . . . . . . . . . . . . . . . . . . . . . . . . . . . . . . . . . . . . . 92
Normal Operating Sounds . . . . . . . . . . . . . . . . . . . . . . . . . . . . . . . . . . . . . . . 93
Regulations, Standards, Guidelines . . . . . . . . . . . . . . . . . . . . . . . . . . . . . . . 93
Technical Terminology . . . . . . . . . . . . . . . . . . . . . . . . . . . . . . . . . . . . . . . . . . 94
Customer Service . . . . . . . . . . . . . . . . . . . . . . . . . . . . . . . . . . . . . . . . . . . . . . . 95

818 34 57-00/4 51
1 Important Safety Instructions
The safety of our appliances is in accordance with recognised techno-
logical standards and appliance safety legislation. We nevertheless feel
that it is important to acquaint you with the following safety guidelines:
Use for Intended Purpose
• The appliance is intended for use at home. Depending on the preset
operation mode, this appliance becomes suitable for cooling,
freezing, for frozen storage of foods or for ice preparation. The
manufacturer assumes no liability for damages occurring through
improper operation or use of the appliance for unintended purposes.
• Alterations or changes to the appliance are not permitted for reasons
of safety.
• If you should use this appliance in a commercial application or for
purposes other than cooling, freezing, or frozen storage of foods,
please observe all valid legal regulations for your application.
Prior to initial start-up
• Check the appliance for transport damage. Do not under any
circumstances connect a damaged appliance! Please contact your
supplier in the event of damage.
• Make sure that the power plug is not squashed or damaged by the
back of the appliance. A damaged power plug may overheat and
cause a fire.
• If the power plug socket is loose, do not insert the power plug. There
is a risk of electric shock or fire.
Refrigerant
The refrigerant isobutane (R600a) is contained within the refrigerant
circuit of the appliance, a natural gas with a high level of
environmental compatibility, which is nevertheless flammable.
• Warning - During transportation and installation of the appliance,
be certain that none of the components of the refrigerant circuit
become damaged.
• If the refrigerant circuit should become damaged:
– avoid open flames and sources of ignition;
– thoroughly ventilate the room in which the appliance is situated.

Important Safety Instructions
52 818 34 57-00/4
Safety for Children
• Packaging materials (e.g. films, styrofoam) can be dangerous for
children. Danger of suffocation! Keep packaging materials away from
children!
• Before disposing of old appliances make them inoperable. Remove
plug from mains, sever the power cable, remove or destroy any snap
or latch closures. This eliminates the danger that playing children lock
themselves into the appliance (danger of suffocation!) or place
themselves into other life-endangering situations.
• Children often do not recognise the dangers involved with household
appliances. Please provide for the necessary supervision and do not
allow children to play with the appliance!
Daily Operation
• Containers with flammable gases or fluids can develop leaks through
contact with the cold. Danger of explosion! Do not store containers
with flammable substances, such as aerosol cans, refill cartridges for
cigarette lighters etc. in the appliance.
• Bottles and cans may not be placed in the freezer compartment. They
can burst when the contents freeze - or even explode if the contents
contain carbonic acid! Never place sodas, juices, beer, wine,
champagne etc. into the freezer compartment. Exception: Spirits with
high alcohol content may be stored in the freezer compartment.
• Do not place ice cream or ice cubes directly from the freezer
compartment into the mouth. Very cold ice can freeze to the lips or
tongue and cause injury.
• Never touch frozen goods with wet hands. Hands can freeze to the
goods.
• Warning - Do not operate any electrical appliances in the appliance
(e.g. electric ice cream makers, mixers etc.).
• Warning - Do not cover or obstruct the ventilation openings as this
will impair the operation of the appliance.
• Warning - Do not use any mechanical devices or other artificial
means to speed up defrosting unless they are recommended by the
manufacturer.
• Before cleaning the appliance switch off and remove the plug from
the mains, or switch off or turn out the circuit breaker or fuse.
• Placing frozen goods on the top of the appliance can lead to the
accumulation of condensation on the top panel through contact with
the cold. Electronic components are housed within this top panel. If

818 34 57-00/4 53
water should drip onto these components, the appliance could be
damaged by a short circuit. For this reason do not place frozen goods
on top of the appliance.
• Do not remove the power cord by pulling on its lead, particularly
when the appliance is being pulled out of its niche. Damage to the
cord may cause a short circuit, fire and/or electric shock.
• Do not place heavy articles or the appliance itself on the power cord.
There is a risk of a short circuit and fire.
• If the power cord is damaged, it must be replaced by a certified
service agent or qualified personnel.
In case of malfunction
• If a malfunction should occur at the appliance, refer first to the
section "What to do if ..." in these operating instruction. If the
instructions in this section are not sufficient, do not undertake any
further work on your own.
• Refrigerators or feezers may only be repaired by trained personnel.
Repairs carried out by untrained personnel can lead to substantial
danger. Please contact your dealer or our customer service
department for repairs.
Environmental Information
Packaging
All transit packaging materials are environmentally compatible and can
be reused. Wood is un-treated. The plastics can be recycled and are
identified as follows:
>PE< for polyethylene, e.g. the outer covering and the bags in the
interior.
>PS< for polystyrene foam, e.g. the pads, which are pure hydrocarbon
compounds and can be recycled.
The carton parts are made from recycled paper. Please dispose of the
packaging with due care for the environment.

54 818 34 57-00/4
Old Appliances
When disposing of your old appliance:
• Make the appliance unusable by cutting off the cable and remove
any door catches to ensure small children cannot be trapped inside.
• The appliance may not be disposed of with domestic waste or bulky
refuse.
• The refrigerant circuit, especially the heat exchanger at the back of
the appliance, may not be damaged.
Help to keep your country tidy - use an authorised disposal site.
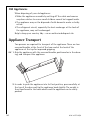
Appliance Transport
Two persons are required for transport of the appliance. There are two
recessed handles at the front of the base and at the back of the
appliance at the top for improved gripping.
0 1. Grip the appliance with the recessed handles positioned as in the draw-
ing, and transport the appliance.
2. In order to push the appliance into its final position, press carefully at
the top of the door and tip the appliance back slightly. The weight is
thus transferred to the back wheels and the appliance can be easily
pushed.

818 34 57-00/4 55
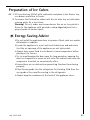
Before Use
Packaging
0 1. Remove all adhesive tape and packaging from the interior of the appli-
ance.
3
Any remnants of adhesive can be removed with white spirit.
2. Remove the transport protection pieces and pull off the adhesive tape.
3. Wash the inside of the appliance with lukewarm water with a little
bicarbonate of soda added (5 ml to 0.5 litre of water). Do not use soap
or detergent as the smell may linger. Dry the appliance thoroughly.

56 818 34 57-00/4
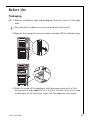
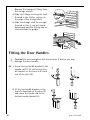
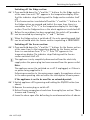
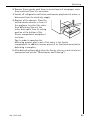
Remove the transport fittings from
the storage shelves:
4. Slide the fittings securing the shelf
forward to the thicker section on
the edge of the storage shelf.
5. Slide the storage shelf far enough
forward so that it can be hinged
downwards and the fittings can be
removed from the guides.
Fitting the Door Handles
1
Caution! Do not overtighten the screws (max. 2 Nm) as you may
damage the door handles.
0 1. Screw the top handle bracket to the
handle rod (1). Fit the bottom han-
dle bracket on the lower left-hand
side of the door (2).
2. Fit the top handle bracket on the
top left-hand side of the door (3)
and screw the handle rod to the
bottom handle bracket (4).

818 34 57-00/4 57
Installation
Installation Location
The appliance should be installed in a well ventilated, dry room.
Energy use and efficient performance of the appliance is affected by
the ambient temperature.
The appliance should therefore
– not be exposed to direct sunlight;
– not be installed next to radiators, cookers or other sources of heat;
– only be installed at a location whose ambient temperature
corresponds to the climate classification, for which the appliance is
designed.
The climate classification can be found on the rating plate, which is
located at the left on the inside of the appliance.
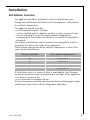
The following table shows which ambient temperature is correct for
each climate classification:
If installation next to a source of heat is unavoidable, the following
minimum clearances must be maintained at the sides of the appliance:
– for electric cookers 3 cm;
– for oil and coal fired ranges 30 cm.
If these clearances cannot be maintained a heat insulating pad is requi-
red between the cooker and the refrigeration appliance.
Climate classification for an ambient temperature of
SN +10 to +32 °C
N +16 to +32 °C
ST +18 to +38 °C
T +18 to +43 °C

Installation
58 818 34 57-00/4
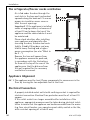
The refrigerator/freezer needs ventilation
Air is fed under the door through the
vent slots in the base and is exhausted
upwards along the back wall. To ensure
proper air circulation never cover or
alter the vent openings.
Important! If the appliance is installed
under a hanging cabinet, a clearance of
at least 10 cm between the top of the
appliance and the cabinet above it must
be maintained.
Please check whether, after installing
your appliance and especially after
reversing the door, the door seal seals
tightly. A badly fitting door seal may
lead to heavy frosting and a higher
power consumption (see also "What to
do if ...“).
Remove the two wall spacers from
the appliance accessories pack and,
in accordance with the illustrations,
fix them at the top of the rear of the
appliance so that the distance from
the wall required for the necessary
ventilation is ensured.
Appliance Alignment
0 1. The appliance must be level. Please compensate for unevenness in the
floor by turning the two adjustable feet at the front.
Electrical Connection
A properly installed socket outlet with earthing contact is required for
electrical connection. Electrical fuse protection must be of at least 10
ampere.
If the outlet socket is no longer accessible after installation of the
appliance, appropriate measures must be taken during electrical instal-
lation to assure that the appliance can be disconnected from the mains
(e.g. fuse, circuit breaker, non-operate current safety-switch or the like,
with a contact opening of at least 3 mm).

Installation
818 34 57-00/4 59
0 1. Before initial start-up, refer to the appliance rating plate to ascertain if
supply voltage and current values correspond with those of the mains
at the installation location.
e.g.: AC 220 ... 240 V 50 Hz or
220 ... 240 V~50 Hz
(i.e. 220 to 240 volts alternating current, 50 Hertz)
The rating plate is inside the appliance at the left.
Warning: To avoid potential danger, if the mains connection lead of
this appliance is damaged, it must be replaced by our customer service
representative or a person with similar qualifications.
Warning: Under no circumstances should the appliance be connected
to electronic “power saving plugs” or to a.c.-d.c. converters which con-
vert direct current to 230 V alternating current (e.g., solar installations,
ship networks)
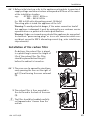
Installation of the carbon filter
On delivery the carbon filter is placed
in a plastic bag to secure the length of
life of the carbon filter. The filter
should be placed behind the grill
before the cabinet is turned on.
0 1. The cover can be opened by simultane-
ously pressing the lever on the right of
grill (1) and turning the cover outward
(2).
2. The carbon filter is then mounted in
the slot found in the back of the cover
(3).
1
The filter should be handled carefully
so fragments don´t loosen from the
surface.

60 818 34 57-00/4
Reversing The Door
The door hinges can be changed from right (as supplied) to left if
required to suit the location where the appliance is installed.
Important! Only a qualified technician should change the side on
which the door is fixed. If this is necessary, please contact our Customer
Services or your dealer.
1
Warning! Unplug from the mains, before reversing the door.

818 34 57-00/4 61
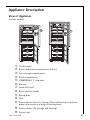
Appliance Description
View of Appliance
(various models)
á Control panel
à Butter and cheese compartment with lid
â Door storage compartments
ä Bottle compartment
ã LONGFRESH 0 °C cold zone
å Shelves
ç Quick chill shelf
é Bottle and can holder
è Rating plate
ê Grid
ë Freezer drawer (only for storage). When defrosting the bottom
drawer also serves as a water collecting vessel
í Freezer drawer (for storage and freezing)
ì Freezer tray

Appliance Description
62 818 34 57-00/4
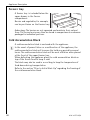
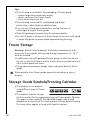
Freezer tray
A freezer tray is included below the
upper drawer in the freezer
compartment.
Berries and vegetables, for example,
can be pre-frozen on the freezer tray.
Advantage: The berries are not squeezed and maintain their natural
form. The frozen berries can then be stored in compartments or drawers
packaged in individual portions.
Cold Accumulation Block
A cold accumulation block is enclosed with the appliance.
3
In the event of power failure or a malfunction of the appliance, the
cold accumulation block will increase the hold over period by several
hours. The cold accumulation block will be most effective when placed
at the front of the upper freezer tray.
When defrosting the appliance place the cold accumulation block on
top of the frozen food to keep it cold.
The block may also be used in a cool bag to keep the temperature of
food down during transportation.
Refer to the section "Prior to Initial Start-Up" regarding the freezing of
the cold accumulation block.

Appliance Description
818 34 57-00/4 63
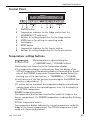
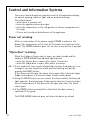
Control Panel
1 ON/OFF button
2 Temperature indicator for the fridge section (not for
LONGFRESH 0 °C cold zone)
3 Buttons for setting temperature for the fridge section
4 MODE button for setting the operating mode
5 Text display
6 RESET button
7 Temperature indicator for the freezer section
8 Buttons for setting temperature for the freezer section
Temperature setting buttons
The temperature is adjusted using the
„+“ (WARMER) and „-“ (COLDER) buttons.
These buttons are connected to the temperature display.
• The temperature display is switched over from the display of the
ACTUAL temperature (Temperature display is illuminated) to the dis-
play of the DESIRED temperature (Temperature display flashes) by
pressing one of the two buttons, „+“ (WARMER) or „-“ (COLDER).
• Each time one of the two buttons is pressed again the DESIRED tem-
perature is adjusted by 1 °C.
• If neither button is pressed, the temperature display automatically
switches back after a short period (approx. 4 sec.) to the display of
the ACTUAL temperature.
DESIRED temperature means:
The temperature that has been selected for inside the fridge or the
freezer compartment. The DESIRED temperature is indicated by flashing
numbers.
ACTUAL temperature means:
The temperature display indicates the current temperature inside the
fridge or the freezer compartment. The ACTUAL temperature is indi-
cated with illuminated numbers.

Appliance Description
64 818 34 57-00/4
3
Once the COOLMATIC- or the FROSTMATIC function has been switched
on the DESIRED temperature that was set originally for the fridge or
the freezer cannot be changed.
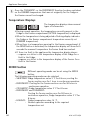
Temperature Displays
The temperature displays shows several
types of information.
• During normal operation, the temperature currently present in the
fridge or the freezer compartment (ACTUAL temperature) is displayed.
• When the temperature is being adjusted a flashing display indicates
the fridge or the freezer compartment temperature currently set
(DESIRED temperature).
• When there is a temperature warning for the freezer compartment, if
the RESET button is activated, the temperature display will show for 5
seconds the warmest temperature the frozen food has reached.
• If there is a fault in the appliance the temperature display shows:
– a square or a letter in the temperature display of the fridge for a
fault in the fridge,
– a square or a letter in the temperature display of the freezer for a
fault in the freezer.
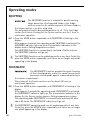
MODE button
Different operating modes can be set using the MODE
button.
The following operating modes can be selected:
– SHOPPING: Fridge temperature value 3 °C for 6 hours, cooling for
freezer section runs for 1 hour in continuous operation.
– FROSTMATIC: Cooling for the freezer section runs for 52 hours in
continuous operation.
– COOLMATIC: Fridge temperature value 3 °C for 6 hours.
– FROSTMATIC and COOLMATIC:
Cooling for freezer section runs for 52 hours in
continuous operation, fridge temperature value 3 °C for
6 hours.
– HOLIDAY: Fridge temperature value 14 °C.
– : Normal operation according to the required
temperatures set.

Appliance Description
818 34 57-00/4 65
0 1. Press MODE button once. In the display the operating mode SHOPPING
will flash.
2. After approx. 4 seconds the display stops flashing, the operating mode
SHOPPING is set.
3. If another operating mode is to be set, before 4 seconds have elapsed,
press the MODE button repeatedly until the desired mode is shown in
the display. After approx. 4 seconds have elapsed, the display stops
flashing, the operating mode is set. If the MODE button is pressed
again, the next operating mode appears in the display.
3
To return to normal operation, press the MODE button repeatedly until
no words appear in the display (“ ”).
Text display
The names of the various operating modes that can be set
with the MODE button and the words indicating an alarm,
power cut or electrical fault appear in the text display.
• Operating modes: SHOPPING, FROSTMATIC, COOLMATIC, FROSTMATIC
and COOLMATIC, HOLIDAY, empty field when operating normally.
• Alarm: DOOR ALARM when the doors of the appliance have been
open for too long, TEMPERATURE when there is a temperature
warning
• Power cut: POWER displayed
• Electrical fault: SERVICE displayed
RESET button
With the RESET button, the acoustic warning signal can
be switched off, e.g. the "Open Door" warning when
sorting in or out, the food to be chilled or frozen.
When there is a temperature warning for the freezer compartment, if
the RESET button is activated, the temperature display will show for 5
seconds the warmest temperature the frozen food has reached.

66 818 34 57-00/4
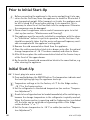
Prior to Initial Start-Up
1
Before connecting the appliance to the mains and putting it into ope-
ration for the first time, leave the appliance to stand for 30 minutes if
was transported upright. After transport on its side, the appliance must
be left to stand for 2 hours before putting it into operation. This is
necessary to allow the oil to flow back into the compressor. Otherwise
the compressor may be damaged.
0 1. Please clean the appliance interior and all accessories prior to initial
start-up (see section: "Maintenance and Cleaning").
2. The appliance must be correctly installed in accordance with the chap-
ter "Installation" before it is put into operation for the first time. Care
should be especially taken that the mains voltage and frequency avail-
able correspond with the appliance’s rating plate.
3. Remove the cold accumulation block from the appliance.
4. Place the cold accumulation block into a drawer only after the optimal
storage temperature of -18 °C has been reached, and allow to freeze.
5. After 24 hours place the cold accumulation block at the freezer tray or
at the front of the upper drawer.
6. Re-freeze the thawed cold accumulation block in the same fashion, e.g.
after cleaning the appliance.
Initial Start-Up
0 1. Insert plug into mains socket.
2. Press and hold down the ON/OFF button. The temperature indicator and
the back lighting light up, the appliance starts up.
3
Temperature settings set in the factory: +5 °C for the fridge section,
-18 °C for the freezer section.
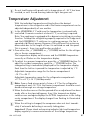
3. Set the refrigerator to the desired temperature (see section: "Tempera-
ture Adjustment").
3
Goods to be refrigerated can be loaded immediately after switching on,
because the storage temperature in the refrigerator is quickly reached.
When the freezer section is operating and the fridge section is switched
off, the latter can be switched on by pressing either of the fridge
section buttons “+” or “-”.
4. Set the freezer temperature to -18 °C or colder (see section: "Tempera-
ture Adjustment").
Page is loading ...
Page is loading ...
Page is loading ...
Page is loading ...
Page is loading ...
Page is loading ...
Page is loading ...
Page is loading ...
Page is loading ...
Page is loading ...
Page is loading ...
Page is loading ...
Page is loading ...
Page is loading ...
Page is loading ...
Page is loading ...
Page is loading ...
Page is loading ...
Page is loading ...
Page is loading ...
Page is loading ...
Page is loading ...
Page is loading ...
Page is loading ...
Page is loading ...
Page is loading ...
Page is loading ...
Page is loading ...
Page is loading ...
Page is loading ...
-
 1
1
-
 2
2
-
 3
3
-
 4
4
-
 5
5
-
 6
6
-
 7
7
-
 8
8
-
 9
9
-
 10
10
-
 11
11
-
 12
12
-
 13
13
-
 14
14
-
 15
15
-
 16
16
-
 17
17
-
 18
18
-
 19
19
-
 20
20
-
 21
21
-
 22
22
-
 23
23
-
 24
24
-
 25
25
-
 26
26
-
 27
27
-
 28
28
-
 29
29
-
 30
30
-
 31
31
-
 32
32
-
 33
33
-
 34
34
-
 35
35
-
 36
36
-
 37
37
-
 38
38
-
 39
39
-
 40
40
-
 41
41
-
 42
42
-
 43
43
-
 44
44
-
 45
45
-
 46
46
-
 47
47
-
 48
48
-
 49
49
-
 50
50


Ask a question and I''ll find the answer in the document
Finding information in a document is now easier with AI
Related papers
Other documents
-
Aeg-Electrolux S72398KA User manual
-
-
-
-
-
-
 SANTO SANTO 72398-6 KA User manual
-
 SANTO S72398KA6 User manual
-
Aeg-Electrolux S72390KA6 User manual
-

