Page is loading ...

Epson
®
DC-10s
Quick Setup
Epson is a registered trademark and Epson Exceed Your Vision is a logomark of Seiko Epson Corporation.
PrivateLine is a registered trademark and Epson Store is a service mark of Epson America, Inc.
General Notice: Other product names used herein are for identification purposes only and may be trademarks of their
respective owners. Epson disclaims any and all rights in those marks.
This information is subject to change without notice.
© 2008 Epson America, Inc. 3/08
CPD-24984
Printed in China
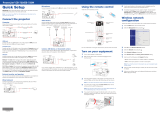
Follow the instructions in this guide for basic steps on connecting
and using the DC-10s document camera. For additional features and
information, see the DC-10s User’s Guide.
The DC-10s document camera comes with these parts:
Document camera
Using the Control Panel
The control panel lets you access commonly used features:
Power adapter
VGA cable
Using the On-screen Menu
Press to view the on-screen menu. Use the arrow buttons to navigate the menu
and adjust the following settings:
Color / Black & White Displays images as color or black-and-white.
Invert Inverts negative film to display positive images.
White Balance Adjusts the image color based on the lighting in the room
where you’re presenting.
Split Screen Displays images from two sources at once (for example, the
live camera image and an image stored in internal memory).
Memory Displays images stored in internal memory.
SD Card Displays images stored on an SD™ card (if one is inserted).
Language Changes the on-screen menu language.
AC Frequency Eliminates flicker when giving presentations in regions with
different electrical systems.
See the User’s Guide for more information about these settings.
Menu
Slideshow
Focus
Zoom
Source
Brightness
Freeze/
Memory
Press to view the on-screen menu.
Use the arrow buttons to adjust settings.
Select the image source:
• live camera image
• PC (if connected)
• internal memory
• SD card (if inserted)
Press to freeze the image.
Press and hold to save the
image in internal memory.
or on an SD
™
card.
Focus the image.
Display images in internal memory. Enlarge part of the image.
Increase or decrease
image brightness.
Where to Get Help
Epson provides these technical support services:
Internet Support
Visit Epson’s support website at epson.com/support and select your product for
solutions to common problems. You can download documentation, view FAQs,
or e-mail Epson with your questions.
Visit http://www.presentersonline.com to access tips, templates, and training for
developing successful presentations.
Speak to a Support Representative
To use the Epson PrivateLine
®
Support service, call (800) 637-7661 and enter the PIN
on the Epson PrivateLine Support card that came with your document camera. This
is the fastest way of speaking to a live representative, and it’s free. This service is
available 6 AM to 6 PM, Pacific Time, Monday through Friday, for the duration of your
warranty period.
You may also speak with a support specialist by dialing one of these numbers:
• U.S.: (562) 276-4394, 6 AM to 6 PM, Pacific Time, Monday through Friday.
• Canada: (905) 709-3839, 6 AM to 6 PM, Pacific Time, Monday through Friday.
Days and hours of support are subject to change without notice. Toll or long distance
charges may apply. Before you call, please have this information ready:
• Product name (DC-10s document camera)
• Product serial number (located on the bottom of the product)
• Proof of purchase (such as a store receipt) and date of purchase
• Description of the problem
Purchase Accessories
You can purchase projectors, screens, carrying cases, or other accessories from an
Epson authorized reseller. To find the nearest reseller, call 800-GO-EPSON
(800-463-7766). Or you can purchase online at www.epsonstore.com (U.S. sales) or
www.epson.ca (Canadian sales).
French stickers

2 Plug in and turn on
1 Connect the power adapter as shown. Plug the adapter into a wall outlet.
2 Press the Power button to turn on the document camera.
3 Turn on your projector or video display device.
3 Extend the arm
1 Raise the camera
arm and rotate the
camera head
downward.
2 If you are displaying documents
larger than letter-size (8.5 11 inches),
extend the camera arm.
Setting Up Your Presentation
1 Connect the document camera
Connect the document camera to a projector or other video display device:
Use a VGA cable (included) or an S-video cable. Connect the cable to one of the
ports shown above. Check your video equipment for the type of cable it uses.
4 Place your document
1 Place your document on the table under the camera head.
Orient it either way as shown.
2 Press the lamp button to illuminate your document.
3 Turn the dial on the camera head to orient the image on the screen.
4 Press the Focus button. Your document is automatically focused.
Note
When you’re done using the document camera, press and hold the Power button
to turn it off. To store it, disconnect any cables and fold down the camera arm.
VGA cable
Typically used by:
• projector
• computer monitor
S-video cable
Typically used by:
• projector
• TV
• VCR
A
A
Lamp button
Image rotation dial
Focus button
1
2
3
Document Camera
S-Video port
VGA port (out)
Projector

Epson
®
DC-10s
Quick Setup
Epson is a registered trademark and Epson Exceed Your Vision is a logomark of Seiko Epson Corporation.
PrivateLine is a registered trademark and Epson Store is a service mark of Epson America, Inc.
General Notice: Other product names used herein are for identification purposes only and may be trademarks of their
respective owners. Epson disclaims any and all rights in those marks.
This information is subject to change without notice.
© 2008 Epson America, Inc. 3/08
CPD-24984
Printed in China
Follow the instructions in this guide for basic steps on connecting
and using the DC-10s document camera. For additional features and
information, see the DC-10s User’s Guide.
The DC-10s document camera comes with these parts:
Document camera
Using the Control Panel
The control panel lets you access commonly used features:
Power adapter
VGA cable
Using the On-screen Menu
Press to view the on-screen menu. Use the arrow buttons to navigate the menu
and adjust the following settings:
Color / Black & White Displays images as color or black-and-white.
Invert Inverts negative film to display positive images.
White Balance Adjusts the image color based on the lighting in the room
where you’re presenting.
Split Screen Displays images from two sources at once (for example, the
live camera image and an image stored in internal memory).
Memory Displays images stored in internal memory.
SD Card Displays images stored on an SD™ card (if one is inserted).
Language Changes the on-screen menu language.
AC Frequency Eliminates flicker when giving presentations in regions with
different electrical systems.
See the User’s Guide for more information about these settings.
Menu
Slideshow
Focus
Zoom
Source
Brightness
Freeze/
Memory
Press to view the on-screen menu.
Use the arrow buttons to adjust settings.
Select the image source:
• live camera image
• PC (if connected)
• internal memory
• SD card (if inserted)
Press to freeze the image.
Press and hold to save the
image in internal memory.
or on an SD
™
card.
Focus the image.
Display images in internal memory. Enlarge part of the image.
Increase or decrease
image brightness.
Where to Get Help
Epson provides these technical support services:
Internet Support
Visit Epson’s support website at epson.com/support and select your product for
solutions to common problems. You can download documentation, view FAQs,
or e-mail Epson with your questions.
Visit http://www.presentersonline.com to access tips, templates, and training for
developing successful presentations.
Speak to a Support Representative
To use the Epson PrivateLine
®
Support service, call (800) 637-7661 and enter the PIN
on the Epson PrivateLine Support card that came with your document camera. This
is the fastest way of speaking to a live representative, and it’s free. This service is
available 6 AM to 6 PM, Pacific Time, Monday through Friday, for the duration of your
warranty period.
You may also speak with a support specialist by dialing one of these numbers:
• U.S.: (562) 276-4394, 6 AM to 6 PM, Pacific Time, Monday through Friday.
• Canada: (905) 709-3839, 6 AM to 6 PM, Pacific Time, Monday through Friday.
Days and hours of support are subject to change without notice. Toll or long distance
charges may apply. Before you call, please have this information ready:
• Product name (DC-10s document camera)
• Product serial number (located on the bottom of the product)
• Proof of purchase (such as a store receipt) and date of purchase
• Description of the problem
Purchase Accessories
You can purchase projectors, screens, carrying cases, or other accessories from an
Epson authorized reseller. To find the nearest reseller, call 800-GO-EPSON
(800-463-7766). Or you can purchase online at www.epsonstore.com (U.S. sales) or
www.epson.ca (Canadian sales).
French stickers
/