KitchenAid KOHCS 60601 User guide

Category
Ovens
Type
User guide

This manual is also suitable for

Instructions for use
3
Important safety instructions 4
Installation 8
Safeguarding the environment 9
Eco Design Declaration 9
Troubleshooting guide 9
After-Sales Service 10
Cleaning 10
Maintenance 11
Instructions for using the oven 12
Functions description table 21
Cooking table 23
Tested recipes 25
Recommended use and tips 26
4
These instructions are also available on the website: docs.kitchenaid.eu
Important safety instructions
YOUR SAFETY AND THAT OF OTHERS IS VERY IMPORTANT
This manual and the appliance itself display important safety warnings, to be
read and observed at all times.
This is the danger symbol relating to safety, which alerts users to
potential risks to themselves and others. All safety warnings are
preceded by the danger symbol and the text shown here:
Indicates a hazardous situation which,
if not avoided, will cause serious injury.
Indicates a hazardous situation which,
if not avoided, could cause serious injury.
All safety warnings give specific details of the potential
risk present, and indicate how to reduce the risk of
injury, damage and electric shock resulting from
improper use of the appliance. Carefully observe the
following instructions:
Wear protective gloves when unpacking and
installing the appliance.
The appliance must be disconnected from the power
supply before installation.
Installation and maintenance must be carried
out by a qualified technician, in compliance with
the manufacturers instructions and local safety
regulations. Do not repair or replace any part of
the appliance unless specifically stated in the user
manual.
Replacement of power cables must be carried out by
a qualified electrician. Contact an authorised After-
Sales Service.
Regulations require that the appliance be earthed.
DANGER
WARNING
5
Once the appliance is fitted in its housing, the power
cable must be long enough to connect the appliance
to the mains power supply.
For installation to comply with current safety
regulations, an omnipolar disconnect switch with a
minimum contact gap of 3 mm must be used.
Do not use multiple plug adaptors if the oven is fitted
with a plug.
Do not use extension leads.
Do not pull the power supply cable.
The electrical components must not be accessible to
the user after installation.
Do not use the surface of the induction plate if it is
cracked, and switch off the appliance to avoid the
possibility of electric shock (only for models with
induction function).
Do not touch the appliance with any wet part of the
body and do not operate it when barefoot.
This appliance is designed solely for use as a
domestic appliance, for cooking food. No other use is
permitted (e.g. heating rooms).
The manufacturer shall accept no responsibility
for the controls being used inappropriately or set
incorrectly.
The appliance and its accessible parts become hot
during use.
Care should be taken to avoid touching heating
elements.
Very young (0-3 years) and young children (3-8 years)
must be kept away unless continuously supervised.
Children aged 8 years and above, and persons with
reduced physical, sensory or mental capabilities
or lack of experience and knowledge can only use
this appliance if they are supervised or have been
6
given instructions on safe appliance use, and if they
understand the hazards involved. Children must
not play with the appliance. Cleaning and user
maintenance must not be carried out by children
without supervision.
During and after use, do not touch the heating
elements or interior surfaces of the appliance – risk
of burns. Do not allow the appliance to come into
contact with cloths or other flammable materials
until all the components have cooled down
completely.
At the end of cooking, exercise caution when
opening the appliance door, letting the hot air or
steam exit gradually before accessing the oven.
When the appliance door is shut, hot air is vented
from the aperture above the control panel. Do not
obstruct the vent apertures.
Use oven gloves to remove pans and accessories,
taking care not to touch the heating elements.
Do not place flammable materials in or near the
appliance: a fire may break out if the appliance is
inadvertently switched on.
Do not heat or cook sealed jars or containers in the
appliance.
The pressure that builds up inside might cause the jar
to explode, damaging the appliance.
Do not use containers made of synthetic materials.
Overheated oils and fats catch fire easily. Always
remain vigilant when cooking foods rich in fat and oil.
Never leave the appliance unattended during food
drying.
If alcoholic beverages are used when cooking foods
(e.g. rum, cognac, wine), remember that alcohol
evaporates at high temperatures. As a result, there is
7
a risk that vapours released by the alcohol may catch
fire upon coming into contact with the electrical
heating element.
Never use steam cleaning equipment.
Do not touch the oven during the pyrolysis cycle.
Keep children away from the oven during the
pyrolysis cycle. Any excess spillage must be removed
from the oven cavity before the cleaning cycle (only
for ovens with pyrolysis function).
During and after the pyrolysis cycle, animals must
be kept away from the area where the appliance is
located (only for ovens with the Pyrolysis function).
Use only the temperature probe recommended for
this oven.
Do not use harsh abrasive cleaners or sharp metal
scrapers to clean the oven door glass as they can
scratch the surface, which may result in the glass
shattering.
Ensure that the appliance is switched off before
replacing the lamp to avoid the possibility of electric
shock.
Do not use aluminium foil to cover food in the
cooking vessel (only for ovens with a cooking vessel
supplied).
SCRAPPING OF HOUSEHOLD APPLIANCES
This appliance is manufactured with recyclable or reusable materials. Scrap
the appliance in accordance with local regulations on waste disposal.
Before scrapping, cut off the power cords so that the appliances cannot be
connected to the mains.
For further information on the treatment, recovery and recycling of
household electrical appliances, contact your competent local authority,
the collection service for household waste or the store where you
purchased the appliance.
8
After unpacking the oven, ensure that it has not
been damaged during transit and that the oven
door closes properly.
In the event of problems, contact the dealer
or your nearest After-Sales Service. To avoid
any damage, only remove the oven from its
polystyrene foam base at the time of installation.
PREPARING THE HOUSING UNIT
Kitchen units in contact with the oven must be
heat-resistant (min 90 °C).
Carry out all cabinet cutting work before fitting
the oven in the housing unit, and carefully
remove all wood chips and sawdust.
After installation, the bottom of the oven must
no longer be accessible.
For correct appliance operation, do not
obstruct the minimum gap between the
worktop and the upper edge of the oven.
Electrical connection
Ensure that the power voltage specified on the
appliance rating plate is the same as the mains
voltage. The rating plate is on the front edge of the
oven (visible when the door is open).
Replacement of power cables (type H05 RR-F 3
x 1.5 mm2) must be carried out by a qualified
electrician. Contact an authorised After-Sales
Service.
The oven is programmed to operate with power
absorption above 2.5 kW (indicated by “HIGH” in
the settings, as shown in the figure below) which is
compatible with a domestic power supply above 3
kW. If the household has a lower power supply, the
setting must be lowered (“LOW in the settings).
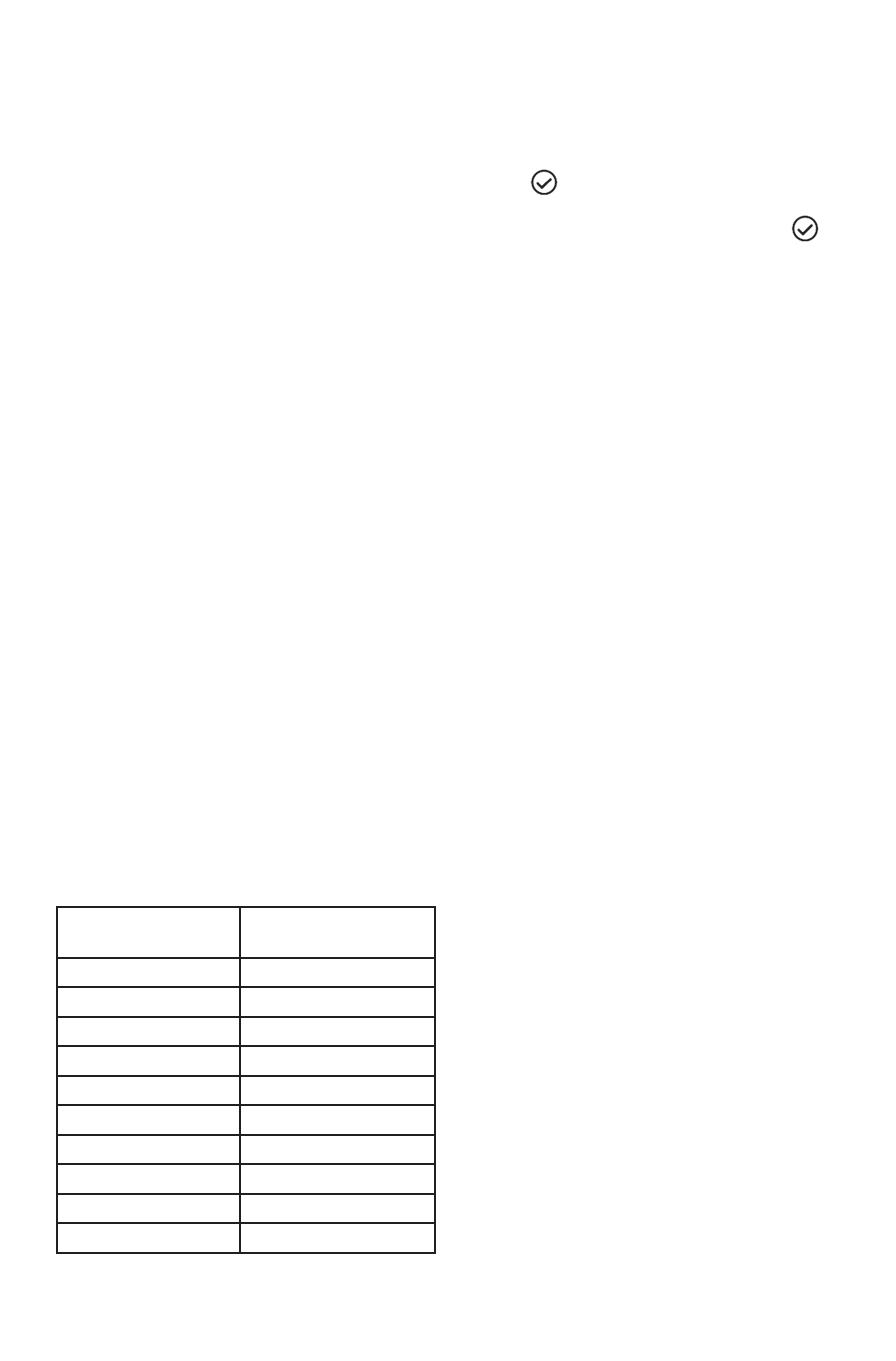
The table below details the recommended
electrical power settings for the various countries.
COUNTRY ELECTRICAL POWER
SETTING
GERMANY HIGH
SPAIN LOW
FINLAND HIGH
FRANCE HIGH
ITALY LOW
NETHERLANDS HIGH
NORWAY HIGH
SWEDEN HIGH
U.K. LOW
BELGIUM HIGH
1. To change the power absorption setting, turn
the “Functions” knob to “CLOCK” and then
select ”POWER” using the “Browse knob.
2. Press
to access the setting.
3. Turn the “Browse knob to select the setting
you require and confirm by pressing the
button.
GENERAL RECOMMENDATIONS
Before use:
Remove any protective pieces of cardboard,
protective film and adhesive labels from the
oven and the accessories.
Remove the accessories from the oven and
heat it at 200°C for about an hour to eliminate
the smell and fumes from the protective
grease and insulating materials.
During use:
Do not place heavy objects on the door as
they could damage it.
Do not cling to the door or hang anything
from the handle.
Do not cover the inside of the oven with
aluminium foil.
Do not pour water into the inside of a hot
oven; this could damage the enamel coating.
Do not drag pots or pans across the bottom
of the oven as this could damage the enamel
coating.
Make sure that the electrical cables of other
appliances do not touch hot parts of the oven
or become trapped in the door.
Do not expose the oven to atmospheric
agents.
Installation
9
Disposal of packing materials
The packaging materials are 100% recyclable
and are marked with the recycling symbol
.
The various parts of the packing must
therefore be disposed of responsibly and in full
compliance with local authority regulations
governing waste disposal.
Appliance scrapping
This appliance is marked in compliance with
European Directive 2012/19/EU on Waste
Electrical and Electronic Equipment (WEEE).
By ensuring correct disposal of the product,
the user can help prevent potential negative
consequences for the environment and
human health.
The
symbol on the product or on the
accompanying documentation indicates that
it should not be treated as domestic waste but
must be taken to an appropriate collection
centre for the recycling of electrical and
electronic equipment.
Energy saving tips
Only preheat the oven if specified in the
cooking table or your recipe.
Use dark lacquered or enamelled baking
moulds as they absorb heat far better.
Safeguarding the environment
Eco Design Declaration
This appliance meets the Ecodesign requirements of European Regulation No. 65/2014 and No.
66/2014 and complies with the European Standard EN 60350-1.
Troubleshooting guide
The oven does not work:
Check the mains electrical power and ascertain whether the oven is connected to the electrical
supply.
Switch the appliance off and then on again it to see whether the problem has been eliminated.
The electronic programmer does not work:
If the display shows the letter "F" followed by a number, contact your nearest After-Sales Service.
In this case, specify the number after the letter "F".
10
After-Sales Service
Before contacting the After-Sales Service:
See if you can solve the problem yourself
with the help of the suggestions given in the
Troubleshooting guide”.
Switch the appliance off and then on again
it to see whether the problem has been
eliminated.
If the fault persists after the above checks,
contact the nearest After-Sales Service.
Always specify:
a brief description of the fault;
the type and exact model of the oven;
the service number (number after the word
“Service on the rating plate), located on the
right-hand edge of the cooking compartment
(visible when the oven door is open).
The service number is also indicated on the
guarantee booklet;
your full address;
your telephone number.
If any repairs are required, contact an authorised
After-Sales Service (to guarantee use of original
spare parts and correct repair).
Cleaning
WARNING
Do not use steam cleaners.
Do not clean the oven until it is cool to the
touch.
Disconnect the appliance from the mains
power supply.
Oven exterior
IMPORTANT: do not use corrosive or abrasive
detergents. If any of these products comes into
contact with the appliance, clean immediately
with a damp microfibre cloth.
Clean the surfaces with a damp microfibre
cloth. If it is very dirty, add a few drops of
washing up detergent to the water. Finish off
with a dry cloth.
Oven interior
IMPORTANT: do not use abrasive sponges or
metallic scrapers or scourers. Over time, these
can ruin enamelled surfaces and the oven door
glass.
After each use, allow the oven to cool then
clean it preferably while it is still warm, in order
to remove built-up dirt and stains caused by
food residues (e.g. food with a high sugar
content).
Do not use corrosive or abrasive detergents.
Clean the door glass with a suitable liquid
detergent. The oven door can be removed to
facilitate cleaning (see MAINTENANCE).
N.B: during prolonged cooking of foods with
a high water content (e.g. pizza, vegetables,
etc.) condensation may form on the inside of
the door and around the seal. When the oven is
cold, dry the inside of the door with a cloth or
sponge.
Accessories:
Soak the accessories in water with washing-
up detergent immediately after use, handling
them with oven gloves if still hot.
Food residues can be easily removed using a
washing-up brush or sponge.
11
Use protective gloves.
Ensure that the oven is cold before carrying out the following
operations.
Disconnect the appliance from the mains power supply.
WARNING
REMOVING THE DOOR
To remove the door:
1. Open the door fully.
2. Lift the catches and push them forwards as far as they will go (fig. 1).
3. Close the door as far as it will go (A), lift it up (B) and turn it (C) until it is
released (D) (fig. 2).
To refit the door:
1. Insert the hinges in their seats.
2. Open the door fully.
3. Lower the two catches.
4. Close the door.
Fig. 1
Fig. 2
Maintenance
REMOVING THE SIDE GRILLES
The side accessory-holder grilles are equipped with two fixing screws
(fig. 3) for optimum stability.
1. Remove the screws and corresponding plates on the right and left
with the aid of a coin or tool (fig. 4).
2. To remove the grilles, lift them up (1) and turn them (2) as shown in
fig. 5.
REPLACING THE LAMP
To replace the rear lamp (if fitted)
1. Disconnect the oven from the mains power supply.
2. Unscrew the lamp cover, replace the lamp (see note for lamp type)
and screw the lamp cover back on.
3. Reconnect the oven to the power supply.
N.B:
Only use 25-40 W/230 V type E-14, T300 °C incandescent lamps, or
20- 40 W/230 V type G9, T300 °C halogen lamps.
The lamp used in the appliance is specifically designed for electrical
appliances, and is not suitable for household room illumination
(Commission Regulation (EC) no. 244/2009).
Lamps are available from our After-Sales Service.
IMPORTANT:
If using halogen lamps, do not handle with bare hands as
fingerprints can damage them.
Do not use the oven until the lamp cover has been put back in
place.
Fig. 3
Fig. 4
2
1
Fig. 5
12
Instructions for using the oven
FOR ELECTRICAL CONNECTION, SEE THE PARAGRAPH ON INSTALLATION
1. Control panel
2. Upper heating element/grill
3. Cooling fan (not visible)
4. Rating plate (not to be removed)
5. Lamps
6. Circular heating element (not visible)
7. Fan
8. Rotisserie (if supplied)
9. Bottom heating element (not visible)
10. Door
11. Position of shelves (the number of shelves is indicated on the front of the oven)
12. Rear wall
13. Meat probe connection
N.B:
During cooking, the cooling fan may switch on at intervals in order to minimise energy consumption.
At the end of cooking, after the oven has been switched off, the cooling fan may continue to run for
a while.
When the oven door is opened during cooking, the heating elements switch off.
1
12
5
2
4
8
9
11
10
7
6
3
13
13
Instructions for using the oven
FOR ELECTRICAL CONNECTION, SEE THE PARAGRAPH ON INSTALLATION
Instructions for using the oven
ACCESSORIES SUPPLIED
A. WIRE SHELF: the wire shelf can be used to grill food or as a
support for pans, cake tins and other oven-proof cookware.
(Fig. A)
B. BAKING TRAY: for making bread and pastry products, but also
roasts, fish en papillotte, etc.
(Fig. B)
C. DRIP TRAY: the drip tray is designed to be positioned under the
wire shelf in order to collect fat or as an oven tray for cooking
meat, fish, vegetables, focaccia, etc.
(Fig. C)
D. MEAT PROBE: to measure the core temperature of food during
cooking.
(Fig. D
E. SLIDING SHELVES (if fitted): for easier handling of shelves and
trays.
(Fig. E
The number of accessories may vary according to which model is purchased.
ACCESSORIES NOT SUPPLIED
Other accessories can be purchased separately from the After-Sales Service.
14
Instructions for using the oven
INSERTING WIRE SHELVES AND OTHER ACCESSORIES IN THE OVEN
1. Insert the wire shelf horizontally, with the raised part "A" facing upwards (fig. 1).
2. The other accessories, such as the baking tray, are inserted in the same way as the wire shelf (fig. 2).
A
Fig. 1 Fig. 2
1. FUNCTIONS KNOB: On/off and function selector knob
2. BROWSE KNOB: for browsing the menu and adjusting pre-set values
3. BUTTON
: to return to the previous screen
4. BUTTON
: to select and confirm settings
CONTROL PANEL DESCRIPTION
DISPLAY
1 3 4 2
15
Instructions for using the oven
DESCRIPTION OF DISPLAY
A. Display of heating elements activated during the various cooking functions
B. Time management symbols: timer, cooking time, end of cooking time, time
C. Information regarding selected functions
D. Automatic BREAD/PIZZA function selected
E. Indication of door locked during automatic cleaning cycle (pyro-cleaning)
F. Internal oven temperature
G. Pyro-cleaning function (not available on this model)
H. Browning
I. Special functions: defrosting, warm keeping, yogurt, rising, meat slow cooking, fish slow cooking,
Eco Forced air.
STARTING THE OVEN – SETTING LANGUAGE
At the first switch on of the oven, display show ENGLISH.
Turn the “Browse” knob until the language you require is displayed, then press the
button to confirm.
SETTING THE TIME
After setting the language, the time must be set on the clock. The two hour digits flash on the display.
1. Turn the “Browse” knob to display the correct hour.
2. Press the button
to confirm; the two minute digits flash on the display.
3. Turn the “Browse” knob to display the correct minutes.
4. Press button
to confirm.
To change the time, e.g. following a power cut, see the next section (SETTINGS).
SELECTING COOKING FUNCTIONS
1. Turn the “Functions” knob to the function you require: The cooking settings are shown on the
display.
2. If the values shown are those desired, press
. To change them, proceed as indicated below.
A
B C D
E
I H G F
16
Instructions for using the oven
SETTING THE TEMPERATURE/OUTPUT OF THE GRILL
To change the temperature or output of the grill, proceed as follows:
1. Turn the “Browse” knob to display the value you require.
2. Press button
to confirm.
FAST PREHEATING
PRE
1. Turn the “Functions” knob to select the fast preheating function.
2. Confirm by pressing
: the settings are shown on the display.
3. If the proposed temperature is that desired, press button
. To change the temperature,
proceed as described in previous paragraphs. The message PRE appears on the display. When the
set temperature is reached, the corresponding value (e.g. 200 °C) appears on the display and the
acoustic signal sounds.
4. If you want to set a different cooking function, turn the “Functions” knob and select the function
you require.
SETTING COOKING TIME
This function can be used to cook food for a set length of time, from a minimum of 1 minute to the
maximum time allowed by the selected function, after which the oven switches off automatically.
1. Once the temperature is confirmed, the symbol
flashes.
2. Turn the “Browse” knob to display the cooking time you require.
3. To confirm the cooking time, press button
.
SETTING END OF COOKING TIME / DELAYED START
IMPORTANT: The delayed start setting is not available for the following functions: FAST
PREHEATING, BREAD/PIZZA.
N.B. with this setting, the selected temperature is reached in a more gradual way, so cooking times
will be slightly longer than those stated in the cooking table.
The end of cooking time can be set, delaying the start of cooking by up to a maximum of 23 hours and
59 minutes. This can only be done once the cooking time has been set.
After setting the cooking time, the display shows the end cooking time (e.g. 15:45) and the
symbol
flashes.
17
Instructions for using the oven
To delay the end cooking time (and therefore the time at which cooking starts as well), proceed as
follows:
1. Turn the “Browse” knob to display the time at which you want cooking to end (e.g. 16:00)
2. Confirm the selected value by pressing button
: the two dots in the end cooking time will
flash, indicating that the setting has been applied correctly.
3. The oven will automatically delay the start of cooking so as to finish cooking at the set time.
The various settings (temperature, grill setting, cooking time) can be changed at any time by
pressing the
button to go back, turning the “Browse knob to change the settings and then
pressing the
button to confirm.
TIMER
This function can only be used with the oven switched off and can be used, for example, to monitor the
cooking time of pasta.
The maximum time which can be set is 23 hours and 59 minutes.
1. With the “Functions” knob at zero, turn the “Browse” knob to display the time you require.
2. Press button
to start the countdown. When the set time has elapsed, the display will show
“END” and an acoustic signal will sound. To mute the acoustic signal, press button (the time of
day appears on the display).
SELECTING SPECIAL FUNCTIONS
Turn the “Functions” knob to “DEFROST to access a submenu containing seven special functions.
To browse, select and start one of these functions, proceed as follows:
DEFRO
WARM
RISIN
1. Turn the “Functions” knob to “DEFROST” along with this function’s corresponding symbol.
2. Turn the “Browse” knob to scroll through the list of functions: DEFROST, WARM KEEPING, YOGURT,
RISING, MEAT SLOW COOKING, FISH SLOW COOKING, ECO FORCED AIR.
3. Press button
to confirm.
18
Instructions for using the oven
BROWNING
At the end of cooking, with certain functions, the display indicates the possibility of browning. This
function can only be used when cooking time has been set.
PRESS
Once the cooking time has ended, the display shows: “PRESS TO BROWN”. Press button , and the
oven starts a 5-minute browning cycle. This function can be selected consecutively a maximum of twice.
BREAD/PIZZA FUNCTION SELECTION
Turn the “Functions” knob to “BREAD” to access a submenu containing two automatic cooking functions
for baking bread and cooking pizza.
Bread
BREAD
1. Turn the “Functions” knob to “BREAD” and AUTO at the side.
2. Press
to select the function.
3. Turn the “Browse” knob to set the required temperature (between 180 °C and 220 °C) and confirm
by pressing the
button.
4. Turn the “Browse” knob to set the required cooking time and press
to start cooking.
Pizza
1. Turn the “Functions” knob to “BREAD”. To select the “PIZZA” function, proceed as follows:
2. Turn the “Browse” knob: “PIZZA” appears on the display.
3. Press
to select the function.
4. Turn the “Browse” knob to set the required temperature (between 220 °C and 250 °C) and confirm
by pressing the
button.
5. Turn the “Browse” knob to set the required cooking time and press
to start cooking.
19
Instructions for using the oven
MEAT PROBE (PROBE)
The meat probe supplied allows the exact temperature (up to 100°C) to be
measured during cooking, to ensure optimum cooking.
Based on the food being cooked, the required core temperature can be set.
It is very important to position the probe accurately in order to obtain
perfect cooking results. Insert the probe fully into the fleshiest part of
the meat, avoiding bones and fatty parts (Fig. 1). For poultry, the probe
should be inserted sideways, in the middle of the breast, taking care to
ensure the tip does not end up in a hollow part (Fig. 2).
In the case of meat with very irregular thickness, check it is cooked
properly before removing it from the oven. Connect the end of the probe
in the hole located on the right wall of the oven chamber.
(Fig. 1)
(Fig. 2)
Meat probe cooking function
When the meat probe is inserted, cavity temperature is managed as defined for the selected function
but cooking process finish once the temperature measured reach the estimated meat probe target set
by the customer.
There isn’t a specified menu for the meat probe cooking functions, but is always possible switch from a
traditional function to a “Meat Probe function This occurs when the meat probe is inserted on.
An acoustic signal sounds when the meat probe is detected, and “PROBE” appears on the display for 3
seconds. The display then shows the current information again.
PROBE
If the Functions knob is not turned to Standby or Lamp, the display shows the general information on
the cooking functions and the temperature set for the meat probe.
If the meat probe is inserted and detected at the start of a function (quick preheating, grill, special
functions, browning) without probe enabling, cooking will not start until the probe is removed. An alarm
signal occurs and the following message is displayed:
REMOV PROBEVE PR
Since the end of cooking depends on the temperature set for the meat probe, a countdown timer cannot
be set for the function, and therefore a cooking function with delayed start cannot be set.
After selecting a cooking function, adjust the oven temperature (at the top right of the display) by
turning the knob +/- and confirming with the key
. The value to be set for the meat probe (at the
bottom right of the display) can now be changed: turn the knob +/- and confirm with the key
to
start cooking.
The oven and meat probe temperature can be changed at any time during cooking. To change the oven
temperature, just turn the knob +/-; to change the meat probe temperature, press the key
twice,
turn the knob +/- to set the value and confirm with the key
. The meat probe default value is 70°C
and can be adjusted with minimum steps of 1°C.
When the meat probe is detected at the start of or during a function, all the preheating phases are
skipped and the first cooking phase of the selected function is carried out; the lamp stays ON until the
meat probe is removed and no longer detected.
If the probe is removed during operation, the display shows the minutes of cooking and the counter
increases the value until the user stops the function or inserts the meat probe again.
When end of cooking occur the display shows a blinking “END”.
20
Instructions for using the oven
SETTINGS
Turn the “Functions” knob to “CLOCK” to access a submenu containing five display settings which can be
changed.
Clock
Turn the “Browse” knob until “CLOCK” is displayed. To change the time of day, see the previous paragraph
(SETTING THE TIME).
Brightness
To change the display brightness, proceed as follows:
1. Turn the “Browse” knob until “BRIGHTNESS” is displayed.
2. Press button
: number 1 appears on the display.
3. Turn the “Browse” knob to increase or decrease the brightness and confirm by pressing
.
Sound
To activate or deactivate the acoustic signal, proceed as follows:
1. Turn the “Browse” knob until “SOUND” is displayed.
2. Press
to access the setting (ON/OFF).
3. Turn the “Browse” knob to select the setting you require and confirm by pressing the
button.
Eco
With the ECO mode selected (ON), the display reduces the brightness, showing the clock when the oven is
in stand-by position for 3 minutes. To view information on the display, simply press a button or turn a knob.
1. Turn the “Browse” knob until “ECO” is displayed.
2. Press
to access the setting (ON/OFF).
3. Turn the “Browse” knob to select the setting you require and confirm by pressing the
button.
4. If Eco mode is activated during a cooking function, the light inside the oven will be switched off
after one minute of cooking. It will switch on again if the user presses any buttons or turns any
knobs on the appliance.
Power
1. To change the power absorption setting, turn the “Functions” knob to “CLOCK” and then select
”POWER” using the “Browse” knob.
2. Press
to access the setting
3. Turn the “Browse” knob to select the setting you require and confirm by pressing the
button.
See the relevant part of the INSTALLATION section (page 8) for more information.
Language
1. Turn the “Browse” knob until “LANGUAGE” is displayed.
2. Press
to access the setting.
3. Turn the “Browse” knob until the language you require is displayed, then press the
button to
confirm.
KEY-LOCK
This function can be used to lock the buttons and knobs on the control panel.
To activate it, press
and at the same time for at least 3 seconds. When activated, the functions
associated with the buttons are locked and the display shows a key symbol. This function can also be
activated during cooking. To deactivate it, repeat the above procedure. When the key-lock function
is activated, the oven can be switched off by turning the knob to 0 (zero). In this case, however, the
previously selected function will have to be set again.
  • Page 1 1
  • Page 2 2
  • Page 3 3
  • Page 4 4
  • Page 5 5
  • Page 6 6
  • Page 7 7
  • Page 8 8
  • Page 9 9
  • Page 10 10
  • Page 11 11
  • Page 12 12
  • Page 13 13
  • Page 14 14
  • Page 15 15
  • Page 16 16
  • Page 17 17
  • Page 18 18
  • Page 19 19
  • Page 20 20
  • Page 21 21
  • Page 22 22
  • Page 23 23
  • Page 24 24
  • Page 25 25
  • Page 26 26
  • Page 27 27
  • Page 28 28

KitchenAid KOHCS 60601 User guide

Category
Ovens
Type
User guide
This manual is also suitable for

Ask a question and I''ll find the answer in the document

Finding information in a document is now easier with AI