Panasonic VIERA TC-P50GT30 Owner's manual
- Category
- Plasma TVs
- Type
- Owner's manual
This manual is also suitable for

Panasonic
Model No.
NOmero de modelo
TC-P50GT30
TC=P55GT30
Thank you for purchasing this Panasonic product,
Please read these instructions before operating your set and retain them for future
reference. The images shown in this manual are for illustrative purposes only.
Gracias per su decision de comprar este producto marca Panasonic.
Lea estas instrucciones antes de utilizar su televisor y guardelas para consultarlas en
el futuro. Las imageries mostradas en este manual tienen solamente fines ilustrativos.
TQB2AA0606

Experience
multi ia
an amazing level of
excitement
[] Do not display a still picture for a long time
This causes the image to remain on the plasma screen
("image retention"). This isnot considered a malfunction and is not covered by the warranty.
To prevent the "Image retention", the screen saver is
automatically activated after a few minutes if no signals are
sent or no operations are performed.
Typical still images
e Channel number and other Iogos
e Image displayed in 4:3 mode
e SD Card photo @Video game @Computer image
[] Set up
¢ Do not place the unit where it's exposed to sunlight or other bright light (including reflections).
e Use of some types of fluorescent lighting may reduce the remote control's transmission range.
2

VIi L.i k"VlERAL,nk'°,satrademarkof
Panasonic Corporation.
I-I ITIII
HDMI, the HDM] logo and High-
Definition Multimedia Interface are
trademarks or registered trademarks
of HDMI Licensing LLC in the United
States and other countries.
SDXC Logo is a trademark of SD-
3C, LLC.
"AVCHD" and the "AVCHD" logo
are trademarks of Panasonic
Corporation and Sony Corporation.
"ReaID 3D" is a trademark of RealD.
This product is covered by U.S.
Patent 5,193,000 until August 28,
2011.
Od!Tn,
DLNA _"_,the DLNA Logo and DLNA
CERTIFIED TM are trademarks,
service marks, or certification
marks of the Digital Living Network
Alliance.
QuickTime and the QuickTime
logo are trademarks or registered
trademarks of Apple inc., used
under license therefrom.
This product qualifies for ENERGY
STAR in the "Home Use" setting
and this is the setting in which
energy savings will be achieved.
Any modifications to the "Home
Use" setting or other factory default
settings could result in greater
energy consumption beyond
levels that meet ENERGY STAR
qualifications.
Manufactured under license from Dolby Laboratories.
Dolby and the double-D symbol are trademarks of Dolby
Laboratories.
HDAVl Control TM is a trademark of Panasonic Corporation.
Skype TM is a trademark of Skype limited.
IMAOEVIEWER
This product is licensed under the AVC patent portfolio
license for the personal and non-commercial use of a
consumer to (i) encode video in compliance with the AVC
Standard ("AVC Video") and/or (ii) decode AVC Video
that was encoded by a consumer engaged in a personal
and non-commercial activity and/or was obtained from a
video provider licensed to provide AVC Video. No license
is granted or shall be implied for any other use. Additional
information may be obtained from MPEG LA, LLC.
See http://www, mpegla.com.
Please read before using the unit
® Safety Precautions .......................................... 4
Getting started
• Accesser eslOptional Accessories..:.i:;::::::.i:i: 8
® Connectionsr:::.::...::,-:....,:.,:..,. .......... -,:,,"," 11
• dent fy ng Contro s :::::::::::::::::::::::::::: :;.i:.i:.; 14
® First Time Setup i.i..::.:i.i:....::.i::.:::i.::..:ii:::::.: i5
Basic Features
® Watching TV ................................................. 19
_ Using VIERATOOLS .................................... 22
® Watching content from external devices ....... 23
_ Viewing 3D images on TV ............................ 24
® Using Media player ....................................... 26
Advanced Features
_, VIERA Link TM"HDAVI ControF M''.................... 32
_ Using Network services ................................ 38
Network Connections .................................. 39
Network settings ......................................... 40
VIERA Connect (Enjoy Internet Service)....43
Using DLNA feature .................................... 44
Network Camera ......................................... 45
_, Editing and Setting Channels ....................... 46
_ How to Use Menu Functions ......................... 48
Picture settings ........................................... 49
Audio settings ............................................. 51
Timer settings ............................................. 51
Lock ............................................................ 52
Closed caption ............................................ 52
Setup .......................................................... 53
Support Information
® Ratings List for parental control .................... 54
® Technical information .................................... 55
® Care and Cleaning ........................................ 59
® Frequently Asked Questions (FAQ) .............. 60
® Specifications ................................................ 63
® index ............................................................. 65
® Limited Warranty
(for U.S.A. and Puerto Rico only) ................. 66
® Customer Services Directory
(for U.S.A. and Puerto Rico) ......................... 67
® Limited Warranty (for Canada) ..................... 68
3

Safety Precau ions
CAUTION
WARNING: To reduce the risk of electric shock, do not remove cover or back.
No user-serviceable parts inside. Refer servicing to qualified service personnel.
The lightning flash with
arrowhead within a triangle is
intended to tell the user that
parts inside the product are a risk
of electric shock to persons.
,_ The exclamation point within a
triangle is intended to tell the
user that important operating
and servicing instructions are in
the papers with the appliance.
WARNING: To reduce the risk of fire or electric shock, do not expose this apparatus to rain or moisture.
Do not place liquid containers (flower vase, cups, cosmetics, etc.) above the set
(including on shelves above, etc.).
1) Read these instructions.
2) Keep these instructions.
3) Heed all warnings.
4) Follow all instructions.
5) Do not use this apparatus near water.
6) Clean only with dry cloth.
7) Do not block any ventilation openings. Install in
accordance with the manufacturer's instructions.
8) Do not install near any heat sources such as radiators,
heat registers, stoves, or other apparatus (including
amplifiers) that produce heat.
9) Do not defeat the safety purpose of the polarized or
grounding-type plug. A polarized plug has two blades with
one wider than the other. A grounding type plug has two
blades and a third grounding prong. The wide blade or the
third prong are provided for your safety. If the provided
plug does not fit into your outlet, consult an electrician for
replacement of the obsolete outlet.
10) Protect the power cord from being walked on or pinched
particularly at plugs, convenience receptacles, and the
point where they exit from the apparatus.
11 ) Only use attachments / accessories specified by the
manufacturer.
12) Use only with the cart, stand, tripod,
bracket, or table specified by the
manufacturer, or sold with the apparatus.
When a cart is used, use caution when
moving the cart / apparatus combination to
avoid injury from tip-over.
13) Unplug this apparatus during lightning storms or when
unused for long periods of time.
14) Refer all servicing to qualified service personnel. Servicing
is required when the apparatus has been damaged in any
way, such as power-supply cord or plug is damaged, liquid
has been spilled or objects have fallen into the apparatus,
the apparatus has been exposed to rain or moisture, does
not operate normally, or has been dropped.
15) To prevent electric shock, ensure the grounding pin on the
AC cord power plug is securely connected.
Small parts can present choking hazard if accidentally
swallowed.
Keep small parts away from young children.
Discard unneeded small parts and other objects,
including packaging materials and plastic bags/sheets to
prevent them from being played with by young children,
creating the potential risk of suffocation.
[] Set up
This Plasma TV may fall and can cause personal injury or
even death if not installed correctly. To prevent personal
injury or death, follow these warnings:
® Install the Plasma TV in accordance with the
manufacturer's recommended pedestal or stand,
corresponding hardware and installation instructions.
This Plasma TV is for use only with the following
optional accessories. Use with any other type of optional
accessories may cause instability. The following accessories
are manufactured by Panasonic Corporation.
• Wall-hanging bracket (Angled)
TY-WK4PI RW(TC-P50GT3O)
TY-WK5PI RW(TC-P55GT30)
® Be sure to ask a qualified technician to carry out the
installation and set-up.
Two or more people are required to install or remove the
television.
® Some wall mounts (wall-hanging brackets) are not
designed to be mounted to walls with steel studs or old
cinder block constructions.
Ask your dealer or licensed contractor to properly secure
the wall-hanging bracket.
® Do not route the TV's power cord inside the wall.
The power cord was not designed for in-wall mounting.
Doing so can lead to fire hazard.
® Do not place the Plasma TV or its stand on a sloped or
unstable surface.
The Plasma TV may fall or tip over.
® Do not support the Plasma TV on a non-specified
pedestal.
® Do not place the Plasma TV on furniture that can easily
be used as steps, such as a chest of drawers.
® Do not climb or allow children to climb on the Plasma TV
® Place or install the Plasma TV where it cannot be
pushed, pulled over or knocked down.
® Route al! cords and cables such that they cannot be
tripped over or pulled by curious children.
4

® Do not place any objects on top of the Plasma TV.
If water spills onto the Plasma TV or foreign objects get
inside it, a short-circuit may occur which could result in
fire or electric shock. If any foreign objects get inside the
Plasma TV, please consult an Authorized Service Center.
In the unlikely event that you receive a shock from this
product it is possible that your household outlet may be
wired improperly. Have an electrician verify that the TV's
outlet is properly wired. If the symptom persists, have the
TV serviced by a qualified authorized technician.
@To prevent the spread of fire, keep candles
or other open flames away from this
product at all times
[] AC Power Supply Cord
To prevent fire or electric shock:
® The Plasma TV is designed to operate on a 120 VAC,
60 Hz service. Insert the power cord plug as far as it will
go into the wall socket.
If the plug is not fully inserted, heat may generate, which
could cause a fire.
® The included power cord is for use with this unit only.
® Do not use any power cord other than that provided
with this TV.
® Do not handle the power cord plug with wet hands.
® Do not do anything that might damage the power
supply cord.
® When disconnecting the power supply cord, hold the
plug, not the cord.
® Do not use the power supply cord if the plug or cord is
damaged.
Replace the cord or contact your Authorized Service Center.
® Do not use a 3-prong to 2-prong AC plug adapters to
connect your TV's plug to the wall outlet.
Doing so will defeat the TV plug's safety feature, which
can lead to a shock hazard. If the wall outlet does not
accommodate a 3-prong plug, have a qualified electrician
replace your outlet and check the associated wiring.
[] Handling the power supply cord
® Insert the power plug fully into the socket outlet. (If the
power plug is loose, it could generate heat and cause fire.)
® Ensure that the power plug is easily accessible.
® Ensure the earth pin on the power plug is securely
connected to prevent electrical shock.
• An apparatus with CLASS I construction shall be
connected to a power socket outlet with a protective
earthing connection.
® Do not touch the power plug with a wet hand. (This may
cause electrical shock.)
® Do not use any power cord other than that provided
with this TV. (This may cause fire or electrical shock.)
® Do not damage the power cord. (A damaged cord may
cause fire or electrical shock.)
• Do net move the TV with the cord plugged in the socket outlet.
• Do not place a heavy object on the cord or place the cord
near a high-temperature object.
• Do not twist the cord, bend it excessively, or stretch it.
• Do not pull on the cord. Hold onto the power plug body
when disconnecting cord.
• Do not use a damaged power plug or socket outlet.
@If a problem occurs (such as no picture or no sound),
or if smoke or an abnormal odor is detected from the
Plasma TV, unplug the power supply cord immediately.
Continued use of the TV under these conditions might
cause a fire or permanent damage to the TV. Have the TV
evaluated by an Authorized Service Center. Servicing of the
TV by unauthorized personnel is strongly discouraged due
to its high voltage.
If water or an object gets inside the Plasma TV, if the
Plasma TV is dropped, or if the enclosure becomes
damaged, unplug the power supply cord immediately.
A short-circuit may occur, which could cause a fire. Contact
an Authorized Service Center for an evaluation.
[_ CAUTION
® Do not cover the ventilation holes.
Doing so may cause the Plasma TV to overheat, which can
cause a fire or damage to the Plasma TV.
® Leave a space of 3 15/16" (10 cm) or more at the top,
left and right, and 2 3/4" (7 cm) or more at the rear.
® When using the pedestal, keep the space between the
bottom of the TV and the pedestal or stand surface
clear from objects that may obstruct ventilation.
[]When Moving the Plasma TV
® Be sure to disconnect all cables before moving the
Plasma TV.
Moving the TV with its cables attached might damage the
cables which, in turn, can cause fire or electric shock.
® To prevent an electric shock, disconnect the power
plug from the wall outlet as a safety precaution before
carrying out any cleaning.
® Transport only in upright position.
Transporting the unit with its display panel facing upright or
downward may cause damage to the internal circuitry.
® Using a dry cloth, clean any dust from the power supply
cord and plug regularly.
Build-up of dust on the power cord plug can increase
humidity, which might damage the insulation and cause a
fire.
This Plasma TV radiates infrared rays;
therefore, it may affect other infrared communication
equipment. Install your infrared sensor in a place away from
direct or reflected light from your Plasma TV.
The TV will still consume some power as long as the
power supply cord is connected to the wall outlet.
® Display panel is made of glass. Do not apply strong
force or impact to the display panel.
This may cause damage resulting in injury.
® The TV is heavy. TV should be handled by 2 or more
people, Support as shown to avoid injury by the TV
tipping or falling.
5

//_ WARNING
ImAbout Prevention of Accidental Ingestion
® Do not store batteries, the band accessory or nose
pads in places where small children can reach.
There is a danger small children could swallow such parts
by mistake.
• If a child accidentally swallows such parts, seek
immediate medical attention.
mAbout Prohibition of Disassembly
® Do not disassemble or modify the 3D Eyewear.
mAhout lithium battery
® Batteries must not be exposed to excessive heat such
as sunshine, fire or the like.
IZLc o,,o.1
mAbout 3D Eyewear
® Do not drop, exert pressure on, or step on the 3D
Eyewear.
Doing so may damage the glass section, which may result
in injury.
• Always store the 3D Eyewear in the case provided when
not in use.
® Be careful of the tips of the frame when putting on the
3D Eyewear.
Accidentally inserting the tip of the frame into the eye may
cause injury.
® Be careful not to trap a finger in the hinge section of the
3D Eyewear.
Doing so may result in injury.
• Pay special attention when children are using this product.
mAbout Use of 3D Eyewear
® Parents/guardians should monitor children's viewing
habits to avoid their prolonged use without rest
periods.
® Use only the 3D Eyewear recommended for this TV.
® Only use the 3D Eyewear for the specified purpose.
® Do not move around while wearing the 3D Eyewear.
The surrounding area appears dark, which may result in
falling or other accidents that may cause injury.
mAbout Viewing of 3D Images
® In the event that you experience dizziness, nausea, or
other discomfort while viewing 3D images, discontinue
use and rest your eyes.
• When you set the effect by using "3D adjustment", take
into account that the vision of 3D images varies among
different individuals.
® Do not use if the 3D Eyewear is cracked or broken.
mAbout lithium battery
® Danger of explosion if battery is incorrectly replaced.
Replace only with the same or equivalent type.
Flat panel displays are not always supported on the
proper stands or installed according to the manufacturer's
recommendations. Flat panel displays that are inappropriately
situated on dressers, bookcases, shelves, desks, speakers,
chests or carts may fall over and may cause personal injury or
even death.
The consumer electronics industry (of which Panasonic is
a member) is committed to making home entertainment
enjoyable and safe. To prevent personal injury or death, be
sure to follow the following safety guidelines:
TUNE INTO SAFETY:
• One size does NOT fit all. Follow the manufacturer's
recommendations for the safe installation and use of your
flat panel display.
• Carefully read and understand all enclosed instructions for
proper use of this product.
• Don't allow children to climb on or play with furniture and
television sets.
• Don't place flat panel displays on furniture that can easily be
used as steps, such as a chest of drawers.
• Remember that children can become excited while watching
a program, especially on "larger than life" flat panel
displays. Care should be taken to install the display where it
cannot be pushed, pulled over, or knocked down.
• Care should be taken to route all cords and cables
connected to the flat panel display so that they cannot be
pulled or grabbed by curious children.
WALL MOUNTING: IF YOU DECIDE TO WALL MOUNT
YOUR FLAT PANEL DISPLAY, ALWAYS:
• Use a mount that has been recommended by the display
manufacturer and/or listed by an independent laboratory
(such as UL, CSA, ETL).
• Follow all instructions supplied by the display and wall
mount manufacturers.
• If you have any doubts about your ability to safely
install your flat panel display, contact your retailer about
professional installation.
• Make sure the wall where you are mounting the display
is appropriate. Some wall mounts are not designed to
be mounted to walls with steel studs or old cinder block
construction. If you are unsure, contact a professional
installer.
• A minimum of two people are required for installation. Flat
panel displays can be heavy.
Panasonic recommends that a qualified installer perform
the wall=mount installation. See page 4.
The American Academy of Pediatrics discourages
television viewing for children younger than two years
of age.
6

This equipment has been tested and found to comply with the limits for an Other Class B digital device, pursuant to Part 15 of the
FCC Rules. These limits are designed to provide reasonable protection against harmful interference in a residential installation.
This equipment generates, uses and can radiate radio frequency energy and, if not installed and used in accordance with the
instructions, may cause harmful interference to radio communications. However, there is no guarantee that interference will not
occur in a particular installation. If this equipment does cause harmful interference to radio or television reception, which can be
determined by turning the equipment off and on, the user is encouraged to try to correct the interference by one or more of the
following measures:
• Reorient or relocate the receiving antenna.
• Increase the separation between the equipment and receiver.
• Connect the equipment into an outlet on a circuit different from that to which the receiver is connected.
• Consult the Panasonic Service Center or an experienced radio/TV technician for help.
FCC Caution:
To assure continued compliance, follow the attached installation instructions and use only shielded interface cables
when connecting to peripheral devices. Any changes or modifications not expressly approved by Panasonic Corp. of
North America could void the user's authority to operate this device.
FCC Radiation Exposure Statement:
This equipment complies with FCC radiation exposure limits set forth for an uncontrolled environment. This equipment
should be installed and operated with minimum distance 20cm between the radiator & your body.
FCC Declaration of Conformity
Model No, TC-P50GT30, TC-P55GT30
Responsible Party:
Contact Source:
email:
Panasonic Corporation of North America
One Panasonic Way, Secaucus, NJ 07094
Panasonic Consumer Electronics Company
1-877-95-VIE RA (958-4372)
This device complies with Part 15 of FCC Rules and RSS-Gen of IC Rules.
Operation is subject to the following two conditions:
(1) This device may not cause harmful interference, and (2) this device must accept any interference received, including
interference that may cause undesired operation of this device.
This transmitter must not be co-located or operated in conjunction with any other antenna or transmitter.
This product is restricted to indoor use due to its operation in the 5.15 to 5.25 GHz frequency range.
FCC and IC require this product to be used indoors for the frequency range 5.15 to 5.25 GHz to reduce the potential for harmful
interference to co-channel Mobile Satellite systems. High power radars are allocated as primary users of the 5.25 to 5.35 GHz
and 5.65 to 5.85 GHz bands. These radar stations can cause interference with and/or damage this product.
The available scientific evidence does not show that any health problems are associated with using low power wireless devices.
There is no proof, however, that these low power wireless devices are absolutely safe.
Low power Wireless devices emit low levels of radio frequency energy (RF) in the microwave range while being used.
Whereas high levels of RF can produce health effects (by heating tissue), exposure to low-level RF that does not produce
heating effects causes no known adverse health effects.
Many studies of low-level RF exposures have not found any biological effects. Some studies have suggested that some biological
effects might occur, but such findings have not been confirmed by additional research.
Product Identification Marking is located on the bottom of the Wireless LAN Adapter.
CANADIAN NOTICE:
For Model TC-P50GT30, TC-P55GT30
This Class B digital apparatus complies with Canadian ICES-003.
7

Accessories/Optional Accessories
Check you have all the items shown.
[] Remote Control
Transmitter
® N2QAYB000571
[] Batteries for the
Remote Control
Transmitter (2)
® AA Battery
[] Cable cl_
[] Wireless LAN Adapter (p. 39)
[] Converter cables (p. 11)
[] Owner's Manual
[] Quick start guide
[] Child safety
[] Product Registration Card (U.S.A.)
[] Pedestal
® TBL5ZX0081 (TC-P50GT30) ® TBL5ZX0058 (TC-P55GT30)
to assemble
(p. 9)
f0ptional Accessories Please contact your nearest Panasonic dealer to purchase the recommended
Optional accessories. For additional details, please refer to the Optional
accessories installation manual.
3D Eyewear
(Rechargeable type) • Product information (Model No. and release date etc.) is subject to change without notice.
® TY-EW3D2S _TY-EW3D2M • For more product information
® TY-EW3D2L (USA) http://www.panasonic.com (Canada) http://panasonic.ca
(Global reference) http:/Ipanasonic.netlavclvieral3dl
Communication Camera
¢ TY-CCIOW
• This camera can be used on VIERA Connect.
• For details, read the manual of the Communication Camera.
Wall-hanging bracket
e TY-WK4P1RW (for 50")
TY-WK5P1RW (for 55")
Rear of the TV
for fixing the TV onto the wall-hanging bracket
(not supplied with the TV)
a: 15.7" (400 mm) (50")
19.7" (500 mm) (55") Holes for I-hanging (View from the side)
b: 11.8" (300 mm) bracket installation \
® In order to maintain the TV's performance and safety, be absolutely sure to ask your dealer or a licensed
contractor to secure the wall-hanging brackets.
e Carefullyreadthe instructionsaccompanyingoptionalaccessories,andbe absolutelysureto takestepstopreventtheTVfrom tippingover.
® Handle the TV carefully during installation since subjecting it to impact or other forces may cause product damage.
® Takecarewhenfixingwallbracketstothewall.Alwaysensurethattherearenoelectricalcablesor pipesin thewallbeforehangingthebracket.
e When using the angled-type wall hanging bracket, please ensure that there is sufficient space for the connecting
cables not to press against the wall when the TV is tilted forward.
8

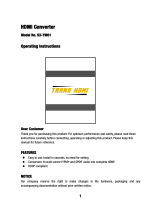
reAssembling the pedestal
_ Fix securely with assembly screws _A_,(Total 4 screws).
_ Tighten screws firmly.
[TC-P50GT30] [TC-P55GT30]
_Pole
Base
Front
_;_Attach pole cover with assembly screw _C_(only for 50")
reSet-up
_DCarry out work on a horizontal and level surface.
_ Tighten assembly screws \B_ (total 4 screws) loosely at first,
then tighten them firmly to fix securely.
Bottom view
Rear side
Arrow
mark Hole for pedestal
installation
Pole
Base
(Image: TC-P55GT30)
Removing the pedestal from the TV
Be sure to remove the pedestal in the following way when using the wall
hanging bracket or repacking the TV.
Remove the assembly screws _B_from the TV.
_2_Pull out the TV from the pedestal.
_3_Remove the assembly screw _€_from the cover (only for 50").
_4_Pull out the cover (only for 50").
_5_Remove the assembly screws _ from the pole.
Accessories
Assembly screws
XYN5+F20FN (for 50")
size (M5 x 20) (Silver) (4)
THEL090N (for 55")
size (M5 x 25) (Black) (4)
_B_ _
\v
THEL088N (for 50")
THEL090N (for 55")
size (M5 x 25) (Black) (4)
_c_
XSB4+8FNK (for 50")
size (M4 x 8) (Black) (1)
Pole (1)
(for 50")
Poles (2)
(for 55")
6_@ or (R) is printed at the
front of the poles.
Cover(1 )
(for 50")
Base (1)
(for 50")
(for 55")
®
o
o
Oo
O_
o
Co
O
o
>
o
o
©
U_
9

Do not disassemble or modify the pedestal.
® Otherwise the TV may fall over and become damaged, and personal injury may result.
( Caution )
Do not use any pedestal other than that provided with this TV.
e Otherwise the TV may fall over and become damaged, and personal injury may result.
Do not use the pedestal if it becomes warped or physically damaged.
® Ifyou use the pedestal when it is physically damaged, personal injurymay result.Contact your nearest PanasonicDealer immediately.
During set-up, make sure that all screws are securely tightened.
® If sufficient care is not taken to ensure screws are properly tightened during assembly, the pedestal will not be strong
enough to support the TV, and it might fall over and become damaged, and personal injury may result.
When removing the pedestal, do not remove the pedestal by any methods other than the specified procedure. (p. 9)
® Otherwise the TV and/or pedestal may fall over and become damaged, and personal injury may result.
Adjust the plasma panel to your
desired angle.
(View from above)
Center of the
rotation.
e TC-P50GT30
a: 9.6 " (242 ram)
b: 18.2 " (460 mm)
c: 10 °
I__1
b
® Ensure that the pedestal does not hang over the edge of the base even if the TV swivels to the full rotation range.
® Do not place any objects or hands within the full rotation range.
Hook
Note the correct
polarity (+ or -).
Close
( Caution )
® Incorrect installation may cause
battery leakage and corrosion,
resulting in damage to the remote
control.
,_,Do not mix old and new batteries.
** Do not mix different battery types (such
as alkaline and manganese batteries).
** Do not use rechargeable (Ni-Cd)
batteries.
® Do not burn or break batteries.
10

Connections
BackoftheTV Accessories
Antenna adapter (1)
e K1TYYYY00158
SD card _a'_
slot (p.26) '_ _':'_
VIDEO adapter (1)
e K2KYYYY00136
_Jy
USB1
terminal
LAN PC
connector terminal
terminal
DIGITAL
AUDIO
OUT
Component adapter (1)
e K2KYYYY00137
s_
LC/_
Audio adapter (1)
® K2KYYYY00138
f_
Optical adapter (1)
e K7CXGYC00002
PC adapter (1)
e K1 HY20YY0007
Back of the TV
,_a}Antenna adapter
@@
>©
8o
8g
8£
o
©
>
o
o
ffl
ffl
©
ffl
Power Cord
(Connect after all the
other connections have
been made.)
VHF/UHF Antenna
• NTSC (National Television System Committee):
ATSC (Advanced Television Systems Committee):
Digital TV Standards include digital high-definition television (HDTV), standard-definition television
(SDTV), data broadcasting, multichannel surround-sound audio and interactive television.
Cable
e You need to subscribe to a cable TV service to enjoy viewing their programming.
@You may need to subscribe to a high-definition (HD) cable service to enjoy HD programming,
The connection for high-definition can be done with the use of an HDMI or Component Video cable, (p, 12)
(2NND
e When using a Cable box, external equipment and video cables shown in this manual are not supplied with the TV.
e When disconnecting the power cord, be absolutely sure to disconnect the power cord plug from the wall outlet first.
@For additional assistance, visit us at: www.panasonic.com/help
www.panasonic.ca
11

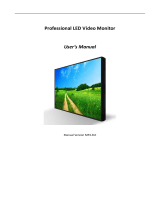
_A_To use HDMI terminals
,_===
_===
HDMI-DVI
Conversion cable
white white
Best
I ij]MDMI
L_JAV OUT
DVI OUT
L
AUDIO OUT
e.g, Blu-ray Disc
player
AV Equipment
e.g, Blu-ray Disc
player
Good
® VIERA Link connection, please refer to p. 33
® The HDMI connection is required for a 1080p signal•
(_ To use COMPONENT terminals
i!!!!!!!!!!!!!!i_
!iiiiiiiiiiii!i!iiiiiiiiiiiiilili!!!'
Basic
(Not HD)
iiiililililililililililili'i ii
i'i'i'i'i'i'i'i'i'i'i'i'ii i'i
green green green
_BCOMPONENT
(c_ Component adapter blue blue VIDEO OUT AV Equipment
_@j_,)PR ....
red red red red /®'_• _z,_
e.g. B[u=ray Disc
L
_ player
_ white wJlite_ white lwhite AUDIO
(d_Audio adapter J_" R OUT
red red red red
@ To use COMPOSITE terminals
f*_Z_-_ AV Equipment
II mL_tULU_--_--_ (,_¢_
......... ! @ COMPOSITE "',,,e.g. DVD Recorder
• . s j
,[b)VlUEO adapter _ _h_ke _ [ w_i white OUT ¢ or
red !_, re _]
red red
e.g. VCR
12

o,,_ Audio equipment
s._ • • f
Le_Optlcal adapter Optical cable
® For HDMI-ARC (Audio Return Channel) connection, see p. 32
e.g. Amplifier
|
|
|
Connect cable which matches the
_',d_'Audlo adapter Audio cable audio out terminal on the computer
/_(_ Computer
Audio OUT tj -
d_' PC adapter
RGB PC cable Conversion adapter
(if necessary)
%
To attach _ Toremove
Cable clamper _ _ ..... Snaps
_ Insert i-_J_ i Keep pushing ]
\ "_) both sides till /
they snap
TO burldle /,_T__
_ Do not bundle the Antenna cable and AC cord together (could cause distorted image).
® Fasten the cables with the Cable clamper as necessary.
6_When using the options, follow the option's assembly manual to fix cable&
®
©
o
::3
::3
(1)
o
13

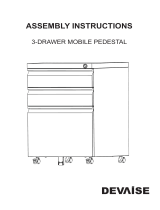
Iden ifying Controls
Front of the TV Back of the TV
3D Eyewear
transmitter
Selects channels
in sequence
Volume up/down
POWER
button
Displays the
Main Menu
-Remote control sensor
Within about 23 feet Changes the --
(7 meters) in front of input mode
Chooses Menu and
the TV set
Submenu entries
indicator
(on: red, off: no light)
C.A.T.S. sensor
Plasma C.A.T.S. (Contrast Automatic
Tracking System) (p. 49)
(2 ND
® The TV consumes a small amount of electdc energy even when turned off.
6_Do not place any objects between the TV remote control sensor and remote control.
Switches TV On or Off (Standby) Closed caption On/Off (p. 19)
Displays 3D settings. (p. 25)
Lights the buttons for 5 seconds
Press again to turn off the button lights
Select source to watch (p. 23)
f
Switches to input terminal J
that has "GAME" label (p. 23)
Displays Main Menu (p. 48)
Displays Sub Menu for special
functions (when available) (p. 20)
Colored buttons
(used for various functions)
Volume up/down
Sound Mute On/Off
r
Changes aspect ratio and zoom --J
(p. 20, 55)
Switches to previously viewed
channel or input
y Audio Programming (p. 19)
Exits from Menu screen
ViERA Link menu (p. 36-37)
Displays VIERA Connect (includes VIERA
CAST) Home screen (p. 43)
Displays VIERATOOLS menu (p. 22)
_ge
back to previous menu
Channel up/down, when viewing from ANT/
Cable source
L Displays or removes the channel banner (p. 19)
)erates the Favorite channel list function
(p. 20)
Numeric keypad to select any channel or
press to enter alphanumeric input in menus
Use for digital channels (p. 19)
External equipment operations
(p. 37)
14

First Time Setup
The first time setup screen is displayed only when the TV is turned on for the first time after the power cord
is inserted into a wall outlet and when "Auto power on" (p. 53) is set to "No".
Turn the TV On with the POWER button
(TV) (Remote)
POWER
POWER
or
Configure your viewing mode
Select your language
@7Select your country
_ Select your viewing mode (Be sure to select "Home use")
- _._select
@OK
® Pleaseconfirm your selection (Home Use) before pressing OK button.
[] If you select "Store Demonstration" by mistake in _,
confirmation screen will be displayed.
® Select "No" and return to previous screen _3_
® If you select "Yes", Screen enters the store demonstration mode.
To display the "Set viewing mode" screen again as shown above and
select "Home Use", do one of the following:
° Press and hold down the front POWER button for at least five seconds.
° Unplug power cord for 30 seconds and plug it again.
® If you use any other step other than _!_then turn the TV off, or if you used
the EXIT button to quit before completing the settings, the next time you turn
the TV on, "First time setup" will not be automatically displayed.
• The settings up to that point are saved.
• You can start "First time setup". (p. 53)
® Language, ANT/Cable setup, Input labels, and Clock can also be changed
in the Settings Menu. (p. 53)
®®
___',q.
,<
5"
({:3
©
q--o
©
15

ANT/Cable setup
_ Do you use a Cable, Satellite or Fiber Optic box with this TV?
_2_aSelect si I type
(CablelAntenna)
Select scan type
@b Select connection type
for Cable or Satellite box
and go to Q (input labels)
@ Start scanning
[] Press to exit from
a menu screen
EXiT
[] Press to go back to
the previous screen
RETURN
_ About broadcasting
systems
Analog (NTSC):
Conventional
broadcasting
Digital (ATSC):
New programming
that allows you
to view more
channels featuring
high-quality video
and sound
Complete scanning
Label the inputs for easy identification (Label inputs)
To name each input, follow the instructions on screen.
When done, select NEXT and press OK to go to the next step.
or
Follow the instructions on
screen to complete the
following operations.
R
--> To edit the labels to match your connected devices.
Label: [BLANK] Blu-ray/CABLE/SATELLITE/DVD/DVD REC/DVR/GAME/HOME
THTR/RECEWER/COMPUTER/MEDIA CTR/MEDIA EXT/VCR/CAMERA/
MONITOR/AUX/OTH ER/Not used
• Select "Not used" for any back-panel input that has no device connected to it.
Afterward, the input will be skipped when pressing INPUT, for your convenience.
• The input labels can be changed at any time from the TV's setup menu
16

Configure Network settings
Select the Network type
Set later: Go to _!?
You can set in "Setup" menu later.
Wireless (WiFi): Start "Wireless network" (p. 18)
_2_Select the setting mode Automatic: Press OK to start setup automatically.
Error screen is displayed when
Network connection has failed,
Manual: Go to Manual setting,
JAut°maticJ
Start connection test
JConnection test I
Connection
@ Complete "Network settings" _
Helpful information isdisplayed when you
successfully complete "Network settings".
[] Manual setting
[] Error screen
®
"13
--t
S
CD
[] Press to exit from
a menu screen
EXIT
[] Press to go back to
the previous screen
RETURN
Retry: Go to "Start connection test"
Set later: Go to @
Adjust the Clock (Set clock)
When done, select NEXT and press OK to go to the next step.
[] Manual setting
or
[] Auto setting
Follow the instructions on
screen to complete the
following operations.
JTime zoneJ
Manual: Adjust the clock manually (Year/Month/Day/Hour/Minute)
Auto: The clock is adjusted automatically via Internet service.
Only available when the TV is on a network. -->Set "Network
settings" first.
Select your time zone. (EST/CST/MST/PST/AKST/HST/NST/
AST)
Set DST (Daylight Saving Time) setting, (On/Off)
On: Advances the clock one hour from the time it is set according
to the time zone,
17

Complete First time setup
Congratulations! You are done.
The First time setup can be repeated at any time.
Press MENU and select SETUP; then "First time setup".
18
[] Press to exit from
a menu screen
EXiT
[] Press to go back to
the previous screen
RETURN
To watch TV via a Cable box, Satellite receiver, or any other source (DVD,
DVR, gaming device, etc,), press the INPUT button and select the appropriate
input,
[] About wireless LAN
e To use the Wireless LAN Adapter, an access point needs to be obtained.
For the additional information for Wireless LAN Adapters, check the following website:
http://Panasonic.com/NetConnect
® It is recommended to use the Wireless LAN Adapter with the supplied extension cable.
e Do not use the Wireless LAN Adapter to connect to any wireless network (SSID*) for which
you do not have usage rights. Such networks may be listed as a result of searches. However,
using them may be regarded as illegal access.
* SSID is a name for identifying a particular wireless network for transmission.
® Do not subject the Wireless LAN Adapter to high temperatures, direct sunlight or moisture.
¢ Do not bend, or subject the Wireless LAN Adapter to strong impacts.
® Do not disassemble or alter the Wireless LAN Adapter in any way.
e Do not attempt to install the Wireless LAN Adapter in any incompatible device.
e When VIERA Connect, Network camera, DLNA, or other device is using the network, do not
disconnect the Wireless LAN Adapter.
e Check that the Access point supports WPS*.
(If it does not support WPS, the encryption key of the Access point is required when
configuring settings.)
e Follow the instructions on the Access point setup screen and configure the appropriate
security settings.
For more details on setting of Access point, please refer to operating manual for the Access point.
e We recommend using 11n (5 GHz) for the wireless system between the Wireless LAN Adapter
and Access point.
Communication is also possible with 11a, 11b, and 11g (2.4 GHz), but the communication
speed may be slower.
e if the wireless system of the Access point is changed, devices that could connect by wireless
LAN may no longer be able to connect.
® Data transmitted and received over radio waves may be intercepted and monitored.
e Keep the TV away from the following devices as much as possible:
Wireless LAN, microwaves, and other devices that use 2.4 GHz and 5 GHz signals.
Otherwise, the TV failures such as malfunction may occur due to the radio wave interference.
e When noises occur due to the static electricity, etc., the TV might stop operating for the protection
of the devices. In this case, turn the TV Off with power On / Off switch, then turn it On again.
* WPS: Wi-Fi Protected Setup
=Wireless network (First time setup) in 69
(_ Display "Wireless network"
_2}Select the connection method
WPS (Wi-Fi Protected Setup using push button}
® Follow the directions on screen to complete the setting.
e See page 41 for more information.

Watching TV
Turn power on
(Remote)
POWER
or
(TV)
POWER
INPUT
s_ Please select correct input --> _ (p. 23)
[] VIERA Connect Banner appears
Press OK to enter VIERA Connect. (p. 43)
To hide the banner _J,Press any button except OK
/Time out (5 sec)
Select a channel number
or _
• Also available side CH button on the unit,
[For Cable/Satellite box connection]
- Use your connected box s remote contro.
[] To directly enter the digital channel
number
When tuning to a digital channel,
press the button to enter the minor
number in a compound channel
number.
example: CH15-1: _ _ _
® Reselect "Cable" or "Antenna" in "ANT in" of "ANT/Cable setup" to switch the signal
reception between cable TV and antenna. (p. 16, 46)
® The channel number and volume level remain the same even after the TV is turned
off.
[] Other Useful Functions
[] Select the Audio mode for watching "rv
SAP Digital mode
Press SAP to select next Audio track (if available) when receiving a digital channel.
Analog mode
Press SAP to select the desired Audio mode.
• Each press of SAP will change the Audio mode. (Stereo/SAP/Mono)
_ SAP is not available when watching TV with a Cable or Satellite box connected via HDMI.
® Contact your Cable or Satellite operator for instructions on enabling SAP with their box.
[] Switches the Closed Caption mode On or Off
q
¢ Closed Caption is not available when watching TV with a Cable or Satellite box connected via HDMI.
® Contact your Cable or Satellite operator for instructions on enabling CC with their box.
[] Displays and removes information. When watching programming via the Antenna/Cable input,
shows the channel banner.
INFO Channel Clock
Station Signal Picture imer
identifier resolution mode remaining time
Closed caption Rating Level Aspect ratio
®@
E-
19

[] Press FORMAT to cycle through the aspect modes (p. 55)
FORMAT J_ 4 _L • 480i, 480p: FULL/JUST/4:3/ZOOM
• 1080p, 1080i, 720p: FULL/H-FILL/JUST/4:3/ZOOM
Use when the picture does not fill the whole screen (bars appears on either side of
the image) or portions of the picture is trimmed.
1. Some content, such as film-based movies, are available in extra-wide format.
Top and bottom bars are unavailable.
2. Connected devices, such as Cable/Satellite box, DVD/Blu-ray players and game
consoles have their own aspect (format) settings. Adjust the device's aspect
settings.
[] Press SUB MENU to show the Sub Menu screen
This menu consists of shortcuts to convenient functions.
Sub menu is only available when the TV is using the Antenna/Cable input, not when using Cable or Satellite box.
SUB
MENU --Specify favorites or type of channels to view when pressing the channel up/
down button.
channel (below)
the channel identifier (p. 47)
signal strength (p. 47)
[] FAVORITE
Channel numbers registered in Favorite are displayed on the favorite tune screen. Selectthe desired broadcast
station with the cursor or use the number buttons. (p. 19)
FAVORITE
[] Set the Favorite channel
SUB
MENU
[] Delete a favorite channel
or
_ _ select the list number
_ _ (to save the channel
_ _ without pressing OK)
)select
)delete
(while holding down)
[] To change the page
FAVORITE
Press repeatedly to change between pages (1/3, 2/3, 3/3 or exit)
Changes the page forward/backward
® Favorite channels cannot be set when using Cable or Satellite box.
20
Page is loading ...
Page is loading ...
Page is loading ...
Page is loading ...
Page is loading ...
Page is loading ...
Page is loading ...
Page is loading ...
Page is loading ...
Page is loading ...
Page is loading ...
Page is loading ...
Page is loading ...
Page is loading ...
Page is loading ...
Page is loading ...
Page is loading ...
Page is loading ...
Page is loading ...
Page is loading ...
Page is loading ...
Page is loading ...
Page is loading ...
Page is loading ...
Page is loading ...
Page is loading ...
Page is loading ...
Page is loading ...
Page is loading ...
Page is loading ...
Page is loading ...
Page is loading ...
Page is loading ...
Page is loading ...
Page is loading ...
Page is loading ...
Page is loading ...
Page is loading ...
Page is loading ...
Page is loading ...
Page is loading ...
Page is loading ...
Page is loading ...
Page is loading ...
Page is loading ...
Page is loading ...
Page is loading ...
Page is loading ...
Page is loading ...
Page is loading ...
-
 1
1
-
 2
2
-
 3
3
-
 4
4
-
 5
5
-
 6
6
-
 7
7
-
 8
8
-
 9
9
-
 10
10
-
 11
11
-
 12
12
-
 13
13
-
 14
14
-
 15
15
-
 16
16
-
 17
17
-
 18
18
-
 19
19
-
 20
20
-
 21
21
-
 22
22
-
 23
23
-
 24
24
-
 25
25
-
 26
26
-
 27
27
-
 28
28
-
 29
29
-
 30
30
-
 31
31
-
 32
32
-
 33
33
-
 34
34
-
 35
35
-
 36
36
-
 37
37
-
 38
38
-
 39
39
-
 40
40
-
 41
41
-
 42
42
-
 43
43
-
 44
44
-
 45
45
-
 46
46
-
 47
47
-
 48
48
-
 49
49
-
 50
50
-
 51
51
-
 52
52
-
 53
53
-
 54
54
-
 55
55
-
 56
56
-
 57
57
-
 58
58
-
 59
59
-
 60
60
-
 61
61
-
 62
62
-
 63
63
-
 64
64
-
 65
65
-
 66
66
-
 67
67
-
 68
68
-
 69
69
-
 70
70


Panasonic VIERA TC-P50GT30 Owner's manual
- Category
- Plasma TVs
- Type
- Owner's manual
- This manual is also suitable for
Ask a question and I''ll find the answer in the document
Finding information in a document is now easier with AI
Related papers
-
Panasonic Viera TC-P50G25 Operating Instructions Manual
-
-
-
-
-
-
Panasonic TX-P65VT30E User manual
-
Panasonic VIERA TC-P55GT30 Owner's manual
-
-
Other documents
-
Philips TC-P42X1X User manual
-
Conceptronic C08-017 Datasheet
-
Contour Balance Keyboard Owner's manual
-
 Wintal SX-SP07 User manual
-
Monster Vision max 3D Owner's manual
-
 Foxun SX-YM01 Operating instructions
-
 Blackbox-av Mediascreen 32|43|50|55|65″ Owner's manual
-
 DEVAISE PCA002A1 Installation guide
-
 Wintal SX-HVY01 Operating instructions
-
 Level Level User manual


