DeLonghi ECAM25462 Instructions For Use Manual
- Category
- Coffee makers
- Type
- Instructions For Use Manual

www.delonghi.com
5713223131/08.14

ECAM25.462
COFFEE MAKER
Instructions for use. Keep these instructions
Visit www.delonghiregistration.com to register
your product
Visit www.delonghi.com for a list of service
centers near you.
ELECTRIC CHARACTERISTICS
120 V~ 60 Hz 1250 W
MACHINE À CAFÉ
Mode d’emploi . Conservez cette notice
Visitez www.delonghiregistration.com pour
enregistrer votre produit en ligne.
Visitez www.delonghi.com pour y voir une liste
des centres de réparation proches de chez vous.
CARACTÉRISTIQUES ÉLECTRIQUES
120 V~ 60 Hz 1250 W
CAFETERA
Repase y guarde estas instrucciones.
Lea cuidadosamente este instructivo antes de usar
su aparato.
Visite www.delonghiregistration.compara
registrar su producto en línea.
Visite www.delonghi.com para ver la lista de
centros de servicios cercanos a usted.
CARACTERISTICAS ELECTRICAS:
120 V~ 60 Hz 1250 W

2
C
C7
C5
BC1
C4
C6
B1
B2
B3
B4
B5
B10
B9
B8
B7
B6
D
C2
C3
D1
D2
D3
D4

3
A14
A20
A19
A17
A18
A15
A
A16
A13
PUSH
A11
A12
A10
A8
A9
A1
A2 A5
A6
A7
A4
A3

4
PUSH
B
A
A B
34A
4B
5
911 12
13 14 16
1817 19
23
28
29
30 32
31
21
12
15
20
12
24
6 7 8
10 25
22
26A
26B
PUSH
27

5
PUSH
B
A
A B
34A
4B
5
911 12
13 14 16
1817 19
23
28
29
30 32
31
21
12
15
20
12
24
6 7 8
10 25
22
26A
26B
PUSH
27

6
CONTENTS
IMPORTANT SAFEGUARDS ....................................... 7
SAVE THESE INSTRUCTIONS ...............................................7
SHORT CORD INSTRUCTIONS .................................... 7
INTRODUCTION ...................................................... 8
Symbols used in these instructions ...................................8
Letters in brackets .............................................................8
Troubleshooting and repairs .............................................8
Description of the appliance ............................................. 8
Description of the control panel ........................................8
Description of the accessories ...........................................9
Description of milk container ............................................9
PRELIMINARY CHECKS ............................................ 9
Checking the appliance .....................................................9
Installing the appliance ....................................................9
Connecting the appliance .................................................9
Setting up the appliance ................................................... 9
TURNING THE APPLIANCE ON ................................ 10
TURNING THE APPLIANCE OFF ............................... 10
MENU SETTINGS ................................................... 10
Descaling ........................................................................10
Install lter .....................................................................10
Replacing the lter .........................................................10
Adjust time .....................................................................10
Auto-start ....................................................................... 10
Auto-O ..........................................................................10
Cup warmer ....................................................................11
Energy saving ..................................................................11
Setting the temperature .................................................11
Setting water hardness ...................................................11
Enable/disable the beep .................................................11
Setting the language ......................................................11
Cup lighting ....................................................................11
Default values (reset) ......................................................11
Statistics function ...........................................................11
MAKING COFFEE ................................................... 12
Selecting the coee avour.............................................12
Selecting the quantity of coee in the cup ......................12
Coee selected ................................................................12
Quantity in cup (ml) ........................................................ 12
Customising the “my coee” quantity .............................12
Adjusting the coee mill .................................................12
Tips for a hotter coee ....................................................12
Making coee using coee beans ...................................12
Making coee using pre-ground coee ..........................13
MAKING CAPPUCCINO AND MILK BASED COFFEES ... 13
Filling and attaching the milk container .........................13
Adjusting the amount of froth ........................................13
Preparing cappuccino......................................................14
Making CAFFELATTE/MACCHIATO/FLAT WHITE/ MILK ...14
Cleaning the milk container after each use .....................14
Programming the quantities of coee and milk in the cup 14
Programming cappuccino: ..............................................14
Programming the MILK MENU drinks: .............................14
MAKING HOT WATER ............................................. 15
Changing the quantity of water delivered automatically 15
CLEANING ............................................................ 15
Cleaning the machine .....................................................15
Cleaning the coee grounds container ............................15
Cleaning the drip tray and condensate tray .....................15
Cleaning the inside of the coee machine ......................15
Cleaning the water tank ..................................................16
Cleaning the coee spouts ..............................................16
Cleaning the pre-ground coee funnel ...........................16
Cleaning the infuser ........................................................ 16
Cleaning the milk container ............................................16
Cleaning the hot water/steam nozzle .............................17
DESCALING ........................................................... 17
SETTING WATER HARDNESS ................................... 17
Measuring water hardness ..............................................17
Set water hardness .........................................................18
WATER SOFTENER FILTER ...................................... 18
Installing the lter ..........................................................18
Replacing the lter .........................................................18
Removing the lter .........................................................18
TECHNICAL DATA................................................... 19
DISPLAYED MESSAGES .......................................... 19
TROUBLESHOOTING .............................................. 20
LIMITED WARRANTY ............................................. 22
What does the warranty cover? .......................................22
How long does the coverage last? ...................................22
What is not covered by the warranty? .............................22
How do you get service? .................................................22
How does country law apply? .........................................22

7
IMPORTANT SAFEGUARDS
When using electrical appliances, basic safety precautions should always be followed, including the following.
• Read all instructions carefully.
• Make sure the voltage of your electrical system corresponds to the voltage shown on the bottom of the
machine.
• Do not touch hot surfaces. Use handles or knobs.
• To protect against re, electrical shock and personal injury, do not immerse cord, plug or appliance in
water or other liquid.
• Keep the appliance out of the reach of children and do not leave appliance unattended while in operation.
• Unplug from the outlet when not in use and before cleaning.
• Do not operate with a damaged cord or plug, or after the appliance malfunctions, or has been damaged
in any manner. Return the appliance to the nearest authorized service facility for examination, repair or
adjustment.
• The use of accessory attachments not recommended by the manufacturer may result in re, electrical
shock, or personal injury.
• Do not use outdoors.
• Make sure the power cord does not hang over the edge of the table or counter-top to avoid getting ac-
cidentally caught or entangled.
•
Do not place the appliance or its electrical parts on or near electric stoves, cooking surfaces, or gas burners.
• Plug cord into the wall outlet. To disconnect, rst turn machine “o”, then remove plug from wall outlet.
• Do not use the appliance for other than the intended use. This appliance is to be utilized for domestic
use only. The manufacturer declines all responsibility for any damage caused by improper, incorrect, or
irresponsible use.
WARNING: To reduce the risk of re or electric shock, do not remove the cover or the exterior of
the unit. Don’t attempt to repair or modify the machine, doing so will void the warranty. Repair
should be done by authorized service personnel only!
SAVE THESE INSTRUCTIONS
THIS APPLIANCE IS FOR HOUSEHOLD USE ONLY
SHORT CORD INSTRUCTIONS
- A short power cord is provided to reduce risks resulting from becoming entangled in or tripping over a
longer cord.
- Longer, detachable power supply cords or extension cords are available and may be used if care is exer-
cised in their use.
- If an extension cord is used, the marked electrical rating should be at least as great as the electrical rating
of the appliance. If the appliance is provided with 3- wire, grounding type cord, the extension should be
a GROUNDING TYPE 3 - WIRE CORD. The longer cord should be arranged so that it will not drape over the
counter-top or table top where it can be pulled on by children or tripped over.
- Your product is equipped with a polarized alternating current line plug (a plug having one blade wider
than the other). This plug will t into the power outlet only one way. This is a safety feature. If you are un-
able to insert the plug fully into the outlet, try reversing the plug. If the plug should still fail to t, contact
your electrician to replace your obsolete outlet. Do not defeat the safety purpose of the polarized plug.

8
INTRODUCTION
Thank you for choosing this automatic espresso and cappuccino
machine. We hope you enjoy using your new appliance.
Take a few minutes to read this Instruction for Use.
This will avoid all risks and damage to the appliance.
Symbols used in these instructions
Important warnings are identied by these symbols. It is vital to
respect these warnings.
Danger!
Failure to observe the warning may result in life threatening
injury by electric shock.
Important!
Failure to observe the warning could result in injury or damage
to the appliance.
Danger of burns!
Failure to observe the warning could result in scalds or burns.
Please note :
This symbol identies important advice or information for the
user.
Letters in brackets
The letters in brackets refer to the legend in the Description of
the Appliance on page 3.
Troubleshooting and repairs
In the event of problems, rst try and resolve them following
the information given in the sections “Displayed messages” on
page 19 and “Troubleshooting” on page 20.
If this does not resolve the problem or you require further infor-
mation, you should consult customer assistance by calling the
number given on the attached "Customer Assistance" leaet.
If your country is not among those listed on the sheet, call the
number given in the warranty. If repairs are required, contact
De’Longhi customer experience only. The addresses are given in
the guarantee certicate provided with the machine.
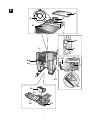
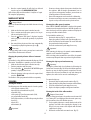
DESCRIPTION
Description of the appliance
(page 3 - A )
A1. Control panel
A2. Grinding adjustment dial
A3. Cup shelf (cup warmer active when selected from set-
tings menu)
A4. Bean container lid
A5. Pre-ground coee funnel lid
A6. Pre-ground coee funnel
A7. Bean container
A8. Main switch
A9. Socket for power cable connector
A10. Water tank
A11. Infuser door
A12. infuser
A13. Coee spout (adjustable height)
A14. Coee grounds container
A15. Condensate tray
A16. Cup tray
A17. Drip tray water level indicator
A18. Drip tray
A19. Cup lighting
A20. Hot water and steam connection nozzle
Description of the control panel
(page 2 - B )
Some keys on the panel have a double function: this is shown in
parenthesis inside the description.
B1. Display: guides the user in using the appliance.
B2. Button : turns the appliance on and o.
B3. MENU button to access the menu
B4. Button : to perform a rinse cycle.
(When in the settings MENU, it acts as the “ESC” button
to exit from the selected function and go back to the main
menu).
B5. CAPPUCCINO BUTTON: to prepare a cappuccino.
B6. Selection dial:
- rotate it to select the amount of coee desired.
- press to select the desired avour.
(When in the settings MENU: turn to select the required func-
tion).
B7. MILK MENU button: to access preparation of MACCHIATO,
CAFFELATTE, FLAT WHITE and MILK.
B8. Button : to deliver hot water.
(When in the MENU: press the "OK" button to conrm the
item chosen)
B9. Button : to make 2 cups of coee
B10. Button : to make 1 cup of coee

9
Description of the accessories
(page 2 - C )
C1. Measure
C2. Cleaning brush
C3. Hot water spout
C4. Water softener lter (certain models only)
C5. “Total Hardness Test” indicator paper
C6. Power cable
C7. Descaler
Description of milk container
(page 3 - D )
D1. Froth adjustment and CLEAN dial
D2. Frothed milk spout (adjustable)
D3. Milk intake tube
D4. Milk container
PRELIMINARY CHECKS
Checking the appliance
After removing the packaging, make sure the product is com-
plete and undamaged and that all accessories are present. Do
not use the appliance if it is visibly damaged. Contact De’Longhi
customer assistance.
Installing the appliance
Important!
When installing the appliance, you should respect the following
safety warnings:
• The appliance gives o heat. After positioning the appli-
ance on the worktop, leave a space of at least 3 cm be-
tween the surfaces of the appliance and the side and rear
walls and at least 15 cm above the coee machine.
• Water penetrating the appliance could cause damage.
Do not place the appliance near taps or sinks.
• The appliance could be damaged if the water it contains
freezes.
Do not install the appliance in a room where the tempera-
ture could drop below freezing point.
• Arrange the power cable in such a way that it cannot be
damaged by sharp edges or contact with hot surfaces (e.g.
electric hot plates).
Connecting the appliance
Important!
Check that the mains power supply voltage corresponds to the
value indicated on the rating plate on the bottom of the appli-
ance.
Connect the appliance to an eciently earthed and correctly
installed socket with a minimum current rating of 10A only.
If the power socket does not match the plug on the appliance,
have the socket replaced with a suitable type by a qualied pro-
fessional.
Setting up the appliance
Please note :
• Coee has been used to factory test the appliance and it is
therefore completely normal for there to be traces of coee
in the mill. The machine is, however, guaranteed to be new.
• You should customise water hardness as soon as possible
following the Instruction for use in the section “Setting
water hardness” on page 17.
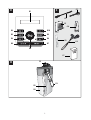
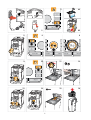
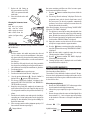
1. Plug the power cable connector into the socket at the back
of the appliance and connect the appliance to the mains
electricity supply (g. 1) making sure the main switch on
the back of the appliance is pressed (g. 2).
You must rst choose the language by turning the selection dial,
or waiting until the languages scroll through on the display at
intervals of about 3 seconds:
2. When “English” appears, press the button (g. 3) for
a few seconds until “English set” is displayed.
Follow the instructions indicated on the appliance display:
3. “FILL TANK”: remove the water tank, ll to the MAX line
with fresh water (g. 4A), then replace in the appliance
(g. 4B).
4. “INSERT WATER SPOUT”: Check that the hot water spout is
inserted on the nozzle and place a container with a mini-
mum capacity of 100 ml under the hot water spout (g. 5).
5. “HOT WATER CONFIRM?” is displayed;
6. Press the button to conrm: the appliance delivers
water from the spout then goes o automatically.
The coee machine is now ready for normal use.
Please note :
• When using the appliance for the rst time, you need to
make 4-5 cups of coee or 4-5 cappuccinos before it starts
to give satisfactory results.
• When making the rst 5-6 cappuccinos, it is normal to hear
the noise of boiling water: the noise will diminish.
• To enjoy your coee even more and improve the perfor-
mance of your appliance, we recommend installing a water
softener lter as described in the section “Install lter”. If
your model is not provided with a lter, you can request
one from De’Longhi Customer Service.

10
TURNING THE APPLIANCE ON
Please note :
Before turning the appliance on, make sure the main switch on
the back of the appliance is pressed (g. 2).
Each time the appliance is turned on, it performs an automatic
preheat and rinse cycle which cannot be interrupted. The appli-
ance is ready for use only after completion of this cycle.
Danger of burns!
During rinsing, a little hot water comes out of the coee spouts
and is collected in the drip tray underneath. Avoid contact with
splashes of water.
• To turn the appliance on, press the button (g. 6). The
message “Heating up Please wait” is displayed.
After heating, the message “Rinsing” is displayed; in this man-
ner, besides heating the boiler, the appliance also heats the
internal circuits by circulating hot water.
The appliance is at temperature when the message indicating
the avour and quantity of coee appears.
TURNING THE APPLIANCE OFF
Each time the appliance is turned o it performs an automatic
rinse if a coee has been prepared.
Danger of burns!
During rinsing, a little hot water ows from the coee spouts.
Avoid contact with splashes of water.
To turn the appliance o, press the button (g. 6). The ap-
pliance performs a rinse cycle then goes o (stand-by).
Please note :
If you will not be using the appliance for a long time, unplug it
from the mains socket:
• rst turn the appliance o by pressing the button
(g. 6);
• press the main switch (g. 2).
Important!
Never press the main switch while the appliance is on.
MENU SETTINGS
Access the settings menu by pressing the MENU button; the fol-
lowing menu items are available:
Descaling
For instructions on descaling, see page 17.
Install lter
For instructions on how to install the lter, see the section “In-
stalling the lter (page 18).
Replacing the lter
For instructions on how to replace the lter, see the section “Re-
placing the lter” (page 18).
Adjust time
To adjust the time on the display, proceed as follows:
1. Press the MENU button to enter the menu;
2. Turn the selection dial (g. 7) until “Adjust time” is dis-
played;
3. Press ;
4. Turn the selection dial to change the hours;
5. Press to conrm;
6. Turn the selection dial to change the minutes;
7. Press to conrm.
The time is now set: Then press to exit the menu.
Auto-start
You can set the auto-start time in order to have the appliance
ready at a certain time (for example in the morning) so you can
make coee immediately.
Please note :
To enable this function, the time must already be set correctly.
1. Press the MENU button to enter the menu;
2. Turn the selection dial until “Auto-start” is displayed;
3. Press : "Enable?" will appear on the display;
4. Press the button to conrm.
5. Turn the selection dial to choose the hours;
6. Press to conrm;
7. Turn the selection dial to change the minutes;
8. Press to conrm;
9. Then press to exit the menu.
Once the time is conrmed, the auto-start activation is shown
on the display with the symbol that is displayed next to the
time and below the Auto-start item on the menu.
To disable the function:
1. Select auto-start from the menu;
2. Press : "Disable?" will appear on the display;
3. Press the button to conrm.
The display no longer shows the symbol.
Auto-O
Auto-o can be set so that the appliance goes o after 15 or 30
minutes, or after 1, 2 or 3 hours.
1. Press the MENU button to enter the menu;
2. Turn the selection dial until “Auto-O” is displayed;
3. Press ;
4. Turn the selection dial until the desired operation time is
displayed (15 or 30 minutes, or 1, 2 or 3 hours);
5. Press the button to conrm.
Auto-o has been reprogrammed: press to exit the menu.

11
Cup warmer
This function enables the cup warmer to be enabled or disabled.
Proceed as follows:
1. Press the MENU button to enter the menu;
2. Turn the selection dial until “Cup warmer” is displayed;
3. Press : “Enable?” or “Disable?” is displayed;
4. Press to enable or disable the cup warmer (an asterisk
under "Cup Warmer" shows that it is active).
5. Then press the button to exit the menu.
Warming the cups keeps the coee hot.
Energy saving
Use this function to enable or disable Energy saving. When en-
abled, the function reduces energy consumption in compliance
with current European regulations.
When energy saving mode is active, an asterisk appears below
“Energy saving” in the menu.
1. Press the MENU button to enter the menu;
2. Turn the selection dial until “Energy saving” is displayed;
3. Press : “Enable?” or “Disable?” is displayed;
4. Press to enable or disable the energy saving mode;
Then press to exit the menu.
When the function is active, if the machine is not used for some
time, “Energy saving” is displayed.
Please note:
• When in energy saving mode, a few seconds elapse before
the rst coee, cappuccino or milk based coee is delivered
as the appliance must heat up again.
• To prepare any drink, press any button to exit energy sav-
ing, then press the button corresponding to the drink you
want to make.
• If the milk container is inserted, “Energy saving” is not acti-
vated.
Setting the temperature
To modify the temperature (low, medium, high) of the water
used to make the coee, proceed as follows:
1. Press the MENU button to enter the menu;
2. Turn the selection dial until “Set temperature” is displayed;
3. Press the button.
4. Turn the selection dial until the desired temperature
(l=low; llll =high) is shown on the display.
5. Press to conrm.
The temperature has been reprogrammed: press to exit
the menu.
Setting water hardness
For instructions on setting water hardness, see page 17.
Enable/disable the beep
This enables or disables the beep emitted by the machine each
time an icon is pressed or an accessory is inserted/removed. To
disable or re-enable the beep, proceed as follows:
1. Press the MENU button to enter the menu;
2. Turn the selection dial until “Beep” is displayed;
3. Press : “Enable?” or “Disable?” is displayed;
4. Press the button to enable or disable the beep;
5. When the function is enabled an asterisk appears under
"Beep" in the menu.
Then press to exit the menu.
Setting the language
To modify the language on the display, proceed as follows:
1. Press the MENU button to enter the menu;
2. Turn the selection dial until “Set language” is displayed;
3. Press ;
4. Turn the selection dial until the desired language is dis-
played;
5. Press to conrm;
6. A message conrming the language installed is displayed;
7. Then press the button to exit the menu.
Cup lighting
This function enables or disables the cup lighting. When the
function is active, the lighting comes on whenever cappuccino
or milk based drinks are made or the appliance is rinsed.
To disable or re-enable this function, proceed as follows:
1. Press the MENU button to enter the menu;
2. Turn the selection dial until “Cup lighting” is displayed.
3. Press : “Enable?” or “Disable?” is displayed;
4. Press the button to enable or disable the cup lighting;
5. When the function is active, an asterisk appears under “Cup
lighting” in the menu.
Then press to exit the menu.
Default values (reset)
This resets all menu settings and programmed quantities back
to the default values (with the exception of the language which
remains as set).
1. Press the MENU button to enter the menu;
2. Turn the selection dial until “Default values” is displayed;
3. Press ;
4. Conrm?” is displayed.
5. Press to conrm and exit.
Statistics function
This displays statistics relating to the machine. To display, pro-
ceed as follows:
1. Press the MENU button to enter the menu;

12
2. Turn the selection dial until “Statistics” is displayed;
3. Press the button.
4. Turn the selection dial to verify:
- how many coees have been made;
- how many drinks have been made using milk;
- the total number of litres of water delivered;
- how many times the machine has been descaled.
- how many times the water softener lter has been re-
placed.
5. Press the button twice to exit the menu.
MAKING COFFEE
Selecting the coee avour
The appliance is set by default to make coee with a standard
avour.
You can also choose one of these avours:
Extra-mild
Mild
Standard
Strong
Extra-strong
To change the taste, press the dial (g. 7) repeatedly
until the required taste is displayed.
Selecting the quantity of coee in the cup
To select the quantity of coee, turn the selection dial (g. 8)
until the message corresponding to the required quantity of cof-
fee is displayed:
Coee selected Quantity in cup (ml)
MY COFFEE ≃30 (program.
from ≃20 to ≃180)
SHORT ≃40
STANDARD ≃60
LONG ≃90
EXTRA LONG ≃120
Customising the “my coee” quantity
The machine is preset to deliver about 30ml of "MY COFFEE“. To
modify this quantity, proceed as follows:
1. Place a cup under the coee spouts (g. 9).
2. Turn the selection dial (g. 8) until “MY COFFEE” is dis-
played.
3. Keep the button (g. 10) pressed until the message
“1 MY COFFEE Program quantity” is displayed and coee
delivery begins. Release the button.
4. As soon as the coee in the cup reaches the required level,
press the button (g. 10) again.
The quantity of coee in the cup has now been programmed.
Adjusting the coee mill
The coee mill is set by default to prepare coee correctly and
should not require regulating initially.
However, if after making the rst few coees you nd that the
coee is either too weak and not creamy enough or delivery is
too slow (in drops), this can be corrected by adjusting the grind-
ing adjustment dial (g. 11).
Please note :
The grinding adjustment dial must only be turned when the cof-
fee mill is in operation.
If the coee comes out too slowly or
doesn't come out at all, turn the dial
one time to number 7.
For fuller bodied creamier coee, turn
one click anticlockwise towards “1”
(do not turn more than one click at
a time otherwise the coee could be
delivered a drop at a time).
These adjustments will only be evident after at least 2 cups of
coee have been delivered. If this adjustment does not obtain
the desired result, turn the dial another click.
Tips for a hotter coee
For hotter coee, you should:
• rinse before delivering coee by pressing the button:
hot water will come out of the spout that heats the circuit
inside the machine making the coee hotter;
• warm the cups with hot water (using the hot water func-
tion);
• enable the cup warmer in the settings menu and leave the
cups until they are warm;
• raise the coee temperature in the settings menu.
Making coee using coee beans
Important!
Do not use caramelised or candied coee beans as they could
stick to the coee mill and make it unusable.
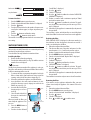
1. Fill the container with coee beans (g. 12).
2. Place under the coee spouts:
- 1 cup, if you want to make 1 coee (g. 9);
- 2 cups, if you want 2 coees (g. 13);
3. Lower the spout as near as possible to the cups: this will
make it creamier (g. 14).
4. Press the button corresponding to the number of coees
required (1 cup or 2 cups ).
5. The preparation starts and the display shows the coee
selected and a progression bar that lls gradually as the

13
coee is prepared.
Once the coee has been made, the appliance is ready to make
the next drink.
Please note :
While the appliance is making coee, the ow can be inter-
rupted at any moment by pressing any button.
• At the end of delivery, to increase the quantity of coee
in the cup, just press and hold one of the coee buttons
(within 3 seconds) ( or ).
Please note :
For hotter coee, consult the paragraph "Tips for a hotter cof-
fee“.
Important!
• If the coee is delivered a drop at a time, too weak and not
creamy enough or too cold, read the tips in the “Trouble-
shooting” section on page 20.
• Various alarm messages could be displayed while using the
machine (FILL TANK, EMPTY GROUNDS CONTAINER, etc).
Their meaning is explained in the section “Displayed mes-
sages” (page 19).
Making coee using pre-ground coee
Important!
• Never place coee beans in the pre-ground coee funnel
as this could damage the appliance.
• Never add pre-ground coee when the machine is o or it
could spread through the inside of the machine and dirty
it. This could damage the appliance.
• Never use more than one level
measure or it could dirty the in-
side of the machine or block the
funnel.
Please note :
When you use pre-ground coee, you can only make one cup of
coee at a time.
1. Make sure the appliance is on.
2. Press the dial (g. 7) repeatedly until “Pre-
ground” is displayed.
3. Make sure the funnel is not blocked, then add one level
measure of pre-ground coee (g. 15).
4. Place a cup under the coee spouts.
5. Press the 1 cup dispensing button .
6. The preparation starts and the display shows the coee
selected and a progression bar that lls gradually as the
coee is prepared.
Please note:
If “Energy Saving” mode is enabled, you may have to wait a few
seconds before the rst cappuccino is dispensed.
MAKING CAPPUCCINO AND MILK BASED
COFFEES
Please note:
• To avoid producing milk with poor froth or large bubbles,
always clean the milk container lid and hot water connec-
tion nozzle as described in the section “Cleaning the milk
container” on pages 14 and 16.
Filling and attaching the milk container
1. Remove the lid (g. 16);
2. Fill the milk container with a sucient quantity of milk,
not exceeding the MAX level marked on the handle (g.
17). Each mark on the side of the container corresponds to
100 ml of milk.
Please note:
• For a denser more even froth, you must use skimmed or
partially skimmed milk at refrigerator temperature (about
5°C).
If “energy saving” mode is enabled, you may have to wait a
few seconds before the rst cappuccino is delivered.
3. Make sure the milk intake tube is correctly inserted in the
bottom of the milk container lid (g. 18).
4. Attach the lid back on the milk container.
5. Attach the container to the connection nozzle and push as
far as it will go (g. 19). The machine emits a beep.
6. Place a suciently large cup under the coee and frothed
milk spouts. Adjust the length of the milk spout. To move it
nearer the cup, simply pull it downwards (g. 20).
7. Follow the instructions below for each function.
Adjusting the amount of froth
Turn the froth adjustment dial on the milk container lid to adjust
the amount of froth on the milk delivered while making milk
drinks (g. 21). Follow the tips in the table below:
Dial
position
Description Recommended for…
No froth CAFFELATTE /
MILK (hot milk)
Min. froth LATTE MACCHIATO /
FLAT WHITE
Max. froth CAPPUCCINO /
MILK frothy milk

14
Preparing cappuccino
1. After attaching the milk container, turn the froth regulator
on the milk container lid to the required position (g. 21).
2. Press the CAPPUCCINO button. “CAPPUCCINO” is displayed,
together with a progress bar which lls gradually as prepa-
ration proceeds.
3. After dispensing the milk, the machine automatically
makes the coee.
Please note:
• If during dispensing you want to stop preparation, press
the CAPPUCCINO BUTTON TWICE.
• At the end of delivery, to increase the quantity of milk or
coee in the cup, within 3 seconds, press and hold the CAP-
PUCCINO button.
• Do not leave the milk container out of the refrigerator for
long periods. The warmer the milk (5°C is ideal), the poorer
the quality of froth produced.
Making CAFFELATTE/MACCHIATO/FLAT WHITE/ MILK
1. After attaching the milk container, turn the froth regulator
on the milk container lid to the required position (g. 21).
2. Press MILK MENU.
3. Turn the selection dial until the required drink is displayed
(CAFFELATTE, MACCHIATO, FLAT WHITE, MILK);
4. Press MILK MENU to conrm: the display will show the
name of the drink selected and a progression bar that lls
gradually as the coee is prepared.
5. After a few seconds, milk is dispensed from the milk spout
into the cup below. Milk dispensing stops automatically
and (if needed for the drink), coee delivery starts.
Pease note:
• Milk or coee dispensing can be interrupted at any time by
pressing the CAPPUCCINO or MILK MENU button according
to the drink selected.
• At the end of delivery, to increase the quantity of milk or
coee in the cup, within 3 seconds, press one of the but-
tons for milk-based drinks.
• Do not leave the milk container out of the refrigerator for
long periods. The warmer the milk (5°C is ideal), the poorer
the quality of froth produced.
Cleaning the milk container after each use
Important! Danger of burns
When cleaning the internal tubes of the milk container, a little
hot water and steam leak out of the frothed milk spout. Avoid
contact with splashes of water.
“SET DIAL TO CLEAN” ashes on the display each time you use a
milk function. To eliminate all milk residues, proceed as follows:
1. Leave the milk container in the machine (you do not need
to empty it);
2. Place a cup or other recipient under the frothed milk spout.
3. Turn the froth adjustment dial to “CLEAN” (g. 22). A prog-
ress bar appears and gradually lls as the operation pro-
ceeds together with “Cleaning underway”. Cleaning stops
automatically.
4. Turn the dial back to one of the froth selections.
5. Remove the milk container and always clean the steam
nozzle with a sponge.
Please note:
• To prepare a number of cappuccinos or milk based drinks,
clean the milk container after you have prepared the last
drink only.
• The milk container can be kept in the refrigerator.
• In some cases, to clean you must wait for the appliance to
heat up.
Programming the quantities of coee and milk in the
cup
The appliance is set by default to automatically deliver standard
quantities. To change these quantities, proceed as follows:
1. Place a cup under the coee spouts and milk spout.
Programming cappuccino:
2. Hold the CAPPUCCINO button until the message “CAP-
PUCCINO PROGRAM MILK” IS DISPLAYED.
3. The appliance starts dispensing milk. Release the button.
4. Once the required quantity of milk has been delivered into
the cup, press the CAPPUCCINO button again.
5. After a few seconds, the appliance starts delivering coee
into the cup and the message “ CAPPUCCINO PROGRAM
COFFEE” is displayed.
6. Once the required quantity of coee has been delivered
into the cup, press the CAPPUCCINO button.
Coee delivery stops and the machine is “ready for use” again.
This completes programming.
Programming the MILK MENU drinks:
2. Press MILK MENU.
3. Turn the selection dial until the drink you want to pro-
gramme again is displayed (CAFFELATTE, MACCHIATO, FLAT
WHITE, MILK);
4. Hold down the MILK MENU button for a few seconds until
“(DRINK) PROGRAM MILK" IS DISPLAYED.
5. The appliance starts dispensing milk. Release the button.
6. Once the required quantity of milk has been delivered into
the cup, press the MILK MENU button again.
7. After a few seconds, if required by the drink, the appliance
starts delivering coee into the cup and the message “
(DRINK) PROGRAM COFFEE” is displayed.

15
8. Once the required quantity of coee has been delivered
into the cup, press the MILK MENU BUTTON.
Coee delivery stops and the machine is “ready for use” again.
This completes programming.
MAKING HOT WATER
Danger of burns!
Never leave the machine unsupervised while hot water is being
delivered.
1. Make sure the hot water spout is attached correctly.
2. Place a container under the water spout (as close as pos-
sible to avoid splashes) (g. 5).
3. Press the button. “Hot water” is displayed, together
with a progress bar which lls gradually as preparation
proceeds.
4. Hot water delivery begins and then stops automatically.
To manually stop dispensing hot water, press .
Please note :
If “Energy saving” mode is active, you may have to wait a few
seconds before the hot water is delivered.
Changing the quantity of water delivered automati-
cally
The machine is set by default to automatically dispense 250 ml
of hot water. To modify these quantities, proceed as follows:
1. Make sure the hot water spout is attached correctly.
2. Position a container under the spout.
3. Press and hold the button until “HOT WATER Program
quantity” is displayed, then release.
4. When the hot water in the cup reaches the required level,
press the BUTTON.
The machine is now reprogrammed with the new quantity.
CLEANING
Cleaning the machine
The following parts of the machine must be cleaned regularly:
- coee grounds container (A14),
- drip tray (A18) and condensate tray (A15),
- water tank (A10),
- coee spouts (A13) and hot water nozzle (A20),
- pre-ground coee funnel (A6),
- inside of the machine, accessible after opening the infuser
door (A11),
- infuser (A12).
- milk container (D)
Important!
• Do not use solvents, abrasive detergents or alcohol to clean
the appliance. With De’Longhi superautomatic bean to
cup espresso and cappuccino machines, you need not use
chemical products to clean the machine.
• None of the components can be washed in a dishwasher.
• Do not use metal objects to remove encrustations or coee
deposits as they could scratch metal or plastic surfaces.
Cleaning the coee grounds container
When “EMPTY GROUNDS CONTAINER” is displayed, the grounds
container must be emptied and cleaned. Until the grounds con-
tainer has been cleaned, the appliance continues to display the
message and coee cannot be made.
To clean (with the machine on):
• Remove the drip tray (g. 23), empty and clean.
• Empty the grounds container and clean thoroughly to re-
move all residues left on the bottom. This can be done with
the spatula on the brush provided.
• Check the condensate tray and empty if necessary .
Important!
When removing the drip tray, the grounds container must be
emptied, even if it contains few grounds.
If this is not done, when you make the next coees, the grounds
container may ll up more than expected and clog the machine.
Cleaning the drip tray and condensate tray
Important!
The drip tray is tted with a level indicator (red) showing the
level of water it contains (g. 24). Before the indicator protrudes
from the cup tray, the drip tray must be emptied and cleaned,
otherwise the water may overow the edge and damage the
appliance, the surface it rests on or the surrounding area.
To remove the drip tray:
1. Remove the drip tray and grounds container (g. 23);
2. Empty the drip tray and grounds container and wash them;
3. Check the condensate tray and empty if necessary.
4. Replace the drip tray complete with grounds container.
Cleaning the inside of the coee machine
Danger of electric shock!
Before cleaning internal parts, the machine must be turned o
(see “Turning o”) and unplugged from the mains power sup-
ply. Never immerse the coee machine in water.
1. Check regularly (about once a week) that the inside of the
appliance (accessible after removing the drip tray) is not
dirty. If necessary, remove coee deposits with the brush
supplied and a sponge.
2. Remove the residues with a vacuum cleaner (g. 25).

16
PUSH
Cleaning the water tank
1. Clean the water tank (A10) regularly (about once a month)
and whenever you replace the water softener lter (if
provided) with a damp cloth and a little mild washing up
liquid.
2. Remove the lter (if present) and rinse with running water.
3. Replace the lter (if provided), ll the tank with fresh wa-
ter and replace the tank.
Cleaning the coee spouts
1. Clean the coee spouts with a sponge or cloth (g. 26A).
2. Check the holes in the coee spout are not blocked. If nec-
essary, remove coee deposits with a toothpick (g. 26B).
Cleaning the pre-ground coee funnel
Check regularly (about once a month ) that the pre-ground cof-
fee funnel (A6) is not blocked. If necessary, remove coee de-
posits with the brush supplied (C2).
Cleaning the infuser
The infuser (A12) must be cleaned at least once a month.
Important!
The infuser may not be extracted when the machine is on.
1. Make sure the machine is correctly turned o (see “Turning
o”, page 10).
2. Extract the water tank.
3. Open the infuser door (g. 27) on the right side of the ap-
pliance.
4. Press the two red release buttons inwards and at the same
time pull the infuser outwards (g. 28).
Important!
RINSE WITH WATER ONLY NO WASHING UP LIQUID
NO DETERGENTS NO DISHWASHER
Clean the infuser without using washing up liquid as it
could be damaged.
5. Soak the infuser in water for about 5 minutes, then rinse
under the tap.
6. Use the brush to remove any coee residues left in the in-
fuser housing, visible through the infuser door.
7. After cleaning, replace the infuser by sliding it onto the in-
ternal support, then push the PUSH symbol fully in until it
clicks into place.
Please note :
If the infuser is dicult to insert, before insertion, adapt it to the
right size by pressing the two levers shown in the gure.
8. Once inserted, make sure the two red buttons have
snapped out.
9. Close the infuser door.
10. Replace the water tank.
Cleaning the milk container
Clean the milk container each time you prepare milk as de-
scribed below:
1. Remove the lid.
2. Remove the milk spout and in-
take tube.
3. Turn the froth adjustment dial
clockwise to the “INSERT” posi-
tion (see gure) and pull o
upwards.
4. Wash all the components
thoroughly with hot water
and mild washing-up liquid.
All components are dish-
washer safe, placing them
in the top basket of the
dishwasher. Make sure there
are no milk residues on the
hollow and groove under the
dial (see gure alongside).
If necessary, scrape the groove
with a toothpick.
5. Rinse inside the froth adjust-
ment dial seat with running
water (see gure).
6. Check that the intake tube and spout are not clogged with
milk residues.

17
7. Replace the dial (lining up
the arrow with the word “IN-
SERT”), the spout and the milk
intake tube.
8. Place the lid back on the milk
container.
Cleaning the hot water/steam
nozzle
Each time you prepare
milk, clean the nozzle
with a sponge to remove
milk residues from the
gaskets (see gure along-
side).
DESCALING
Descale the machine when the message “DESCALE” FLASHES
ON THE DISPLAY.
Important!
• Descaler contains acids which may irritate the skin and
eyes. It is vital to respect the manufacturer’s safety warn-
ings given on the descaler pack and the warnings relating
to the procedure to follow in the event of contact with the
skin and eyes.
• You should use De’Longhi descaler only. Using unsuitable
descaler and/or performing descaling incorrectly may re-
sult in faults not covered by the manufacturer’s guarantee.
1. Turn the machine on.
2. Press the MENU button to enter the menu.
3. Turn the selection dial until “Descale” is displayed.
4. Select by pressing thebutton : “Descale Conrm?” is
displayed. Press again to enable the function.
5. The message “Add descaler Conrm?” is displayed, alter-
nating with “EMPTY THE DRIP TRAY” and “REMOVE FIL
TER” (if the lter is present).
6. Empty the water tank (A10) completely and remove the
water softener lter (if present). Empty the drip tray (g.
23) and grounds container, then put them back in the ap-
pliance.
7. Pour the descaler into the water tank up to the level A (cor-
responding to a 100 ml pack) marked on the back of the
tank (g. 29), then add water (1 litre) up to level B (g. 29).
Replace the water tank.
8. Place an empty container with a minimum capacity of 1.5
litres under the hot water spout (g. 5).
Danger of burns!
Hot water containing acid ows out of the hot water spout.
Avoid contact with splashes of water.
9. Press the button to conrm that you have added the
solution.
10. The message “Descale underway” is displayed. The descale
programme starts and the descaler liquid comes out of
the water spout. The descale programme automatically
performs a series of rinses and pauses to remove limescale
deposits from inside the machine.
After about 30 minutes, the message “Rinsing” “INSERT FILTER”
(if present), “FILL TANK” is displayed.
11. The appliance is now ready for rinsing through with clean
water. Extract the water tank, empty, rinse under running
water, ll with clean water up to the MAX level, insert the
lter (if removed previously) and put the water tank back
in the machine. “RINSING Conrm?” is displayed.
12. Empty the container used to collect the descaler solution
and replace it empty under the cappuccino maker.
13. Press the button to starting rinsing. Hot water ows
out of the spout and the message “RINSING PLEASE WAIT”
is displayed.
14. When the water tank is completely empty, the message
“Rinsing complete Conrm?” is displayed.
15. Press the button to conrm. “FILL TANK” is displayed.
Fill and replace the water tank.
16. “Heating up Please wait” is displayed at the end of which
the machine will be ready for use.
SETTING WATER HARDNESS
The DESCALE message is displayed after a period of time estab-
lished according to water hardness.
The machine is set by default for a hardness value of 4. The ma-
chine can also be programmed according to the hardness of the
mains water in the various regions so that the machine needs to
be descaled less often.
Measuring water hardness
1. Remove the “TOTAL HARDNESS TEST” indicator paper from
its pack (attached to the English instructions).
2. Immerse the paper completely in a glass of water for one
second.
3. Remove the paper from the water and shake lightly. After
about a minute, 1, 2, 3 or 4 red squares appear, depending
on the hardness of the water: each square corresponds to
one level.
soft water l
slightly hard water
ll
25

18
hard water lll
very hard water
llll
Set water hardness
1. Press the MENU button to enter the menu;
2. Turn the selection dial until “Water Hardness” is displayed;
3. Press the button.
4. Turn the selection dial and set the number of squares mea-
sured by the indicator paper (see gure in previous para-
graph).
5. Press the button to conrm the setting.
6. Then press the button to exit the menu.
The machine is now reprogrammed with the new water hard-
ness setting.
WATER SOFTENER FILTER
Some models come supplied with the water softener lter. If
this is not the case with your model, we recommend purchasing
one from De’Longhi customer assistance.
To use the lter correctly, follow the instructions below.
Installing the lter
1. Remove the lter from the packaging.
2. Turn the date indicator disk (see g. 30) until the next two
months of use are displayed.
Please note :
The lter lasts about two months if the appliance is used regu-
larly. If the coee machine is left unused with the lter installed,
it will last a maximum of three weeks.
3. To activate the lter, run tap water through the hole in the
lter as shown in the gure until water comes out of the
openings at the side for more than a minute (g. 31).
4. Extract the tank from the appliance and ll with water.
5. Insert the lter in the water tank and immerse it com-
pletely for about ten seconds, sloping it to enable the air
bubbles to escape (g. 32).
6. Insert the lter in the lter
housing and press as far as
it will go.
7. Close the tank with the lid,
then put the tank back in
the machine.
When you install the lter, you
must notify the appliance of its
presence.
8. Press the MENU button to
enter the menu;
9. Turn the selection dial until
“Install lter” is displayed;
10. Press the button.
11. “Enable?” is displayed;
12. Press the button to conrm the selection. “HOT WATER
CONFIRM?” is displayed;
13. Position a container with a minimum capacity of 500ml
under the hot water spout.
14. Press the button to conrm the selection. The appli-
ance begins hot water delivery and the message “Please
wait” is displayed.
15. After delivery, the appliance is automatically ready to make
the next drink.
The new lter is active and indicated by an asterisk displayed
under “Install lter” in the menu. You can now use the appliance.
Replacing the lter
When “REPLACE FILTER” is displayed, or after two months (see
date indicator) or when the appliance has not been used for 3
weeks, you should replace the lter:
1. Extract the tank and exhausted lter;
2. Take the new lter out of its packet and proceed as illus-
trated in points 2, 3, 4, 5 and 6 in the previous section.
3. Position a container with a minimum capacity of 500ml.
4. Press the MENU button to enter the menu;
5. Turn the selection dial until “Replace lter” is displayed.
6. Press the button.
7. Conrm?” is displayed.
8. Press the button to conrm the selection;
9. “HOT WATER Conrm?” is displayed;
10. Press the button to conrm the selection. The appli-
ance begins hot water delivery and the message “Please
wait” is displayed.
11. After delivery, the appliance is automatically ready to make
the next drink.
The new lter is now active and you can use the coee machine.
Removing the lter
If you want to use the appliance without the lter, you must
remove it and notify the appliance of its removal. Proceed as
follows:
1. Extract the tank and exhausted lter;
2. Press the MENU button to enter the menu;
3. Turn the selection dial until “Install lter” is displayed;
4. Press the button.
5. “Disable?” is displayed;
6. Press to conrm and to exit the menu.

19
TECHNICAL DATA
Voltage: 120 V~ 60 Hz max. 10A
Absorbed power: 1250W
Pressure: 15 bar
Max. water tank capacity: 1.8 litres
Size: LxHxD: 238x351x430 mm
Cable length: 1,75 m
Weight: 9.1 kg
Max. beans container capacity: 250 g
DISPLAYED MESSAGES
MESSAGE DISPLAYED POSSIBLE CAUSE SOLUTION
FILL TANK Insucient water in the tank. Fill the tank with water and/or insert it correctly, pushing
it as far as it will go until it clicks into place (g. 4).
EMPTY GROUNDS CONTAINER The grounds container (A14) is full. Empty the grounds container and drip tray, clean and
replace (g. 23). Important: When removing the drip
tray, the grounds container must be emptied, even if it
contains few grounds. If this is not done, when you make
the next coees, the grounds container may ll up more
than expected and clog the machine.
GROUND TOO FINE ADJUST
MILL
The grinding is too ne and the
coee is delivered too slowly or not
at all.
Repeat coee delivery and turn the grinding adjustment
dial (g. 11) one click clockwise towards “7” while the
coee mill is in operation.If after making at least 2 cof-
fees delivery is still too slow, repeat the correction proce-
dure, turning the grinding adjustment dial another click
until delivery is correct (see the grinding adjustment
section on page 12) If the problem persists, make sure
the water tank is fully inserted, press the button and
deliver a little water from the spout.
INSERT GROUNDS CONTAINER After cleaning, the grounds contai-
ner has not been replaced.
Remove the drip tray and insert the grounds container.
ADD PREGROUND COFFEE With the pre-ground function selec-
ted, pre-ground coee has not been
poured into the funnel.
Add pre-ground coee in the funnel or deselect the pre-
ground function.
DESCALE The machine must be descaled. The descaling procedure described in the section “Desca-
ling” needs to be performed as soon as possible (page
17).
LESS COFFEE Too much coee has been used. Select a milder avour or reduce the quantity of pre-
ground coee.
FILL BEANS CONTAINER The coee beans have run out. Fill the beans container.
The pre-ground coee funnel is
clogged.
Empty the funnel with the help of a brush as described in
the section “Cleaning the pre-ground coee funnel”.
INSERT INFUSER ASSEMBLY The infuser has not been replaced
after cleaning.
Insert the infuser as described in the paragraph “Cleaning
the infuser” (page 16).
INSERT TANK The tank was not inserted properly. Insert the tank correctly and press as far as it will go.
GENERAL ALARM The inside of the appliance is very
dirty.
Clean the inside of the appliance thoroughly, as descri-
bed in the section “Cleaning” (page 15). If the message is
still displayed after cleaning, contact a service centre.
Page is loading ...
Page is loading ...
Page is loading ...
-
 1
1
-
 2
2
-
 3
3
-
 4
4
-
 5
5
-
 6
6
-
 7
7
-
 8
8
-
 9
9
-
 10
10
-
 11
11
-
 12
12
-
 13
13
-
 14
14
-
 15
15
-
 16
16
-
 17
17
-
 18
18
-
 19
19
-
 20
20
-
 21
21
-
 22
22
-
 23
23


DeLonghi ECAM25462 Instructions For Use Manual
- Category
- Coffee makers
- Type
- Instructions For Use Manual
Ask a question and I''ll find the answer in the document
Finding information in a document is now easier with AI
Related papers
-
DeLonghi 26.455.M User manual
-
-
-
DeLonghi Eletta Cappuccino ECAM 44.660.B Owner's manual
-
-
-
DeLonghi ECAM 26.455M PrimaDonna S De Luxe Owner's manual
-
DeLonghi PrimaDonna XS De Luxe ETAM 36.365.M User manual
-
-
Other documents
-
De'Longhi 6900.M User manual
-
De’Longhi Eletta Plus ECAM 44.620.S User manual
-
-
DE LONGHI ECAM11.11X User manual
-
Bauknecht KMT11 F45 Use & Care
-
Whirlpool KMT11 F45 User guide
-
-
-
-
Smeg CMS4604 User manual