Whirlpool WHELJ1 Installation Instructions Manual

Type
Installation Instructions Manual
1
Do not return unit to store
If you have any questions or concerns when
installing, operating or maintaining your your
Central Water Filtration System,
call our toll free number:
1-866-986-3223
Monday- Friday, 8 AM - 7 PM EST or visit
www.whirlpoolwatersofteners.com
When you call, please be prepared to provide
the model and serial number of your product,
found on the rating decal on back of the cover.
Manufactured and warranted by
Ecodyne Water Systems
1890 Woodlane Drive
Woodbury, MN 55125
For a detailed owners manual,
including specifications,
programming and parts list, go to:
www.whirlpoolwatersofteners.com
or call 1-866-986-3223
Installation Instructions
System tested and certified by the Water Quality
Association against CSA B483.1.
7337602 (Rev. D 7/22/14)
English
Model WHELJ1
Whirlpool Central
Water Filtration System
System tested and certified by NSF International
against NSF/ANSI Standard 42
for the reduction of chlorine taste and odor,
and certified to NSF/ANSI Standard 372.
In the state of Massachusetts: The Commonwealth
of Massachusetts plumbing code 248-CMR shall
be adhered to. A licensed plumber shall be used
for this installation.
2
Central Water Filtration System Safety
Before You Start
Your safety and the safety of others are very important.
We have provided many safety messages in this manual and on your appliance. Always read and obey all safety
messages.
This is the safety alert symbol.
This symbol alerts you to potential hazards that can kill or hurt you and others.
All safety messages will follow the safety alert symbol and either the word “DANGER” or “WARNING”
These words mean:
You can be killed or seriously injured if you don’t
immediately follow instructions.
You can be killed or seriously injured if you don’t
follow instructions.
All safety messages will tell you what the potential hazard is, tell you how to reduce the chance of injury, and tell
you what can happen if the instructions are not followed.
= Do not turn the Central Water Filtration System
upside down, drop, or set on sharp protrusions.
= The Central Water Filtration System has a maxi-
mum allowable inlet water pressure of 125 psi and
a minimum of 30 psi. If daytime pressure is over 80
psi, nighttime pressure may exceed the maximum.
Use a pressure reducing valve if necessary (Adding
a pressure reducing valve may reduce the flow.). If
your home is equipped with a back flow preventer,
an expansion tank must be installed in accordance
with local codes and laws.
= Do not use this system to treat water that is micro-
biologically unsafe or of unknown quality without
adequate disinfection upstream or downstream of
the system.
LOCATION REQUIREMENTS
Consider the following when selecting an installation
location for the Central Water Filtration System.
= Do not operate the Central Water Filtration System
where freezing temperatures occur. Do not attempt
to treat water over 100ºF (38ºC). Freezing temper-
atures or hot water damage voids the warranty.
= To condition all water in the home, install the
Central Water Filtration System close to the water
supply inlet, and before all other plumbing connec-
tions, except outside water pipes.
= For a home with municipal water supply, install the
Central Water Filtration System between the home’s
incoming water supply and the water softener, if one
is being used (See Figure 1A). If the home has well
water, reverse the order of the Central Water Filtra -
tion System and the water softener (See Figure 1B).
= A nearby drain is needed to carry away Clean
Rinse discharge water. Use a floor drain, laundry
tub, sump, standpipe, or other options (check your
local codes). See "Air Gap Requirements" and
"Valve Drain Requirements" sections.
= The Central Water Filtration System works on 28V
DC electrical power, supplied by a direct plug-in
power supply (included). Provide a 120V, 60 Hz
electrical outlet in accordance with NEC and local
codes.
= Do not install the Central Water Filtration System on
a hot water line (See Figures 1A & 1B).
= Avoid installing in direct sunlight. Excessive sun
heat may cause distortion or other damage to non-
metallic parts.
PLUMBING CODES
All plumbing must be completed in accordance with
national, state and local plumbing codes.
English
3
English
AIR GAP REQUIREMENTS
A drain is needed for Clean Rinse discharge water
(See Figure 4). A floor drain, close to the Central
Water Filtration System, is preferred. A laundry tub,
standpipe, etc. are other drain options. Secure valve
drain hose in place. Leave an air gap of 1-1/2”
between the end of the hose and the drain. This gap
is needed to prevent backflow of sewer water into the
Central Water Filtration System . Do not put the end
of the drain hose into the drain.
VALVE DRAIN REQUIREMENTS
Using the flexible drain hose (included), measure and
cut to the length needed. Flexible drain hose is not
allowed in all localities (check your plumbing codes). If
local codes do not allow use of a flexible drain hose, a
rigid valve drain run must be used. Purchase a com-
pression fitting (1/4 NPT x 1/2 in. minimum tube) and
1/2" tubing from your local hardware store. Plumb a
rigid drain as needed (see Figure 4).
NOTE: Avoid drain hose runs longer than 30 feet.
Make the valve drain line as short and direct
as possible.
It is recommended that the Central Water Filtration
System be installed near a drain. However, if a drain
is not available, it is still possible to operate the
Central Water Filtration System in a manual Clean
Rinse mode. See “Operating in Manual Clean Rinse
Mode” section in the detailed owner’s manual (go to
www.whirlpoolwatersofteners.com or call 1-866-
986-3223). The automatic Clean Rinse function must
be disabled if the Central Water Filtration System will
not be connected to a drain.
THE PROPER ORDER TO INSTALL WATER TREATMENT EQUIPMENT
Untreated Water to
Outside Faucets
FIG. 1B
Hot Water
to House
Cold Water
to House
Untreated Water to
Outside Faucets
Water
Heater
Optional
Sediment
Filter
Pressure
Tank
Well
Pump
Hot Water
to House
Cold Water
to House
Central
Water
Filtration
System
Water
Heater
Water
Softener
Optional
Sediment
Filter
City Water Supply
Well Water Supply
Central
Water
Filtration
System
Water
Softener
FIG. 1A
OR
Questions? Call Toll Free 1-866-986-3223 Monday- Friday, 8 AM - 7 PM EST
or visit www.whirlpoolwatersofteners.com
When you call, please be prepared to provide the model and serial number, found on the rating decal on back of the cover.
Before You Start
4
English
INLET - OUTLET PLUMBING OPTIONS
Always install either a single bypass valve (provided)
to the contractor/plumber-supplied plumbing, as shown
in Figure 2 OR if desired, a 3 valve bypass system
(parts not included) can be installed, as shown in
Figure 3. Bypass valves allow you to turn off water to
the Central Water Filtration System for maintenance if
needed, but still have water in house pipes.
Use either:
= Copper pipe
= Threaded pipe
= PEX (Crosslinked Polyethylene) pipe
= CPVC plastic pipe
= Other pipe approved for use with potable water
IMPORTANT: Do not solder with plumbing attached to
installation adapters and single valve
bypass. Soldering heat will damage the
adapters and valve.
1-1/2”
air gap
Install adaptor
elbow using hose
clamp. Aim noz-
zle down toward
center of drain
Tie or wire
tubing in
place
FIG. 4
LAUNDRY TUB STANDPIPE
1-1/2”
air gap
FLOOR DRAIN
1-1/2”
air gap
To drain point other
than floor drain.
Support tubing in
place as needed.
Drain
Fitting
Clip
Barbs
1/4 NPT Threads
1/2” Outside Dia.
Copper Tube
(not included)
Comp Fitting. 1/4
NPT x 1/2” O.D.
Tube (not included)
Cut barbs from
drain fitting (pull
clip to remove fit-
ting from valve)
CONNECTING VALVE TO DRAIN
SUBSTITUTING RIGID DRAIN LINE
Hose
Clamp
Valve
Drain
Hose
Drain grate with 1”
dia. hole in center
FIG. 3
3 VALVE BYPASS
From Water
Softener
To Water
Softener
Inlet
Valve
Outlet
Valve
Bypass
Valve
FIG. 2
SINGLE BYPASS VALVE
Pull out for “Service”
(Soft water)
Push in for
“Bypass”
Before You Start
5
Installation Instructions
TURN OFF WATER SUPPLY
1. Close the main water supply valve, near the well
pump or water meter.
2. Open all faucets to drain water from the house
pipes.
NOTE: Be sure not to drain water from the water
heater, as damage to the water heater ele-
ments could result.
MOVE THE CENTRAL WATER FILTRATION
SYSTEM INTO PLACE
1. Move the Central Water Filtration System into instal-
lation position. Set it on a level surface.
2. Remove top cover.
3. Hang cover from post on front of rim, as shown in
Figure 5. Avoid allowing cover to hang from wires.
Excessive Weight Hazard
Use two or more people to move and install
Central Water Filtration System.
Failure to do so can result in back or other
injury.
1. Install metal grounding clamp to metal house water
supply pipes before beginning installation.
2. Securely tighten connection in center of metal
ground clamp (See Figure 6).
3. Loosely assemble any pipe and fittings needed from
the main water supply to the inlet and outlet ports of
the Central Water Filtration System valve.
IMPORTANT:
= Be sure to fit, align and support all plumbing to pre-
vent putting stress on the Central Water Filtration
System valve inlet and outlet. Undue stress from
misaligned or unsupported plumbing may cause
damage to the valve.
= Be sure to keep fittings fully together, and pipes
squared and straight.
= Be sure incoming water supply pipe goes to the
Central Water Filtration System valve INLET side.
Inlet and outlet are marked on the valve. Trace the
water flow direction to be sure.
4. Complete the inlet and outlet plumbing for the type
of pipe as described on the next page.
Electrical Shock Hazard
Install metal ground clamp to metal house
water supply pipe before beginning installation.
Securely tighten connection in center of metal
ground clamp.
Failure to do so can result in death or
electrical shock.
ASSEMBLE INLET AND OUTLET PLUMBING
A ground clamp should be installed on the household
plumbing supply lines in accordance with the National
Electric Code.
English
Post
Top Cover
REMOVE TOP COVER AND HANG IT
FROM POST ON FRONT OF RIM
FIG. 5
FIG. 6
Ground
Clamp (2)
Screw with
locking nut
Plastic
Bypass
Valve
Metal
Pipes
6
English
Installation Instructions
Soldered Copper
1. Thoroughly clean and apply solder flux to all joints.
2. Make all solder connections.
IMPORTANT: Do not solder with plumbing attached to
installation adapters and single valve
bypass. Soldering heat will damage the
adapters and valve.
Threaded Pipe
1. Apply pipe joint compound or Teflon® tape to all
male pipe threads.
2. Tighten all threaded joints and make all solder con-
nections.
CPVC Plastic Pipe
1. Clean, prime and cement all joints, following the
manufacturer's instructions supplied with the plastic
pipe and fittings.
Other, including PEX (Crosslinked Polyethylene)
1. Follow the piping system manufacturer's instructions
when using other pipe approved for potable water.
FIG. 7B
INOUT
Use Teflon® tape,
pipe joint com-
pound or both
Clip (2)
Valve
Inlet
1” NPT
Adapter (2)
1” NPT Sweat
Adapter (2)
(not included)
CONNECTING PLUMBING TO VALVE
Included
1” NPT
Adapter (2)
Clip (4)
1” NPT Sweat
Adapter (2)
(not included)
Use Teflon® tape,
pipe joint com-
pound or both
Bypass
Valve
Valve
Inlet
INOUT
Included
INSTALL VALVE DRAIN HOSE
1. Measure, cut to needed length and connect the 3/8"
drain line (provided) to the Central Water Filtration
System valve drain fitting (See Figure 4). Use a
hose clamp to hold the hose in place.
NOTE: If codes require a rigid drain line see “Valve
Drain requirements" section.
2. Run the drain hose or copper tubing to the floor
drain. Secure drain hose. This will prevent the
drain line from “whipping'' during Clean Rinse
cycles. See “Air Gap Requirements" section.
TEST FOR LEAKS
1. Make sure the single bypass valve (or 3 valve
bypass, if installed) is in the bypass position, with
the handle pushed in (See Figure 2).
2. Fully open the main water supply valve.
3. Briefly open a faucet in the house to refill the plumb-
ing with water.
4. Slowly move the bypass valve(s) to the normal
operation position, pausing several times to allow
the unit to pressurize slowly (See Figure 2).
5. Check for leaks at all the plumbing connections you
made.
IMPORTANT: Start up procedure must be run prior to
using any filtered water. Follow the
instructions below and on Page 7.
TURN ON THE CENTRAL WATER FILTRA-
TION SYSTEM
During installation, the Central Water Filtration System
wiring may be moved or jostled from place. Check to
be sure all leadwire connectors are secure on the back
of the electronic board and be sure all wiring is away
from the valve gear and motor area, which rotates dur-
ing Clean Rinse cycles.
1. Plug the Central Water Filtration System’s power
supply into an electrical outlet that is not controlled
by a switch.
2. In the display, the words “PRESENT TIME” appear
and 12:00 PM begins to flash. Set the clock accord-
ing to the “Set Time of Day” section on Page 7.
3. Run the start up procedure, as detailed on Page 7.
® Teflon is a registered trademark of E.I. Du Pont de
Nemours and Company.
FIG. 7A
7
Programming the Electronic Controller
English
SET TIME OF DAY
When the power supply is plugged into the electrical
outlet, a model code and a test number (example:
J2.0), begin to flash in the faceplate display. Then,
12:00 PM and the words “PRESENT TIME" begin to
flash.
If the words “PRESENT TIME" do not show in the dis-
play, press the PROGRAM button until they do.
1. Press the
r UP or s DOWN buttons to set the
present time. Up moves the display ahead; down
sets the time back. Be sure AM or PM is correct.
NOTE: Press buttons and quickly release to slowly
advance the display. Hold the buttons down
for fast advance.
2. Press the PROGRAM button a few times, until the
time appears on the display, but is not flashing.
NOTE: You can find complete instructions for program-
ming the Central Water Filtration System and
customizing features of the electronic controller
in the owners manual.
Go to www.whirlpoolwatersofteners.com
or call 1-866-986-3223.
FIG. 8
IMPORTANT:
Run the start up cycle immediately after
completing installation, before using any
water in the home.
The filtration media in this Central Water Filtration
System contains a small number of harmless activated
carbon particles generated during shipping that are
small enough to exit the system with water flow. It is
normal for these particles to cause a temporary discol-
oration of the water coming out of the system. To
avoid discolored water at your home’s faucets the sys-
tem’s start up cycle should be initiated to rinse the par-
ticles and any discolored water down the drain.
If the Central Water Filtration System is used without
first running the start up cycle, you will notice that the
water will temporarily have a gray color until the parti-
cles have exited the system.
To Initiate the start up cycle:
1. Make sure the drain hose is attached to the Central
Water Filtration System and the other end is
secured over a drain (see Figure 4).
2. Make sure bypass valve is in the “service” (open or
filtered water) position and the home’s water supply
is turned on.
3. Press and hold the CLEAN button to initiate the
start up cycle. The button can be released when
you hear the valve changing position and
“RECHARGE NOW” flashes in the display.
During the start up cycle:
Throughout the start up cycle you will hear the valve
changing position and notice the flow of water to drain
starting and stopping. The start up cycle will take
approximately 20 minutes. Avoid using water during
this time. Do not set the time of day or press other
buttons during the start up cycle, as this will interrupt
the start up cycle. Do not unplug the power supply
during the start up cycle. If the start up cycle is inter-
rupted, it should be initiated again and allowed to run
to completion.
After the start up cycle:
Once the start up procedure completes successfully, it
cannot be initiated a second time. The Central Water
Filtration System will automatically return to the normal
operation position. Once the start up cycle has run, a
faucet in the home should be opened and water
allowed to run for 10 minutes at the system’s rated
flow. If, after running the start up cycle, the water still
appears discolored, manually run a 3-minute Clean
Rinse cycle: Press and hold the CLEAN button for a
few seconds, until “RECHARGE NOW” flashes in the
display. Repeat, if necessary, until the water is clear.
If the time of day was not set before the start up cycle,
set it now (See “Set Time of Day”, above).
Check the new plumbing connections and joints once
more for leaks.
Start Up Procedure
FIG. 9
8
English
Customizing Features / Options
SET NUMBER OF DAYS BETWEEN
CLEAN RINSE CYCLES
By default the Central Water Filtration System will
automatically initiate a Clean Rinse every 14 days.
This should be sufficient for most applications.
To change the number of days between Clean Rinse
cycles:
1. Press the PROGRAM button twice, so “RECHARGE
is shown in the display.
2. Press the
r UP or s DOWN buttons to set the
number of days between Clean Rinse cycles (from 1
to 99).
3. Press the PROGRAM button twice when complete.
SET CLEAN RINSE TIME
By default the Central Water Filtration System will
Clean Rinse at 1:00 a.m.
To change the Clean Rinse start time:
1. Press the PROGRAM button three times, so
“RECHARGE TIME” is shown in the display.
FIG. 11
2. Press the r UP or s DOWN buttons to set the
Clean Rinse time. Be sure AM or PM is correct.
3. Press the PROGRAM button again when com-
plete.
FIG. 12
SET LENGTH OF CLEAN RINSE
By default the Central Water Filtration System’s
Clean Rinse cycle will consist of a 2 minute back-
wash followed by a 1 minute fast rinse. This should
be sufficient for most applications.
Increasing the length of Clean Rinse time will
increase the amount of water flushed to drain during
each Clean Rinse cycle, therefore, these times
should only be increased when necessary.
To change the length of the backwash part of the
Clean Rinse cycle:
1. Press and hold the PROGRAM button for a few
seconds, until the “000--” screen appears, as shown
in Figure 13.
2. Press the PROGRAM button once, so “bA TIME”
appears in the display.
FIG. 13
3. Press the r UP or s DOWN buttons to set the
length of backwash in minutes.
4. Press the PROGRAM button twice when complete.
To change the length of the fast rinse part of the
Clean Rinse cycle:
1. Press and hold
the PROGRAM button for a few
seconds, until the “000--” screen appears, as shown
in Figure 13.
2. Press the PROGRAM button twice, so “Fr TIME”
appears in the display.
3. Press the
r UP or s DOWN buttons to set the
length of fast rinse in minutes.
4. Press the PROGRAM button again when com-
plete.
FIG. 14
FIG. 15
FIG. 10
START A CLEAN RINSE CYCLE
To manually start a Clean Rinse cycle, press and
hold the CLEAN button for a few seconds, until
“RECHARGE NOW” flashes in the display.
9
For a detailed owners manual, including specifications, programming and parts list, go to:
www.whirlpoolwatersofteners.com or call 1-866-986-3223
CENTRAL WATER FILTRATION SYSTEM WARRANTY
Warrantor: Ecodyne Water Systems, 1890 Woodlane Drive, Woodbury, MN 55125
Warrantor guarantees, to the original owner, that:
One Year Full Warranty:
● For a period of one (1) year from the date of purchase, all parts will be free from defects in materials
and workmanship and will perform their normal functions.
● For a period of one (1) year from the date of purchase, labor to repair or replace any part deemed to
be defective in materials or workmanship, will be provided at no additional cost.
Limited Warranties:
● For a period of ten (10) years from the date of purchase, the fiberglass filtration media tank will not
rust, corrode, leak, burst, or in any other manner, fail to perform its proper functions.
● For a period of three (3) years from the date of purchase, the electronic control board will be free of
defects in materials and workmanship and will perform its normal functions.
If, during such respective period, a part proves to be defective, Warrantor will ship a replacement part,
directly to your home, without charge. After the first year, labor necessary to maintain this product is not
covered by the product warranty.
If you have questions regarding a warranted product, need assistance with installation or troubleshooting,
wish to order a part or report a warranty issue, we are just a phone call away. SIMPLY DIAL 1-866-986-
3223, Monday - Friday, 8 am - 7 pm EST, for assistance.
General Provisions
The above warranties are effective provided the Central Water Filtration System is operated at water pres-
sures not ex ceed ing 125 psi, and at water temperatures not exceeding 100°F (38°C); provided further that
the Central Water Filtration System is not subject to abuse, misuse, alteration, neglect, freezing, accident
or negligence; and provided further that the Central Water Filtration System is not damaged as the result
of any unusual force of nature such as, but not limited to, flood, hurricane, tornado or earthquake.
Warrantor is excused if failure to perform its warranty obligations is the result of strikes, government regu-
lation, materials shortages, or other circumstances beyond its control.
*THERE ARE NO WARRANTIES ON THE CENTRAL WATER FILTRATION SYSTEM BEYOND THOSE
SPECIFICALLY DESCRIBED ABOVE. ALL IMPLIED WARRANTIES, INCLUDING ANY IMPLIED WAR-
RANTY OF MERCHANTABILITY OR OF FITNESS FOR A PARTICULAR PURPOSE, ARE DISCLAIMED
TO THE EXTENT THEY MIGHT EXTEND BEYOND THE ABOVE PERIODS. THE SOLE OBLIGATION
OF WARRANTOR UNDER THESE WARRANTIES IS TO REPLACE OR REPAIR THE COMPONENT OR
PART WHICH PROVES TO BE DEFECTIVE WITHIN THE SPECIFIED TIME PERIOD, AND WARRAN-
TOR IS NOT LIABLE FOR CONSEQUENTIAL OR INCIDENTAL DAMAGES. NO WARRANTOR DEAL-
ER, AGENT, REPRESENTATIVE, OR OTHER PERSON IS AUTHORIZED TO EXTEND OR EXPAND
THE WARRANTIES EXPRESSLY DESCRIBED ABOVE.
Some states do not allow limitations on how long an implied warranty lasts or exclusions or limitations of
incidental or consequential damage, so the limitations and exclusions in this warranty may not apply to
you. This warranty gives you specific legal rights, and you may have other rights which vary from state to
state. This warranty applies to consumer-owned installations only.
® /TM © 2013 Whirlpool. All rights reserved.
Manufactured under license by Ecodyne Water Systems, Woodbury, Minnesota.
English
10
Fabricado y garantizado por
Ecodyne Water Systems
1890 Woodlane Drive
Woodbury, MN 55125
Para obtener el manual detallado del
propietario, con especificaciones,
programación y lista de piezas,
visite el sitio:
www.whirlpoolwatersofteners.com
o llame al 1-866-986-3223
Instrucciones de instalación
No devuelva la unidad a la tienda
Si tiene cualquier pregunta o inquietud al
instalar, operar o mantener su sistema central
de filtrado de agua, llame gratis a nuestro
número telefónico:
1-866-986-3223
de lunes a viernes, de 8 a.m. a 7 p.m.,
hora del Este, o visite el sitio web
www.whirlpoolwatersofteners.com
Cuando llame, esté preparado para proporcionar
el modelo y número de serie del producto, que se
encuentran en la calcomanía de clasificación, la que
está situada en la parte posterior de la cubierta.
Este sistema ha sido probado y certificado por
Water Quality Association
según la norma CSA B483.1.
Modelo WHELJ1
Sistema central de filtrado
de agua Whirlpool
Este sistema ha sido probado y certificado por
NSF International según la norma NSF/ANSI 42
para la reducción del sabor y el olor a cloro,
y certificado según la norma NSF/ANSI 372.
Español
11
Español
Seguridad del sistema central de filtrado de agua
Es muy importante su seguridad y la seguridad de los demás.
En este manual y en el aparato hemos incluido muchos mensajes de seguridad. Siempre lea y cumpla con todos
los mensajes de seguridad.
Este es el símbolo de alerta de seguridad.
Este símbolo le alerta sobre peligros potenciales que pueden causar la muerte o lesiones a usted y
los demás.
Todos los mensajes de seguridad aparecerán después del símbolo de alerta de seguridad y la pal-
abra “DANGER” (PELIGRO) o “WARNING” (ADVERTENCIA). Estas palabras significan:
Usted puede morir o lesionarse gravemente si no
sigue de inmediato las instrucciones.
Usted puede morir o lesionarse gravemente si no
sigue las instrucciones.
Todos los mensajes de seguridad mostrarán cuál es el posible peligro, indicarán cómo reducir la posibilidad de
lesiones y le dirán qué sucederá si no se siguen las instrucciones.
PELIGRO
= No lo voltee el sistema central de filtrado de agua, no lo
deje caer ni lo apoye sobre salientes puntiagudas.
= La presión de entrada máxima del agua para el sis-
tema de central de filtrado de agua es 125 PSI, y la
presión mínimo es 30 PSI. Si la presión de agua
durante el día supera las 80 PSI, la presión durante la
noche podría exceder el máximo. Utilice una válvula
de reducción de presión, si es necesario (si agrega
una válvula de reducción de presión puede reducir el
flujo). Si su casa está equipada con un protector de
reflujo, deberá instalar un tanque de expansión con-
forme a los códigos y las leyes locales.
= Si el agua es microbiológicamente impura o si se
desconoce su calidad, no use el sistema para tratar
agua sin una adecuada desinfección antes o después
del sistema.
REQUISITOS DE UBICACIÓN
Considere lo siguiente al seleccionar una ubicación para
instalar el sistema central de filtrado de agua.
= No opere el sistema central de filtrado de agua donde
se registren temperaturas de congelamiento. No
intente tratar agua con una temperatura superior a los
100°F (38°C). El uso de temperaturas de conge-
lamiento o de agua caliente anula la garantía.
= Para acondicionar toda el agua de la vivienda, instale
el sistema central de filtrado de agua cerca de la
entrada del suministro de agua, y antes de todas las
demás conexiones de plomería, excepto los tubos de
agua externos.
= Para una casa con suministro municipal de agua,
instale el sistema central de filtrado de agua entre el
Antes de comenzar
suministro entrante de agua de la vivienda y el suavi -
zante de agua, si se utiliza (Vea la Figura 1A). Si la
casa tiene un suministro de agua de cisterna, invertir
el orden del sistema central de filtrado de agua y el
suavizante de agua (Vea la Figura 1B).
= Se necesita tener un desagüe cerca para descargar el
agua del ciclo de limpieza. Use un desagüe de piso,
una pileta de lavadero, un sumidero, un tubo vertical u
otras opciones (Consulte sus códigos locales). Lea las
secciones tituladas “Requisitos de separación de aire”
y “Requisitos para el desagüe de la válvula”.
= El sistema central de filtrado de agua funciona con
una corriente continua de 28 voltios, suministrada por
una fuente de alimentación électrica directa enchufa-
ble (que se incluye). Proporcione un 120V, 60
hercios
tomacorriente eléctrico conforme a los códigos NEC y
locales.
= No instale el sistema central de filtrado de agua en una
tubería de agua caliente (Vea las Figuras 1A y 1B).
= Evite instalarlo bajo la luz directa del sol. El exceso de
calor solar puede deformar o causar algún otro daño a
las piezas no metálicas.
CÓDIGOS DE PLOMERÍA
Toda la plomería debe instalarse en cumplimiento de los
códigos de plomería nacional, estatal y local.
En el estado de Massachusetts: Se debe cumplir con
el código de plomería 248-CMR del Estado de
Massachusetts. Un plomero con licencia realizará
esta instalación.
12
Español
REQUISITOS DE SEPARACIÓN DE AIRE
Se necesita tener un desagüe para descargar el agua del
ciclo de limpieza (vea la Fig. 4). Es preferible usar un
desagüe de piso, cerca del sistema central de filtrado de
agua. Otras opciones pueden ser una pileta de lavadero,
un tubo vertical, etc. Fije la manguera de desagüe de la
válvula en su sitio. Deje una separación de aire de 1-1/2
pulg. (3.8 cm) entre el extremo de la manguera y el desae.
Se necesita esta separación para impedir el reflujo de agua
residual al sistema central de filtrado de agua. No coloque el
extremo de la manguera de desagüe dentro del desagüe.
REQUISITOS PARA EL DESAGÜE DE
LA VÁLVULA
Use la manguera flexible de desagüe (que se incluye),
mídala y córtela a la longitud necesaria. No en todas las
localidades se permite usar mangueras flexibles de desagüe
(Consulte susdigos de plomería). Si losdigos locales no
Antes de comenzar
permiten usar una manguera flexible de desagüe, deberá
instalar un desagüe con lvula gida. Adquiera una unión
de compresión (NPT de 1/4 x tubo de 1/2 pulg. como
mínimo) y tubo de 1/2 pulg. en su ferretería local. Instale
un desagüe rígido según se necesite (Vea la Figura 3).
NOTA: Evite que la longitud de la manguera de desagüe
supere los 30 pies (9.14 m). Haga la tubería de
desagüe de la válvula tan corta y directa como
sea posible.
Se recomienda instalar el sistema central de filtrado de
agua cerca de un desagüe. Sin embargo, si no hay un
desagüe disponible, es posible operar el sistema central
de filtrado de agua en modo de limpieza manual. Vea la
sección titulada “Cómo operar en modo de limpieza man-
ual” en el manual detallado del propietario (visite el sitio
www.whirlpoolwatersofteners.com o llame al 1-866-
986-3223). Si el sistema central de filtrado de agua no se
conectará a un desagüe, hay que desactivar la función
automática de limpieza.
¿Tiene preguntas? Llame gratis al 1-866-986-3223
de lunes a viernes, de 8 a.m. a 7 p.m., hora del Este
o visite el sitio web www.whirlpoolwatersofteners.com
Cuando llame, esté preparado para proporcionar el modelo y número de serie del producto,
que se encuentran en la calcomanía de clasificación, la que está situada en la parte posterior de la cubierta.
ORDEN CORRECTO PARA INSTALAR EL EQUIPO DE TRATAMIENTO DE AGUA
Agua sin tratar a
los grifos externos
FIG. 1B
Agua caliente
a la casa
Agua fría a
la casa
Agua sin tratar a
los grifos externos
Calentador
de agua
Filtro
opcional de
sedimentos
Tanque
de presión
Bomba de
cisterna
Agua caliente
a la casa
Agua fría a
la casa
Sistema
central
de filtrado
de agua
Calentador
de agua
Suavizante
de agua
Filtro
opcional de
sedimentos
Suministro municipal
de agua
Sistema
central
de filtrado
de agua
Suavizante
de agua
FIG. 1A
O BIEN
Suministro
de agua de cisterna
13
Español
Antes de comenzar
OPCIONES DE PLOMERÍA PARA ENTRA-
DA/SALIDA
Siempre instale una válvula de derivación (que se
incluye) a la plomería suministrada por el contratista o
plomero, como se ilustra en la Fig. 2, O BIEN, si lo
desea, puede instalar un sistema de derivación de 3
válvulas (no se incluyen las piezas), como se ilustra en la
Fig. 3. Las válvulas de derivación le permiten cerrar la
entrada de agua al sistema central de filtrado de agua
para su mantenimiento, si es necesario, y aún así tener
agua en las tuberías de la casa.
Use uno de estos:
= Tubería de cobre
= Tubería roscada
= Tubo de PEX (polietileno reticulado)
= Tubo de plástico CPVC
= Otro tubo aprobado para usar con agua potable
IMPORTANTE: No suelde con la plomería conectada a
adaptadores de instalación y una
derivación de una sola válvula. El calor
de la soldadura dañará los adaptadores y
la válvula.
FIG. 3
DERIVACIÓN DE 3 VÁLVULAS
Del ablandador
de agua
Al ablandador
de agua
Válvula
de entrada
Válvula
de salida
Válvula de
derivación
FIG. 2
VÁLVULA DE UNA DERIVACIÓN
Tire hacia afuera para
“Servicio” (agua blanda)
Presione para
“Derivación”
Separación
de aire de
1-1/2 pulg.
(3.8 cm)
Instale un codo adapta-
dor con abrazadera
para manguera. Apunte
la boquilla hacia abajo y
al centro del desagüe
Fije el tubo en su
sitio con alambre
o amarres.
FIG. 4
PILETA DE
LAVADERO
TUBO VERTICAL
Separación
de aire de
1-1/2 pulg.
(3.8 cm)
DESAGÜE DE PISO
Separación
de aire de
1-1/2 pulg.
(3.8 cm)
A un punto de
desagüe que no sea
un desagüe de piso.
Fije el tubo en su sitio
según se necesite.
Accesorio
para
desagüe
Clip
Rebabas
Roscas NPT de 1/4 pulg.
Tubo de cobre de
1/2 pulg. de D.E.
(no se incluye)
Unión de compresión NPT
de 1/4 x tubo de 1/2 pulg.
de D.E. (no se incluye)
Corte las rebabas
de la unión para
desagüe (tire del
clip para separar
la unión de la
válvula)
CONEXIÓN DE LA VÁLVULA AL DESAGÜE
SUBSTITUCIÓN CON
TUBERÍA RÍGIDA DE DESAGÜE
Abrazadera
para
manguera
Manguera de
desagüe para
la válvula
Rejilla de desagüe con orificio de
1 pulg. (2.5 cm) en el centro
14
Español
Instrucciones de instalación
CIERRE EL SUMINISTRO DE AGUA
1. Cierre la válvula principal del suministro de agua,
cerca de la bomba de la cisterna o el medidor de agua.
2. Abra todos los grifos para desaguar la tubería de
la casa.
NOTA: Cerciórese de no desaguar el calentador de agua,
ya que podrían dañarse los elementos del calen-
tador.
TRASLADE EL SISTEMA CENTRAL DE
FILTRADO DE AGUA A SU SITIO
1. Ponga el sistema central de filtrado de agua en la
posición de instalación. Apóyelo sobre una superficie
nivelada.
2. Retire la cubierta superior.
3. Cuelgue la cubierta de la espiga del frente del reborde,
como se ilustra en la Fig. 5. Evite que la cubierta
cuelgue de los cables.
Peligro de peso excesivo
Para mover e instalar el sistema central de fil-
trado de agua se necesitan dos personas.
En caso contrario, podría lesionarse la espal-
da o lastimarse de otro modo.
Cubierta
superior
RETIRE LA CUBIERTA SUPERIOR Y
CUÉLGUELA DE LA ESPIGA QUE HAY AL
FRENTE DEL REBORDE
1. Antes de comenzar la instalación del sistema, instale la
abrazadera metálica a tierra en las tuberías de sumin-
istro de agua de la casa.
2. Fije firmemente la conexión en el centro de la
abrazadera metálica a tierra (Vea la Fig. 6).
3. Arme sin apretar cualquier tubo y accesorio que se
necesite desde la tubería principal de agua hacia los
puertos de entrada y salida de la válvula del sistema
central de filtrado de agua.
IMPORTANTE:
= No olvide armar, alinear y dar soporte a toda la plom-
ería para evitar el esfuerzo excesivo de la entrada y la
salida de la válvula del sistema central de filtrado de
agua. El esfuerzo indebido a causa de piezas desalin-
eadas o con soporte deficiente podría dañar la válvula.
= Cerciórese de mantener las uniones bien apretadas
entre sí, con los tubos derechos y bien alineados unos
con otros.
= Cerciórese de que la línea entrante de suministro de
agua de la casa vaya al lado de la ENTRADA de la
válvula del sistema central de filtrado de agua. La
entrada y la salida están marcadas en la válvula. Siga
el sentido del flujo del agua para cerciorarse.
4. Finalice la plomería de entrada y salida para el tipo de
tubería descrito en la página siguiente.
Peligro de descarga eléctrica
Antes de comenzar la instalación del sistema,
instale la abrazadera metálica a tierra en la
línea de suministro de agua de la casa.
Fije firmemente la conexión en el centro de la
abrazadera metálica a tierra.
En caso contrario, podría causarse la muerte o
una descarga eléctrica.
ARME LA PLOMERÍA DE ENTRADA Y SALIDA
Hay que instalar una abrazadera a tierra en las tuberías
de suministro de agua de la casa conforme al Código
Eléctrico Nacional (NEC).
FIG. 6
Abrazadera
a tierra (2)
Tornillo con
tuerca de seguridad
Válvula de
derivación
de plástico
Tubos
metálicos
Espiga
FIG. 5
15
Español
Instrucciones de instalación
FIG. 7B
ENT.SAL.
Clip (2)
CONEXIÓN DE LA PLOMERÍA A LA VÁLVULA
Clip (4)
Se incluyen
FIG. 7A
Se incluyen
Adaptador
NPT de
1 pulg. (2)
Adaptador por
fusión NPT de
1 pulg. (2)
(no se incluye)
Use cinta de
Teflon®, compuesto
para juntas de
tubería o ambos
Válvula de
derivación
Entrada de
la válvula
ENT.SAL.
Entrada de
la válvula
Adaptador
NPT de
1 pulg. (2)
Adaptador por
fusión NPT de
1 pulg. (2)
(no se incluye)
Use cinta de
Teflon®, compuesto
para juntas de
tubería o ambos
Cobre soldado
1. Limpie bien y aplique fundente de soldadura a todas
las juntas.
2. Haga todas las conexiones de soldadura.
IMPORTANTE: No suelde con la plomería conectada a
adaptadores de instalación y una derivación
de una sola válvula. El calor de la soldadura
dañará los adaptadores y la válvula.
Tubería roscada
1. Aplique compuesto para junta de tuberías o cinta de
Teflon® a todas las roscas macho de los tubos.
2. Apriete todas las juntas roscadas y haga las conexiones
de soldadura.
Tubo de plástico CPVC
1. Limpie, aplique tapaporos y cemento a todas las juntas,
siguiendo las instrucciones del fabricante proporcionadas
con el tubo y las uniones de plástico.
Otros tubos, incluyendo de PEX
(polietileno
reticulado)
1. Siga las instrucciones del fabricante del sistema de
tuberías al usar otros tubos aprobados para agua potable.
INSTALE LA MANGUERA DE DESAGÜE
PARA LA VÁLVULA
1. Mida, corte en el largo necesario y conecte el tubo de
desagüe de 3/8 pulg. (se incluye) a la unión para
desagüe de la válvula del sistema central de filtrado de
agua. (Vea la Figura 4.) Mantenga la manguera en su
sitio con una abrazadera.
NOTA: Si los códigos exigen una tubería rígida de
desagüe, vea la sección titulada “Requisitos para
el desagüe de la válvula”.
2. Tienda la manguera o la tubería de cobre de desagüe
hasta el desagüe de piso. Fije la manguera de desagüe.
Eso impedirá que la tubería de desagüe “dé latigazos”
durante los ciclos de limpieza. Lea la sección titulada
“Requisitos para el desagüe de la válvula”.
PRUEBE PARA DETECTAR FUGAS
1. Compruebe que la válvula de una derivación (o la válvula
de 3 derivaciones, si se instala) esté en la posición de
derivación, con la manija empujada hacia adentro.
(Vea la Figura 2.)
2. Abra totalmente la válvula principal del suministro
de agua.
3. Abra brevemente un grifo de la casa para recargar la
plomería con agua.
4. Mueva lentamente la válvula o válvulas de derivación
a la posición de operación normal, con varias pausas
para permitir que la unidad presurice lentamente.
(Vea la Figura 2.)
5. Revise todas las conexiones de plomería que haya
hecho para detectar fugas.
IMPORTANTE: El procedimiento de arranque debe
realizarse antes de usar cualquier agua
filtrada. Siga las instrucciones más abajo
y las de la página 16.
ENCIENDA EL SISTEMA CENTRAL
DE FILTRADO DE AGUA
Durante la instalación, es posible que el cableado del
sistema central de filtrado de agua se haya desplazado de
su sitio. Compruebe que todos los conectores de los cables
estén fijos en la parte posterior del tablero electrónico y
cerciórese de que todos los cables estén alejados del área
del engranaje y el motor de la válvula, el cual gira durante
los ciclos de limpieza.
1. Enchufe la fuente de alimentación électrica del sistema
central de filtrado de agua a un tomacorriente eléctrico
que no esté controlado por un interruptor.
2. En la pantalla destellará la hora 12:00 PM y “PRESENT
TIME” (Hora actual). Programe el reloj según la sección
titulada “Fije la hora del día” de la página 16.
3. Ejecute el procedimiento de arranque, como se detalla
en la página 16.
® Teflon es una marca registrada de E.I. Du Pont de Nemours
and Company.
16
Español
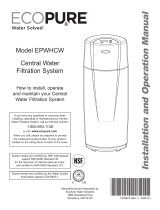
Programación del controlador electrónico
FIJE LA HORA DEL DÍA
Cuando se enchufe la fuente de alimentación électrica
a un tomacorriente, comenzará a destellar un código de
modelo y un número de prueba (ejemplo: J2.0) en la pan-
talla de la placa frontal. Luego comenzará a destellar en
pantalla la hora 12:00 PM y “PRESENT TIME” (Hora actual).
Si no se ven las palabras “PRESENT TIME” en la pan-
talla, oprima el botón PROGRAM hasta que aparezcan.
1. Oprima los botones r SUBIR o s BAJAR para fijar la
hora actual. “Subir” hace avanzar los números en pan-
talla; “Bajar” los hace retroceder. Cerciórese de que la
función AM o PM esté correcta.
NOTA: Oprima y suelte enseguida los botones para
hacer avanzar lentamente los números en la pan-
talla. Mantenga oprimidos los botones para avan-
zar rápidamente.
2. Oprima el botón PROGRAM varias veces, hasta que
aparezca la hora en la pantalla, sin destellar.
NOTA: En el manual del propietario podrá hallar instruc-
ciones completas para programar el sistema cen-
tral de filtrado de agua y personalizar las carac-
terísticas del controlador electrónico.
Visite el sitio www.whirlpoolwatersofteners.com
o llame al 1-866-986-3223.
IMPORTANTE:
Ejecutar el procedimiento de arranque
inmediatamente después de terminar la
instalación, antes de usar el agua en la
casa.
Los medios filtrantes de este sistema central de filtrado
de agua contienen una pequeña cantidad de partículas
generadas durante la fabricación y el envío, las cuales
son suficientemente pequeñas para salir del sistema con
el flujo del agua. Es normal que dichas partículas causen
una decoloración temporal en el agua que sale del sis-
tema. Para evitar que salga agua descolorida por los gri-
fos de la casa, hay que iniciar el ciclo de arranque del
sistema para eliminar las partículas y toda el agua des-
colorida por el desagüe.
Si se usa el sistema central de filtrado de agua sin ejecu-
tar primero el ciclo de arranque, notará que el agua sal-
drá temporalmente de color gris hasta que las partículas
hayan salido del sistema.
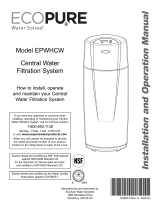
Para iniciar el ciclo de arranque:
1. Cerciórese de que la manguera de desagüe esté
conectada al sistema central de filtrado de agua y que
el otro extremo se haya fijado sobre un desagüe
(Vea la figura 4).
2. Cerciórese de que la válvula de derivación esté en la
posición de “Service” (Servicio: abierta o agua filtrada)
y que esté abierto el suministro de agua de la casa.
3. Mantenga oprimido el botón CLEAN (Limpiar) para ini-
ciar el ciclo de arranque. Puede soltar el botón cuando
oiga que la válvula cambia de posición y que en la
pantalla destelle la frase “RECHARGE NOW”
(Recargar ahora).
Durante el ciclo de arranque:
Durante el ciclo de arranque oirá que la válvula cambia
de posición y notará que comienza y se detiene el flujo
de agua hacia el desagüe. El ciclo de arranque durará
aproximadamente 20 minutos. Evite usar agua durante
ese tiempo. No programe la hora del día ni oprima otros
botones durante el ciclo de arranque, pues lo interrumpirá.
No desenchufe la fuente de alimentación électrica durante
el ciclo de arranque. Si se interrumpe el ciclo de arranque,
habrá que iniciarlo nuevamente y dejar que se ejecute
completamente.
Después del ciclo de arranque:
Una vez que el ciclo de arranque haya finalizado satisfac-
toriamente, no podrá iniciarse una segunda vez. El sis-
tema central de filtrado de agua volverá automáticamente
a la posición de operación normal. Una vez que se haya
cumplido el ciclo de arranque, hay que abrir un grifo en la
casa y dejar correr el agua durante 10 minutos al caudal
nominal del sistema. Después del ciclo de arranque, si el
agua se ve descolorida, ejecutar manualmente un ciclo
de limpieza de tres minutos de duración: mantenga
oprimido
el botón CLEAN (Limpiar) durante unos segun-
dos, hasta que destelle la frase “RECHARGE NOW
(Recargar ahora) en la pantalla. Repita, si es necesario,
hasta que el agua salga clara.
Si no se programó la hora del día antes del ciclo de
arranque, fíjela ahora (Vea la sección titulada “Fije la
hora del día”, más arriba).
Revise nuevamente las conexiones y juntas de la plom-
ería para detectar fugas.
Procedimiento de arranque
FIG. 9
FIG. 8
17
Español
Características/opciones de personalización
FIJE LA CANTIDAD DE DÍAS ENTRE
CICLOS DE LIMPIEZA
El sistema central de filtrado de agua viene programado
para iniciar automáticamente un ciclo de limpieza cada
14 días. Eso será suficiente para casi todas las aplica-
ciones.
Para cambiar la cantidad de días entre ciclos de
limpieza:
1. Oprima dos veces el botón PROGRAM hasta que
aparezca “RECHARGE” (Recargar) en la pantalla.
2. Oprima los botones r SUBIR o s BAJAR para fijar
la cantidad de días entre ciclos de limpieza (de 1 a 99).
3. Oprima dos veces el botón PROGRAM cuando haya
terminado.
FIJE LA HORA DE LIMPIEZA
El sistema central de filtrado de agua viene programado
para iniciar la limpieza a la 1:00 a.m.
Para cambiar la hora de inicio de la limpieza:
1. Oprima tres veces el botón PROGRAM hasta que
aparezca “RECHARGE TIME” (Hora de recarga) en la
pantalla.
FIG. 11
2. Oprima los botones r SUBIR o s BAJAR para fijar
la hora de limpieza. Cerciórese de que la función AM o
PM esté correcta.
3. Oprima nuevamente el botón PROGRAM cuando
haya terminado.
FIG. 12
FIJE LA DURACIÓN DEL CICLO DE
LIMPIEZA
El sistema central de filtrado de agua viene programado
para un ciclo de limpieza de 2 minutos de retrolavado,
seguido por 1 minuto de enjuague rápido. Eso será sufi-
ciente para casi todas las aplicaciones.
Aumentar la duración del tiempo de limpieza aumentará
la cantidad de agua descargada en el desagüe durante
dicho ciclo; por lo tanto, ese tiempo debe aumentarse
sólo cuando sea necesario.
Para cambiar la duración de la parte de retrolavado del
ciclo de limpieza:
1. Mantenga oprimido
el botón PROGRAM durante
unos segundos, hasta que aparezca en pantalla “000--”,
como se ilustra en la Fig. 13.
2. Oprima el botón PROGRAM hasta que aparezca “bA
TIME” (Tiempo de retrolavado) en la pantalla.
FIG. 13
3. Oprima los botones r SUBIR o s BAJAR para fijar
la duración del retrolavado en minutos.
4. Oprima dos veces el botón PROGRAM cuando haya
terminado.
Para cambiar la duración de la parte de enjuague rápi-
do del ciclo de limpieza:
1. Mantenga oprimido
el botón PROGRAM durante
unos segundos, hasta que aparezca en pantalla “000--”,
como se ilustra en la Fig. 13.
2. Oprima dos veces el botón PROGRAM hasta que
aparezca “Fr TIME” (Tiempo de enjuague rápido) en la
pantalla.
3. Oprima los botones r SUBIR o s BAJAR para fijar
la duración del enjuague rápido en minutos.
4. Oprima nuevamente el botón PROGRAM cuando
haya terminado.
FIG. 14
FIG. 15
FIG. 10
INICIE UN CICLO DE LIMPIEZA
Para iniciar manualmente un ciclo de limpieza, manten-
ga oprimido
el botón CLEAN (Limpiar) durante unos
segundos, hasta que destelle la frase “RECHARGE
NOW” (Recargar ahora) en la pantalla.
18
Español
Para obtener el manual detallado del propietario,
con especificaciones, programación y lista de piezas, visite el sitio:
www.whirlpoolwatersofteners.com o llame al 1-866-986-3223
GARANTÍA DEL SISTEMA CENTRAL DE FILTRADO DE AGUA
Garante: Ecodyne Water Systems, 1890 Woodlane Drive, Woodbury, MN 55125
El garante garantiza al dueño original, que:
Garantía completa por un año:
● Por un periodo de un (1) año a partir de la fecha de compra, todas las piezas estarán libres de
defectos en materiales y mano de obra, y cumplirán sus funciones normales.
● Por un periodo de un (1) año a partir de la fecha de compra, la mano de obra para reparar o
reemplazar cualquier pieza que se haya comprobado con defectos en materiales o mano de obra se
proporcionará sin costo adicional.
Garantías limitadas:
● Por un periodo de diez (10) años a partir de la fecha de compra, el tanque de fibra de vidrio con
medios filtrantes no se oxidará, corroerá, tendrá fugas, estallará ni de ninguna otra manera dejará de
cumplir sus funciones normales.
● Por un periodo de tres (3) años, a partir de la fecha de compra, el tablero de control electrónico
estará libre de defectos en materiales y mano de obra, y cumplirá sus funciones normales.
Si durante los periodos respectivos mencionados se comprueba que una pieza está defectuosa, el
garante enviará sin cargo una pieza de repuesto, directamente a su residencia. Después del primer año,
la mano de obra necesaria para mantener este producto no está cubierta por la garantía.
Si tiene preguntas con respecto a un producto cubierto por una garantía, si necesita asistencia con la
instalación o para solucionar problemas, si desea pedir una pieza o reportar un problema cubierto por la
garantía, sólo tiene que llamarnos. SIMPLEMENTE marque 1-866-986-3223, de lunes a viernes,
de 8 a.m. a 7 p.m., hora del Este, para obtener asistencia.
Disposiciones generales
Las garantías precedentes tendrán vigencia a condición de que el sistema central de filtrado de agua
funcione a presiones de agua no superiores a 125 PSI, y a temperaturas de agua no superiores a 100°F
(38°C); y a condición de que el sistema central de filtrado de agua no se someta a maltrato, uso incorrecto,
modificación, abandono, congelamiento, accidente o negligencia; y a condición de que dicho sistema
central de filtrado de agua no sea dañado por ninguna fuerza inusual de la naturaleza, que incluye, entre
otras, inundación, huracán, tornado o terremoto.
El garante queda justificado si el incumplimiento de sus obligaciones de garantía se debe a huelgas,
regulaciones gubernamentales, escasez de materiales u otras circunstancias ajenas a su control.
*EXCEPTO LAS GARANTÍAS DESCRITAS ESPECÍFICAMENTE MÁS ARRIBA, NO RIGE NINGUNA
OTRA GARANTÍA SOBRE EL SISTEMA CENTRAL DE FILTRADO DE AGUA. TODA GARANTÍA
IMPLÍCITA, INCLUYENDO CUALQUIER GARANTÍA IMPLÍCITA DE COMERCIABILIDAD O APTITUD
PARA UN PROPÓSITO EN PARTICULAR, SE EXCLUYE EN LA MEDIDA DE QUE PUEDA
PROLONGAR LOS PERIODOS INDICADOS PRECEDENTEMENTE. LA ÚNICA OBLIGACIÓN DEL
GARANTE CONFORME A LAS PRESENTES GARANTÍAS ES REEMPLAZAR O REPARAR EL
COMPONENTE O LA PIEZA QUE SE DEMUESTRE DEFECTUOSA DENTRO DEL PERIODO
ESPECÍFICO. ASIMISMO, EL GARANTE NO SE RESPONSABILIZARÁ DE DAÑOS CONSECUENTES
O IMPREVISTOS. NO SE AUTORIZA A NINGÚN DISTRIBUIDOR GARANTE, AGENTE,
REPRESENTANTE NI A NINGUNA OTRA PERSONA A PROLONGAR NI AMPLIAR LAS GARANTÍAS
DESCRITAS EXPRESAMENTE MÁS ARRIBA.
En ciertas jurisdicciones no se permiten limitaciones sobre la duración de una garantía implícita ni
exclusiones o limitaciones de daños imprevistos o consecuentes, de modo que las limitaciones y
exclusiones de la presente garantía podrían no aplicarse a usted. Esta garantía le otorga derechos legales
específicos, y es posible que usted tenga otros derechos, los cuales varían de una jurisdicción a otra.
La presente garantía sólo se aplica a instalaciones que sean propiedad de los consumidores.
® /TM © 2013 Whirlpool. Reservados todos los derechos.
Fabricado bajo licencia por Ecodyne Water Systems, Woodbury, Minnesota
19
Français
Fabriqué et garanti par
Ecodyne Water Systems
1890 Woodlane Drive
Woodbury, MN 55125
Pour obtenir le manuel détaillé
de l’utilisateur, incluant les spécifi -
cations, les directives de program -
mation et la liste des pièces, allez à :
www.whirlpoolwatersofteners.com
ou appelez au 1-866-986-3223
Instructions d’installation
N’effectuez pas le retour de
l’appareil en magasin
Pour toute question ou préoccupation
concernant l’installation, le fonctionnement et
l’entretien de votre système de filtration central
de l’eau, composez notre numéro sans frais :
1-866-986-3223
du lundi au vendredi, entre 8 h et 19 h, HNE
ou visitez
www.whirlpoolwatersofteners.com
Au moment d’appeler, veuillez être prêt à fournir
le numéro de modèle et le numéro de série
du produit, qui se trouvent sur l’autocollant
d’homologation à l’arrière du couvercle.
Système évalué et certifié par Water Quality
Association selon la norme CSA B483.1.
Modèle WHELJ1
Système de filtration central
de l’eau Whirlpool
Système évalué et certifié par NSF
International selon la norme NSF / ANSI 42
pour la réduction du goût et de l'odeur de chlore,
et certifié selon la norme NSF / ANSI 372.
20
Français
Votre sécurité et celle des autres sont très importantes.
Ce guide contient plusieurs messages importants relatifs à la sécurité. D’autres messages ont été apposés sur votre
appareil. Veuillez toujours lire et respecter tous les messages relatifs à la sécurité.
Ce symbole incite à la vigilance.
Ce symbole vous prévient des dangers présentant un risque de blessures graves ou mortelles.
Tous les messages de sécurité sont précédés d’un symbole de sécurité et de la mention
« DANGER » ou « AVERTISSEMENT ». Ces termes signifient :
Vous pourriez subir des blessures graves, voire
mortelles, si vous ne suivez pas immédiatement
ces instructions.
Vous pourriez subir des blessures graves, voire
mortelles si vous ne suivez pas ces instructions.
Tous les messages de sécurité signalent le danger, indiquent comment réduire les risques de blessures et précisent
ce qui peut survenir si les instructions ne sont pas suivies.
AVERTISSEMENT
= Usez de prudence lors de la manipulation du système
de filtration central de l’eau. Ne pas retourner l’appareil
à l’envers, l’échapper ou déposer sur un objet coupant.
= Le système de filtration central de l’eau fonctionne à
une pression d’entrée maximale de 125 psi et mini-
male de 30 psi. Si la pression d’eau pendant le jour
est de plus de 80 psi, alors pendant la nuit la valeur
maximale de la pression sera donc excédée. Installer
un réducteur de pression si nécessaire. (Ajouter un
réducteur de pression peut réduire le débit). Si votre
domicile est équipé d’un clapet anti retour, réservoir
d’expansion doit être installé conformément aux Codes
et lois de votre municipalité.
= N’utilisez pas ce système pour traiter une eau qui n’est
pas sûre d’utilisation d’un point de vue microbiologique
ou si elle est d’une qualité inconnue sans une désin-
fection adéquate en aval ou en amont du système.
Avant de commencer
Tenez compte de tous les points suivants lors du choix de
l’emplacement pour l’installation du système de filtration
central de l’eau.
= Ne pas faire fonctionner le système de filtration central
de l’eau dans un emplacement où la température est
susceptible d’être sous le point de congélation. Ne pas
essayer de traiter une eau dont la température est de
plus de 100ºF (38ºC). La garantie ne couvre pas les
dommages causés par le gel ainsi que l’utilisation de
l’appareil avec de l’eau chaude.
= Pour filtrer l’eau de tout le domicile, installez le
Système de filtration central de l’eau près de l’arrivée
de l’alimentation d’eau principale, en précédents tous
les autres raccords de tuyauterie à l’exception des
tuyaux d’eau extérieurs.
= Pour une maison avec l’alimentation en eau municipale,
EXIGENCES RELATIVES À L’EMPLACEMENT
Dans l’État du Massachusetts : le code 248-CMR du
Commonwealth of Massachusetts doit être respecté.
L’installation doit être confiée à un plombier autorisé.
installez le système de filtration central de l’eau entre
l’alimentation d’eau du domicile et l’adoucisseur d’eau,
si un tel appareil est utilisé (voir la figure 1A).
Si la maison a l’alimentation en eau d’un puit, inverser
l’ordre du système de filtration central de l’eau et
l’adoucisseur d’eau (voir la figure 1B).
= Un drain d’évacuation situé à proximité est nécessaire
afin d’évacuer les eaux usées lors du cycle de
régénération. Utiliser un drain d’évacuation au sol, une
cuve de lavage, un puisard, une conduite verticale ou
d’autres options (consultez les codes locaux).
Consultez les sections traitant des « Exigences rela-
tives à l’intervalle d’air » et « Exigences relatives au
conduit de vidange ».
= Le système de filtration central de l’eau fonctionne
avec un courant continu de 28 volts fourni par un
e
bloc d’alimentation électrique à branchement direct
(inclus). Assurez-vous de disposer d’une prise de
courant 120V, 60 Hz qui respecte le Code national de
l’électricité (NEC) et les codes locaux.
= Ne pas effectuer le raccordement du système de
filtration central de l’eau sur la conduite d’eau chaude
(voir les figures 1A et 1B).
= Évitez de l’installer dans un endroit placé sous la
lumière directe du soleil. Une chaleur excessive du
soleil peut faire gauchir ou endommager les pièces
non métalliques.
CODES DE PLOMBERIE
Tous les travaux de plomberie doivent être réalisés en
respectant les codes nationaux, provinciaux et locaux.
Consignes de sécurité pour le
Système de filtration central de l’eau
  • Page 1 1
  • Page 2 2
  • Page 3 3
  • Page 4 4
  • Page 5 5
  • Page 6 6
  • Page 7 7
  • Page 8 8
  • Page 9 9
  • Page 10 10
  • Page 11 11
  • Page 12 12
  • Page 13 13
  • Page 14 14
  • Page 15 15
  • Page 16 16
  • Page 17 17
  • Page 18 18
  • Page 19 19
  • Page 20 20
  • Page 21 21
  • Page 22 22
  • Page 23 23
  • Page 24 24
  • Page 25 25
  • Page 26 26
  • Page 27 27

Whirlpool WHELJ1 Installation Instructions Manual

Type
Installation Instructions Manual

Ask a question and I''ll find the answer in the document

Finding information in a document is now easier with AI

in other languages