Page is loading ...

1.Power: Press to turn the thermostat on/off.
2.Cooling / Heating mode: This thermostat supports cooling or heating
mode, which can be selected and switched in the APP, or refer to
"Advanced Options Settings".
3.Manual/Programming/Temporary Manual/Holiday Mode:
Press in the APP or on the control panel of the thermostat to switch
between Manual/Programming/Holiday mode. Depending on the mode,
the corresponding icon will be displayed at the top of the screen.
Manual Mode : In this mode, the thermostat controls the device
according to the manually set temperature.
Programming Mode : In this mode, the screen displays the current
programming cycle the thermostat is in, and the thermostat controls
the device according to the weekly programming schedule. Please refer
to point 7 for timetable setting.
Temporary manual mode: In the programming mode, manually adjust
the temperature and enter the temporary manual mode. At this time,
the screen display icon " " will flash, and the thermostat will execute
the current set temperature at this time, and the temperature will
restore during next weekly programming cycle.
Holiday Mode : In this mode, the screen will display the icons
" " and " ", and the thermostat will maintain a fixed temperature
until the holiday is over. Lasting days of Holiday Mode can be set in the
APP or Or long press " " to enter the clock setting, then press " "
4 times to enter the holiday mode day setting, the test screen "RT" will
flash..
4.Temperature setting: Press " "/" " to set the target tempera-
ture.
5.Time setting: The Wifi version will automatically synchronize the time
after connecting to the network. Or long press " " to enter the time
setting, and press " " to adjust the value, respectively set up for
minutes, hours, and days of the week ("①" at the top of the screen
means Monday, "②" means Tuesday, and so on) . After the adjustment
is completed, press " " to exit the time setting.
6.Child lock : Press and hold " " and " " at the same time for
5 seconds, the thermostat will enter the child lock mode. You can also
set full lock and half lock in advanced options, please refer to the
description of advanced options below.
7.5+1+1 programming mode setting: wifi version can be set in APP. In
the non-wifi version, long press " " to enter the clock setting, and
then press " " 4 times to enter the programming mode setting. At
this time, the screen displays (①②③④⑤), the minute of the time
flashes, and the cycle is 1 " ". Then press " " to select and set
the hour, temperature and cycle. Press " " or " " to adjust the
corresponding value. After completing the setting, you need to shut
down once to store the data in the thermostat.
Transportation
Instruction Manual
BHT-12 Smart Thermostat
WTP-BY-EU
The products shall be free from severe vibration, impact,
exposure to rain, dumping and other problems during
transportation, and shall comply with the provisions of the
marks on the packing boxes.
Safety Information
1. Do not disassemble, reassemble, modify, or attempt to
repair the product by yourself.
2.This product has no waterproof and dustproof function.
Thank you for purchasing
Thank you for choosing our thermostat. We are committed to
bringing together high-end technology, high-quality produc-
tion technology, safe and reliable materials to produce
high-quality and low-cost products.
Please read this manual for comprehensive product informa-
tion. Also make sure a professional installs the thermostat and
follows all your local regulations.
Packing List
Thermostat*1 User Manual*1 QC certificate*1
External Sensor 2.5m ( optional)*1
About Your Thermostat
BHT-12 is suitable for electric heating radiator, electric
cooling and temperature control system.It can be used in smart
homes, shopping malls, and industrial places.
Before use, please confirm that this product is compatible with
your temperature control equipment.
Appearance Features
1. Small size: small and flexible, can be installed without a large
space;
2. Classic color matching: pearl white, midnight black, into a variety
of decoration styles;
3. Warm hand feel: curved body, chamfer transition, no hand cutting;
Function Features
1. Touch buttons: no need to worry about the buttons being stuck
and not rebounding;
2. Heat and cool dual mode: heating and cooling, one device, two
control modes;
3. Internal and external dual senors; default built-in sensor, optional
external sensor;
4. Heating indication: two working indicator lights on the left and
right, know its working status without coming close;
5. Dual temperature systems: support Celsius-℃ and Fahrenheit-℉
switching;
6. Various plugs: optional plugs of various specifications, British
standard, European standard, American standard, Australian
standard, and national standard are optional;
7. Convenient control: The advanced options of the thermostat can
be set in the APP, which is more convenient.
8. Intelligent voice: connected to Tmall Genie, Alexa, Google
Assistant, Xiaodu, Yandex, voice control, which frees hands;
9. APP control: The APP supports ios/android system, and the
temperature is updated in real time; automatically obtains the
temperature and humidity, PM2.5 of the local area, and creates
intelligent scenes. It has supported all regions and languages at
home and abroad, and the service is more comprehensive.
Product Parameters
Caution!
Electric shock hazard
Voltage: 95~220V, 50~60Hz
Maximum load: 16A
Temperature sensing element: NTC10K
Temperature control accuracy: ±0.5℃
Temperature control range: 5 - 90°C, can be changed in advanced
options
Shell material: PC+ABS (flame retardant)
Working environment: 0 - 45℃, 5 -95%RH (no condensation)
Storage temperature: -5 - 55℃
Protection class: IP20
Display temperature range: 5~99℃
Precautions Before Installation
1. Before installation, please confirm that the plug type of this
product is suitable for your local standard and heating equipment;
2. Please contact the after-sales service for equipment failure,
please do not try to repair it by yourself;
3. After the installation, please refer to this manual to check again to
ensure normal safety
Dimensions and installation instructions
62.0
120.0
35.0
53.2
Product UI
Manipulation Instructions
Time
display
MON. -FRI.
(①②③④⑤ shows on
scteen)
SAT.
(⑥shows on scteen)
SUN.
(⑦shows on scteen)
TIME TEMP. ON TIME TEMP. ON TIME TEMP.
Period 16:00~8:00 206:00~8:00 206:00~8:00 20
Period 2 8:00~11:308:00~11:3015
8:00~11:30
208:00~11:3020
Period 3 11:30~13:00 1511:30~13:00 20 11:30~13:00 20
Period 4 13:30~17:00 1513:30~17:00 20 13:30~17:00 20
Period 5 17:00~22:00 22 17:00~22:00 20 17:00~22:00 20
Period 6 22:00~6:00 15 22:00~6:00 15 22:00~6:00 15
Advanced Options Settings
In the power-off state, long press " " for 5 seconds to enter
the advanced options settings. Press " " to select a function,
and press " " or " " to adjust the corresponding code.
All advanced options settings will take effect automatically
after restarting the thermostat.
Dimensions: millimeters (mm)
Default settings for program schedule
8.External sensor data query: long press " " for 5 seconds,
the screen will display the temperature of the sensor data.
If no external sensor is connected, "err" will be displayed
1Temperature
compensation -9 to 9 ℃-3
2Deadzone Temp. 1-5℃ 1
3 Button Locking 01:All buttons are locked except power button.
01:All buttons are locked.01
4Sensor typer
In: Internal Sensor(to control the temp.)
Ou: External Sensor (to control the temp.)
AL: Internal&External Sensor (Internal sensor to control
the temp., external sensor to limit the temp.)
AL
5 5-15℃5
615-45℃35
7
00: Display the room temperature and the set
temperature, press the up and down keys to display the
set temperature
01: Only display the set temperature
00
8Low temp. protection
setting.0-10℃ 0
9High temp. protection
setting.25-70℃ 50
10 Energy saving Mode 00:OFF 01:ON 00
11 Cool Energy saving
Temp.10-50℃ 20
12Heat Energy saving
Temp.10-50℃ 26
13Cool/Heat 0:Cool Mode
1:Heat Mode 01
14℃/℉0: Degree
Code Function Setting and options Default
Celsius ℃
1: Fahrenheit ℉00
15Screen brightness
when no operation
0-8, when set to 0, after 10 seconds of no operation,
the screen will turn off, press the up and down keys to
wake up
1
16 Reset 00: No factory reset; 01: Factory reset 00
17Version number U1
Min.Set Temp.
Max.Set Temp.
Temperature display
Week
Heating/Cooling
Clock
WIFI
Period
External sensor
Manual mode Programming
mode
External
sensor
connector
Connect to the controlled device Connect to a power outlet
Clock
Up/Down
Energy saving
mode
Room temp.
Set temp.
Floor temp.
Power
Mode
HOME,SMART MOES HOME

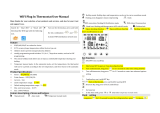
① Download MOES App on App store or scan the QR code.
Preparation for use
② Registration or Log in.
Steps for connecting the APP to the device
5.enjoy your smart life with home automation.
APP operation interface description
(heating thermostat))
• Download “MOES” Application.
• Enter the Register/Login interface; tap “Register” to create
an account by entering your phone number to get verification
code and “Set password”. Choose “Log in” if you already have
a MOES account.
Method One:
1. Make sure your phone is connected to Wi-Fi and Bluetooth.
2. Scan the QR code to configure the network guide.
1
2
3
Simplement Exception Handling
No. Phenomenons Handling
Power is on but without
display.
Without output but
display works.
Room Temp. Is a little
different from the actual.
* Check if the terminals between LCD
panel and Power Unit Box is loosen.
* Use a new LCD panel or new Power
Unit Box to replace the old one.
*Do temperature calibration in item
1 of high senior options
More Set
Name
Return
Set Temp.
Current Temp.
Set Temp.
Quick Setup
Set Temp. Trim - Up
Set Temp. Trim - Down
Anto/Manual/Temp Hold/Holidays
Week Program Schedule Settings
Seting the Functions and Options
Power
4. Enter Wi-Fi Password and click “Next”, waiting for completing the
connection. Add the device successfully, you can edit the name of the
device to enter the device page by click “Done” .
Mobile number/e-mail address
Region
Obtain verification code
Bluetooth
2.4G WiFi
SET
Steps for connecting the APP to the device
Method Two:
1. Make sure your phone is connected to Wi-Fi and Bluetooth.
2. Reset: When the thermostat is off, press and hold the " "until
the thermostat screen flashes quickly and displays the " " icon.
Bluetooth
2.4G WiFi
SET
①
③ Scan this QR code ④
②
3.Open MOES App,then the prompt page will automatically show on
the screen. Click “Add”, Select the device you want to add and click
“+”. Product Information
Product Name_____________________________________________
Product Type______________________________________________
Purchase Date_____________________________________________
Warranty Period___________________________________________
Dealer Information_________________________________________
Customer's Name__________________________________________
Customer Phone___________________________________________
Customer Address_________________________________________
__________________________________________________________
Maintenance Records
Failure date Cause Of Issue Fault Content Principal
WARRANTY CARD
www.moes.net
Thank you for your support and purchase at we Moes, we are
always here for your complete satisfaction, just feel free to
share your great shopping experience with us.
If you have any other need, please do not hesitate to contact
us first, we will try to meet your demand.
WENZHOU NOVA NEW ENERGY CO.,LTD
Address: Power Science and Technology Innovation
Center, NO.238, Wei 11 Road, Yueqing Economic
Development Zone, Yueqing, Zhejiang, China
Tel: +86-577-57186815
Email: [email protected]
EVATOST CONSULTING LTD
Address: Suite 11, First Floor, Moy Road Business
Centre, Taffs Well, Cardiff, Wales, CF15 7QR
Tel: +44-292-1680945
Email: [email protected]
AMZLAB GmbH
Laubenhof 23, 45326 Essen
Made In China
BJ08
/