Page is loading ...


Introduction
Congratulations for making B.C. Rich your choice of instrument. This manual
will explain how to keep your instrument in top shape for years of musical
enjoyment.
Controls
Bronze Series guitars
The Bronze Series has 3 controls to adjust the sound of the guitar.
•The first knob (closest to the bridge pickup) is the Master Volume.
It controls the loudness of both pickups.
•The next control is the 3-way Pickup Selector. It is used to switch
the two pickups on or off. Switching the selector up will engage
the neck pickup. The middle position engages both pickups, and
switching it down will engage the bridge pickup.
•The final control is the Master Tone control. This changes the
tonal characteristics of the pickup(s) currently engaged.
Platinum, Platinum Pro, Acrylic, NJ and Classic Series guitars
These guitars have 4 output controls:
•The first knob (closest to the bridge pickup) is the Volume Control
for the bridge pickup. It controls the loudness of this pickup.
•The next control is the 3-way Pickup Selector. It is used to switch
the two pickups on or off. Switching the selector up will
engage the neck pickup. The middle position engages both
pickups, and switching it down will engage the bridge pickup.
•The next control is the Volume Control for the neck pickup.
It controls the output of this pickup.
•The final control is the Master Tone Control. This changes the
characteristics of the pickup(s) currently engaged.
Exclusive Series guitars
This series has the traditional control set-up found on most archtop guitars
with two pickups. It consists of 2 Volume Controls, 2 Tone Controls and a 3-
Way Pickup Selector.
Platinum Series basses
Platinum Basses come equipped with 2 passive split-coil bass pickups. The
controls are as follows:
•The first knob (closest to the bridge pickup) is the Volume
Control for the bridge pickup. It controls the loudness
of this pickup.
•The next control is the 3-way Pickup Selector. It is used to switch
the two pickups on or off. Switching the selector up will engage
the neck pickup. The middle position engages both pickups,
and switching it down will engage the bridge pickup.
•The next control is the Volume Control for the neck pickup. It controls
the output of this pickup.
• The final control is the Master Tone Control. This changes the tonal
characteristics of the pickup(s) currently engaged.
NJ and Innovator Series basses
NJ Basses come equipped with 2 split-coil pickups with an active EQ system.
Innovator Basses come equipped with 2 EMG-HZ passive pickups with an
Active EQ System. Both Active EQ Systems use a 9-volt alkaline battery for
power. For longer battery life, always unplug your bass when not in use.
Step 6:
If you're ready to float the tremolo,
check your tuning one last time and
make any needed adjustments using
the range tuner set screw. Then, back
the tremolo stop set screw away from
the spring block. This will cause the
bridge to tilt back toward the body of
the guitar and all the strings will go
sharp. This is normal.
Step 7:
You must now retune the guitar, this
time using a Phillips screwdriver to
turn the spring claw screws counter-
clockwise to loosen the spring tension
(If you added an extra spring to pull
the spring block against the tremolo
stop screw you should remove it first.)
Step 8:
The good news is that you only have
to retune one string. Pluck the string
you want to tune (Typically the "A"
string for this procedure) and then,
while watching the tuner, loosen first
one claw screw then the other claw
screw the same amount.
Check the tuning and repeat until the
string is in tune. When you get the
string you chose in tune the other
strings will be in tune. This assumes
that all the strings were in tune before
you released the tremolo stop.
For foreign language translation of this owner's manual, please visit
www.bcrich.com.
2
15

When you do need to change batteries you will get better performance and
battery life if you use an alkaline battery. The battery compartment is located
on the back of the bass just above the control cavity. It can easily be opened
by unscrewing the 2 screws with a Phillips head screwdriver. Changing the
battery will not affect your warranty.
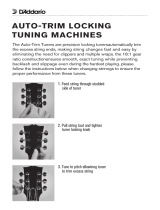
The controls for both the NJ and Innovator series are as follows:
(see photo)
•#1 is the Master Volume. It controls the output of both pickups.
•#2 is the Blend Control. The purpose of the Blend Control is to
be able to select pickups (bridge or neck) and also to be able
to blend them together. Turning the knob counterclockwise
will bring more of the neck pickup into the mix. Turning it
clockwise will bring more of the bridge pickup into the mix.
Setting the Blend Control knob in the middle (there is a middle
detent position) will place each pickup evenly in the mix.
•#3 is the Bass Boost/Cut Control. It controls the amount of bass
(low end) output of the instrument. Turning the knob clockwise
will add bass. Turning the knob counterclockwise will decrease
the bass output. Once again, there is a center position that
will set the bass EQ flat (no cut or boost).
•#4 is the Treble Boost/Cut Control. It controls the amount of
high-end output of the instrument. Turning the knob clockwise
will add treble. Turning the knob counterclockwise will
decrease the treble output. Once again, there is a center position
that will set the treble EQ flat (no cut or boost).
tuning using the range tuner set screw.
Remember: do not use the fine tuner
screws to tune the guitar at this point.
Step 4:
A range tuner setscrew is located in
the nose of each pivoting saddle.
Step 5:
Using a 1.5mm Allen wrench and the
range tuner setscrew, tune your guitar
to any tuning you desire. You can
increase the pitch of a given string by
turning the setscrew clockwise, and
decrease the pitch of the string by
turning the setscrew counter-
clockwise. (Remember not to use the
fine tuner screws for this tuning.)
Now that you have tuned your guitar
to the tuning you want, the bridge
should be properly setup, and the fine
tuners should be set to the middle of
their range.
The way your guitar is set up now is
what is called a "blocked" setup. This
means that the tremolo can be used
for dive effects but you can't pull up
on the arm for up bends. You can leave
your guitar the way it is, or you can
disengage the tremolo stop to return
the tremolo to what is called a
"floating" setup. However, before you
return the bridge to a floating
condition, you might want to check
your intonation. If your intonation
needs adjusting, go to the "Setting your
intonation" section.
14 3

Step 1:
The first thing you do to reset the
range of all the fine tuners is to position
all the fine tuner screws to the middle
of their possible movement.
Step 2:
One way to do this is to turn the low
"low E" string fine tuner screw all the
way up, then turn the "D" string fine
tuner screw all the way down.
Now, position the "A" string fine tuner
screw half way between the "E" and
the "D" fine tuner screw positions.
Step 3:
Now, leaving the "A" string fine tuner
where you set it, reposition all the of
the other fine tuner screws to match
the height of the "A" string fine tuner
screw.
You should now have all of the fine
tuner screws set to the middle of their
range.
Ignore the fact that your guitar is now
completely out of tune, we're going to
fix that next.
At this point you're ready to tune your
guitar using the range tuner set screw.
You can set your guitar up for standard
pitch, any open tuning, or any drop
SETTING THE FINE TUNER RANGE ON THE SPEEDLOADER
TREMOLO
Like the Original Floyd Rose, there are several situations that will cause the
SpeedLoader fine tuners to run out of range. If this happens don't panic, the
fine tuner range can be reset.
To reset the fine tuner range first engage the tremolo stop and set the bridge
position as described in the "Setting up the SpeedLoader Tremolo Bridge base
plate."
With the base plate set properly and the tremolo stop properly engaged, you
are ready to set your fine tuner range. If only one or two of the fine tuners
are out of range you may want to try adjusting them without engaging the
tremolo stop.
Climate, Humidity and Your Guitar
Damage done to an instrument as a result of too little, or too much, humidity
is not covered by the manufacturer's warranty. Cracks resulting from a lack
of humidity are not due to a manufacturing defect, but are considered neglect,
and educating yourself could save you some heartaches...and expense.
Do not leave your instrument in a hot car, direct sunlight, near a stove, heater,
an attic or other area where the temperatures are high. Cold temperatures
can also damage your guitar. If you must take your instrument out in the cold,
let it warm back up before taking it out of the case. This will keep the finish
from cracking or clouding. It will also keep your fretboard from drying out and
cracking.
Cleaning
Like all fine instruments, your B.C. Rich requires periodic care and maintenance.
One of the most important ways to maintain the beauty of your instrument
and prolong its string life is regular cleaning. Perspiration can actually contain
acids that are corrosive to the strings as well as the metal parts of the guitar.
After playing, wipe down your instrument's finish, strings, fretboard, and metal
parts (bridge, tuners, etc.) with a soft cloth. The finish should be polished only
as needed to avoid polish build-up that will dull the appearance. When you
do need to polish, use a soft treated cloth or cotton rag. Also, only use a polish
formulated for musical instruments to avoid build up. Follow these simple steps
and your instrument should shine for years to come.
Bridge Adjustments
Bronze Series Guitars
The Bronze Series Guitars have a one-piece adjustable bridge. These are
adjusted by turning the two screws on each side of the bridge with a flathead
screwdriver until the desired height is achieved. Loosening the strings before
adjustment will keep the screws from becoming scratched or blemished.
Platinum, Acrylic, Exclusive, and Classic Series Guitars
The Tune-O-Matic Bridge is adjusted by turning the two finger screws on each
side of the bridge until you reach the desired height.
Platinum Pro, NJ, and Neck Thru Series Guitars
The Licensed Floyd Rose Tremolo plate on the Platinum Pro, Neck Thru and
SpeedLoader-NJ models must be kept parallel to the body for proper intonation
and tuning. To adjust, open the back cavity of the guitar and adjust the two claw
screws. This can be a time consuming task but once the bridge is balanced, it
shouldn’t need adjustment unless you decide to change string gauges.
If the bridge is tilting towards the neck, tighten the claw screws, return your
guitar to pitch, and see if the bridge is parallel.
Changing Strings with a Licensed Floyd Rose
Changing strings on a guitar equipped with a locking tremolo may seem tedious
at first but with a little practice the process will become second nature.
Changing one string at a time will keep the proper tension on the neck and
tremolo, which, in turn, will make tuning your guitar back to pitch much easier.
4 13

Step 6:
Now check the base plate position. If it is not parallel to the face of the guitar
body turn the setscrew until the base plate is parallel.
Step 7:
After you get the base plate parallel,
check your string action. If your strings
are too high or too low for you, adjust
the action with the two rocker screws,
using a 3mm Allen wrench until the
action is where you like it.
When you get the base plate parallel
with the face of the guitar, the action
properly adjusted, and the tremolo
stop firmly engaged with the spring
block, you are ready to set the fine
tuner range or intonate the guitar.
These procedures follow...
Intonation
Use and electronic tuner and tune your instrument to standard pitch. Play an
open string and them compare it to the fretted note at the 12th fret. These
notes should read the same on the tuner.
* If the fretted note on the 12th fret is flatter (lower) than the open
note, move the saddle forward toward the neck.
* If the fretted note on the 12th fret is sharper (higher) than the open
note, move the saddle back away from the neck.
For an accurate reading, be sure to retune the string to pitch after each
adjustment of the saddle. Bronze and Platinum guitars require a Phillips head
screwdriver for this adjustment. Models with the Licensed Floyd Rose will need
the supplied 2.5mm allen wrench.
The quality of strings affects intonation as does string gauge. An adjustment
of the intonation will most likely have to be made if the string gauge is changed.
Neck Adjustments
Each B.C. Rich Guitar is carefully adjusted at the factory, as well as by our
Quality Control Department before shipping. The truss rod and string height
are set for optimum action and playability with the gauge string supplied.
Occasionally an instrument's neck may need adjustment as a result of string
tension or climactic changes. The curvature of the neck should be slightly
concave. The amount depends on the player’s personal taste.
Truss rod adjustment should only be performed by a B.C. Rich Authorized
Service Center. Over adjustment can cause permanent damage that will
not be cover by the warranty.
12 5
1. Loosen the locking nut that corresponds to the string being changed
with the 3mm allen wrench.
2. Loosen the string completely by turning the tuning key on the headstock.
3. Loosen the saddle lock screw with the 3mm allen wrench.
4. Remove the string.
5. Remove any broken string bits with a small magnetic screwdriver or
long nose tweezers.
6. Return the tremolo fine tuners to their mid point position.
7. Cut the ball end and extra wraps off the new string.
8. Insert the new string into the tremolo lock box.
9. Tighten the saddle screw securely but do not over tighten.
10. Slide the string thru the string post on the headstock.
11. Leave enough slack for about three turns around the post.
12. Tune to pitch.
13. Once all the strings have been replaced and stretched, tune the guitar
to pitch, lock down the nut, and use the fine tuners for minor
adjustments.

Step 1:
To replace a string, push down on the
back of the saddle of one of the strings.
Step 2:
Then, pull back on the sliding latch by
placing the first finger of your free
hand on the black knob protruding
out the back of the saddle then placing
your thumb on the fin sticking up just
behind the fine tuner screw and pull
the latch back with a pinching action
between the thumb and first finger.
Step 3:
Once you have pulled back on the
sliding latch, release the saddle and
allow it to rotate forward.
REMOVING SPEEDLOADER GUITAR STRINGS
*For use with SpeedLoader™ bridges only.
Please note: SpeedLoader strings are offered in two scale lengths: 25.5inches
and 24.75 inches. If you're not sure what scale length your guitar is, consult
the guitar manufacturer or the store where you purchased the guitar.
Make sure you have purchased the correct scale length strings for your guitar.
The string scale length appears in the lower left corner of the string package.
To purchase strings go to: www.floydrose.com or ask for them at your local
dealer.
Step 3:
If this part is missing stop right here
and get one installed by a qualified
guitar repairman. You can get this part
from www.floydrose.com.
Depending on the guitar you purchased,
the tremolo stop may or may not be
engaged with the spring block.
We will assume it is not engaged and
show you how to engage it.
Take the 3mm Allen wrench and turn
the setscrew until it touches the spring
block.
Step 4:
Now, tighten the springs with the spring
claw screws so the spring block is
pulled tightly against the setscrew.
Step 5:
Another way to pull the spring block
against the tremolo stop set screw is
to add another spring to the spring
block and claw. Using this method is
preferred because it will be easier to
re-float the tremolo after setting up
the bridge.
6 11

Step 4:
Now remove the bullet from the
saddle.
Step 5:
If you are replacing a broken string,
when you unlatch the pivoting saddle
there will be no tension on the string
to pull the pivoting saddle forward, so
you'll have to pivot the saddle forward
with your finger.
You can now remove the bullet on the
other end of the string from the nut
by simply sliding it out the back of the
nut.
Step 6:
If you try to release a saddle and pull back on the sliding latch and it won't
budge, release everything and start over making certain that you don't turn
the sliding latch sideways. If the sliding latch turns on its shaft, the safety catch
portion of the sliding latch will not line up properly with the safety catch
portion of the pivoting saddle and will cause binding.
The safety catch is there to prevent the string from accidentally releasing while
playing or changing strings.
Step 1:
To level the base plate, first take the
spring cover plate off the back of the
guitar.
Step 2:
Inside the spring cavity you should find
a tremolo stop.
SETTING UP THE SPEEDLOADER TREMOLO BRIDGE BASE
PLATE
The proper setup of the SpeedLoader Tremolo Bridge looks exactly like a
properly setup Original Floyd Rose Tremolo Bridge. By the way, the SpeedLoader
Tremolo will retrofit an Original Floyd quite easily.
The first thing you'll want to do is check to see if the top surface of the base
plate of the bridge is sitting parallel to the top surface of the guitar.
If the base plate appears to be tilted forward away from the top surface of the
guitar or tilted back closer to the top of the guitar, then an adjustment should
be made.
This is what the safety catch looks like up close. (see above)
10 7

Step 1:
To put on the new string simply slide
one of the bullets into the nut, then
place the other bullet into the
appropriate saddle and push down on
the back on the saddle until you hear,
or feel, a snap.
Step 2:
This sound is the spring-loaded sliding
latch snapping into place. If you don't
hear or feel the snap, push the sliding
latch toward the saddle until it catches.
Making sure the sliding latch is all the
way forward to its locked position is
important because if it isn't two things
will happen:
1) The replaced string will be held
sharp, and;
2) the safety catch will not be engaged
and the string could suddenly and
unexpectedly be released and fly across
the room.
LOADING SPEEDLOADER STRINGS
Step 4:
Then do a couple of stretching pulls
on the string.
Step 5:
The string is now seated and no more
stretching is necessary, just play. In fact
if you stretch the string too vigorously
you will damage the string. Just play
the string in for a bit and re-adjust your
tuning with the fine-tuning screw as
needed.
If the string you're replacing was tuned
to your desired pitch, the new string
you install should be able to be tuned
to that pitch with the fine tuner screw.
If the fine tuners do not have enough
range to tune the new string to the
previous pitch you will need to adjust
the range tuner setscrew as described
below. See "Setting the fine tuner range
on the SpeedLoader Tremolo".
Step 3:
Now that the new string has been properly installed you should seat the new
string. To seat the new string press down firmly on the string just in front of
the saddle and just in front of the nut.
8 9
/