Page is loading ...

Is it live or is it Memorex?
TM
MVDP1072
User’s Guide
PORTABLE DVD/VCD/MP3/PHOTO CD Player
D
E
C
O
D
E
R
U
I
T
-
Before operating this product,
please read these instructions completely.

WARNING
- TO PREVENT FIRE OR SHOCK HAZARD. DO NOT USE THIS PLUG WITH AN EXTENSION
CORD, RECEPTACLE OR OTHER OUTLET UNLESS THE BLADES CAN BE FULLY INSERTED TO
PREVENT BLADE EXPOSURE.
- TO PREVENT FIRE OR SHOCK HAZARD, DO NOT EXPOSE THIS APPLIANCE TO RAIN OR
MOISTURE.
The lightning flash with arrowhead
symbol. Within an equilater at
trlangle is intended to alert the user
to the presence of uninsutated
"dangerous voltage" with in the product
enclosure that may be of sufficient
CAUTION: TO REDUCE THE RISK
OF ELECTRIC SHOCK DO NOT
REMOVE COVER(OR BACK) NO
USERSERMCEABLE PARTS INSIDE.
REFER SERVICING TO QUALIFIED
SERVICE PERSONNEL.
The exclamation point within an
equllateral triangle is intended to alert
the user to the pressnce of Important
operating and maintenance (servicing)
instructions in the lite rature
accormpanying the appliance.
IMPORTANT SAFETY INSTRUCTIONS
1)Read these instructions.
2)Keep these instructions.
3)Heed all warnings.
4)Follow all instructions.
5)Do not use this apparatus near water.
6)Clean only with dry cloth.
7)Do not block any ventilation openings. Install in accordance with the manufacturers instructions.
8)Do not install near any heat sources such as radiators, hear registers, stoves, or other
apparatus(including amplifiers)that produce heat.
9)The AC plug supplied with the unit is polarized to help minimize the possibility of electric shock.
If the AC plug does not fit into a nonpolarized AC outlet , do not file or cut the wide blade. It is user’s
responsibility to have an electrician replace the obsolete outlet.
10)Protect the power cord from being walked on or pinch particularly at plugs convenience
receptacles, and the point where they exit from the apparatus.
11)Only use attachments/accessories specified by the manufacturer.
12)Unplug this apparatus during lightening storms or when unused for long periods of time.
13)Refer all servicing to qualified service personnel. Servicing is required when the apparatus
has been damaged in any way, such as power-supply cord or plug is damaged .Iiquid has
been spilled or objects have fallen into the apparatus, the apparatus, has been exposed to rain
or moisture, does not operate normally ,or has been dropped.
This appliance shall not be exposed to dripping or splashing water and that no object filled with
liquid such as vases shall be placed on the apparatus.
CAUTION
RISK OF ELECTRIC SHOCK
DO NOT OPEN
magnitude to constitute a risk of
electric shock to parsons.

is a trademark of DVD Format/Logo Licensing Corporation, registered in the
U.S., Japan and other countries.
Safety Instructions
This product incorporates copyright protection technology that is protected
by method claims of certain U.S. Patents and other intellectual property rights
owned by Macrovision Corporation and other rights owners. Use of this copyright
protection technology must be authorized by Macrovision Corporation, and is
intended for home and other limited viewing uses only unless otherwise
authorized by Macrovision Corporation. Reverse engineering or disassembly is
prohibited.
CAUTION:
This DVD player contains laser system.
To prevent direct laser radiation, do not attempt to open the enclosure. Visible laser beam will radiate
when the enclosure is opened or when the interlock device is released. Do not stare at the laser-beam.
The DVD pick-up is a precision component, so do not open the disc tray door for an extended period
of time in order to prevent dust.
Never place other things or articles upon the player, otherwise it may cause improper playback.
Please retain this manual in a safe place for future reference. Please contact your local dealer or
our technical service center for maintenance.
Read this manual carefully and get familiar with the instructions before operating.
Reminding the user of the dangerous voltage!
Danger Symbol
Reminding the user of the important instructions for operation and maintenance.
Danger of explosion if battery is incorrectly replaced .Do not replace the battery.
Warning Symbol
All images in this manual are sketch illustrations for reference only. The actual
displays are contingent upon discs.
The TFT display is a delicate device, so do not press it to avoid damaging to the display.

Contents
Brief Introduction to DVD
Control Button Locations and Explanations
Features
Cautions
Compatible Disc Types
Remote Control Illustration
Connecting to Power Supply
Connected to TV set
Connected to Amplifier with Dolby Digital Decoder
Connected to Ordinary Audio System
Connected to Amplifier with DTS Digital Decoder
Audio/Video In
Playback
KEY/Volume Control
Pause/Step Playback
TV System Selection
OSD
DVD Menu Playback
PBC Playback
Language/Audio Channel Selection
Direct Selection Playback Function by Number Button
Mute
Fast Playback
Slow Playbck
Repeat Playback
Repeat the Selected Section
Subtitle Selection
Angle Selection
Playback from the Desired Point
PREFACE
SYSTEM CONNECTIONS
BASIC OPERATION
PLAY OPERATION
How to use the Remote Control
Accessories
Installing Battery Pack

PLAY OPERATION
Contents
Power Spectrum Meter(PSM)
Zooming the Displayed Frame
Picture Quality Setting
Virtual Keyboard
Browser
MP3 and JPEG File Playing
FUNCTION SETUP
Functions Setup
General Settings
Video Setup
Audio Setup
Initial Setup
Troubleshooting
OTHERS
Useful notes
Specifications
Terms
Language Code List

1
PREFACE
Brief Introduction to DVD
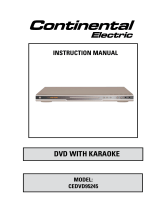
Disc Pictures
TV Screen
4:3
16:9
Pan-Scan
Letterbox
16:9
4:3
DVD is well known for its extraordinarily large capacity and outstanding audio-video quality. Its
capacity is as high as 4.7-17 GB (approximately 7-26 times the CD capacity).With 500-line
horizontal resolution for pictures and Dolby Digital 5.1 Channel surround sound, it brings a new era to
the household AV products.
Comparison Between DVD and Other Discs
Linear PCM
Digital
250 lines or
more
VCD
Digital/MPEG1
650MB
44.1KHz
12CM/8CM
74min.
350 lines or
more
SVCD
Digital/MPEG2
650MB
12CM/8CM
45min.
CD
650MB
44.1KHz/16bit
12CM/8CM
74min.
Digital/MPEG2
Double-
sided
2 layers
17G
Single-
sided
1 layer
4.7G
133min.
500 lines or more
Multiple
Dolby Digital/Linear PCM
32 types
Single-
sided
2 layers
8.5G
242min.
Double-
sided
1 layer
9.4G
266min. 484min.
DVD
48KHz,96KHz/16,20,24bit
12CM/8CM
Recording
Method
Capacity
Playback time
Disc Diameter
Horizontal
Resolution
Aspect Ratio
Subtitle
Audio
Sound Quality
Analog
Linear PCM
FM modulation
One
430 lines or
more
LD
44.1KHz/16bit
30CM/20CM
1 side 60min.
2 sides 120min.
Max. 16 types
Function Introduction
DVD discs can support as many as 8 dubbing languages and 32 subtitle languages.
DVD discs may support as many as 9 camera angles.
Some discs support user selection of various plot choices that effect the beginning, development
or end of the story all on the same disc.
Multiple aspect ratios support various TV screens.
Multiple languages and subtitles
Multiple angles
Multiple story plots
Multiple aspect ratios

2
Cautions
Please remove the power plug from the wall outlet if you do not intend to use this player for an
extended period of time.
Do not put this player near any high power speaker or any other source of vibration. Accessive
vibration will cause problems with normal operation and playback.
Please put this player in a dry and ventilated area. Do not put it near a heat source, or expose it to
direct sunlight, mechanical vibration, humidity or dust-rich environment.
Condensation may form on the laser head if it is moved from one temperature extreme to another.
Turn the player on and do not load a disc for 1-2 hours. This will evaporate the condensation and
keep your new player functioning correctly.
If you need to clean the player, you may use a small amount of neutral detergent. Never use
sandpaper or organic solvent such as alcohol or gasoline for cleaning.
Please adjust the volume to minimum. Adjust the volume control to a comfortable level after
playback begins to avoid damaging your speakers, amplifier or your hearing.
This player utilizes a switching power supply. Power supply: AC 120V, 60Hz.
Do not place objects full of liquid such as vase on the player.
Ensure that all connection wires and power supply cords are properly connected before turning
on power.
ON THIS UNIT
ON THE TFT DISPLAY
Please do not expose the display to heat or scratch the screen with pointed objects.
A few bright or dark spots may appear on the display and is normal. This does not indicate a
problem or defect.
Setting the display to maximum brightness for an extended period will damage the display.
0.01% of the pixels may not illumiate normally.
ON BATTERY PACK
This player's battery pack is rechargeabl and should be fully charged before use.
Do not dispose of in fire or water. Do not heat the battery pack.
Do not use it in high temperature or near a heat source.
Do not connect the positive and negative polarities with a metal object.
The operating temperature of the battery pack is 32~95°F
Please remove the battery pack if you do not intend to use this player for an extended period
of time. (Power is still consumed although this player is turned off. Therefore, the battery pack
may be damaged due to excessive discharging.)
The battery pack can be recharged only when this player is turned off.
PREFACE

3
Features
This player utilizes color TFT LCD and a new generation DVD decoding chip with built-in
Dolby Digital decoders to bring you the best sight and sound from your DVD. The
2-laser super error correction mechanism supports CD-R.
Audio/Video Features
High Quality Digital Audio
Digital audio optical output capable of connecting to a power amplifier with the Dolby
Digital or DTS decoder.
2
Dolby Digital and PCM digital audio outputs can definitely satisfy audiophiles' high
listening requirements.
3
Built-in Dolby Digital decoder.
4
Audio output.
2
Composite video and S-Video connections.
5
Built-in stereo speakers.
6
Hi-Fi stereo headphone jack.
Additional Convenient Functions
Supports SVCD, VCD, CD, MP3, HDCD, KODAK PICTURE CD,
DVD-R/RW.
Screen saver function protects your LCD and TV displays.
3
Easy-to-use Graphical User Interface (GUI) and virtual keyboard.
4
Multi-angle playback function makes it possible for you to view a scene
from different camera angles (when supported by your DVD).
5
Direct entry to desired scenes (title/chapter/time/track search).
6
Zooming function to zoom in on any playing frame.
7
Supports PAL/NTSC systems, no compression to pictures.
8
Multiple aspect ratios to fit various TV sets.
9
Parental control function to protect children from watching inappropriate discs.
10
Multiple dubbing languages and subtitle languages keep you in the best entertaining
status anytime.
Electronic anti-shock circuits and large capacity solid Li-Ion battery make your new DVD
player truly portable.
2
1
7 color TFT LCD.
PREFACE

4
PREFACE
Compatible Disc Types
NOTES
These icons on the top banner indicate the disc types that the function described in this section
applies to.
VCD
MP
3
SVCD
Issues related to
MP
3
CDVCDSVCDDVD
CD
Applies to DVD disc Applies to CD disc
Applies to MP3 disc
Applies to SVCD disc
Applies to VCD disc
DVD
DIGITAL VIDEO
MP3
Types
CD-DA Digital audio
SVCD Compressed digital audio+compressed digital
video(dynamic picture)
VIDEO CD Compressed digital audio+compressed
digital video(dynamic picture)
MP3 Compressed digital audio
Sizes
Recorded Contents
DVD Compressed digital audio+compressed digital video
(dynamic picture)
12cm or 8cm
12cm or 8cm
12cm or 8cm
12cm or 8cm
12cm or 8cm

5
PREFACE
Control Button Locations and Explanations
1
Color TFT LCD
2
Speakers
3
4
PREV button / LEFT direction arrow
5
OPEN/CLOSE button
6
SET button
9
IR (Remote Control)sensor
7
Power indicator
8
10
MENU button
11
PAUSE button / DOWN
direction arrow
12
PLAY button / SELECT
button
13
NEXT button / RIGHT
direction arrow
14
STOP button / UP direction
arrow
17
15
Function Select
16
Browser Button
Press once to switch to Direction
Buttons function
Press twice to switch to Virtual
Keyboard function
11
14
2
1
17
16
15
13
3
5
7
9
6
8
10
4
12
18
19
18
19
Vol-
Adjust the volume of headphone
and speaker.
Vol+
Adjust the volume of headphone
and speaker.
PICTURE button
DVD/AUXIN button
POWER button
2

Headphones jack
Audio/Optical Out jack
Audio in jack
S-Video Out jack
Video In jack
Video Out jack
Power supply socket
Control Button Locations and Explanations

Remote Control Illustration
6
3
2
5
7
8
9
12
11
13
14
16
33
22
20
18
21
19
23
24
28
27
25
26
15
17
4
31
32
30
29
10
35
34
Switch new user interface.
BROWSER
18
Press to turn On/Off the unit.
STANDBY Button
Change the audio language or
audio channel.
AUDIO Button
2
Play from the desired location.
GOTO button
3
Zoom In/Out the display frame.
ZOOM Button
4
Fast forward play.
FWD Button
14
Change camera angles, MP3/JPEG
playback modes switch.
ANGLE Button
5
Press once to mute, twice to unmute.
6
MUTE button
DVD titles.
TITLE button
7
Fast backward play.
REV Button
13
Function setup.
10
SETUP Button
Normal playback.
PLAY Button
11
Stop playback.
STOP Button
12
8
CURSOR Buttons
SELECT Button
9
Fall tone.
KEY Button
15
Switch the TV system between
PAL, NTSC and AUTO.
P/N Button
17
Rise tone.
KEY Button
16
Adjusting sound field effects.
SF Button
19
Adjusting equalization effects.
EQ Button
20
Decrease volume.
VOLUME-
21
Increase volume.
VOLUME+
22
Slow motion Forward/Reverse playback.
SLOW Button
26
Skip forward.
NEXT Button
24
25
PAUSE/STEP Button
Pause or play frame by frame.
Skip backward.
PREV Button
23
A-B Button
28
Repeat the select.
Display DVD menu or open/close
PBC.
27
MENU/PBC Button
Display or hide disc information.
OSD Button
35
REPEAT Button
29
Repeat play.
Power Spectrum Meter on/off.
PSM Button
27
31
NUMBER Buttons
27
33
Change subtitle languages/
Switch JPEG display modes.
SUBTITLE Button
34
Back to the previous menu/
Clearing input numbers.
30
RETURN Button
Set video.
27
32
PIC Button
REV
7

Within about 3m
¡-
8
PREFACE
Battery Installation
How to use the Remote Control
Accessories
Cautions
Never expose the infrared remote sensor on the front panel to direct
sunlight or strong beams.
Never drop the remote control or expose it to moisture.
When the batteries become low, replace it in time.
Step 1: Push the button toward left.
Step 2: Pull the battery holder out.
Using the Remote control
When using the remote control,
the transmitter of the remote
control should be pointed to the
IR sensor on the front panel
within an angle of 30 from the
center and a distance of 3 meters
from the sensor.
1pcs
1pcs
1pcs
1pcs
1pcs
1pcs
1pcs
Audio cord
Remote Control
3V (CR2025)Button Battery
Instruction Manual
S-Video cord
Battery Pack
Power Adapter
AC Cord
Car Adapter
Step 3: Insert a Standard CR2025 battery according to the polarity on the battery holder and
replace the battery holder to the remote.
1pcs
1pcs
Video cord
1pcs

9
Installing Battery Pack
Insert the clasps of the battery pack into the holes in the bottom of this player as shown in the
figure.
1
Installing Battery Pack
Slide the battery pack to secure it.
Insert the output plug of the power adapter into the battery pack's power socket. The battery
pack indicator will be orange for 0.5 seconds, then the indicator will flash green, which shows
the battery pack is being recharged.
When the battery pack is going to be fully recharged, the indicator will flash orange.
The indicator will be green when the battery is fully recharged.
.
If the indicator lights up in red, the battery pack has problems and needs repair.
Connecting to Power Supply
2
Connect the output plug of to this player's power adapter.
Connect the power adapter to an AC power source.
3
PREFACE
1
Connect the AC cord with the power adapter. (See picture )
A
B
A
Connect the car adapter to an DC power source in the car. (See picture )
1
B
Portable DVD
Player
Battery Pack
2
Recharging Battery Pack
Indicator
Power Adapter
You can charge the battery while using the DVD player. You must have the power
connected to the battery pack and not to the main unit.
The usage of car adapter is the same as using the standard home power adapter.

10
Connect this player to the TV set with the video cord.
If your TV set has a S-VIDEO IN connector, use S-VIDEO CORD to connect the DVD
player and TV set in order to get the best picture possible.
Make sure to connect your AUDIO Out to the same input group on your TV.
Example: AUX1, VIDEO1
S-VIDEO
VIDEO In
Video Cord
S-Video Cord
or
S-Video
Audio Cord
Audio In
Connecting to a TV set

11
Connecting to an Ordinary Audio System
Front Left Speaker
Front Right
Speaker
Center Speaker
Subwoofer
Surround Left Speaker Surround Right Speaker
When setting up the speakers please set the Audio mode to "LT/RT"(Please refer to page
36 for details).
Amplifier equipped with Dolby Pro Logic Surround
Video In
Video Cord
Audio Cord
Audio In
SYSTEM CONNECTIONS

12
Connecting to an Amplifier with Dolby Digital Decoder
Amplifier with Dolby Digital Decoder
SYSTEM CONNECTIONS
Front Left Speaker
Front Right
Speaker
Center Speaker
Subwoofer
Surround Left Speaker Surround Right Speaker
Manufactured under license from Dolby Laboratories. "Dolby" and the
double-D symbol are trademarks of Dolby Laboratories. Confidential
unpublished works. 1992-1997 Dolby Laboratories. All rights reserved.
Video In
Video Cord
Optical Cord
Optical In

13
Connecting to an Amplifier with DTS Digital Decoder
Amplifier with DTS Digital Decoder
SYSTEM CONNECTIONS
Front Left Speaker
Front Right
Speaker
Center Speaker
Subwoofer
Surround Left Speaker Surround Right Speaker
"DTS" and "DTS Digital Out" are the trademarks of Digital Theater Systems, Inc.
Video In
Video Cord
Optical Cord
Optical In

14
Audio/Video In (AUX IN)
Connect the video cords from the Video Out on the source to Video In on your DVD.
Connect the audio cords from the Audio Out on the source to Audio In on your DVD.
14
Audio/Video In (AUX IN)
Connect the video cords to the video out jacks of the video equipment.
Connect the audio cords to the video equipment's audio out jacks which
ought to be in the same group of the audio out jacks.
14
Audio/Video In (AUX IN)
Connect the video cords to the video out jacks of the video equipment.
Connect the audio cords to the video equipment's audio out jacks which
ought to be in the same group of the audio out jacks.
14
Audio/Video In (AUX IN)
Connect the video cords to the video out jacks of the video equipment.
Connect the audio cords to the video equipment's audio out jacks which
ought to be in the same group of the audio out jacks.
Video output
Video Cord
Audio Cord
Audio output
Video Equipment
SYSTEM CONNECTIONS

15
Playback
3. Press OPEN/CLOSE to open the disc lid.
1.Connect the player to the power supply(Please refer to page9).
MP3
CDVCDSVCDDVD
Place a disc with label side facing up.
The player will start reading the disc.
STANDBY
PLAY
STOP
5. Press PLAY to play the disc.
6. Press STOP to stop playback.
7. When playback finishes, press POWER to enter the standby mode. If you do
not intend to use this player for an extended period of time, please remove the
plug from the power supply socket.
To pause the disc playback, press STOP. Press PLAY to resume or press STOP again
to discontinue play.
Pressing Stop when playing a MP3 disc stops play instead of pausing playback.
4. Close the disc lid.
Open Disc Lid
Close Disc Lid
2. Press the power button(on main unit) or the Standby button (on the remote)
to turn the unit on.
BASIC OPERATION
Lift the top gently to open the DVD player and adjust the TFT LCD angle.
/