Roland FR-1x User guide

Category
Musical Instruments
Type
User guide

This manual is also suitable for

SEFR-1X/FR-1XB
FR-1X/FR-1XB
Lycka till med din nya Roland-produkt!
Registrera dig online på www.roland.se och bli medlem i Rolands VIP-klubb – MY
ROLAND.
Är du nybliven ägare av ett Roland HP-piano kan du förlänga garantin till hela 5 år
om du registrerar dig online på Rolands hemsida.
Du har också möjligheten att beställa Rolands nyhetsmail så att du kan hålla dig
uppdaterad kring Rolands produktnyheter, demonstrationer hos återförsäljarna,
spännande artiklar om olika musiker, konserter, tävlingar och andra evenemang.
Roland har producerat instrument under många år och är i dag en av de ledande
tillverkarna inom ett flertal olika instrumentkategorier. Oavsett om du spelar piano,
keyboard, orgel, synt, gitarr, trummor, bas eller är ägare av en större eller mindre
studio så har Roland den rätta produkten för dig. På Rolands hemsidor och via
Rolands nyhetsmail får man information om våra olika produkter och tips kring
användning, olika teknologier och tillbehör.
Om man behöver hjälp med sin produkt kan man skicka sina frågor i ett email till
[email protected] eller ringa vår produktsupport på telefon 08-683 71 60
(måndag-torsdag mellan 14-16, fredag kl. 9-11). Naturligtvis kan man också vända sig
direkt till sin återförsäljare med sina frågor.
Vi önskar dig många trevliga musikstunder med din nya Roland-produkt.
Lycka till!
Reservation för tryckfel
SVENSK BRUKSANVISNING RSC-0960
SÄKERHETSFÖRESKRIFTER / SVENSKA 5
INDLEDNING 7
PANELBESKRIVNING 8
Diskantsektionen 8
Bassektionen 10
Batterilåda 11
Anslutningar 11
FÖRBEREDELSER 13
Använd FR-1x med Batterier 14
Batteri Status 14
Lyssna till demolåtar 15
BYT MELLAN SET 16
Välj Set (dragspel) 17
BYT LJUD MED REGISTERKNAPPARNA 18
Diskantsektionen 18
Bassektionen 19
SPELA MED ORKESTERLJUD I DISKANTSEKTIONEN 20
SOLO och DUAL 20
Spela trum/perkussion i bas- och ackordsektionen 21
SPELA MED ORKESTERLJUD I BASSSEKTIONEN 21
SPELA UPP LJUDFILER VIA USB (Musik) 22
Kopiera ljudfiler till USB-minne 22
Spela upp ljudfiler 22
Byt mellan musiknummer 23
Justera volymen på ljudfilen 24
Metronom 25
Transponering 25
PRAKTISKA FUNKTIONER 25
Justera balansen mellan diskant- och basdelen 26
Välj parameter som skall ändras 27
REDIGERING AV PARAMETRAR 27
Spara dina parameterinställningar 28
SPARA DINA INSTÄLLNINGAR (USER PROGRAM) 29
Spara dina personliga inställningar 30
Använd dina personliga inställningar 31
Gör om dina personliga inställningar 31
Spara User Program inställningar på USB-minne (köps separat) 33
HANTERING AV DATA VIA FR-1X’s USB PORT 33
Hämta User Program inställningar från USB-minne (köps separat) 34
Hämta User Set inställningar från USB-minne (köps separat) 34
HÄMTA FABRIKSINSTÄLLNINGARNA 36
INNEHÅLL
SNABBGUIDE 5
SÄKERHETSFÖRESKRIFTER / SVENSKA
Det är viktigt att du läser dessa sidor innan du använder din nya produkt från Roland. Även om
produkten tillverkats enligt högsta möjliga standard och genomgått omfattande tester under till-
verkningsprocessen bör du studera denna lilla guide som sammanställts för att du skall kunna und-
vika problem med din produkt.
Strömförsörjning
Det är viktigt att använda rätt strömrsörjning
till din nya produkt. Använder du fel ström-
rsörjning kan du dels riskera att produkten
inte fungerar och kan gå sönder, dels kan det
utgöra en brandfara. Se därr till att en-
dast använda den nätadapter/nätkabel som
medföljer produkten eller den strömförsörjn-
ing som rekommenderas i den medföljande
engelska manualen.
Kom ihåg att om du använder en annan typ av
strömförrjning än den som medljer/rekom-
menderas av Roland, så kommer en eventuell
skada inte att omfattas av garanti eller svensk
konsumentköplag.
Se också till att de kablar du använder är i gott
skick. En nätkabel som inte är hel kan utgöra en
stor brandfara och skada både dig, produkten
och den lokal ni befinner er i.
Använder du en felaktig strömförsörjning kan
detta gå ut över ljudkvaliteten och förstöra din
produkt. Var också uppmärksam på att om du
ansluter din strömförrjning till samma grupp/
kring som t.ex. kylskåp, frys eller uttag med
dimmer kan detta medföra störningar.
När du ansluter produkten till nätuttaget är det
viktigt att den är avstängd.
Innan du ansluter produkten till ett nätuttag
r du kontrollera att det överenssmmer med
de specifikationer som står på instrumentet (i
Sverige: 230 volt/50 Hz växelspänning).
Inte alla Rolands produkter har en extern näta-
dapter. Många har inbyggt, godnt nätaggre-
gat och levereras med en S-märkt nätkabel.
Placering
Alla elektriska apparater kan påverkas av sin
placering och det gäller naturligtvis också
r din nya produkt. Du har säkert hört det
ljud som kan komma ur en TV, musikanläggn-
ing osv. om en ringande mobiltelefon ligger
r nära apparaten. Denna störning kommer
från elektromagnetism som många apparater
skickar ut. Det enklaste sättet att undvika dessa
störningar är att placera sin produkt utom
ckll för potentiella srkällor. Det kan vara
TV- och datorsrmar, kraftfulla försrkare,
hushållsapparater etc.
Se också till att din produkt inte är placerad där
det är väldigt varmt, i direkt solljus, på ställen
med mycket fukt, damm och i andra extrema
miljöer. Din produkt är inte tillverkad för ex-
trema påfrestningar och bör därför inte använ-
das under sådana omständigheter.
Kommer du att transportera din produkt i ex-
trema miljöer är det klokt att satsa på någon
form av transportskydd. Din musikhandlare kan
informera dig om lämplig typ av väska, fodral
eller flightcase för just din produkt.
ll din produkt ren. Smuts och damm kan
vara en medverkande orsak till att din produkt
går sönder. Alla Rolands produkter innehåller
elektronik och som du säkert redan vet är
elektronik känslig för just smuts, fett och
damm. Var därför rädd om din produkt. Torka
bort damm på utsidan med en torr, mjuk trasa.
Finns det fettäckar ska dessa tas bort med en
tt fuktad trasa, eventuellt med lite diskmedel
om fläckarna sitter hårt. Du får under inga
omständigheter använda rengöringsprodukter
som innehåller lösningsmedel.
ll alla typer av vätskor (öl, läsk osv.) långt bor-
ta fn din produkt. Det gäller också alla typer av
objekt t.ex. vassa föremål som kan tänkas skada
din produkt.
6 SNABBGUIDE
Dagligt bruk
När du använder din produkt i det dagliga så
tryck inte överdrivet hårt på knappar o. dyl. Alla
reglage på din produkt skall fungera utan att
använda våld. Känner du att du måste använda
mer kraft än nödndigt bör du kontakta din
auktoriserade Roland-återförsäljare. Har du en
produkt som är batteridriven byt först batterier
och kontrollera om problemet försvinner.
När du ansluter/kopplar ur kablar på din produkt
så håll i själva kontakten aldrig i kabeln.
Det är helt normalt att elektronikprodukter kan
bli varma när de står på.
När du transporterar din produkt bör du som
sagt använda ett anpassat fodral eller ett case,
alternativt orginalemballaget.
Utsätt inte produkten för kraftiga belastnin-
gar. Hantera den varsamt, placera inte tunga
remål på dess ovansida och undvik alla andra
typer av våldsamheter.
Reparation
Skulle olyckan vara framme bör du kontakta
din återförsäljare. Din produkt är skyddad
mot fel i material och arbete genom garantier
och svensk konsumentköplag. Reparation och
service skall ske på en Roland-auktoriserad
verkstad och din återförsäljare kan hjälpa dig
att sända din produkt dit. Kontakta Rolands
svenska serviceavdelning på service@roland.
se om du har frågor.
Du får under inga omständigheter själv förka
öppna och reparera din produkt om den går
sönder. Dina eventuella rättigheter genom
garantier och konsumentköplag anses då
förverkade.
Data
Många av Rolands produkter har inbyggda
minnen för att lagra data (ljud, sånger, an-
vändarprogram osv.). Har din Roland-produkt
gon form av minnesfunktion kom ihåg att ta
backup med jämna mellanrum och under alla
omständigheter om produkten skall skickas in
r service. När du gör en backup sker detta
oftast till det inbyggda mediet (minneskort,
diskett, USB-minne osv.) eller via MIDI till en
dator. Detta förklaras närmare i din användar-
manual. Du kan också kontakta vår support på
roland.support@roland.se. Roland ansvarar
inte för förlorade data i samband med service.
Var uppmärksam på att olika typer av lagrings-
media måste hanteras med omsorg. Generellt
kommer disketter och ZIP-diskar att tappa sina
data om de förvaras i närheten av magnetiska
remål, t.ex. dator- och TV-skärmar, högtalare
och liknande. Läs mer om användningen av en-
skilda lagringsmedia i din engelska manual.
SNABBGUIDE 7
INDLEDNING
I denna svenska Quickguide får du en introduktion till generellt användning och huv-
udfunktioner i ditt nya FR-1x digitala dragspel, samt beskrivning över hur du använder
instrumentet.
Är det specifika detaljer du inte kan hitta, skall du läsa den engelska bruksanvisningen
(Owners Manual), där du också kan hitta mer djupdykande förklaringar samt diverse
scheman, etc.
Ditt nya dragspel fungerar i grunden på samma sätt som ett akustiskt instrument.
Man kan välja mellan hela 16 olika dragspel. Vart dragspel inkluderar 14 diskantregi-
ster samt 7 basregister som är tillgängliga genom att trycka flera gånger på register-
knappen. Detta gäller också om man vill spela med orkesterstämmorna.
Det är som utgångspunkt nödvändigt att använda bälgen för att spela på instrumen-
tet, om man vill spela dynamiskt, på samma sätt som ett akustisk instrument, men
man kan om man vill koppla bort bälgen!
Det är också möjligt att ändra knappsystem (FR-1x knapp version), så man till exempel
kan spela med system som används i andra länder (till exempel norskt eller finskt
system). Dessa funktioner beskrivs inte i denna guide, så vi hänvisar till den engelska
Owners Manual.
Mycket nöje med ditt nya V-Accordion, FR-1x!
8 SNABBGUIDE
PANELBESKRIVNING
Diskantsektionen
1. USB MEMORY port
FR-1x’s USB port ger dig möjlighet till att ansluta ett USB-minne, där man kan spara
och hämta egna registreringar (User Programs) såväl som User Set och nya ljud.
(USB-minne är extra utrustning).
2. ORCHESTRAL BASS knapp
Denna knapp aktiverar orkestersektionen för basknapparna och låter dig spela spela
med orkesterljud i stället för dragspelsljud i basen
3. ORCHESTRAL CHORD/FREE BASS knapp
Denna knapp aktiverar orkestersektionen för ackordknapparna och låter dig spela med
orkesterljud i stället för dragspelsljud i ackorddelen.
Om FREE BASS sektionen är aktiverad, kommer denna knapp att aktivera orkester-
stämmorna för Free Bass sektionen.
4. LEFT HAND FREE BASS knap
Tryck på denna knapp om du önskar använda alla knapparna i vänster hand till att
spela melod bas. Med denna inställning är det inte möjligt att spela ackord.
Denna knapp används också till att kontrollera batterierna.
5. LEFT HAND DRUMS knapp
Med denna knapp kan man lägga till trum- eller perkussionsljud till ackord- och bas-
sektionen.
6. SET knapp
Denna knapp används till att välja ett av de 16 Set (dragspel) som kan väljas i de 4
dragspel Set familjerna: Tryck [SET] knappen och efterföljande en av de 4 diskantregi-
sterknapparna.
Panel descriptions
12
r
FR-1x V-Accordion
4. Panel descriptions
Treble control panel
A
USB MEMORY port
The FR-1x’s USB port allows you to connect an
optional USB memory. It can be used to save and
load User Programs as well as to load User Sets and
new sounds.
NOTE
Use USB memory sold by Roland (M-UF series). We cannot
guarantee operation if any other USB memory is used.
B
ORCHESTRAL BASS button
This button activates the orchestral section for the
bass buttons, allowing you to play the bass notes
using an orchestral sound instead of an accordion
sound.
C
ORCHESTRAL CHORD/FREE BASS button
This button activates the orchestral section for the
chord buttons, allowing you to play chords using an
orchestral sound instead of an accordion sound.
When the FREE BASS section is active, this button
activates the orchestral section for the Free Bass sec-
tion.
D
LEFT HAND FREE BASS button
Press this button if you want to use all buttons in the
left hand to play bass notes (in which case no chords
are available).
Press and hold this button to check the state of the
batteries you installed.
E
LEFT HAND DRUMS button
Allows you to add drum/percussion sounds to the
bass and chord section.
F
SET register
This register is used to recall one of 16 Sets from one
of the 4 Set families: press the [SET] register and one
of the 4 treble registers.
The [SET] register has additional functions:
•To edit function and MIDI parameters: press and hold
[SET].
•To change octaves: press [SET] and [1/OCT–] or [2/
OCT+].
•To activate the metronome: press [SET] and then tre-
ble register [3/(METRON)].
•To alternate between Dual and Solo modes: press
[SET] and then treble register [4/(DUAL/SOLO)].
G
Treble registers
The treble section contains 4 registers that allow you
to select accordion, orchestral and organ sounds, Sets
and User Programs.
NOTE
By pressing and holding any register, you can switch off
the treble or Treble Orchestra and Organ sections. Press
another register to switch it back on.
H
USER PROGRAM/ENTER button
This button is used to recall one of the 8 User Pro-
gram memories: first press [USER PROGRAM] and
then one of the treble registers. See page 38.
It is also used to confirm settings and commands.
I
PLAYER buttons
These buttons are used to operate the FR-1x’s built-in
USB player. [œ] allows you to return to the beginning
of the current song. [®÷π] is used to start and pause
playback of the selected song.
A
D E F H I
J
K
L
M
G
B
C
FR-1x GB.book Page 12 Tuesday, November 8, 2011 11:44 AM
SNABBGUIDE 9
Set knappen har också följande funktioner:
Ändra i MIDI-parametrar: Tryck och håll [SET]
Ändra oktav: Tryck och håll [SET] och [1/OCT–] eller [2/OCT+].
Aktivera metronom: Tryck [SET] och register [3/(METRON)].
Byta mellan Dual och Solo inställning: Tryck [SET] och register [4/(DUAL/SOLO)].
7. Diskantregister
Diskantsektionen innehåller 4 registerknappar, med vilka du kan byta dragspelsstäm-
mor, orkester- och orgelljud, Set och användarregistreringar.
8. USER PROGRAM/ENTER knapp
Används till att ta fram en av de 8 personliga användarregistreringarna. Tryck på
[USER PROGRAM] och en av de 4 diskantregistren.
9. Player knappar
Dessa knappar hör till den inbyggda USB-spelaren. Vänster knapp tar dig till start av
vald låt. Höger knapp startar låten eller sätter uppspelningen på paus.
10. RIGHT HAND ORCHESTRA knapp
Denna knapp aktiverar orkestersektionen för diskantdelen (höger sida).
Trycks denna ned, samtidigt som [ORGAN] knappen, så aktiveras demofunktionen i
FR-1x.
11. RIGHT HAND ORGAN knapp
Denna knapp aktiverar orgelsektionen för diskantdelen (höger sida).
Trycks denna ned, samtidigt som [ORCHESTRA] knappen, så aktiveras demofunktion
i FR-1x.
12. Power knapp
Tryck på denna knapp för att sätta på FR-1x (knappen lyser)
Från fabriken är FR-1x inställd, så instrumentet automatisk stängs av efter 10 minuters
inaktivitet. Detta kan slås från i parameterinställningarna (”Auto off”/ ”Off”)!
13. Volym knapp
Med denna ratt kan du höja och sänka volymen för hela instrumentet.
10 SNABBGUIDE
Bassektionen
14. Basregisterknappar
Med dessa register kan du välja basljud.
Observera: Om man trycker på en av registerknapparna och håller den nere kan man
slå från sektionen. Genom att trycka på en av registerknapparna slås registret på igen.
15. Bas- och akkordknappar
Dessa 72 knappar är anslagskänsliga och kan också används till att spela trumljud
16. Bälg, motståndsregulator och luftknapp
Denna ratt ger dig möjlighet till att kunna reglera kraften som skall används till att
spela på instrumentet. Genom att trycka på knappen kan luften släppas ut ur bälgen.
17. Display
Displayen håller dig informerad om FR-1x inställningar och gör det lätt för dig att hitta
det du vill ställa in.
Bass control panel
V-Accordion
r
13
J
RIGHT HAND ORCHESTRA button
This button activates the orchestral section for the
right hand (treble). Press it together with the
[ORGAN] button to select the FR-1x’s demo function.
K
RIGHT HAND ORGAN button
This button activates the organ section for the right
hand (treble). Press it together with the [ORCHESTRA]
button to select the FR-1x’s demo function.
L
POWER button
Press this button to switch the V-Accordion on (the
button lights) and off (button dark).
NOTE
If you need to turn off the power completely (when using
the supplied AC adaptor), first turn off the [POWER] button,
then disconnect the AC adaptor’s plug from the wall outlet.
NOTE
With the factory settings, the FR-1x’s power will automati-
cally be switched off 10 minutes after you stop playing or
operating the FR-1x.
If the unit’s power has been turned off automatically, you
can use the [Power] switch to turn the unit back on again.
If you don’t want the power to turn off automatically,
change the “Auto Off” setting to “Off” as described on
page 55.
M
VOLUME knob
This knob allows you to set the V-Accordion’s overall
volume.
Bass control panel
N
Bass registers
These registers allow you to select the desired bass
sound.
NOTE
By pressing and holding any register, you can switch off
the Bass/Chord (or Free Bass) section. Press another register
to switch it back on.
O
Bass and chord buttons
These 72 buttons are used to play bass notes and
chords (they are velocity-sensitive). They also allow
you to play drum sounds.
P
Bellows resistance regulator and air button
This wheel allows you to specify the bellows’ inertia
(the force needed to push and pull it). See page 11.
By pressing it you can purge the air that still remains
in the bellows after playing.
Q
Display
The display keeps you informed about the FR-1x’s
status and helps you locate the functions you may
wish to set.
N
O
P
Q
FR-1x GB.book Page 13 Tuesday, November 8, 2011 11:44 AM
Bass control panel
V-Accordion
r
13
J
RIGHT HAND ORCHESTRA button
This button activates the orchestral section for the
right hand (treble). Press it together with the
[ORGAN] button to select the FR-1x’s demo function.
K
RIGHT HAND ORGAN button
This button activates the organ section for the right
hand (treble). Press it together with the [ORCHESTRA]
button to select the FR-1x’s demo function.
L
POWER button
Press this button to switch the V-Accordion on (the
button lights) and off (button dark).
NOTE
If you need to turn off the power completely (when using
the supplied AC adaptor), first turn off the [POWER] button,
then disconnect the AC adaptor’s plug from the wall outlet.
NOTE
With the factory settings, the FR-1x’s power will automati-
cally be switched off 10 minutes after you stop playing or
operating the FR-1x.
If the unit’s power has been turned off automatically, you
can use the [Power] switch to turn the unit back on again.
If you don’t want the power to turn off automatically,
change the “Auto Off” setting to “Off” as described on
page 55.
M
VOLUME knob
This knob allows you to set the V-Accordion’s overall
volume.
Bass control panel
N
Bass registers
These registers allow you to select the desired bass
sound.
NOTE
By pressing and holding any register, you can switch off
the Bass/Chord (or Free Bass) section. Press another register
to switch it back on.
O
Bass and chord buttons
These 72 buttons are used to play bass notes and
chords (they are velocity-sensitive). They also allow
you to play drum sounds.
P
Bellows resistance regulator and air button
This wheel allows you to specify the bellows’ inertia
(the force needed to push and pull it). See page 11.
By pressing it you can purge the air that still remains
in the bellows after playing.
Q
Display
The display keeps you informed about the FR-1x’s
status and helps you locate the functions you may
wish to set.
N
O
P
Q
FR-1x GB.book Page 13 Tuesday, November 8, 2011 11:44 AM
SNABBGUIDE 11
Batterilåda
18. Batterilåda
Här kan man installera 8 stycken laddningsbara batterier (AA-typ Ni-MH)
Anslutningar
19. DC IN-kontakt
Anslut den medföljande AC-strömförsörjningen (PSB-1U).
Observera: Använd bara den strömförsörjningen som följer med instrumentet. Andra
strömförsörjningar kan skada ditt instrument. Observera, att du kan använda 8 lad-
dningsbara batterier och spela med instrumentet utan strömförsörjningen.
20. MIDI OUT-kontakt
Denna kontakt kan skicka MIDI-information.
21. USB DATOR port
Denna port kan anslutas till din dators USB-port med en USB-kabel (extra tillbehör)
Panel descriptions
14
r
FR-1x V-Accordion
Battery compartment
Connection panel
S
DC IN socket
This is where you need to connect the supplied power
adapter (PSB-1U). Note that you can also purchase 8
rechargeable AA-type Ni-MH batteries and use the
FR-1x without the adapter.
T
MIDI OUT socket
This socket can be used to transmit MIDI data.
U
USB COMPUTER port
This port can be connected to one of your computer’s
USB ports (see p. 63). Please use a commercially
available USB cable.
V
OUTPUT L/MONO (TREBLE) & R/MONO (BASS)
sockets
These sockets can be connected to an amplifier, a
mixing console or a commercially available wireless
system. If you use both connectors, the FR-1x’s out-
put is stereo. In that case the signals of the Treble
section are transmitted to the L/MONO socket, while
the R/MONO socket transmits the bass (and chord)
signal. If you only use one jack (connected to the “L”
or “R” socket), the FR-1x’s output is mono.
NOTE
On the FR-1x, connecting jacks to these sockets does not
mute the internal speakers.
NOTE
Using these sockets and switching off the FR-1x’s speakers
(see “Speaker Mode” on p. 55) allows you to save battery
power.
W
PHONES socket
This is where you can connect stereo headphones
(Roland RH-series).
NOTE
Connecting a pair of headphones mutes the internal speak-
ers.
R
R
Battery compartment
This is where you install 8 commercially
available rechargeable AA-type Ni-MH
batteries (see p. 16).
T
S U V
W
FR-1x GB.book Page 14 Tuesday, November 8, 2011 11:44 AM
12 SNABBGUIDE
22. OUTPUT L/MONO (TREBLE) & R/MONO (BASS)-kontakter
Anslut dessa telekontakter till ingången på din förstärkare, om du önskar förstärka ditt
spel. När du ansluter 2 kablar, skickas diskantspelet ut ur TREBLE-utgången och bas-
spelet skickas ut ur BASS-utgången. Om du använder monosignal, skall du använda L/
MONO-kontakten eller R/MONO-kontakten.
Observera, att när du ansluter telekontakt till dessa kontakter på FR-1x bryts inte sig-
nalen till instrumentets högtalare. Om du önskar att spela utan de interna högtalarna i
FR-1x när du använder en extern förstärkare, så kan dessa slås från (se Speaker Mode
i den engelsk manualen sida 55.)
23. PHONES-kontakt
Instrumentet har en hörlursutgång. När du ansluter ett par hörlurar till denna kontakt,
bryts signalen till instrumentets högtalare, och du kan spela utan att störa andra.
SNABBGUIDE 13
FÖRBEREDELSER
FR-1x är ett elektroniskt instrument och kräver därför ström för att kunna spela. Man
kan ansluta instrumentet med den medföljande strömförsörjningen eller köpa 8
stycken laddningsbara batterier (AA-typ Ni-MH).
Anslutning till väggkontakt
1. Vrid ned [VOLYM] knappen (helt moturs till den lilla pricken)
2. Anslut strömkabeln till AC-adaptern (PSB-1U)
Indikatorlampan på adaptern lyser när strömmen sätts på.
3. Anslut adapter till FR-1x’s DC IN-kontakt.
4. Anslut ström och sätt på FR-1x [Power] knapp
Before you start playing
V-Accordion
r
15
5. Before you start playing
Getting ready to play
The FR-1x is an electronic instrument that requires
some form of electrical power. This chapter explains
how to power your FR-1x using the supplied adaptor or
8 commercially available rechargeable batteries (AA-
type Ni-MH). In addition, you will learn how to connect
your FR-1x to an external amplification system.
Connecting the AC adaptor
NOTE
To prevent malfunction and/or damage to speakers or other
devices, always turn down the volume, and turn off the
power on all devices before making any connections.
1.
Turn the [VOLUME] knob all the way
towards the small dot to minimize the vol-
ume.
2.
Connect the included power cord to the AC
adapter.
The indicator will light once you plug the AC adapter
into a wall outlet.
Place the AC adaptor so the side with the indicator
(see illustration) faces upwards and the side with tex-
tual information faces downwards.
NOTE
Depending on your region, the included power cord may
differ from the one shown above.
NOTE
Be sure to use only the AC adaptor supplied with the unit
(PSB-1U). Also, make sure the line voltage at the installa-
tion matches the input voltage specified on the AC adap-
tor’s body. Other AC adaptors may use a different polarity,
or be designed for a different voltage, so their use could
result in damage, malfunction, or electric shock.
3.
Connect the AC adaptor to the FR-1x’s DC
IN jack.
4.
Plug the power cord into a power outlet.
Now that the FR-1x is connected to a wall outlet, you
can continue with the section “Switching the power
on and off” on p. 21. To use the FR-1x with batteries,
see “Installing and removing batteries” on p. 16.
NOTE
If the FR-1x is to remain unused for an extended period of
time, unplug the adaptor.
NOTE
To prevent the inadvertent disruption of power to your unit
(should the plug be pulled out accidentally), and to avoid
applying undue stress to the AC adaptor jack, anchor the
power cord. See “Securing the adapter and/or MIDI cable”
on p. 20.
To the FR-1x’s DC IN connector
AC adaptor
Power cord
To a AC outlet
Indicator
To a wall outlet
FR-1x GB.book Page 15 Tuesday, November 8, 2011 11:44 AM
To the FR-1x’s DC IN connector
AC adaptor
Power cord
To a AC outlet
Indicator
14 SNABBGUIDE
Använd FR-1x med Batterier
FR-1x har möjlighet till att spela med batterier. Till detta skall du köpa 8 stycken. lad-
dningsbara batterier (AA-typ Ni-MH). Fråga din handlare om ytterligare information.
1. Stäng av FR-1x
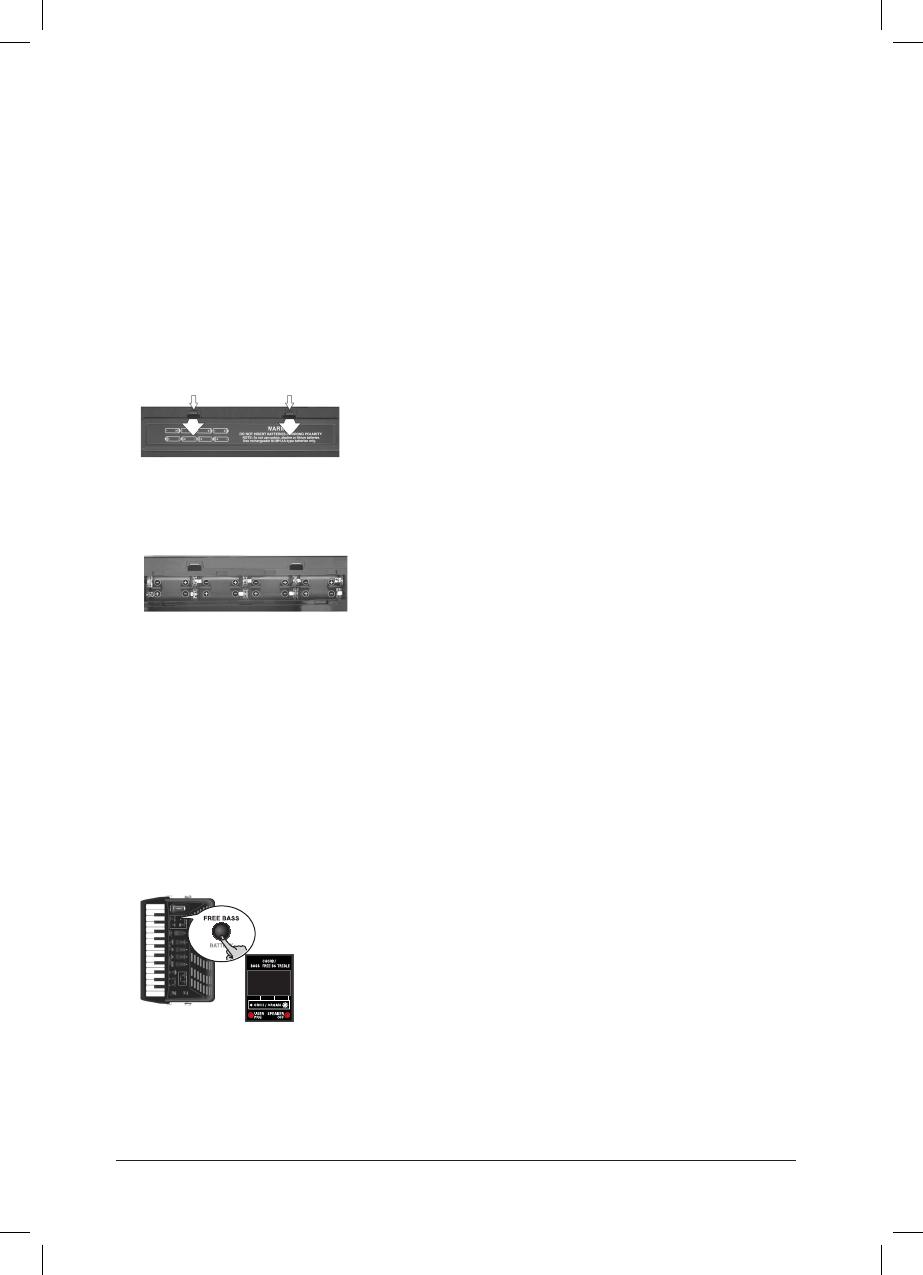
2. Ta bort batteriplattan på batterilådan genom att trycka på de 2 klämmorna
3. Sätt i 8 stycken laddningsbara batterier (AA-typ Ni-MH) enligt hänvisning till ”+” och
”-” markeringar
4. Montera locket på batterilådan
Batteri Status
Om, vid använd av batterier, displayen visar ”bAt”, så är batterierna slut och batte-
rierna skall bytas till nya fullt laddade batterier. Om meddelelandet ”bAt” blinkar är
batterierna nästan slut och man kan välja att byta till strömadapter eller nya batterier.
Det är också möjligt att kolla batterierna på följande sätt: Tryck och håll [FREE BASS]
(BATTERY) nere.
Before you start playing
16
r
FR-1x V-Accordion
Installing and removing batteries
The FR-1x has a compartment into which you can
install 8 commercially available AA-type Ni-MH batter-
ies (which are rechargeable). You can therefore play
your instrument without connecting the supplied
adaptor.
1.
Switch off the FR-1x.
2.
Remove the cover from the FR-1x’s battery
compartment by pressing the two tabs and
lifting the cover.
3.
Insert 8 rechargeable AA-type Ni-MH bat-
teries into the compartment (4 on either
side), taking care to orient them in accor-
dance with the “+” and “–” indications.
4.
Close the FR-1x’s battery compartment.
NOTE
Though it is perfectly possible to use rechargeable batter-
ies, be aware that they cannot be recharged simply by leav-
ing them in the FR-1x’s compartment and connecting the
adapter. You will need an external charging unit.
NOTE
When replacing batteries, be sure to insert them correctly
(ensure correct polarity).
NOTE
Remove the batteries whenever the FR-1x is to remain
unused for an extended period of time.
Battery charge indication
If, while using batteries, the “bAt” message appears in
the display, the remaining battery power is low.
Replace the batteries at your earliest convenience.
A flashing “bAt” message means that you need to
replace the batteries right away (or use the supplied
adaptor).
The FR-1x also allows you to check the remaining
battery charge at any time:
1.
Press and hold the [FREE BASS] (BATTERY)
button.
The FR-1x’s display now shows the battery status.
“ooo” means that the charge is still at the maximum
level, “oo” refers to a medium level, and “o” to a low
charge level. If the “o” starts flashing, you need to
replace or recharge the batteries. If the message
“AdP” is displayed, the FR-1x is powered by the sup-
plied adaptor.
NOTE
The battery charge indication is only an approximation.
Battery duration
New or fully charged batteries should last about 8
hours (for 2000mAh Ni-MH batteries) during contin-
uous operation while the internal speakers are off
(see “Speaker Mode” on p. 55), or 5 hours while the
speakers are on.
NOTE
Actual battery life varies according to usage conditions, the
quality of the batteries and the number of charging cycles.
NOTE
While the adaptor is connected to the DC IN socket with-
out being connected to a wall outlet, the FR-1x cannot be
switched on, regardless of whether or not it contains bat-
teries.
Note about rechargeable batteries
Certain batteries can be recharged several times
before they need to be replaced with new ones. Note
that it is normal for the batteries to last increasingly
shorter as time goes by. At the end of their life cycle,
they may only last one hour, for example. But that is
a gradual process.
NOTE
Though it is perfectly possible to use rechargeable batter-
ies, be aware that they cannot be recharged simply by leav-
ing them in the FR-1x’s compartment and connecting the
adapter. You will need an external charging unit.
NOTE
We recommend using rechargeable AA-type Ni-MH batter-
ies.
ooo
FR-1x GB.book Page 16 Tuesday, November 8, 2011 11:44 AM
SNABBGUIDE 15
ooo” betyder full kapacitet, ”oo” betyder medium kapacitet. Om ”o” betyder det låg
kapacitet. Om ”o” blinkar så skall batterierna bytas.
Förväntad speltid med högtalare (2000mAh Ni-MH batterier) är cirka 5 timmar.
Batterier kan inte laddas när de sitter i FR-1x
Lyssna till demolåtar
FR-1x innehåller olika demolåtar, som ger en uppfattning av de många fantastiska
dragspel och de många möjligheter som instrumentet innehåller och kan ge dig inspi-
ration.
1. Sätt på FR-1x
2. Tryck samtidigt på [ORCHESTRA] och [ORGAN] tills displayen visar följande:
Uppspelning startar automatisk med den förste demolåten
3. Använd diskantregisterknapp [1] och [2] till att välja demolåt.
Följande demolåtar är tillgängliga:
4. Tryck på [ORCHESTRA] och [ORGAN] för att gå ifrån uppspelning av demolåtar.
Listening to the demo songs
V-Accordion
r
23
6. Listening to the demo songs
The FR-1x contains several demo songs. Here is how to play back those demo songs and fully appreciate the sounds con-
tained in the FR-1x.
1.
Switch on the FR-1x.
See “Switching the power on and off” on p. 21.
2.
Simultaneously press the [ORCHESTRA] and
[ORGAN] buttons until the display looks as
follows:
Playback starts automatically with the first demo
song (there are 8 demo songs in all). At the end of the
first song, the FR-1x starts playing songs “2”, “3” etc.
You can also directly jump to the song you’re inter-
ested in:
3.
Use treble registers [1] and [2] (VALUE
®) to select the demo song you want to
listen to.
4.
Use the [VOLUME] knob to change the vol-
ume if it is too loud or too soft.
5.
Press [ORCHESTRA] and [ORGAN] again to
leave demo song mode.
NOTE
During demo song playback, the FR-1x’s keyboards cannot
be used.
NOTE
No data for the music that is played back will be output
from the MIDI OUT socket or USB COMPUTER port.
The following demo songs are available:
NOTE
All rights reserved. Unauthorized use of this material for purposes other than private, personal enjoyment is a violation of applicable
laws.
d01
No. Song title Performed by
1 Forro de Janeiro Ludovic Beier
2 Tango Dancers Ludovic Beier
3 Sax on the Phone Ludovic Beier
4 Sotto i ponti della Senna Ludovic Beier
5 Funky Night Ludovic Beier
6 Passionate Red Rose Sergio Scappini
7 Carnival in Venice (traditional) Sergio Scappini
8 Sonata in C Maj. by D. Scarlatti Sergio Scappini
FR-1x GB.book Page 23 Tuesday, November 8, 2011 11:44 AM
16 SNABBGUIDE
BYT MELLAN SET
FR-1x innehåller 16 Sets (16 dragspel). Vart dragspel har 14 diskantregister, 7 bas/ack-
ordregister, o.s.v..
FR-1x innehåller 16 olika Sets (kompletta dragspel)
Dessa är uppdelade i 4 ”familjer” (CLASSIC, JAZZ, WORLD och USER).
USER familjen kan bytas mot andra dragspel genom att läsa in User Sets från USB-
minne.
Varje Set-familj innehåller 4 kompletta dragspel, vart och ett med 14 diskantregister
och 7 basregister.
Using Sets
24
r
FR-1x V-Accordion
7. Using Sets
The FR-1x is a “virtual” accordion. It recreates the sounds of various accordion instruments and can even generate
orchestral sounds (like trumpet, flute, etc.), organ and drum sounds.
Recalling a Set is similar to switching to a different
accordion.
The FR-1x contains 16 Sets divided over 4 families. All
Set families have been programmed at the factory
(“CLASSIC”, “JAZZ”, “WORLD” and “USER”, see the leg-
ends above the treble registers). The “USER” family can
be used to load User Sets from an optional USB mem-
ory.
Each Set family comprises 4 Sets (see below). Recalling
a Set immediately changes the settings of the sections
presented on p. 26 and configures the treble and bass
registers.
Selecting Sets
To select the desired Set, proceed as follows:
1.
Press the [SET] register.
The number of the selected Set flashes in the display.
The first digit from the left refers to the Set family,
the second to the Set memory within that family. If,
after pressing [SET] once, you do not press a treble
register, the display returns to the main page after a
while.
In that case, press [SET] again and proceed with step
2.
NOTE
If you hold down [SET] for more than 2 seconds without
pressing another register, the FR-1x switches to PARAME-
TER mode. In that case, press [SET] again to leave that
mode, then repeat step (1).
2.
Press one of the treble registers [1]~[4] to
select the Set family.
Set selection is handled in the following way:
If the Set family you select is the same as the one you
have been using so far, the FR-1x selects the next Set
within that family.
Example: Pressing [1] CLASSIC while the display
shows “11” selects Set memory “12” (still within the
“CLASSIC” family).
Treble register
[1] CLASSIC [2] JAZZ
11 Concerto
12 Classic
13 Bajan
14 “I” Scala
21 Jazz
22 FJazz
23 Bandoneon
24 Studio
Treble register
[3] WORLD [4] USER
31 “I” Folk
32 “F” Folk
33 “D” Folk
34 “SP” Folk
U1 Alpine
U2 Cajun
U3 Tex Mex
U4 Scottish
Treble
1~14
Bass & Chord
1~7
Orchestra
1~16
Orch. Bass
1~7
Orch. Chord
1~7
Orch FB
1~7
Free Bass
1~7
User Set 16
Set 3
Set 2
Set 1
GLOBAL
Metronome
Reverb
Chorus
Level
Touch
::
Organ
1~4
Most of these set-
tings can be saved.
11
12
FR-1x GB.book Page 24 Tuesday, November 8, 2011 11:44 AM
SNABBGUIDE 17
Välj Set (dragspel)
Vill du byta till ett annat dragspel, gör följande:
1. Tryck på [SET] knapp (kort tryck)
Numret för valt Set blinkar i displayen
2. Tryck på en av de fyra diskantregisterknapparna [1]~ [4] för att välja Set familj
(upprepade tryck på registerknappen väljer nästa dragspel i vald grupp)
Exempel:
Om man önskar att välja 23 Bandoneon (se schema för Treble register)
1. Tryck på [SET] knappen, snabbt följt av 2 tryck på register 2 knappen.
Using Sets
24
r
FR-1x V-Accordion
7. Using Sets
The FR-1x is a “virtual” accordion. It recreates the sounds of various accordion instruments and can even generate
orchestral sounds (like trumpet, flute, etc.), organ and drum sounds.
Recalling a Set is similar to switching to a different
accordion.
The FR-1x contains 16 Sets divided over 4 families. All
Set families have been programmed at the factory
(“CLASSIC”, “JAZZ”, “WORLD” and “USER”, see the leg-
ends above the treble registers). The “USER” family can
be used to load User Sets from an optional USB mem-
ory.
Each Set family comprises 4 Sets (see below). Recalling
a Set immediately changes the settings of the sections
presented on p. 26 and configures the treble and bass
registers.
Selecting Sets
To select the desired Set, proceed as follows:
1.
Press the [SET] register.
The number of the selected Set flashes in the display.
The first digit from the left refers to the Set family,
the second to the Set memory within that family. If,
after pressing [SET] once, you do not press a treble
register, the display returns to the main page after a
while.
In that case, press [SET] again and proceed with step
2.
NOTE
If you hold down [SET] for more than 2 seconds without
pressing another register, the FR-1x switches to PARAME-
TER mode. In that case, press [SET] again to leave that
mode, then repeat step (1).
2.
Press one of the treble registers [1]~[4] to
select the Set family.
Set selection is handled in the following way:
If the Set family you select is the same as the one you
have been using so far, the FR-1x selects the next Set
within that family.
Example: Pressing [1] CLASSIC while the display
shows “11” selects Set memory “12” (still within the
“CLASSIC” family).
Treble register
[1] CLASSIC [2] JAZZ
11 Concerto
12 Classic
13 Bajan
14 “I” Scala
21 Jazz
22 FJazz
23 Bandoneon
24 Studio
Treble register
[3] WORLD [4] USER
31 “I” Folk
32 “F” Folk
33 “D” Folk
34 “SP” Folk
U1 Alpine
U2 Cajun
U3 Tex Mex
U4 Scottish
Treble
1~14
Bass & Chord
1~7
Orchestra
1~16
Orch. Bass
1~7
Orch. Chord
1~7
Orch FB
1~7
Free Bass
1~7
User Set 16
Set 3
Set 2
Set 1
GLOBAL
Metronome
Reverb
Chorus
Level
Touch
::
Organ
1~4
Most of these set-
tings can be saved.
11
12
FR-1x GB.book Page 24 Tuesday, November 8, 2011 11:44 AM
18 SNABBGUIDE
BYT LJUD MED REGISTERKNAPPARNA
Diskantsektionen
1. Tryck på en av registerknapparna ([1]~ [4]) för att välja önskat ljud.
Displayens siffror, längst till höger, visar vilket registernummer som väljs.
Dent lilla punkten till höger om siffrorna under ”TREBLE” indikerar följande:
Avstängd: Du spelar med dragspelsljud.
Tänd: Du spelar med orkesterljud.
Blinkar: Du spelar med orgelljud.
Spela några toner i diskantdelen. (Glöm inte att dra i bälgen!)
Du har möjlighet att välja mellan 14 register, även om det bara finns 4 registerknap-
par. Detta görs på följande sätt:
1. Tryck på registerknapp [1]~[3] upprepade gånger för att byta mellan de fyra ljuden
(a~d, se nedanstående tabell). Register [4] ger möjlighet till 2 olika ljud (a och b)
Exempel: Önskar du att byta från ljud 1a (Bassoon) till 1c (Cello), så trycker du två
gånger på registerknapp [1].
Selecting and playing sounds
26
r
FR-1x V-Accordion
8. Selecting and playing sounds
Treble section
The treble section can be played
using the 26-key “piano” keyboard
or the 62 treble buttons.
The sound it produces is deter-
mined by the treble register [1]~
[4] you pressed last. This section
can be used to play accordion,
orchestral and organ sounds.
Selecting sounds for the right hand
This section explains how to select accordion, orchestral
and organ sounds for the treble section (right hand). On
p. 27, you will learn how to combine accordion notes
with an orchestral or organ sound.
Sounds are selected using treble registers [1]~[4]. To
select an orchestral or organ sound, you first need to
press the [ORCHESTRA] or [ORGAN] button, and then a
treble register.
1.
Switch on the FR-1x.
See “Switching the power on and off” on p. 21.
2.
If you wish to select a treble accordion reg-
ister, skip to step 4.
NOTE
After switching on the FR-1x, the treble registers select
accordion sounds.
3.
Press the [ORCHESTRA] or [ORGAN] button
to activate the orchestral or organ section.
(If you press [ORCHESTRA] or [ORGAN] again at this
stage, the treble registers once again allow you to
select accordion sounds.)
The number of the last sound you selected for that
group (orchestra or organ) is indicated by the right-
most digit in the display.
In some cases, the display shows a dot to the right of
the treble register number. Here is what that means:
4.
Press one of the treble registers ([1]~[4]) to
select the desired sound.
The rightmost digit in the display changes and indi-
cates the number of the sound you have just
selected.
5.
Play a few notes to audition the sound
(accordion, orchestral or organ).
Do not forget to move the bellows in order to hear
the notes you are playing.
If you did not select the correct sound family, return
to step 3.
Additional information about the accordion
section
The FR-1x allows you to select among 14 accordion
sounds (even though there are only 4 treble registers).
Pressing register [1], [2] or [3] repeatedly selects one of
the four available sounds (a~d, see the table below).
Register [4] provides access to two sounds (a and b).
The following accordion sounds are available:
Example: To go from sound “1a” to sound “1c”, you
need to press treble register [1] twice.
Dot status Explanation
Dark You are using an accordion sound.
Lit You are using an orchestral sound.
Flashes You are using an organ sound.
Treble registers
1 2 3 4
a
Bassoon Master
Clarinet Piccolo
b
Bandon Organ Musette
Oboe
c
Cello Accord Celeste
d
Harmon
Violin Tremolo
223
.
FR-1x GB.book Page 26 Tuesday, November 8, 2011 11:44 AM
SNABBGUIDE 19
Bassektionen
Du har möjlighet att välja mellan 7 register, även om det bara finns 3 registerknappar.
1. Tryck på en av de 3 registerknapparna i bassektionen för att välja önskat ljud.
Displayen visar det valda registernumret i displayen under BASS” och CHORD/FREE
BASS”
Följande dragspelsljud kan väljas genom att trycka upprepade gånger på register-
knappen:
Registerknapp 1 och 2 ger möjlighet att byta mellan 2 olika ljud och Register 3 har 3
olika registreringar (totalt 7 register).
Selecting orchestral sounds for the left hand
V-Accordion
r
29
1.
Switch on the FR-1x.
See “Switching the power on and off” on p. 21.
NOTE
After switching on the FR-1x, the bass registers select
accordion sounds.
2.
Press one of the 3 bass registers (1~3) to
select the desired sound.
The display shows the number of the selected sound
in the “BASS” and “CHORD/FREE BS” columns.
This choice always applies to both the bass and the
chord rows. The following accordion sounds can be
selected for the bass and chord buttons:
Note that registers “1” and “2” allow you to select
two sounds, while register “3” provides access to
three sounds. You may therefore have to press the
register in question repeatedly.
Selecting orchestral sounds for the left hand
Here is how to select an orchestral sound for the left
hand. While the bass and chord accordion sections
always use the same accordion sound, orchestral
sounds can be assigned to only the bass buttons, only
the chord buttons, or both (in which case you can select
different orchestral sounds for the bass and chord
rows).
1.
Switch on the FR-1x.
See “Switching the power on and off” on p. 21.
2.
Do one of the following:
•To select an orchestral sound for the
bass rows
,
press the ORCHESTRAL [BASS] button.
NOTE
If you prefer to assign an accordion sound to the bass rows
(bass section) at this stage, again press the [BASS] button.
•To select an orchestral sound for the
chord rows
,
press the ORCHESTRAL [CHORD/FREE BASS] button.
The last sound you selected for the section in ques-
tion is recalled and its number is displayed in the
“BASS” (left) or “CHORD/FREE BS” (middle) column of
the display.
If you select an orchestral sound, the digit in ques-
tion is displayed with a dot to its right:
NOTE
If you prefer to assign an accordion sound to the chord
rows (chord section) at this stage, again press the [CHORD/
FREE BASS] button.
3.
Press one of the 3 bass registers to select
the desired sound.
The display shows the number of the selected orches-
tral sound in the “BASS” or “CHORD/FREE BS” column
(see the examples above).
The following sounds can be selected for the bass or
chord buttons:
Bass & chord registers
1 2 3
a
8’/4’/2’
16’/8’/8-4’/4’/2’
16’/2’
b
8-4’
16’/8’/8-4’
4’
c—
2’
Orchestral bass sounds ‰ [BASS]
1 2 3
a Acoustic Bowed* Tuba Mix
bFingered Jazz Pedal VTW* Tuba*
c Fretless
Orchestral chord sounds ‰ [CHORD/FREE BASS]
1 2 3
aSt. Strings* Jazz VTW* Steel Gtr
b Jazz Doos* R&B VTW* Ac Guitar
c— Ac Piano
443
423
.
The bass and chord buttons use an
accordion sound (no dots).
The bass buttons use an accordion
sound (no dot). The chord buttons
use an orchestral sound (dot).
[3] [2] [1]
FR-1x_1_GB.fm Page 29 Tuesday, November 8, 2011 12:02 PM
20 SNABBGUIDE
SPELA MED ORKESTERLJUD I
DISKANTSEKTIONEN
1. Tryck på [ORCHESTRA] eller [ORGAN] knappen för att välja orkester- eller orgelsektio-
nen.
2. Tryck på en av registerknapparna [1]~[4] upprepande gånger för att byta mellan de
fyra ljuden (a~d, se nedanstående tabell).
OBS: Ljud i tabellen som är märkta med ”*” kan bara kontrolleras med hjälp av
bälgen. Ljud märkta ”**” kan kontrollares både med bälgen, men också av anslaget
på tangenten. De resterande ljuden är anslagsbestämda.
Väljs [ORGAN] kan man välja mellan fyra ljud [1]~[4]. Trycks registerknappen ned en
gång till så kan man byta mellan Rotary effekt (snabb ”FSt och långsam ”SLo” effekt).
Du kan välja mellan följande orgelljud:
SOLO och DUAL
Orkester- eller orgelljuden kan användas som Solo ljud (enbart orkesterljud) men kan
också blandas med diskantdragspelsljuden:
1. Välj ett dragspels-, orkester- eller orgelljud
2. Håll [SET] knappen nere och tryck på register [4] (DUAL/SOLO) för att
byta mellan SOLO (bara orkesterljud) eller DUAL.
Additional information about the orchestral section
V-Accordion
r
27
When you select Set 32, “F Folk”, the footages change
as follows:
Additional information about the orchestral
section
The [ORCHESTRA] button allows you to use treble regis-
ters [1]~[4] to select from among 16 different orches-
tral sounds:
Each time you press a treble register [1]~[4], you select
the next sound (always starting from “a” the first time
the register is pressed).
Example: To go from sound “2a” to sound “2d”, you
need to press treble register [2] three times.
NOTE
The dynamics of sounds marked with an asterisk (*) can
only be controlled by bellows movements. Those sounds are
not velocity sensitive. The dynamics of sounds marked with
a double asterisk (**) can be controlled by bellows move-
ments and playing velocity. For the other sounds, see also
“Orchestra Bass/Chord Touch” on p. 48.
Additional information about the organ sounds
and the Rotary effect (organ section)
The FR-1x allows you to recall 4 organ sounds with tre-
ble registers [1]~[4].
Pressing the register of the selected organ sound again
allows you to switch between the slow (“SLo”) and fast
(“FSt”) speeds of the Rotary effect. The display briefly
shows which one is selected.
The FR-1x contains the following organ sounds:
NOTE
The organ sounds can only be controlled with bellows
movements.
Switching off the treble section
1.
To switch off the treble section, press and
hold any single register ([1]~[4]) for a while.
The section in question must be assigned to the reg-
isters. See above for how to decide which section can
be muted.
2.
To switch the treble section back on, briefly
press any of its registers.
NOTE
This only switches off the section that is currently selected.
Remember that the treble section can control both an
accordion and an orchestral or organ sound. While in
Orchestra mode, you thus only switch off (or activate) the
orchestral/organ section. And while in accordion mode, you
only switch off the treble accordion section.
NOTE
Even if you switch off the treble section, it still transmits
MIDI messages.
SOLO and DUAL
The orchestral or organ sound assigned to the treble
section can be played in isolation or together with the
treble accordion sound.
1.
Select an orchestral or organ sound.
See “Selecting sounds for the right hand” on p. 26.
2.
Hold down the [SET] register and press tre-
ble register [4] (DUAL/SOLO) to alternate
between DUAL and SOLO modes.
NOTE
If you hold down [SET] for more than 2 seconds without
pressing another register, the FR-1x switches to PARAME-
TER mode. In that case, press [SET] again to leave that
mode, then repeat step (1) above.
Treble registers (“F Folk” set)
1 ENSEMBLE 2 BRASS
a
Basson Tsigane
b
JazzA Concerto
c
ArnoldX 4 Voix
d
JazzX! Violon
3 WIND 4 PIANO/GUITAR
a
SW Valse Piccolo
b
Star 10 Mr Gus
c
Pro 8M
d
SOS Musette
Treble registers (ORCHESTRA)
1 ENSEMBLE 2 BRASS 3 WIND
4 PIANO/
GUITAR
aStrings* Twin Trump* Flute 1* Ac Piano
b Jazz Scat 1** Trombone* Tenor Sax 2* Ac Guitar
c Jazz Doos* French Horn* Clarinet 1* Mandolin
d Str &Choir* Brass* Oboe* HarpsStr
Treble registers (ORGAN)
1 2 3 4
Jazz Latin HousPerc Theatre
PIANO/GUITAR
FR-1x GB.book Page 27 Tuesday, November 8, 2011 11:44 AM
  • Page 1 1
  • Page 2 2
  • Page 3 3
  • Page 4 4
  • Page 5 5
  • Page 6 6
  • Page 7 7
  • Page 8 8
  • Page 9 9
  • Page 10 10
  • Page 11 11
  • Page 12 12
  • Page 13 13
  • Page 14 14
  • Page 15 15
  • Page 16 16
  • Page 17 17
  • Page 18 18
  • Page 19 19
  • Page 20 20
  • Page 21 21
  • Page 22 22
  • Page 23 23
  • Page 24 24
  • Page 25 25
  • Page 26 26
  • Page 27 27
  • Page 28 28
  • Page 29 29
  • Page 30 30
  • Page 31 31
  • Page 32 32
  • Page 33 33
  • Page 34 34
  • Page 35 35
  • Page 36 36
  • Page 37 37
  • Page 38 38
  • Page 39 39
  • Page 40 40

Roland FR-1x User guide

Category
Musical Instruments
Type
User guide
This manual is also suitable for

Ask a question and I''ll find the answer in the document

Finding information in a document is now easier with AI

in other languages