Page is loading ...

*One cup equals approximately 5 oz. (varies by brewing technique)
*Una taza equivale a aproximadamente 5 onzas. (varía de acuerdo al método de preparación utilizado)
*Une tasse équivaut à environ 115 g (5 oz; varie selon la technique de brassage)
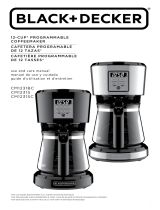
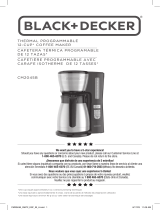
12-CUP* PROGRAMMABLE
COFFEEMAKER
CAFETERA PROGRAMABLE
DE 12 TAZAS*
CAFETIÈRE PROGRAMMABLE
DE 12 TASSES*
use and care manual
manual de uso y cuidado
guide d’utilisation et d’entretien
CM1331BS
CM1331BSC
CM1331S
We want you to have a 5-star experience!
Should you have any questions or concerns about your new product, please call our Customer Service
Line at 1-800-465-6070 (U.S. and Canada). Please do not return to the store.
¡Deseamos que disfrute de una experiencia de 5 estrellas!
Si usted tiene alguna inquietud o pregunta con su producto, por favor llame a nuestra línea de servicio al
cliente una atención inmediata 1-800-465-6070 (EE.UU/Canadá) 01-800-714-2503 (México). No devuela
a la tienda.
Nous voulons que vous ayez une expérience 5 étoiles!
Si vous avez des questions ou des préoccupations à propos de votre nouveau produit, veuillez
communiquer avec notre Service à la clientèle au 1 800 465-6070 (États-Unis et Canada). Veuillez ne
pas rapporter le produit au magasin.

2
WARNING
RISK OF FIRE OR ELECTRIC SHOCK. DO NOT OPEN.
The lightning symbol refers to “dangerous voltage”; the exclamation symbol refers
to maintenance instructions. See below.
Warning: To reduce the risk of fire or electric shock, do not remove the cover of the
coffeemaker. There are no user-serviceable parts inside. Repair should be done by
authorized service personnel only.
WELCOME!
Congratulations on your purchase of the Black+Decker™ 12-Cup Programmable
Coffeemaker. We have developed this guide to ensure optimal product
performance and your complete satisfaction. Save this use and care manual
and be sure to register your appliance online at www.prodprotect.com/
blackanddecker.
CONTENTS
SAVE THESE INSTRUCTIONS.
This product is for household use only.
IMPORTANT SAFEGUARDS ........................................... 3
GETTING TO KNOW YOUR COFFEEMAKER.............................. 4
GETTING STARTED ................................................. 5
SETTING THE CLOCK ............................................... 5
BREW STRENGTH SELECTION ........................................ 5
KEEP WARM....................................................... 5
BREWING COFFEE ................................................. 6
SNEAK-A-CUP
TM
FEATURE ........................................... 6
AUTO BREW (BREW LATER) ......................................... 7
CARE AND CLEANING .............................................. 7
AUTO CLEAN
®
SYSTEM .............................................. 8
TROUBLESHOOTING ............................................... 9
WARRANTY AND CUSTOMER SERVICE INFORMATION ....................10

3
POLARIZED PLUG (120V models only)
This appliance has a polarized plug
(one blade is wider than the other). To
reduce the risk of electric shock, this
plug is intended to fit into a polarized
outlet only one way. If the plug does not
fit fully into the outlet, reverse the plug.
If it still does not fit, contact a qualified
electrician. Do not attempt to modify the
plug in any way.
TAMPER-RESISTANT SCREW
Warning: This appliance is equipped
with a tamper-resistant screw to prevent
removal of the outer cover. To reduce
the risk of fire or electric shock, do not
attempt to remove the outer cover.
There are no user-serviceable parts
inside. Repair should be done only by
authorized service personnel.
ELECTRICAL CORD
a) A short power-supply cord is provided
to reduce the risks resulting from
becoming entangled in or tripping
over a longer cord.
b) Extension cords are available and may
be used if care is exercised in their use.
c) If an extension cord is used:
1) The marked electrical rating of the
extension cord should be at least as
great as the electrical rating of the
appliance;
2) If the appliance is of the grounded
type, the extension cord should be
a grounding-type 3-wire cord; and
3) The cord should be arranged
so that it will not drape over the
counter top or tabletop where it
can be pulled on by children or
tripped over.
Note: If the power cord is damaged,
please contact the warranty department
listed in these instructions.
• Read all instructions.
• Do not touch hot surfaces. Use handles or knobs.
• To protect against fire, electric shock and injury to
persons do not immerse cord, plugs or appliance in
water or other liquid.
• Close supervision is necessary when any appliance
is used by or near children.
• Unplug from outlet when either the appliance or
display clock is not in use, and before cleaning. Allow
to cool before putting on or taking off parts, and
before cleaning the appliance.
• Do not operate any appliance with a damaged cord
or plug, or after the appliance malfunctions or has
been damaged in any manner. Contact Consumer
Support at the number listed in this manual.
• The use of accessory attachments not
recommended by the appliance manufacturer may
result in fire, electric shock or injury to persons.
• Do not use outdoors.
• Do not let cord hang over edge of table or counter,
or touch hot surfaces.
• Do not place on or near a hot gas or electric
burner, or in a heated oven.
• To disconnect, press the Start/Power button
to
turn the appliance off, then remove plug from wall
outlet.
• Do not use this appliance for other than
intended use.
• Keep lid on the carafe when in use.
• Scalding may occur if the lid is removed during the
brewing cycles.
• The carafe is designed for use with this appliance.
It must never be used on a range top.
• Do not set a hot carafe on a wet or cold surface.
• Do not use a cracked carafe or a carafe having a
loose or weakened handle.
• Do not clean carafe with cleansers, steel wool pads
or other abrasive material.
• This appliance is not intended for use by persons
(including children) with reduced physical, sensory
or mental capabilities, or lack of experience
and knowledge, unless they have been given
supervision or instruction concerning use of the
appliance by a person responsible for their safety.
• Children should be supervised to ensure that they
do not play with the appliance.
Please Read and Save this Use and Care Book.
IMPORTANT SAFEGUARDS.
When using electrical appliances, basic safety precautions should always be followed to
reduce the risk of fire, electric shock, and/or injury, including the following:
SAVE THESE INSTRUCTIONS.
This product is for household use only.

4
GETTING TO KNOW YOUR
COFFEE MAKER
1. Cover
2. Vortex Showerhead
3. Water reservoir
4. Removable filter basket
(Part # CM1331-01) (not shown)
5. Digital display
6. Control panel
7. Sneak-A-Cup™ interrupt feature
8. 12 cup perfect-pour carafe with lid
(Part # CM1331-02)
9. Nonstick “Keep hot” carafe plate
10. Built-in cord storage (not shown)
11. Water level markings
Product may vary slightly from what is illustrated.

5
HOW TO USE
This product is for household use only.
GETTING STARTED
• Remove all packing material, any stickers, and the plastic band around the
power plug.
• Go to www.prodprotect.com/blackanddecker to register your product.
• Wash removable parts as instructed in CARE AND CLEANING.
• Pour fresh cold water up to 12-cup level mark into the water reservoir.
• Place basket-style paper filter into removable filter basket. Place basket into
filter basket holder. Make sure the word “Back” is towards the back of the unit.
• Plug cord into standard electrical outlet.
• Brew water through appliance without adding coffee grounds.
We recommend filtered water.
• Discard water from the carafe and paper filter from filter basket.
• Turn off appliance; unplug and allow to cool down.
SETTING THE CLOCK
1. Plug appliance into standard electrical outlet.
2. The digital clock display flashes “12:00”.
3. To change the time: Press HOUR button until
the correct time appears on the display. When
the time passes noon the light next to the PM
illuminates to let you know you are in PM time. If
the PM light is not illuminated, it is AM time.
4. Press the MIN button to select the minutes. The “:”
will remain blinking. Pressing and holding the HOUR
or MIN button will activate a rapid time advance.
Note:
If the appliance is unplugged or power is interrupted even momentarily, the
time may need to be reset.
BREW STRENGTH SELECTION
You may choose between regular or strongly flavored coffee to suit your personal
taste. If you press the STRONG button; the light goes on and the brewing process
slows to extract the maximum flavor from the coffee grounds. Regular strength is
indicated by the STRONG light being off.
KEEP WARM
You may select how long you wish for the heated carafe plate keep coffee warm
after brewing. The default is 120 minutes.
1. Press KEEP WARM button until your preference is shown. The button cycles
through 30, 60, 90, 120 minutes or OFF.
2. Coffee Maker will turn off once keep warm timer has expired.

6
BREWING COFFEE
1. Open cover.
2. Fill water reservoir with desired amount of water. The 12 Cup line represents a
full carafe of coffee. Do not fill reservoir past this 12 Cup (maximum) line.
Note:
Use spring water or filtered water. Distilled water lacks the minerals
necessary to bind to elements of coffee.
3. Place an 8-12 cup basket-style paper filter into the removable filter basket.
4. Add desired amount of ground coffee. Close cover.
5. Make sure carafe lid is properly attached to the empty carafe. Close the lid.
Note:
Coffee may overflow if carafe lid is not properly placed.
6. Place empty carafe on the carafe plate.
7. If not already plugged in, plug power cord into an outlet.
8. If regular brew strength is desired, your coffeemaker is set to brew coffee.
9. If strong coffee is desired, press the STRONG button once to select the strong
brew. The light next to the STRONG button illuminates.
10. Press the Start/Power button
, and brewing begins. The button illuminates.
11. Once coffee grounds have cooled, carefully open cover and discard used
grounds. Close cover.
12. The coffeemaker will keep brewed coffee hot for how long is selected with the
Keep Warm feature. Then the coffeemaker automatically turns off.
To turn off the coffeemaker at any time press the Start/Power button
. The Start/
Power button
light goes off. Unplug appliance when not in use.
SNEAK-A-CUP™ FEATURE
Remove the carafe and brewing will pause. The carafe must be placed back on the
carafe plate in 30 seconds to prevent overflow. Brewing will begin again.

7
AUTO BREW
1. Make sure clock has been set to correct time of day.
2. Follow steps 1 through 9 under BREWING COFFEE.
3. Press the BREW LATER button.
4. The digital clock will flash 12:00.
Note
: If the coffeemaker has not been unplugged, the last programmed brewing
time will appear on the digital display.
5. To change the time: press HOUR button until the desired correct time appears
on the display. Press the MIN button to select the minutes.
6. Delayed brewing is activated after 3 seconds with no button press. The light in
the BREW LATER button will illuminate.
7. To check the preset auto time, press BREW LATER button. The delayed
brewing time will flash for three seconds. Then the clock time will display again.
8. To change the delayed brew time, follow steps 1-5.
Note
: To brew immediately and cancel AUTO BREW, press the button.
If you don’t want to brew then, immediately press the button again to turn off
the coffeemaker. The
button light goes off.
CARE AND CLEANING
This product contains no user serviceable parts. Refer service to qualified
service personnel.
CLEANING
• Be sure the unit is unplugged and has cooled.
• Open the cover.
• To remove the filter basket, grip the handle and lift straight up. Discard the
paper filter and the coffee grounds.
• Wash the filter basket, carafe and carafe lid in the top rack of the
dishwasher or wash by hand with hot water and soap.
• Wipe the appliance’s exterior surface, control panel and carafe plate with
a soft damp cloth. Do not use abrasive cleansers or scouring pads. Never
immerse the coffeemaker in water.
• To clean the inside of the cover, open the cover and leave in the open
position. Wipe surfaces with a damp cloth.

8
Coffee
Freshness
AUTO CLEAN™ SYSTEM
De-scaling With Auto Clean™
Over time, calcium deposits or “scale” may build up in your brewer. Scale is
non-toxic but if left unattended can hinder brewer performance and cause
premature failure. Regularly de-scaling your brewer helps to maintain quality
coffee as well as the lifespan of the heating element, and other internal parts
that come in contact with water throughout the brew process.
To make the de-scaling process as effortless as possible, an Auto Clean
system has been programmed into your coffeemaker.
When should I use Auto Clean?
After every 60 brews, “CL” will be displayed and blink. This notifies you it is
time to run the Auto Clean system. “CL” will be displayed until you run the
Auto Clean system. If you would like to clean your coffeemaker prior to 60
brew cycles, you may do so by following the steps below.
Please note: If the unit is unplugged, the counter that keeps track of
reminding you to clean your coffeemaker will reset to 0.
If you have unplugged the coffeemaker, or if there have been power
outages, we recommend cleaning the unit once a month.
How do I use Auto Clean?
Follow the simple steps below. Your coffeemaker will take care of the rest.
1. Combine 6 cups of white vinegar and 4 cups of cold water in carafe.
We recommend filtered water.
2. Pour into water reservoir.
3. Place an 8 to 12 cup basket style paper filter in the removable filter
basket. Insert filter basket into filter basket holder and close cover.
4. Make sure the lid of the carafe is in place and place empty carafe on
the carafe plate.
5. Plug power cord into an outlet.
6. Press CLEAN to activate cleaning cycle; “CL” is displayed and the
Start/Power button
illuminates. The word, “CLEAN” scrolls across the
display.
7. Part of the mixture will brew through. The remaining mixture will be
held in the coffeemaker for 30 minutes before completing its brew
through.
Note: The entire cleaning cycle will take 45–60 minutes to complete.
8. When the coffeemaker completes the AUTO CLEAN cycle, it shuts off
automatically.
9. Brew fresh water through appliance following instructions given in
GETTING STARTED before brewing coffee again.

9
TROUBLESHOOTING
PROBLEM POSSIBLE CAUSE SOLUTION
Coffeemaker does
not turn on.
Coffeemaker is not plugged in. Make sure appliance is
plugged into a working
outlet.
Coffeemaker
is leaking.
Water reservoir may have
been overfilled.
Make sure you don’t
fill the water reservoir
beyond the 12-cup line.
Cover may not be correctly
placed on carafe.
Make sure cover is
correctly placed and
tightened on carafe
Carafe may not be correctly
placed on the carafe plate.
Make sure carafe is
placed securely onto
the carafe plate.
The filter basket
overflows.
The carafe has been removed
for longer than 30 seconds
when using the Sneak-A-
Cup™ feature.
Make sure to replace
the carafe within 30
seconds during the
brewing cycle.
Excessive amount of coffee
is used.
Reduce the amount of
coffee used.
Brewing with softened
water.
Always brew with cold,
filtered water.
Coffee sediment in
brewed cup of coffee.
The paper filter and/or the
filter basket are not properly
placed.
Insert basket-shaped
paper filter into filter
basket and insert basket
properly into holder.
The coffeemaker
brews slowly.
The coffeemaker needs
cleaning.
Follow the instructions in
the “Auto Clean” section.
If additional assistance is needed, please contact our consumer service team at
1-800-465-6070.

10
WARRANTY AND CUSTOMER
SERVICE INFORMATION
Two-Year Limited Warranty
(Applies only in the United States and Canada)
For service, repair or any questions regarding your appliance, call the
appropriate 800 number listed within this section. Please DO NOT return the
product to the place of purchase. Also, please DO NOT mail product back to
manufacturer, nor bring it to a service center. You may also want to consult
the website listed on the cover of this manual.
What does it cover?
• Any defect in material or workmanship provided; however, Spectrum Brands,
Inc.’s liability will not exceed the purchase price of product.
For how long?
• Two years from the date of original purchase with proof of purchase.
What will we do to help you?
• Provide you with a reasonably similar replacement product that is either new or
factory refurbished.
How do you get service?
• Save your receipt as proof of date of sale.
• Visit the online service website at www.prodprotect.com/blackanddecker, or call
toll-free 1-800-465-6070, for general warranty service.
• If you need parts or accessories, please call 1-800-738-0245.
What does your warranty not cover?
• Damage from commercial use
• Damage from misuse, abuse or neglect
• Products that have been modified in any way
• Products used or serviced outside the country of purchase
• Glass parts and other accessory items that are packed with the unit
• Shipping and handling costs associated with the replacement of the unit
• Consequential or incidental damages (Please note, however, that some states do
not allow the exclusion or limitation of consequential or incidental damages, so
this limitation may not apply to you.)
How does state law relate to this warranty?
• This warranty gives you specific legal rights. You may also have other rights that
vary from state to state or province to province.

11
PRECAUCIÓN
RIESGO DE INCENDIO O DE CHOQUE ELÉCTRICO. NO ABRA.
El símbolo de un rayo indica voltaje peligroso. El signo de exclamación
indica importantes instrucciones de mantenimiento. Consulte a
continuación:
Precaución: Para reducir el riesgo de incendio o de choque eléctrico,
no retire la cubierta de la cafetera. No contiene por dentro partes
reparables por el consumidor. Cualquier reparación deberá ser
efectuada únicamente por personal autorizado.
TABLA DE CONTENIDOS
INSTRUCCIONES IMPORTANTES DE SEGURIDAD ........................12
CONOZCA SU CAFETERA ............................................13
PRIMEROS PASOS ..................................................14
AJUSTE DEL RELOJ ................................................14
SELECCIÓN DE INTENSIDAD DE LA PREPARACIÓN.......................14
FUNCIÓN DE MANTENER CALIENTE ...................................15
CÓMO PREPARAR CAFÉ .............................................15
FUNCIÓN SNEAK-A-CUP™ ...........................................15
PREPARACIÓN AUTOMÁTICA.........................................16
CUIDADO Y LIMPIEZA...............................................16
SISTEMA DE LIMPIEZA AUTOMÁTICA AUTO CLEAN™ .....................17
RESOLUCIÓN DE PROBLEMAS .......................................18
GARANTÍA E INFORMACIÓN DE SERVICIO PARA EL CLIENTE ............. 28
¡BIENVENIDO!
¡Felicitaciones por su compra de la cafetera de la BLACK+DECKER! Hemos
desarrollado este manual para asegurar rendimiento óptimo y su satisfacción
total. Conserve este manual de uso y cuidado y asegúrese de registrar su
producto en línea visitando www.prodprotect.com/blackanddecker.

19
AVERTISSEMENT
RISQUES D'INCENDIE OU DE CHOC ÉLECTRIQUE NE PAS OUVRIR
Le symbole clignotant indique que la « tension est dangereuse »; le point
d'exclamation fait référence aux instructions d'entretien. Voir ci-dessous.
Avertissement : Pour réduire les risques d'incendie ou de choc électrique, ne pas
retirer le couvercle de la cafetière. L'appareil ne contient aucune pièce réparable
par l'utilisateur. Les réparations doivent être effectuées par un technicien autorisé
seulement.
BIENVENUE!
Félicitations pour votre achat de la Cafetera programmable de 12 tazas
BLACK+DECKER™! Nous avons élaboré le présent guide d’utilisation et
d’entretien pour assurer le rendement optimal du produit et votre entière
satisfaction. Conservez le présent guide d’utilisation et d’entretien, et
enregistrez votre appareil en ligne au www.prodprotect.com/blackanddecker.
MATIÈRES
MISES EN GARDE IMPORTANTES.....................................20
FAMILIARISATION AVEC LA CAFETIÈRE................................21
POUR COMMENCER ............................................... 22
RÉGLAGE DE L’HORLOGE .......................................... 22
SÉLECTION DU DEGRÉ D’INFUSION .................................. 22
RÉCHAUD........................................................ 23
INFUSION DU CAFÉ ............................................... 23
FONCTION SNEAK-A-CUP
MC
......................................... 23
INFUSION AUTOMATIQUE (INFUSION DIFFÉRÉE) ....................... 24
ENTRETIEN ET NETTOYAGE ........................................ 24
SYSTÈME DE NETTOYAGE AUTOMATIQUE AUTO CLEAN
MC
................ 25
DÉPANNAGE ..................................................... 26
INFORMATION SUR LA GARANTIE ET LE SERVICE À LA CLIENTÈLE ........ 27

31
1000 W 120 V ~ 60 Hz
Sello del Distribuidor:
Fecha de compra:
Modelo:
Código de fecha / Date Code / Le code de date:
Comercializado por:
Spectrum Brands de México, SA de C.V
Avenida 1° de Mayo No. 120
Piso 7, Oficina 702.
Colonia San Andres Atoto, C.P. 53500
Naucalpan de Juárez, Estado de México,
México
Servicio y Reparación
Art. 123 No. 95
Col. Centro, C.P. 06050
Deleg. Cuauhtemoc
Servicio al Consumidor,
Venta de Refacciones
y Accesorios
01 800 714 2503
Importado y Distribuido por:
RAYOVAC ARGENTINA S.R.L. Humboldt
2495 Piso# 3 C1425FUG) C.A.B.A.
Argentina C.U.I.T NO. 30-70706168-1
Importado por / Imported by:
Spectrum Brands de México, SA de C.V
Avenida 1° de Mayo No. 120
Piso 7, Oficina 702.
Colonia San Andres Atoto, C.P. 53500
Naucalpan de Juárez, Estado de México,
México
Para atención de garantía marque:
01 (800) 714 2503
Importado por / Imported by:
Household Products Chile Commercial
Ltda
Av. Del Valle 570, Ofic. 704
Ciudad Empresarial, Huechuraba
Santiago - Chile
Fono: (562) 2571 3700
Importado por / Imported by:
Spectrum Brands Colombia S.A.
Carrera 17 No.89-40
Bogotá, Colombia
Línea de atención al cliente:
018000510012
BLACK+DECKER and the BLACK+DECKER logos and product names are trademarks of
The Black & Decker Corporation, used under license. All rights reserved.
BLACK+DECKER y los logos y nombres de productos de BLACK+DECKER son marcas
registradas de The Black & Decker Corporation, usados bajo licencia. Todos los derechos
reservados.
BLACK+DECKER et les logos et noms de produits BLACK+DECKER sont des marques de
commerce de The Black & Decker Corporation, utilisées sous licence. Tous droits réservés.
All other marks are Trademarks of Spectrum Brands, Inc.
Todas la demás marcas son Marcas Registradas de Spectrum Brands, Inc.
Toutes les autres marques sont des marques de commerce de Spectrum Brands, Inc.
Made in China.
Fabricado en China.
Fabriqué en Chine.
© 2019 The Black & Decker Corporation and Spectrum Brands, Inc., Middleton, WI 53562

32
24989 E/S/F
T22-9001483-C
www.BlackAndDeckerAppliances.com
We want you to have a 5-star experience!
Should you have any questions or concerns about your new product, please call our Customer Service
Line at 1-800-465-6070 (U.S. and Canada). Please do not return to the store.
¡Deseamos que disfrute de una experiencia de 5 estrellas!
Si usted tiene alguna inquietud o pregunta con su producto, por favor llame a nuestra línea de servicio al
cliente una atención inmediata 1-800-465-6070 (EE.UU/Canadá) 01-800-714-2503 (México).
No devuela a la tienda.
Nous voulons que vous ayez une expérience 5 étoiles!
Si vous avez des questions ou des préoccupations à propos de votre nouveau produit, veuillez
communiquer avec notre Service à la clientèle au 1 800 465-6070 (États-Unis et Canada). Veuillez ne
pas rapporter le produit au magasin.
/