Page is loading ...


1
You have chosen one of the finest bicycles available. Your bicycle has been carefully manufactured with the
benefit of years of experience and fully tested to ensure the highest standards of safety and comfort for the rider.
In order to fully enjoy your bicycle, a certain amount of care and maintenance is required.
This Owner’s Manual is not intended as a fully comprehensive workshop manual but it will guide you in the assembly,
safe usage and correct maintenance of your new bicycle. If you have any doubt or difficulty with any of
the tasks described, please seek the assistance of a specialist bicycle dealer.
Please read the Manual thoroughly, paying special attention to the safety warnings. This Manual will help ensure
that your new bicycle keeps working properly and safely, and continues to give you years of enjoyable cycling.
GENERAL WARNING:
Bicycling can be a hazardous activity even under the best of circumstances. Proper maintenance of your bicycle is
your responsibility as it helps reduce the risk of injury. This Manual contains many “Warnings” and “Cautions”
concerning the consequences of failure to maintain or inspect your bicycle. Many of the Warnings and Cautions
say “you may lose control and fall”. Because any fall can result in serious injury or even death, we do not repeat
the warning of possible injury or death whenever the risk of falling is mentioned.
The bicycle you have purchased is a complex article. The following manual is only a guide to assist you and is not a
complete or comprehensive manual of all aspects of maintaining and repairing your bicycle. The Company has taken
all reasonable care to ensure that the manual is accurate and the information is current as at
April 2009.
The Company recommends you consult a specialist bicycle dealer particularly if:
. you have any doubts or concerns as to your experience or ability to properly repair or maintain your bicycle;
. the following manual does not cover a particular matter; or
. you have any other questions or concerns.
CONGRATULATIONS
20067_OWNERS-MANUAL.qxp 08/03/2006 10:34 AM Page 1
SHEPPARD CYCLES ABN 60 082 376 289
SC/2012

2
DIRECTORY
Purchase Record
Inside Front Cover
PART 1
Parts Identification
Pages 4 - 7
PART 2
Assembly
Pages 8 - 16
PART 6
Warranty
Inside Back Cover
Wa rning / Important
(Take notice of this symbol
throughout this manual)
PART 3
Before You Ride
Pages 17 - 31
PART 4
Servicing
Pages 34 - 36
PART 5
Detailed Maintenance
Pages 37 - 80
PART 7
Contact Addresses
Back Cover
SHEPPARD CYCLES ABN 60 082 376 289
SC/2012

3
INDEX
Riding Safely
25
. wet weather riding 26
. night riding 26
. pedalling technique 26
. hill technique 27
. cornering technique 27
. rules for children 27
Gears . How To Operate
28
. derailleur gears 28
. operating principles 28
. thumb shifters (top mounted) 29
. down tube & stem shifters 29
. below the bar shifters 30
. hand grip shifters 30
. dual control shifters 31
Bicycle Care
32
. basic maintenance 32
. storage 32
. security 33
4 . SERVICING
34
. Schedule 1 . Lubrication 34
. Schedule 2 . Service Checklist 35
Torque Requirements
36
Tools Required
36
5 . DETAILED MAINTENANCE
37
Wheels and Tyres
37
. wheel inspection 37
. tyre inspection 38
. recommended tyre pressures 38
. fron
t wheel removal & replacement 39
. rear wheel removal & replacement 40
. correct QR axle setting 41
. hub bearing adjustment 42
. hub bearing adjustment & lubrication 42
. how to fix a flat tyre 43
. tyre valves 44
Steering System
45
. handlebar stem 45
. handlebars / forks 46
. bicycle suspension 47
. headset 48
. A-headset type assemblies 48
. rotors 50
Saddle & Seat Post
51
Brakes
53
. sidepull calipers 54
. cantilever calipers 55
. linear pull 57
. u-brake 59
. brake shoe replacement 60
. disc brakes 60
Drivetrain
61
. pedals 61
. crank set 64
. one piece cranks 65
. cotterless cranks 66
. chain 68
. fre
ewheel 69
. coaster hub 70
Derailleur Systems
71
. rear derailleur 72
. front derailleur 74
Reflectors
75
Accessories
76
Troubleshooting
79
6 . WARRANTY Back Cover
7 . CONTACT ADDRESSES
Back
PURCHASE RECORD
Inside Cover
1 . PARTS IDENTIFICATION
4
Racing Bicycles
4
Mountain Bicycles & Crossbikes
5
Suspension Bicycles
6
BMX/Loop Frame/U-Frame Bicycles
7
2 . ASSEMBLY
8
Derailleur Geared Bicycles
9
. Mountain Bicycles
. Crossbikes
. Racing Bicycles
Single Speed Bicycles
13
(coasters & freewheels)
. BMX/Loop Frame/U-frame Bicycles
3 . BEFORE YOU RIDE
17
Correct Frame Size
17
Riding Position
18
. saddle height 18
. reach 18
. handlebar height 19
Safety Checklist
20
. brakes 20
. wheels & tyres 20
. saddle 20
. steering 21
. chain 21
. bearings 21
. cranks & pedals 21
. derailleurs 21
. frame & fork 21
. suspension 21
. accessories & safety 22
Helmets
22
Reflectors 23
SHEPPARD CYCLES ABN 60 082 376 289
SC/2012

4
PA R T 1 . PA R T S I D E N T I F I C A T I O N
Top Tube
Seat
Seat Post
Seat Post Binder Bolt
Seat Stay
Rear Reflector
Rear Brake
Wheel Reflector
Spoke Protector Disc
Rear Derailleur
Handlebar Stem
Head Set
Head Tube
Seat Tube
Shift Lever
Down Tube
Front Derailleur
Bottom Bracket Axle
Toe Strap
Toe Clip
Pedal
Crank Arm
Chainwheel
Chainstay
Chain
Freewheel
Rear Dropout
Rim
Tyre
Tyre Valve
Brake Control Cable
Front Reflector
Brake Lever
Handlebar
Front Brake
Brake Pad
Wheel Reflector
Front Fork
Front Hub
Spokes
Bicycles are available in a variety of different styles and sizes designed for different uses. Despite the different styles, all are made up of a frame,
wheels, drivetrain, saddle, handlebar assembly and brakes. Study and familiarise yourself with the names of various parts on the diagram
similar to your bicycle. This will help when you come to the assembly and basic maintenance instructions described later in this manual.
Care For Your Carbon Frame
•Assembly & Maintenance -
when assembling or carrying
out maintenance on your
carbon framed bicycle it is
recommended to hold the
bicycle in a workstand by the
seatpost or use an internal
seatpost clamp.
•Carrying your Carbon Frame
Bike on a Motor Vehicle -
when carrying your carbon
framed bicycle on a motor
vehicle it is recommended to
use a carrying device where
the bicycle is held by the
wheels and/or fork dropouts
and not direct clamping of the
frame.
•Failure to do so may cause
the frame to crack due to
un-natural forces on the
frame.
Racing Bicycles
Racing style, or road
bicycles, are light in weight
and are designed for fast
travel over long distances on
paved surfaces.
SHEPPARD CYCLES ABN 60 082 376 289
SC/2012

5
Handlebar Stem
Head Set
Head Tube
Seat Tube
Down Tube
Front Derailleur
Rear Gear Control
Cable
Pedal
Crank Arm
Bottom Bracket Axle
Chainwheel
Chainstay
Chain
Rim
Tyre
Tyre Valve
Front Hub
Spokes
Shift Lever
Brake Lever
Handlebar
Brake Control Cables
Front Reflector
Front Brake
Front Fork
Wheel Reflector
Wheel Reflector
Freewheel
Gear Control Cable
Rear Derailleur
Top Tube
Seat
Seat Post
Seat Post Binder Bolt
Seat Stay
Rear Reflector
Rear Brake
Mountain Bicycles & Crossbikes . Mountain bicycles are designed to give maximum comfort over a wider variety of road
surfaces. The wider handlebars and convenient shift lever position make them very easy to control. Wider wheel rims and tyres give them
a softer ride with more traction on rough surfaces. The frame and fork on mountain style bicycles is much sturdier and heavier than a
racing style bicycle. A variation of the mountain bicycle is the crossbike or hybrid. This style of bicycle is lighter than a mountain bicycle but not
as fast as a racing bicycle. It combines some of the features of comfort and control with lighter weight and higher speed.
20067_OWNERS-MANUAL.qxp 08/03/2006 10:34 AM Page 5
SHEPPARD CYCLES ABN 60 082 376 289
SC/2012

Seat
Seat Post
Seat Post Binder
Seat Tube
Rear Reflector
Brake Control Cable
Gear Control Cable
Rear Suspension Damper
Rear Brake
Top Tube
Front Derailleur
Down Tube
Suspension Mounting
Head Tube
Handlebar End Extension
Handlebar
Handlebar Stem
Head Set
Rear Frame Sub Assembly
Shift Lever
Brake Lever
Control Cables
Reflector
Upper Fork (Suspension)
Protective Boot
Fork Brace
Front Brake
Lower Fork (Suspension)
Tyre Valve
Pedal
Crank Arm
Bottom Bracket Axle
Chainwheel
Rim
Tyre
Spokes
Chainstay
Drive Chain
Rear Derailleur
Wheel Reflector
Gear Control Cable
Freewheel
6
Front Hub Axle
Suspension Bicycles .
With similar components to standard frame mountain bicycles, suspension fitted bicycles give even more
comfort over uneven road surfaces. Some are fitted with shock absorbing front forks only, while others are designed with special frames
which also have a rear suspension mechanism. In addition, some bikes may be fitted with a special shock absorbing seat pillar or even a
handlebar stem to cushion and relieve road shocks and add to rider comfort. Like standard mountain bikes, wide handlebars and conveniently
positioned shift levers make them easier to control. Wide rims and tyres add to a softer ri
de while enhancing traction over rough surfaces.
Suspension bikes come in a variety of styles but the basic components are similar.
SHEPPARD CYCLES ABN 60 082 376 289
SC/2012

7
BMX Bicycles .
BMX style bicycles are a popular general purpose type most suited to younger riders.
They are valued because of their sturdy and simple construction and low maintenance.
Other kinds of children’s bicycles use different styles of frames such as the loop frame and the U-shape frame.
Top Tube
Seat
Seat Post
Seat Post Binder Bolt
Seat Stay
Rear Reflector
Wheel Reflector
Rear Sprocket
Training Wheel
Crash Pad
Handlebar Stem
Head Set
Head Tube
Crash Pad
Seat Tube
Down Tube
Crank Arm
Pedal
Chain
Chainstay
Chainwheel
Rim
Tyre
Tyre Valve
Handlebar Grip
Brake Lever
Handlebar
Brake Control Cable
Reflector
Front Brake
Brake Pad
Front Fork
Wheel Reflector
Front Hub
Spokes
20067_OWNERS-MANUAL.qxp 08/03/2006 10:35 AM Page 7
SHEPPARD CYCLES ABN 60 082 376 289
SC/2012

8
PART 2 . ASSEMBLY
Your new bicycle was assembled and tuned in the factory and then partially disassembled for shipping.
You may have purchased the bicycle already fully re-assembled and ready to ride OR in the shipping carton in the
partially disassembled form. If it was purchased in the carton the following instructions will enable you to prepare your
bicycle for years of enjoyable cycling.
Please check that all parts referred to in the instructions and shown in the photographs/diagrams have been included,
and that all tools needed are at your disposal.
For more detail on inspection, lubrication, maintenance, additional tools needed and adjustment of any area please refer to
the relevant section elsewhere in this manual.
You will need the following tools:
Spanners, ring or open ended - 8mm, 10mm, 12mm, 13mm, 14mm and 15mm, or adjustable wrenches.
Spanners, open ended narrow - 15mm.
Torque Wrench with newton meter graduations.
Phillips head screwdriver.
Blade ended screwdriver.
Bicycle pump
Allen key - 5mm and 6mm.
Standard slipjoint pliers
It is recommended that a torque wrench be used in the initial assembly process and that the torque requirements
listed on Page 36 be adhered to.
20067_OWNERS-MANUAL.qxp 08/03/2006 10:35 AM Page 8
SHEPPARD CYCLES ABN 60 082 376 289
SC/2012

9
DERAILLEUR GEARED BICYCLES
Includes 20”(51cm), 24”(61cm) and 26”(66cm) wheel Mountain Bikes, 27”(69cm)
and 700C Touring and Racing Bikes, and 700C Crossbikes.
Assembly is the same for female and male models.
1 . Getting Started
Open the carton from the top and remove the bicycle.
Remove the straps holding the front wheel, handlebar assembly, and
the package containing the pedals, seat and seat pillar.
Remove the protective wrapping from the bicycle.
2 . Handlebars
Remove the protective cap from the handlebar stem and loosen the Allen
key bolt using the 6mm Allen key. Some models may use a 13mm
hexagonal bolt instead of an Allen key bolt. Place the handlebar stem
into the top of the head tube, ensuring all cab
les are free of tangles.
Tighten the handlebar stem in the frame while observing the minimum
insertion mark and checking that the forks and handlebars are both facing
forward. Ensure that the handlebar binder clamp on the stem is tightened.
For MTB bicycles supplied with handlebar end extensions, these can now be
fitted to the exposed ends of the handlebar. Set the angle to your
personal preference, ensuring both are fitted at the same angle. End plugs
must be fitted and the clamp bolts must be firmly tightened.
The handlebar stem must be inserted so that the minimum
insertion mark cannot be seen.
SHEPPARD CYCLES ABN 60 082 376 289
SC/2012

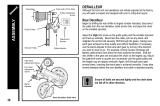
3 . Seat
Insert the smaller end of the seat pillar into the seat clamp and tighten.
Insert the seat/pillar assembly into the frame tube of the bicycle observing
the minimum insertion mark on the seat pillar. Ensure the seat is level and facing
the front. Tighten with a 13mm ring spanner. If your bicycle is fitted with a Quick
Release type seat bolt, turn the adjusting nut to ensure the locking lever is moved
to the closed position with a firm action. Refer to Page 41 for more detail about
quick release mechanisms. Turn the bicycle upside down and rest it on the seat
and handlebars.
The seat pillar must be inserted so that the minimum insertion
mark cannot be seen.
4 . Pedals
Attach the pedals carefully, engaging the thread initially by hand.
Note that the right hand pedal attaches to the chainwheel side crank with a
right hand (clockwise) thread. The left pedal attaches to the other crank arm
and has a left hand (counter clockwise) thread.
The ends of each pedal spindle are marked with either an ‘R’ for right
or ‘L’ for left. Tighten pedals very firmly using a narrow 15mm open ended spanner.
Note, damage will occur if pedals are not correctly and firmly attached.
Attachment of an incorrect pedal into a crank arm will cause
irreparable damage.
10
20067_OWNERS-MANUAL.qxp 08/03/2006 10:35 AM Page 10
SHEPPARD CYCLES ABN 60 082 376 289
SC/2012

11
5 . Front Wheel
Insert the front wheel into the forks. Where supplied ensure that the specially
shaped washer, sometimes with a small tab, under the wheel nut is located in the
forks. This tab will ensure that the wheel will not fall out should the nuts become
loose. Note that some mountain bicycle forks are designed with a special recess
built in so that retention washers are not required. Tighten the wheel nuts using the
appropriate 14mm or 15mm spanner. If the wheel is fitted with a Quick Release type
axle, turn the adjusting nut so that the locking lever is moved to the closed position
with a firm action.
Refer P.39 for more detail about Quick Release mechanisms.
Turn the bicycle upright using the kickstand, where provided, to support it.
6 . Front Brake
Brakes must be adjusted and firmly tightened so that the brake shoes are correctly
aligned with the rim, and have minimal clearance with the rim before the control
lever is squeezed. Your bike may be fitted with sidepull, cantilever, “V” style, or other
types of brakes but the same adjustments must be made. Be sure that the right hand
control lever operates the front brake, and the left lever operates the rear brake.
To connect the front brake, position yourself so you can comfortably squeeze the
brake calipers together with one hand while adjusting and fastening the brake cable
with the other hand.
If your bike is fitted with ”sidepull” type brakes grasp and firmly squeeze the caliper
with one hand so that the brake pads are touching the rim. Loosen the eyebolt
holding the brake cable with a 10mm spanner, firmly pull the cable through the
hole, and then re-tighten.
If fitted with “cantilever” type brakes position the straddle cable into the straddle cable holder above the reflector bracket and
connect the cable end into the brake arm. With the cable fitted the straddle holder should sit 10-20mm above the reflector
bracket and can be adjusted via the eyebolt using a 10mm spanner.
To connect and adjust “V” style or “Linear Pull” type brakes, use a 10mm spanner or Allen key to set the brake shoes to within 2mm
of, and parallel to, the rim with the brake arms in a vertical position. Position the drum shaped end button of the control
20067_OWNERS-MANUAL.qxp 08/03/2006 10:35 AM Page 11
SHEPPARD CYCLES ABN 60 082 376 289
SC/2012

12
cable into the hand brake lever. Loosen the cable eyebolt on the left hand brake arm.
Thread the cable through both brake arms, positioning the curved outer casing runner
through the right arm, and the inner wire through the eyebolt on the left arm. Squeeze
the brake arms together, pull the cable wire through the eyebolt, and tighten it.
Adjust the brake pads and tighten with appropriate 10mm spanner or Allen key so they
contact squarely with and are aligned parallel to the rim surface. Firmly squeeze the control
lever and check the brake pads are 1.5mm to 2mm away from the rim each side after lever is
released. If clearance needs adjusting loosen the eyebolt, hold the brake arms in position so
the pads just touch the rim, pull the cable tight, then re-tighten the eyebolt. Firmly squeeze the
lever again and re-check clearance. Adjust again as above if clearance excessive, or fine tune
by turning the cable adjusters at the lever. Ensure end cap is fitted to cable to prevent
fraying. Connecting and adjusting rear brakes follows similar procedures as for the front.
For more details refer to Brakes section under Detailed Maintenance further on in the manual.
Do not ride the bicycle until the brakes are functioning properly. To test,
apply the brakes while trying to push the bike forward to make sure they
will stop the bicycle.
8. Gears
Gears are preset at the factory and normally will not require further adjustment before
riding. However before testing them check that the 10mm anchor bolts which clamp the
front and rear derailleur control cables are firmly fastened. Only then test the gears
ensuring the drive chain moves freely into each position when the control levers are
activated. If further adjustment is needed, refer to the Derailleur Systems section under
Detailed Maintenance further in this manual.
9 . Finally
If your bike is supplied with a water bottle and cage, the cage should now be
attached to the frame as illustrated using the Allen head bolts supplied. Check
tyre pressure is inflated to the range recommendation on the tyre sidewalls.
Attach the orange reflectors to the spokes of both wheels directly opposite the
valve stem and within 76mm of the rim. Attach the white reflector to the front
reflector bracket, and the red reflector to the rear reflector bracket using an
8mm spanner or Phillips head screwdriver. Attach the bell to the left handlebar
near the grip. Check and adjust the gears if necessary before riding.
Before riding ensure all nuts, bolts and fittings on the bicycle have been
correctly tightened.
Correct maintenance of your bicycle will ensure many years of happy and safe
riding. Service your bicycle regularly yourself, by referring to the relevant sections of
this manual, OR take it to your specialist bicycle shop.
20067_OWNERS- MANUAL. qxp 08/ 03/ 2006 10: 35 AM Page 12
SHEPPARD CYCLES ABN 60 082 376 289
SC/2012

13
SINGLE SPEED BICYCLES (COASTERS AND FREEWHEELS)
Includes 12”(30cm), 16”(40cm) and 20”(51cm) wheel BMX and MTB style bicycles, 16”(40cm)
and 20”(51cm) U-Frame and Loop Frame bicycles. Assembly is the same for girls and boys models.
1 . Getting Started
Open the carton from the top and remove the bicycle.
Remove the straps holding the front wheel, handlebar assembly,
and the package containing the pedals, seat and seat pillar.
Remove the protective wrapping from the bicycle.
2 . Handlebars
Remove the protective cap from the handlebar stem and loosen the
centre bolt using a 13mm spanner. MTB models may use a 6mm Allen
key bolt instead. Insert the handlebar stem, with handlebars attached, into
the head tube of the bicycle, re-tighten it while observing the minimum
insertion mark and ensuring both the forks and handlebar assembly are
facing forward. Ensure that the handlebar clamping mechanism on the
stem is tightened. Note, for some 12”(30cm) BMX bicycles the handlebar
and stem is a one piece assembly and is tightened via a clamp fitted on
top of the fork tube. (See inset diagram). After front wheel is fitted test the
tightness by clamping the wheel between your knees and trying to twist the
handlebars. (Please refer to “Steering Systems” pages 45-51 for more details.)
The handlebar must be inserted so that the minimum
insertion mark cannot be seen.
20067_OWNERS-MANUAL.qxp 08/03/2006 10:35 AM Page 13
SHEPPARD CYCLES ABN 60 082 376 289
SC/2012

14
3 . Seat
Insert the seat pillar into the seat clamp and tighten.
Insert the seat/pillar assembly into the frame tube of the bicycle
observing the minimum insertion mark on the pillar.
Ensure the seat is level and facing the front. Tighten with a 13mm ring
spanner. Turn the bicycle upside down and rest it on the seat and
handlebars.
The seat pillar must be inserted so that the minimum insertion
mark cannot be seen.
4 . Pedals
Attach the pedals carefully, engaging the thread initially by hand.
Note that the right hand pedal attaches to the chainwheel side crank
with a right hand (clockwise) thread. The left pedal attaches to the other
crank arm and has a left hand (counter clockwise) thread.
The ends of each pedal spindle are marked with either
an ‘R’ for right or ‘L’ for left. Tighten pedals very firmly using a narrow
15mm open ended spanner. Note, damage will occur if pedals are not
correctly and firmly attached.
Attachment of an incorrect pedal into a crank arm will cause
irreparable damage.
5 . Front Wheel and Mudguard
For bicycles where a front mudguard is supplied, this should be attached
before fitting the front wheel. Position it with the short end facing forward
and attach the metal bracket behind the 10mm nut fixed to the rear
of the brake centre bolt.
Insert the front wheel into the forks. W
here supplied ensure that the
specially shaped washer, sometimes with a small tab, under the wheel nut
under the wheel nut is located in the slot in the forks.
This tab will ensure that the wheel will not fall out should the nuts
become loose. The mudguard stays are to be attached under the wheel
axle nuts. Tighten the wheel nuts using the appropriate 14mm or 15mm spanner.
20067_OWNERS-MANUAL.qxp 08/03/2006 10:36 AM Page 14
SHEPPARD CYCLES ABN 60 082 376 289
SC/2012

15
6 . Training Wheels
For 12”(30cm) and 16”(40cm) bicycles supplied with trainer wheels, each wheel must
first be assembled onto the metal “L” brackets supplied, and then mounted to each
side of the rear wheel. First, insert the axle bolts through each trainer wheel, fol
lowed by the washers. Next, insert each assembly into the “L” brackets and attach
with the hexagonal nuts supplied.
Then, remove the 15mm rear axle nuts from the bicycle and fit the metal locating
brackets onto the rear axle so that the tabs fit into the frame slot. Place the training
wheel support arms over the locating brackets,refit and re-tighten the rear axle nuts.
Note that the trainer wheels should be positioned so that they do not quite touch the
ground when the bicycle is standing vertically.
7 . Front Brake
Brakes must be adjusted and firmly tightened so that the brake shoes are correctly aligned
with the rim, and have minimal clearance with the rim before the control lever is
squeezed. Your bike may be fitted with sidepull, ‘V’ style, or other types of brakes but the
same adjustments must be made. Be sure that the right hand control lever operates the
front brake, and for freewheel models with two handbrakes, the left lever operates the
rear brake. To connect the front brake, position yourself so you can comfortably squeeze
the brake calipers together with one hand while adjusting and fastening the brake cable
with the other hand. If your bike is fitted with “sidepull” type brakes grasp and firmly
squeeze the caliper with one hand so that the brake pads are touching the rim. Loosen
the eyebolt holding the brake cable with a 10mm spanner, firmly pull the cable through
the hole, and then re-tighten. To connect and adjust “V” style or “Linear Pull” type brakes,
use a 10mm spanner or Allen key to set the brake shoes to within 2mm of, and parallel to, the rim with the
brake arms
in a vertical position. Position the drum shaped end button of the control cable into the hand brake lever. Loosen the cable eyebolt on the left hand
brake arm. Thread the cable through both brake arms, positioning the curved outer casing runner through the right arm, and the inner wire through the
eyebolt on the left arm. Squeeze the brake arms together, pull the cable wire through the eyebolt, and tighten it. Adjust the brake pads and tighten with
appropriate 10mm spanner or Allen key so they contact squarely with and are aligned parallel to the rim surface.
Firmly squeeze the control lever and check the brake pads are 1.5mm to 2mm away from the rim each side after lever is released. If clearance needs
adjusting loosen the eyebolt, hold the brake arms in position so the pads just touch the rim, pull the cable tight, then re-tighten the eyebolt. Firmly
squeeze the lever again and re-check clearance. Adjust again as above if clearance excessive, or fine tune by turning the cable adjusters at the lever.
Ensure end cap is fitted to cable to prevent fraying. Connecting and adjusting rear brakes on freewheel models follows similar procedures as for the
front. For more details refer to Brakes section under Detailed Maintenance further on in the manual.
Do not ride the bicycle until the brakes are functioning properly. Test the brakes by squeezing the brake control lever firmly and trying
to push the bicycle forward.
20067_OWNERS-MANUAL.qxp 08/03/2006 10:36 AM Page 15
SHEPPARD CYCLES ABN 60 082 376 289
SC/2012

16
front/rear
drop outs
retaining
washer
axle nut
step
retaining washer
Threaded
front/rear
hubs
front/rear
drop outs
retaining
washer
axle nut
step
retaining washer
Non-Threaded
front/rear
hubs
washer
8 . Axle Peg Assembly Instructions
NON-THREADED
First remove the axle nut from the wheel. There will be either a retaining washer or a step
retaining washer included. Place this washer between the peg and the frame of the
bicycle. Slide the peg onto the axle followed by a flat washer and lastly the axle nut.
Tighten the axle nut clockwise until the peg fits snugly against the frame or fork. Repeat
for all the remaining pegs.
THREADED
This syle of peg is threaded to fit the axle. Make sure the axle nut is tight with a
15mm wrench. Place a screw driver through the mounting holes of the peg and
attach the peg to the axle by turning clockwise. Tighten against the frame or fork for
a snug fit. repeat for all the remaining pegs
PLEASE NOTE Not all axles are able to accept pegs. Please consult
our service department if you have any questions. Some BMX bicycles
come with two or four pegs. If your bicycle is a dirt Jumping style
bicycle, you will receive only two pegs. These are designed for the front
wheel. F
reestyle bicycles come with four pegs, two for each wheel.
9 . Finally
For BMX bicycles attach the safety crash pads as shown. Check tyre pressure is
inflated to the range recommendation on the tyre sidewalls. Attach the orange
reflectors to the spokes of both wheels directly opposite the valve stem and within
76mm of the rim. Attach the white reflector to the front reflector bracket and the red
reflector to the rear reflector bracket using an 8mm spanner or Phillips head
screwdriver. Attach the bell to the left handlebar near the grip. Before riding ensure all
nuts, bolts and fittings on the bicycle have been correctly tightened. Correct
maintenance of your bicycle will ensure many years of happy riding. Service your
bicycle regularly yourself by referring to the relevant sections of this manual OR take it
to your specialist bicycle shop.
20067_OWNERS-MANUAL.qxp 08/03/2006 10:36 AM Page 16
SHEPPARD CYCLES ABN 60 082 376 289
SC/2012

17
25-50mm
PA R T 3 . B E F O R E Y O U R I D E
When selecting a new bicycle the correct wheel and frame size is a very important safety consideration. A bicycle should never be
purchased too big for the rider with the view that they will grow to fit it. This is especially important for kids as they need to gain
confidence and the necessary co-ordination to control the bike safely. Kid’s body and leg lengths vary a lot even in same age groups.
Kid’s bikes come in different wheel sizes and there are different frame styles, such as Y-Frames, to suit the rider’s size. Most full sized
gent’s bicycles come in a range of frame sizes. These sizes usually refer to the distance between the centre of the bottom bracket and the
top of the frame seat tube. For selection of a bicycle for children of short stature, the seat position must be adjustable so that the feet of
a seated rider can reach the ground.
WARNING: If your bicycle does not match your size properly, you may lose control and fall, so ask your dealer
to exchange it before you ride it. For safe and comfortable riding there should be a clearance of between 25mm and
5
0mm between the crotch of the intended rider and the top frame tube of the bicycle, while rider straddles the bicycle
with both feet flat on the ground. Female riders should take into account the slope of the top tube to determine frame
size suitability. If in doubt, ask your dealer.
The ideal clearance will vary between types of bicycles and rider preference. This makes straddling the frame when off the
s
addle easier and safer in situations such as sudden traffic stops.
The correct sized female style bicycle can be checked using a male model as a guide.
The following chart and diagram will help you make the correct choice.
Bicycle Sizing Guide
Approx. rider Approx. Wheel Size Suggested Frame Suggested Frame
inner leg length Ages (kid’s models) Size for Road Bikes Size for Mountain
or Hybrid Bikes
40cm min. 3-5 30cm(12”)
4
6cm min. 4-7 40cm(16”)
55cm min. 6-10 50cm(20”)
61cm min. 9-12 61cm(24”)
61-69cm 12 plus - - 37cm(14.5”)
66-76cm 12 plus - - 43cm(17”)
71-79cm 12 plus - 50cm(19.5”) 45cm(18”)
76-84cm 12 plus - 55cm(21.5”) 50cm(19.5”)
79-86cm 12 plus - 57cm(22.5”) 52cm(20.5”)
81-89cm 12 plus - 60cm(23.5”) 53cm(21”)-56cm(22”)
86-94cm 12 plus - 63cm(25”) 58cm(23”)-60cm(23.5”)
CO RRECT FRAME SIZE
SHEPPARD CYCLES ABN 60 082 376 289
SC/2012

18
RIDING POSITION
1 . Saddle Height
In order to obtain the most comfortable riding position, offering the best
possible pedalling efficiency, the seat height should be set correctly in
relation to the riders leg length. The correct saddle height should
not allow leg strain from over-extension, and the hips should not
rock from side to side while pedalling.
While sitting on the bicycle with one pedal at its lowest point, place the
ball of your foot on that pedal. The correct saddle height will allow that
knee to be slightly bent in this position. If the rider then places the heel
of that foot on the pedal the leg should be almost straight.
Ensure seat pillar does not extend beyond the minimum insertion
mark. (Refer P. 52 on how to adjust seat height.) If your bicycle
is fitted with a suspension type seat post, the same caution
should be noted.
2 . Reach
To obtain maximum comfort the rider should not overextend his or her
reach when riding. While placing your elbow against the seat
and stretching out your arm, the distance between the outstretched
fingertips and the handlebar should be 2cm-5cm.
To adjust this distance, the position of the seat can be altered in relation
to the seat pillar. (Refer to Part 5 on how to adjust the seat clamp).
Maximum Height/
Minimum Insertion
Mark.
(Should not be visible)
Seat Clamp
Arms not over-extended
Handlebar stem height
about the same as seat
height
Pedal at bottom
position
20067_OWNERS-MANUAL.qxp 08/03/2006 10:36 AM Page 18
SHEPPARD CYCLES ABN 60 082 376 289
SC/2012
/