
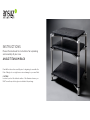
INSTRUCTIONS
Please find enclosed the instructions for unpacking
and assembly of your new
ANSUZ TITANIUM RACK
Read all the instructions carefully prior to beginning to assemble the
Rack. Failing to do so might cause serious damage to your new Rack.
CAUTION!
In order to protect the delicate surface of the titanium columns, you
MUST wear the protective gloves included in this package.

CONGRATULATIONS
Thank you for purchasing this ultimate Ansuz Titanium Rack.
The highly acclaimed line of Darkz products set the stage for the evolution of the
new Ansuz Rack. Both the Resonance Controlling and Mechanical Grounding techniques
of the Darkz have been integrated into the sophisticated design of the Ansuz Titanium
Rack.
The modules can be set up in a variety of combinations or used individually as
amp-stands.
Each Rack module is available in four quality levels determined by the Darkz supporting
the shelves: Aluminium, Ceramic, Diamond D2 or Diamond D-TC.
PLEASE FOLLOW THE INSTRUCTIONS
Correctly assembled, the Ansuz Titanium Rack will make your audio system perform at its
ultimate peak, and let you enjoy music in a way you will absolutely love.
CONTENT
Unpacking .............................3
Assembling ...........................4
Adjustments ..........................5
Building a Rack tower .......6
Maintenance..........................7

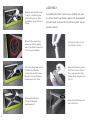
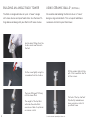
UNPACKING
For unpacking the Rack, simply follow the steps as shown.
Before unpacking, prepare an area where you can safely
set aside the shelf and the titanium parts until you need
them.
3
Break the transparent seal
and pull out the drawer box.
Remove the top layer of foam
and you will find the shelf
enclosed in a protective cloth
bag.
All parts are fitted into the
package with laser-cut foam
to protect them from being
scratched or damaged during
transport.
Remove the next foam layer
and you will find all the alu-
minium and titanium parts
that need to be assembled.
Lift out the shelf and put it in
a safe place until needed for
final installation. Make sure it
does not get scratched.
Remove the fitted foam be-
fore lifting out the shelf. This
will make removal of the shelf
easier.

Begin by removing the small
“toolbox” containing a pair
of protective gloves, three
screwdrivers and some brass
fittings.
Remove the final layer
of foam holding the
preassembled X.
Put on the gloves and remove
the Darkz and titanium
columns. Be careful to keep
the parts from scratching or
bumping into each other.
Before further unpacking,
make sure that the quality
level of the Darkz is identical
to the one you ordered.
Correctly assembled, your X
will look like this.
Mount the titanium columns
to all four corners of the X.
The screws must be firmly
fixed without using any kind
of tools.
Unscrew the top from the
four titanium columns.
ASSEMBLY
Assembling the Rack is quite easy, just follow the steps
as shown. Wear the protective gloves that are provided
for both hands to ensure that the titanium parts will not
become stained.
4

Mount the four Darkz in the
matching pits.
With screws and Darkz fitted
tightly, you are almost set.
Tighten the screws again to
fix your height setting.
Unpack the shelf from its
cloth bag and fit the pits
beneath the shelf upon the
Darkz – you will hear them
“click” into place.
Be certain that the screws
and Darkz are fitted tightly.
Turn the foot until the shelf is
leveled out on all sides.
Like this.
Adjust height by unscrewing
the three screws.
ADJUSTING
Use the adjustable feet to level out your Rack. When the
Rack is in a level position, use the hex screwdriver to fas-
ten the three screws in each foot.
5

Use the brass fittings from the
toolbox and screw them into
the feet.
The brass fitting will fit firmly
into the lower Rack.
The weight of the top Rack
will make the entire Rack
even more stable for optimum
resonance control.
Fix the screw tightly using the
screwdriver from the toolbox.
The feet of the top shelf will
fit perfectly and add even
more resonance control to
your Rack tower.
Fill the ceramic balls into the
pits of the lower Rack shelf in
all four corners.
BUILDING AN ANSUZ RACK TOWER
The Rack is designed to be set up in a “tower” design
with more shelves on top of each other. Use the brass fit-
tings delivered along with your Rack to fit more shelves.
USING CERAMIC BALLS* (OPTIONAL)
We recommend building the Rack shelves in “tower”
design using ceramic balls. This set-up will add more
resonance control to your Rack tower.
6
*) can be ordered separately at extra cost

To fix additional Darkz
between Rack sections, you
need six ceramic balls per
Darkz.
The feet of the top shelf
will fit perfectly to the
ceramic balls in the Darkz
when mounted.
Fitting Darkz to the bottom
Rack, you will only need three
ceramic balls per Darkz.
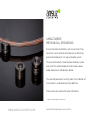
USING ANSUZ DARKZ* (OPTIONAL)
If you prefer the ultimate high-end option for building
your Rack tower, we recommend that you add Ansuz
Darkz between the columns. This will create an optimal
environment around your audio components.
MAINTENANCE OF THE ANSUZ RACK
The titanium columns will slowly evolve into a beautiful
dark color. This is absolutely natural for the material.
Always wear the protective gloves if you need to touch the
columns, e.g. for cleaning.
The shelves consist of dierent layers of wood-based com-
posite materials with a black ash finish. The ash veneer is
softer than most high-end gear, so take extra care not to
scratch the shelves.
For cleaning both the columns and shelves, simply use a
moist fiber cloth and make sure to wipe them dry. To do so,
we recommend using a separate dry soft cloth.
7
*) can be ordered separately at extra cost

ANSUZ DARKZ*
MECHANICAL GROUNDING
Prevent mechanical vibrations with Ansuz Darkz. They
consist of a series of mechanical devices to eectively
ground all components in a high-end audio system.
They are mechanically tuned to allow vibrations a path-
way out of the audio component and to keep various
audio components individually isolated.
The sound improvement resulting from the installation of
Ansuz Darkz is undeniable and truly addictive.
Please check our website for more information.
*) can be ordered separately at extra cost
HANDCRAFTED IN DENMARK BY ANSUZ ACOUSTICS
WWW.ANSUZ-ACOUSTICS.COM
-
 1
1
-
 2
2
-
 3
3
-
 4
4
-
 5
5
-
 6
6
-
 7
7
-
 8
8


Ask a question and I''ll find the answer in the document
Finding information in a document is now easier with AI
Other documents
-
AE RC10SC5M Manual & Catalog
-
-
-
Associated Electrics B5M User manual
-
-
-
Outback Titanium Assembly And Operating Instructions Manual
-
Maytag MWA 0714FIC User manual
-
 Grizzly Industrial G0751 Owner's manual
-
Genesis G7 Owners Manual And Set-Up Manual
