Page is loading ...

BL A C K B OX
®
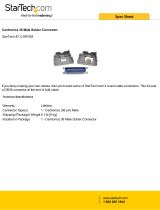
Connect the ServTray to one DVI/VGA with USB
or PS/2 supported computer.
DVI/VGA USB/PS2 1-Port KVM Module
Order toll-free in the U.S.: Call 877-877-BBOX (outside U.S. call 724-746-5500)
FREE technical support 24 hours a day, 7 days a week: Call 724-746-5500 or fax 724-746-0746
Mailing address: Black Box Corporation, 1000 Park Drive, Lawrence, PA 15055-1018
Web site: www.blackbox.com • E-mail: info@blackbox.com
Customer
Support
Information
KVT6S1UV

724-746-5500 | blackbox.com
Page 2
Trademarks Used in this Manual
We‘re here to help! If you have any questions about your application
or our products, contact Black Box Tech Support at 724-746-5500
or go to blackbox.com and click on “Talk to Black Box.”
You’ll be live with one of our technical experts in less than 30 seconds.
Trademarks Used in this Manual
Black Box and the Double Diamond logo are registered trademarks of BB Technologies, Inc.
Centronics is a registered trademark of Centronics Corporation.
PS/2 is a registered trademark of International Business Machines Corporation.
IntelliMouse, Microsoft, Windows, Windows NT, and Windows Vista™ are either registered trademarks or trademarks of
Microsoft Corporation in the United States and/or other countries.
UL is a registered trademark of Underwriters’ Laboratories, Inc.
Any other trademarks mentioned in this manual are acknowledged to be the property of the trademark owners.

724-746-5500 | blackbox.com
Page 3
FCC and IC RFI Statements
Federal Communications Commission and Industry Canada Radio Frequency Interference
Statements
This equipment generates, uses, and can radiate radio-frequency energy, and if not installed and used properly, that is, in strict
accordance with the manufacturer’s instructions, may cause inter ference to radio communication. It has been tested and found to
comply with the limits for a Class A computing device in accordance with the specifications in Subpart B of Part 15 of FCC rules,
which are designed to provide reasonable protection against such interference when the equipment is operated in a commercial
environment. Operation of this equipment in a residential area is likely to cause interference, in which case the user at his own
expense will be required to take whatever measures may be necessary to correct the interference.
Changes or modifications not expressly approved by the party responsible for compliance could void the user’s authority to
operate the equipment.
This digital apparatus does not exceed the Class A limits for radio noise emis sion from digital apparatus set out in the Radio
Interference Regulation of Industry Canada.
Le présent appareil numérique n’émet pas de bruits radioélectriques dépassant les limites applicables aux appareils numériques
de la classe A prescrites dans le Règlement sur le brouillage radioélectrique publié par Industrie Canada.

724-746-5500 | blackbox.com
Page 5
Table of Contents
Chapter
1. Specifications ....................................................................................................................................................................6
2. Overview ....................................................................................................................................................................7
2.1 Introduction .............................................................................................................................................................7
2.2 Components ...........................................................................................................................................................7
2.2.1 Front Panel ..................................................................................................................................................7
2.2.2 Rear Panel ..................................................................................................................................................7
2.3 What’s Included ......................................................................................................................................................8
2.4 Typical Applications ..................................................................................................................................................8
3. Installation ....................................................................................................................................................................9
3.1 Linking the VGA USB/PS2 1-Port Module to the ServTray ........................................................................................9
3.2 Hardware Installation ..............................................................................................................................................9
3.2.1 Connecting the Console, Keyboard, and Mouse ........................................................................................9
3.2.2 Powering On the ServTray .........................................................................................................................11
Appendix. Troubleshooting. .........................................................................................................................................................12
A.1 Problems/Possible Causes/Solutions .......................................................................................................................12
A.2 Contacting Black Box ............................................................................................................................................13
A.3 Shipping and Packaging .........................................................................................................................................13

724-746-5500 | blackbox.com
Page 6
Chapter 1: Specifications
1. Specifications
Cable Length (Maximum) — 16.7 ft. (5 m) at PC ports for PS/2
®
and USB
Hardware — Works with PS/2 or USB PCs, compatible with DVI or VGA sources
Plug-and-Play — Yes
Rear-mount Brackets — 1U high, included
Resolution — Up to 2048 x 1152, DDC2B
Supported Operating Systems — Windows
®
98/Me/2000/XP, Windows NT
®
, Windows Vista
®
, and Windows 7
User Controls — None; connects to ServTray via its Centronics
®
connector
Connectors — Computer: (1) HD15 male, (1) DVI female, (2) 6-pin mini-DIN female, (1) USB Type B, (1) barrel
connector for power;
Interface to ServTray: (1) Centronics 36-pin male
Indicators — None
Temperature Tolerance — Operating: 32 to 104° F (0 to 40° C);
Storage: -4 to +140° F (-20 to +60° C)
Relative Humidity — Up to 80%, noncondensing
Power — 12 VDC, 3 A (when connected to a ServTray); 9-12 VDC, 500 mA (when not connected to a ServTray)
Size — 1.57"H (1U) x 15.9"W x 4.5"D (4 x 40.4 x 11.4 cm); fits in 19" rack
Weight — 2 lb. (0.9 kg)

724-746-5500 | blackbox.com
Page 7
Chapter 2: Overview
2. Overview
2.1 Introduction
The DVI/VGA USB/PS2 1-Port Module allows you to connect the ServTray to one computer via a DVI/VGA, PS/2, or USB cable.
The module works with most common Windows operating systems. Plus, it supports video resolutions of up to 2048 x 1152,
DDC2B.
2.2 Components
2.2.1 Front Panel
Figure 2-1 shows the DVI/VGA USB/PS2 1-Port Module’s front view. The Centronics connector links directly to the ServTray.
1
Figure 2-1. The DVI/VGA USB/PS2 1-Port Module front-panel view.
2.2.2 Rear Panel
Figure 2-2 shows the DVI/VGA USB/PS2 1-Port Module’s rear view. Table 2-1 describes the components numbered in Figures 2-1
and 2-2.
2 6 4 7
5 8 3
Figure 2-2. The VGA USB/PS2 1-Port Module back-panel view.
Table 2-1. Front- and rear-panel components.
Number Component Description
1 Centronics connector Links to ServTray
2 Barrel connector 12-VDC power connector
3 HD15 connector Links to computer’s monitor port
4 6-pin mini DIN connector Links to computer’s PS/2 mouse port
5 6-pin mini DIN connector Links to computer’s PS/2 keyboard port
6 USB Type B connector Links to computer’s USB keyboard/mouse port
7 DVI connector Links to computer’s DVI video card
8 Video selector switch Selects DVI or VGA input signal

724-746-5500 | blackbox.com
Page 8
Chapter 2: Overview
2.3 What’s Included
The package should contain the following items. If anything is missing or damaged, please contact Black Box at 724-746-5500 or
info@blackbox.com.
• (1) DVI/VGA USB/PS2 1-Port Module
• (1) 3-in-1 cable for VGA and PS/2 computers
• (1) 2-in-1 cable for VGA and USB computers
• (1) 2-in-1 cable for DVI and USB computers
• (10) 0.19" x 0.43" (0.5 x 1.1 cm) screws
• (10) 0.12" x 0.24" (0.3 x 0.6 cm) screws
• This user’s manual
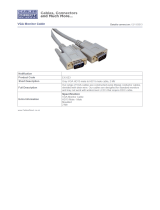
2.4 Typical Applications
The DVI/VGA USB/PS2 1-Port Module can be used to enable the KVT41xA-R2, KVT517A, and KVT517A-WIDE to manage one
PS/2 and USB computer directly connected to the module as shown in Figure 2-3.
Centronics connector
(links to ServTray,
KVT41xA-R2,
KVT517A, or
KV T517A-WIDE)
DVI/VGA USB/PS2
1-Port Module
(KVT6S1UV)
Figure 2-3. Single computer configuration.

724-746-5500 | blackbox.com
Page 9
Chapter 3: Installation
3. Installation
3.1 Linking the DVI/VGA USB/PS2 1-Port Module to the ServTray
The DVI/VGA USB/PS2 1-Port Module is 1U high and is designed to connect to the ServTray via a Centronics connector.
CAUTION: Do not place cables near things that create electrical noise such as fluorescent lighting, air conditioning equipment, etc.
3.2 Hardware Installation
This section provides instructions for the basic hardware setup of a single DVI/VGA USB/PS2 1-Port Module.
CAUTION: Before you begin, make sure that power to all the devices that you will be connecting is turned off. To prevent damage
caused by ground potential differences, make sure that all devices are properly grounded. If you don’t follow these
instructions, your computers, the ServTray, and/or the DVI/VGA USB/PS2 1-Port Module could be damaged.
3.2.1 Connecting the Computer Console, Keyboard, and Mouse
1. Power off all computers.
2. Using the 3-in-1 or 2-in-1 cable (all cables included, see Figure 3-1), connect the HD15 VGA female or DVI male, keyboard, and
mouse connectors on the cable to the console VGA, keyboard, and mouse ports on the back of the module.

724-746-5500 | blackbox.com
Page 10
Chapter 3: Installation
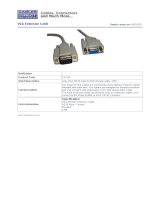
2-in-1 Cable
(included)
3-in-1 Cable
(included)
HD15 female
connector
(2) 6-pin mini DIN
male connectors
(2) 6-pin mini DIN
male connectors
HD15 male
connector
HD15 female
connector
HD15 male
connector
USB Type B
connector
USB Type A
connector
This side connects
to the computer/
server.
This side attaches to
the ServTray unit’s
KVM module.
This side attaches
to the ServTray
unit’s KVM
module.
This side connects
to the computer/
server.
2-in-1 Cable
(included)
USB Type B
connector
USB Type A
connector
DVI-I male
connector
DVI-I male
connector
This side attaches
to the ServTray
unit’s KVM
module.
This side connects
to the computer/
server.
Figure 3-1. 3-to-1 PS/2 cable and 2-to-1 USB cables (all included).

724-746-5500 | blackbox.com
Page 11
Appendix: Troubleshooting
3. Connect the other end of the 3-in-1 or 2-in-1 cable to the monitor, keyboard, and mouse ports on the computer. See Figure
3-2.
HD15 keyboard,
mouse, and monitor
connection
3-in-1 cable
DVI
cable
PS/2 or USB
computer
Figure 3-2. Console keyboard, mouse, and monitor connections.
NOTE: One video signal is supported at any given time.
3.2.2 Powering On the ServTray
Connect the power adapter’s barrel connector to the power jack on the rear of the module. Then plug the power supply into an
available power outlet.

724-746-5500 | blackbox.com
Page 12
Appendix: Troubleshooting
Appendix. Troubleshooting
A.1 Problems/Possible Causes/Solutions
Problem: The mouse does not work.
Possible Cause #1: Too many mouse drivers are installed in the computer.
Solution #1: Make sure there is only one mouse driver installed in each computer.
Possible Cause #2: The wrong mouse driver is installed.
Solution #2: Use a Microsoft
®
mouse driver.
Problem: The monitor works fine, but the keyboard and mouse do not work.
Possible Cause #1: Cables might be swapped.
Solution #1: Connect the cables according to the PC99 standard keyboard and mouse icons on the connectors.
Possible Cause #2: Incorrect cables are used.
Solution #2: Use only PS/2 or USB compatible cables.
Problem: The video image is not clear.
Possible Cause: You’re using poor quality video cables.
Solution: Use UL
®
2919 rated, double-shielded video cables.
Problem: No screen image appears.
Possible Cause: The selected computer is not powered on.
Solution: Power on the computer.
Problem: A keyboard error appears when you power on the ServTray.
Possible Cause: The keyboard cable connection is loose.
Solution: Make sure that the keyboard cable connections are secure.
Problem: Alphabet symbols on the computer’s monitor are blue or have shadows.
Possible Cause: Resolution settings are incorrect.
Solution: Under Windows Control Panel, set the computer’s video output to match the highest resolution for the monitor with a
large font for best performance.

724-746-5500 | blackbox.com
Page 13
Appendix: Troubleshooting
A.2 Contacting Black Box
If you determine that your DVI/VGA USB/PS2 1-Port Module is malfunctioning, do not attempt to alter or repair the unit.
It contains no user-serviceable parts. Contact Black Box at 724-746-5500 or info@blackbox.com.
Before you do, make a record of the history of the problem. We will be able to provide more efficient and accurate assistance if
you have a complete description, including:
• the nature and duration of the problem.
• when the problem occurs.
• the components involved in the problem.
• any particular application that, when used, appears to create the problem or make it worse.
A.3 Shipping and Packaging
If you need to transport or ship your DVI/VGA USB/PS2 1-Port Module:
• Package it carefully. We recommend that you use the original container.
• If you are shipping the DVI/VGA USB/PS2 1-Port Module for repair, make sure you include everything that came in the original
package. Before you ship, contact Black Box to get a Return Authorization (RA) number.

724-746-5500 | blackbox.com
Page 14
NOTES

724-746-5500 | blackbox.com
BLACK BOX
®
Black Box Tech Support: FREE! Live. 24/7.
Tech support the
way it should be.
Great tech support is just 30 seconds away at 724-746-5500 or blackbox.com.
KVT6S1UV, version 1
About Black Box
Black Box provides an extensive range of networking and infrastructure products. You’ll find everything from cabinets and racks
and power and surge protection products to media converters and Ethernet switches all supported by free, live 24/7 Tech support
available in 30 seconds or less.
© Copyright 2011. Black Box Corporation. All rights reserved.
/