
Avaya QoS Manager
User Guide
August 2003

Avaya QoS Manager 2.0 User Guide
Copyright 2003 Avaya Inc. ALL RIGHTS RESERVED
The products, specifications, and other technical information regarding the products
contained in this document are subject to change without notice. All information in this
document is believed to be accurate and reliable, but is presented without warranty of any
kind, express or implied, and users must take full responsibility for their application of any
products specified in this document. Avaya disclaims responsibility for errors which may
appear in this document, and it reserves the right, in its sole discretion and without notice, to
make substitutions and modifications in the products and practices described in this
document.
Avaya is a registered trademark and a trademark of Avaya Inc.
© 2003 Avaya Inc. All rights reserved. All trademarks identified by the ® or are registered
trademarks or trademarks, respectively, of Avaya Inc. All other trademarks are the property
of their respective owners.
Release 2.003

Avaya QoS Manager User Guide iii
Table of Contents
Preface . . . . . . . . . . . . . . . . . . . . . . . . . . . . . . . . . . . . . . . . . . . . . . . . . .vi
The Purpose of This On-Line Help . . . . . . . . . . . . . . . . . . . . . . . . . . vi
Who Should Use This On-Line Help . . . . . . . . . . . . . . . . . . . . . . . . . vi
Chapter 1 Avaya QoS Manager Overview . . . . . . . . . . . . . . . . . . . 1
Overview . . . . . . . . . . . . . . . . . . . . . . . . . . . . . . . . . . . . . . . . . . . . . .1
Policy Overview . . . . . . . . . . . . . . . . . . . . . . . . . . . . . . . . . . . . . . . . .2
Rule Overview . . . . . . . . . . . . . . . . . . . . . . . . . . . . . . . . . . . . . . . . . .2
QoS Overview . . . . . . . . . . . . . . . . . . . . . . . . . . . . . . . . . . . . . . . . . . .3
DSCP . . . . . . . . . . . . . . . . . . . . . . . . . . . . . . . . . . . . . . . . . . . . . .4
Class of Service . . . . . . . . . . . . . . . . . . . . . . . . . . . . . . . . . . . . . .4
Trust . . . . . . . . . . . . . . . . . . . . . . . . . . . . . . . . . . . . . . . . . . . . . . .4
Chapter 2 Getting Started with Avaya QoS Manager . . . . . . . . . . 6
The User Interface . . . . . . . . . . . . . . . . . . . . . . . . . . . . . . . . . . . . . . . .7
Toolbar . . . . . . . . . . . . . . . . . . . . . . . . . . . . . . . . . . . . . . . . . . . . .7
Tree View . . . . . . . . . . . . . . . . . . . . . . . . . . . . . . . . . . . . . . . . . . .8
Table View . . . . . . . . . . . . . . . . . . . . . . . . . . . . . . . . . . . . . . . . . .9
Form View . . . . . . . . . . . . . . . . . . . . . . . . . . . . . . . . . . . . . . . . . .9
Status Line . . . . . . . . . . . . . . . . . . . . . . . . . . . . . . . . . . . . . . . . . .9
Tooltips . . . . . . . . . . . . . . . . . . . . . . . . . . . . . . . . . . . . . . . . . . .10
Managing Tables . . . . . . . . . . . . . . . . . . . . . . . . . . . . . . . . . . . . . . . .10
Saving Configuration Changes . . . . . . . . . . . . . . . . . . . . . . . . . . . . .11
Running Changes . . . . . . . . . . . . . . . . . . . . . . . . . . . . . . . . . . .11
Committed Changes . . . . . . . . . . . . . . . . . . . . . . . . . . . . . . . . .11
Searching for Avaya QoS Manager Components . . . . . . . . . . . . . . .12
Using Avaya QoS Manager Help . . . . . . . . . . . . . . . . . . . . . . . . . . .12
Opening the Help to the Contents Page . . . . . . . . . . . . . . . . . .12
Opening the Help to a Topic of Interest . . . . . . . . . . . . . . . . . . .12
Chapter 3 Avaya QoS Manager Views . . . . . . . . . . . . . . . . . . . . . 14
Avaya QoS Manager Views Overview . . . . . . . . . . . . . . . . . . . . . . .14
Using the Tree View . . . . . . . . . . . . . . . . . . . . . . . . . . . . . . . . . . . . .15
Using the Table View . . . . . . . . . . . . . . . . . . . . . . . . . . . . . . . . . . . .16
Device List . . . . . . . . . . . . . . . . . . . . . . . . . . . . . . . . . . . . . . . . .16
WAN Interfaces . . . . . . . . . . . . . . . . . . . . . . . . . . . . . . . . . . . . .17
Policy List . . . . . . . . . . . . . . . . . . . . . . . . . . . . . . . . . . . . . . . . . .18
Adding Policies . . . . . . . . . . . . . . . . . . . . . . . . . . . . . . . . . .20

iv Avaya QoS Manager User Guide
Table of Contents
Deleting Policies . . . . . . . . . . . . . . . . . . . . . . . . . . . . . . . . .20
Rules List . . . . . . . . . . . . . . . . . . . . . . . . . . . . . . . . . . . . . . . . . .21
Adding Rules . . . . . . . . . . . . . . . . . . . . . . . . . . . . . . . . . . . .25
Modifying Rules . . . . . . . . . . . . . . . . . . . . . . . . . . . . . . . . .25
Copying Rules . . . . . . . . . . . . . . . . . . . . . . . . . . . . . . . . . . .25
Moving Rules . . . . . . . . . . . . . . . . . . . . . . . . . . . . . . . . . . .26
Deleting Rules . . . . . . . . . . . . . . . . . . . . . . . . . . . . . . . . . . .26
Policy Enforcement Points . . . . . . . . . . . . . . . . . . . . . . . . . . . . .27
DSCP Mapping Table . . . . . . . . . . . . . . . . . . . . . . . . . . . . . . . . .27
Composite Operations Table . . . . . . . . . . . . . . . . . . . . . . . . . . .28
Adding Composite Actions . . . . . . . . . . . . . . . . . . . . . . . . .29
Modifying Composite Actions . . . . . . . . . . . . . . . . . . . . . .29
Deleting Composite Actions . . . . . . . . . . . . . . . . . . . . . . . .31
Device Configuration/Configuration . . . . . . . . . . . . . . . . . . . . .31
Device Configuration . . . . . . . . . . . . . . . . . . . . . . . . . . . . .31
Policy List Configuration . . . . . . . . . . . . . . . . . . . . . . . . . .32
Using Address Wildcards . . . . . . . . . . . . . . . . . . . . . . . . . . . . . . . . .34
Chapter 4 Applications Editor Tool . . . . . . . . . . . . . . . . . . . . . . . . 36
Applications Editor Overview . . . . . . . . . . . . . . . . . . . . . . . . . . . . . .36
Using the Applications Editor . . . . . . . . . . . . . . . . . . . . . . . . . . . . . .37
Adding Application Protocols . . . . . . . . . . . . . . . . . . . . . . . . . .37
Modifying an Application Protocol . . . . . . . . . . . . . . . . . . . . . .38
Deleting an Application Protocol . . . . . . . . . . . . . . . . . . . . . . . .38
Applying Changes . . . . . . . . . . . . . . . . . . . . . . . . . . . . . . . . . . .38
Reports . . . . . . . . . . . . . . . . . . . . . . . . . . . . . . . . . . . . . . . . . . . . . . .38
Chapter 5 Deployment Wizard . . . . . . . . . . . . . . . . . . . . . . . . . . . 40
Deployment Wizard Overview . . . . . . . . . . . . . . . . . . . . . . . . . . . . .40
Using the Deployment Wizard . . . . . . . . . . . . . . . . . . . . . . . . . . . . .41
The Welcome Screen . . . . . . . . . . . . . . . . . . . . . . . . . . . . . . . . .41
The Configuration Screen . . . . . . . . . . . . . . . . . . . . . . . . . . . . .41
The Source Screen . . . . . . . . . . . . . . . . . . . . . . . . . . . . . . . . . . .42
The Target Screen . . . . . . . . . . . . . . . . . . . . . . . . . . . . . . . . . . .42
The Activate Policy Screen . . . . . . . . . . . . . . . . . . . . . . . . . . . .43
The Summary Screen . . . . . . . . . . . . . . . . . . . . . . . . . . . . . . . .43
Deployment Status Window . . . . . . . . . . . . . . . . . . . . . . . . . . .43
Chapter 6 IP Simulate . . . . . . . . . . . . . . . . . . . . . . . . . . . . . . . . . . . 45
IP Simulate Overview . . . . . . . . . . . . . . . . . . . . . . . . . . . . . . . . . . . .45
Using IP Simulate . . . . . . . . . . . . . . . . . . . . . . . . . . . . . . . . . . . . . . .46
Appendix A Menus . . . . . . . . . . . . . . . . . . . . . . . . . . . . . . . . . . . . . 50
File Menu . . . . . . . . . . . . . . . . . . . . . . . . . . . . . . . . . . . . . . . . . . . . .50
Edit Menu . . . . . . . . . . . . . . . . . . . . . . . . . . . . . . . . . . . . . . . . . . . . .50
View Menu . . . . . . . . . . . . . . . . . . . . . . . . . . . . . . . . . . . . . . . . . . . .51
Actions Menu . . . . . . . . . . . . . . . . . . . . . . . . . . . . . . . . . . . . . . . . . .51

Avaya QoS Manager User Guide v
Table of Contents
Tools Menu . . . . . . . . . . . . . . . . . . . . . . . . . . . . . . . . . . . . . . . . . . . .51
Help Menu . . . . . . . . . . . . . . . . . . . . . . . . . . . . . . . . . . . . . . . . . . . .52
Appendix B ICMP Packet Types & Codes. . . . . . . . . . . . . . . . . . . . 53
ICMP Packet Type/Code List . . . . . . . . . . . . . . . . . . . . . . . . . . . . . . .53
Index. . . . . . . . . . . . . . . . . . . . . . . . . . . . . . . . . . . . . . . . . . . . . . . . . . . 56

Avaya QoS Manager User Guide vi
Preface
Welcome to Avaya QoS Manager. This section provides an introduction
to this on-line help. It includes the following sections:
The Purpose of This
On-Line Help - A description of the goals
of this on-line help.
Who Should Use This
On-Line Help - The intended audience
of this on-line help.
The Purpose of This On-Line Help
This on-line help contains the information needed to use Avaya QoS
Manager efficiently and effectively.
Who Should Use This On-Line Help
This guide is intended for use by network managers familiar with
network management and its fundamental concepts.
ICMP Packet Types & Codes
- All ICMP Packet Types and
corresponding Codes as used by Avaya QoS Manager.

Avaya QoS Manager User Guide 1
1
Avaya QoS Manager Overview
This topic provides an overview of terms and concepts used in
Avaya QoS Manager. It includes the following sections:
Overview
- A general overview of Avaya QoS Manager.
Policy Overview
- A description of the composition and
function of policies.
Rule Overview
- A description of the rules that comprise
policies.
QoS Overview
- A description of Quality of Service (QoS),
including DSCP and DSCP mapping, Class of Service (CoS) and
Trust in Avaya QoS Manager.
Overview
Policy Management is used by Network managers to control network
traffic by applying rules to packets. The rules are based on the packets'
classification, application, source, and destination.
Policy Management allows network managers to implement forwarding
and routing based on policies and rules, and focus on Quality of Service
(QoS). For example, you can define a set of rules that states, packets
from the R&D department to the marketing department are forwarded
with a lower priority than packets from the R&D department to the
development team. Avaya QoS Manager provides an efficient method
for you to determine network priorities using policies and rules. Rules
are listed in the tables and are implemented in the order that they
appear, with precedence given to mandatory rules. This allows you to
determine the order in which rules are applied.
Avaya QoS Manager is an SNMP based application using MIBs to interact
with Avaya Devices. Avaya QoS Manager provides QoS and access
control management for small to medium sized networks operating in a
LAN.

Chapter 1
2 Avaya QoS Manager User Guide
Policy Overview
Policies determine the actions taken on network traffic entering a
module.
A policy is a set of rules governing the forwarding of information packets
in Avaya device modules. Avaya QoS Manager provides you with a
Policy List that displays available policies, their statuses, and whether or
not changes have been made to specific policies.
Multiple policies can be created for a module, but only one policy can be
active on a module at a time. Active policies appear in green in the Tree
View. Policies can contain invalid rules. However, a policy that contains
an invalid mandatory rule cannot be activated. For more information on
viewing and using policies, refer to
Policy List on page 18.
Policies can be activated on individual modules. The Deployment Wizard
provides a simple method for activating a policy on a group of modules.
For more information on the Deployment Wizard, refer to Chapter 5,
Deployment Wizard
.
Rule Overview
Rules are the building blocks of policies. Rules provide the information
about how the module forwards a defined data packet. A module can
forward packets with a priority of 0 to 7, permit the packets to pass as is,
or block the passage of the packet, optionally sending a message to the
module's manager.
A rule includes the following information:
A description of the packets to which the rule applies.
The action to perform on the described packets.
Whether or not the rule is mandatory.
For example, you can define a rule as FTP packets from IP address
143.32.1.2 to subnet 145.7.0.0 must be forwarded with a priority 4.
Packet Description - FTP packets from IP address 143.32.1.2 to
subnet 145.7.0.0.
Mandatory - Must be.
Action - Forwarded with Priority Level 4.

Avaya QoS Manager User Guide 3
Avaya QoS Manager Overview
Each packet entering a module is matched to the active policy rules in
the following order:
All mandatory rules in the order of their appearance in the
Rules List.
All non-mandatory rules in the order of their appearance in the
Rules List.
The first rule matched to the packet is applied. Therefore, the order of
the rules in the table is important.
Rules can be viewed, created, modified, and deleted using the Rules List.
For more information on viewing and configuring rules, refer to
Rules
List on page 21.
QoS Overview
QoS is a scheme that enables network managers to improve the flow of
important traffic on their networks. Higher priority packets are given
precedence on being moved through the network.
For example: In order to ensure better network service you can specify
that information packets from the accounting department are forwarded
immediately, while the marketing department is restricted from
accessing the Internet.
Avaya QoS Manager supports two QoS schemes:
DSCP
Class of Service (CoS)
Avaya QoS Manager uses Trust to determine which QoS scheme is used
to forward packets. The following topics are discussed in this section:
DSCP
Class of Service
Trust

Chapter 1
4 Avaya QoS Manager User Guide
DSCP
Differential Service Code Point (DSCP) provides a method of tagging IP
packets with priority information.
A DSCP value between 0 and 63 is added to the IP header of data
packets. Avaya QoS Manager supports 8 levels of forwarding priorities.
The 64 DSCP priority levels are mapped to the 8 levels in Avaya QoS
Manager. Each DSCP value is mapped to its corresponding priority level.
The DSCP Mapping table allows you to configure the correlation of
DSCP priorities to the priority levels in Avaya QoS Manager. DSCP
values 0-63 are assigned a priority level between 0 and 7.
Avaya QoS Manager allows you to assign DSCP priority values in the
DSCP Mapping table. For more information on using DSCP mapping,
refer to
DSCP Mapping Table on page 27.
Class of Service
Class of Service (CoS) is the 802.1p priority scheme used to provide a
method of tagging packets with priority information.
A CoS value between 0-7 is added to the Layer II header of the data
packets. Zero is the lowest priority and seven is the highest.
Avaya QoS Managers priority scheme parallels that of CoS priority.
Avaya QoS Manager can use CoS tags to determine the priority with
which to forward packets.
Trust
A data packet can contain conflicting priority information. A DSCP tag
may give a packet a very high priority, while the CoS tag may give the
same packet a very low priority.
Trust determines the QoS scheme used by Avaya switches for packets
entering a module. There are four possible Trust settings:
DSCP Value - Avaya switches use only the packet's DSCP tag. If
a packet entering a module matches no rules, or matches a rule
with a permit operation, the packet will be forwarded with a
priority based on the DSCP Mapping of the packet's DSCP tag.

Avaya QoS Manager User Guide 5
Avaya QoS Manager Overview
CoS Priority - Avaya switches use only the packets CoS tag. If a
packet entering a module matches no rules, or matches a rule
with a permit operation, the packet will be forwarded with the
priority in the packet's CoS tag.
Untrust - Avaya QoS Manager ignores both DSCP tags and CoS
priority tags. If a packet entering a module matches no rules, or
matches a rule with a permit operation, the packet will be
forwarded with the default priority.
Both - Avaya QoS Manager uses DSCP tag and CoS priority tags.
If a packet entering a module matches no rules, or matches a rule
with a permit operation, the packet's DSCP priority (based on
the DSCP Mapping table) and the packet's CoS are compared. The
packet is forwarded with the higher of the two priorities.

Avaya QoS Manager User Guide 6
2
Getting Started with Avaya
QoS Manager
This topic provides an overview of the user interface It includes the
following sections:
The User Interface
- An introduction to the user interface,
including using the toolbar.
Managing Tables
- Instructions on how to manage tables.
Saving Configuration Changes
- Instructions for applying
changes to the Policy List and committing changes to modules.
Searching for Avaya QoS Manager Components
-
Instructions on how to search for devices and modules.
Using Avaya QoS Manager Help
- Instructions on how to use
the on-line help.
Avaya QoS Manager User Guide 7
Getting Started with Avaya QoS Manager
The User Interface
The user interface consists of the following elements:
Menu Bar - Menus for accessing functions. For a full listing of all
the menus, refer to Appendix A,
Menus
.
Toolbar
- Toolbar buttons for accessing Avaya QoS Manager
functions.
Tree View
- A hierarchical view of the network and the policies
created for specific modules.
Table View
- A window where tables open and where policies
and rules can be added, managed, modified, and deleted.
Form View
- A re-sizeable window where the IP Simulate form
opens.
Status Line
- An area at the bottom of the screen that displays
the IP of the device where the currently selected list in the Tree
View is applied, and the list number. The status line also displays a
progress bar when the Avaya QoS Manager opens, and when a
Refresh Discovery process is implemented, by selecting the
Network icon and refreshing the screen. There is also an icon in
the right corner of the Status Line displaying if a policy is read
only or read/write.
Tooltips
- Tooltips for viewing information about policies and
rules.
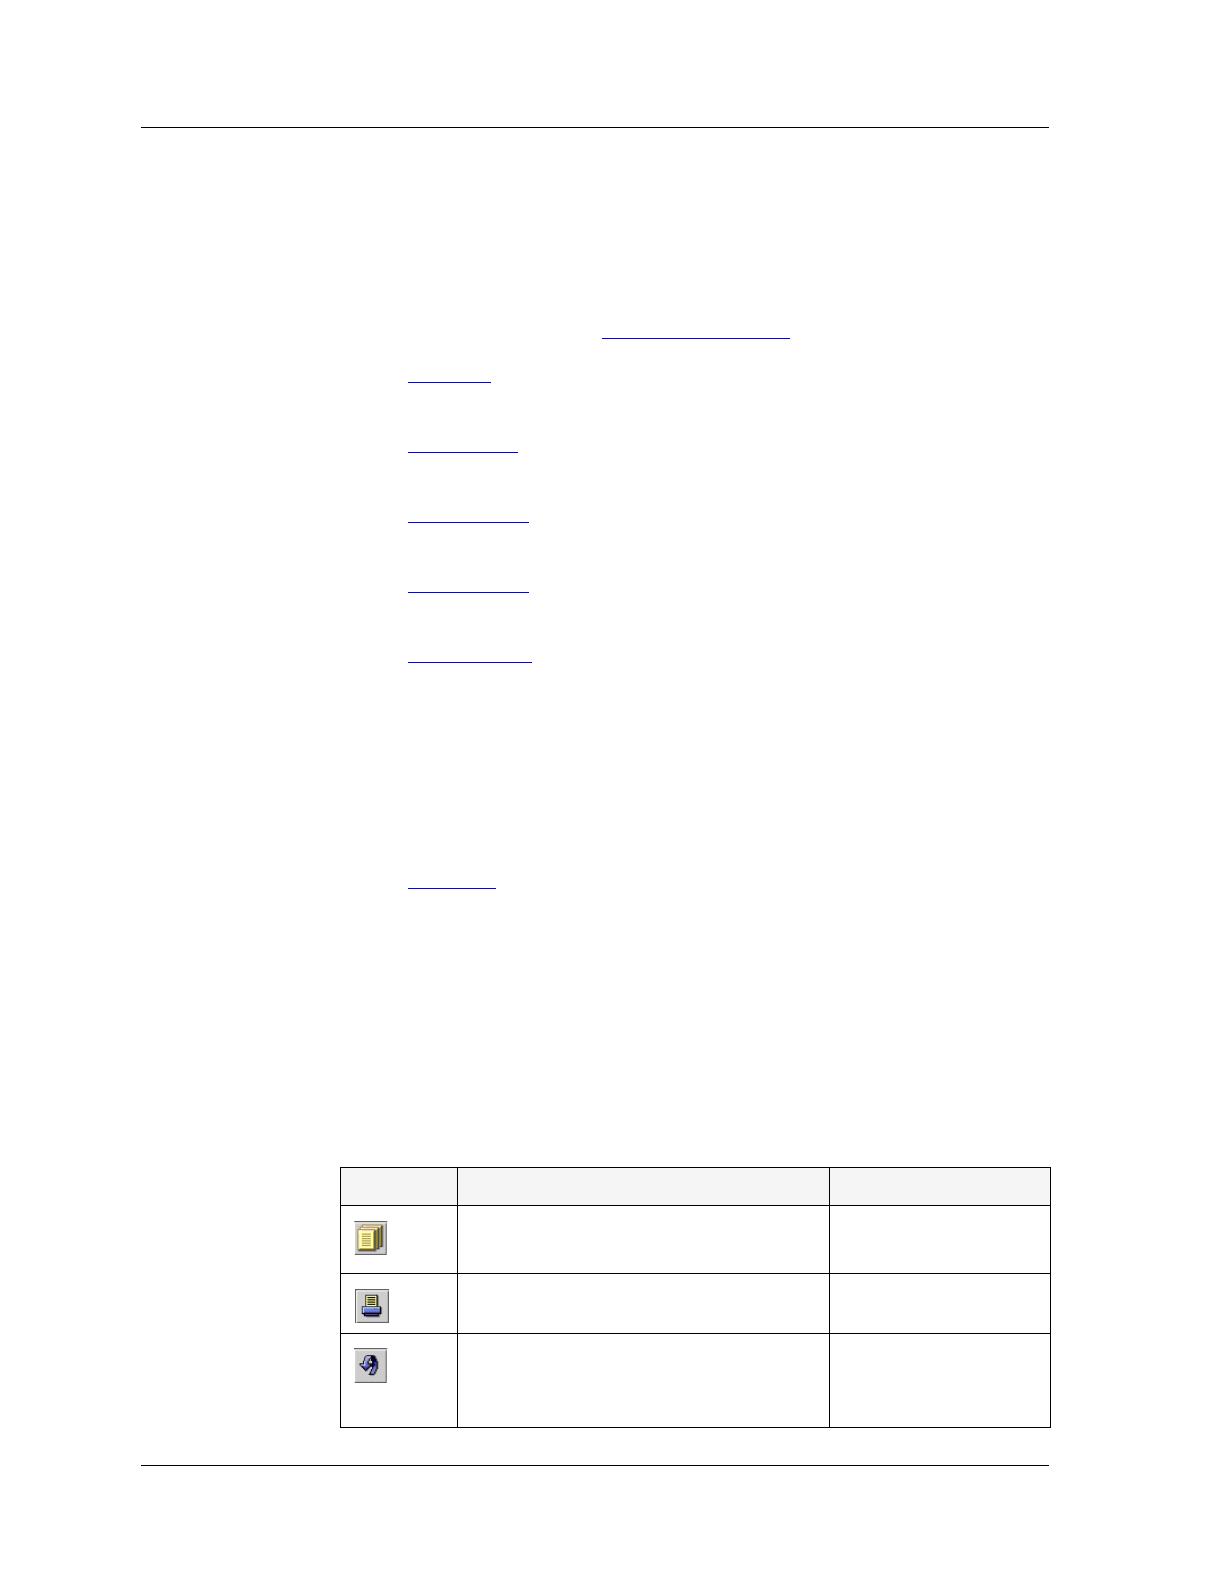
Too l bar
The toolbar provides shortcuts to Avaya QoS Managers main functions.
The table below describes the buttons on the toolbar and gives the
equivalent menu options.
Table 2-1. Toolbar Buttons
Buttons Description Menu Item
Creates an ASCII report of the
Table View.
File > Report
Prints the active view.
File > Print
Refreshes the Table View and
discards any changes that have not
been applied.
Edit > Revert
Chapter 2
8 Avaya QoS Manager User Guide
When you place the cursor on a toolbar button for one second, a tooltip
appears with the name of the button.
Tree View
The Tree View is a hierarchical representation of the network structure
and the policies created for modules in the network. To select modules
and policies, click their icons in the Tree View.
You can alternate the Tree View to display the following:
Inventory - All policies are displayed in the Tree View. There are
four levels in the hierarchy.
Active Policies - Only the active policies are displayed. There
are six levels in the hierarchy, as each policy list is displayed
under the interface and direction that it is active.
Alternate these displays using the option buttons at the bottom of the
Tree View pane.
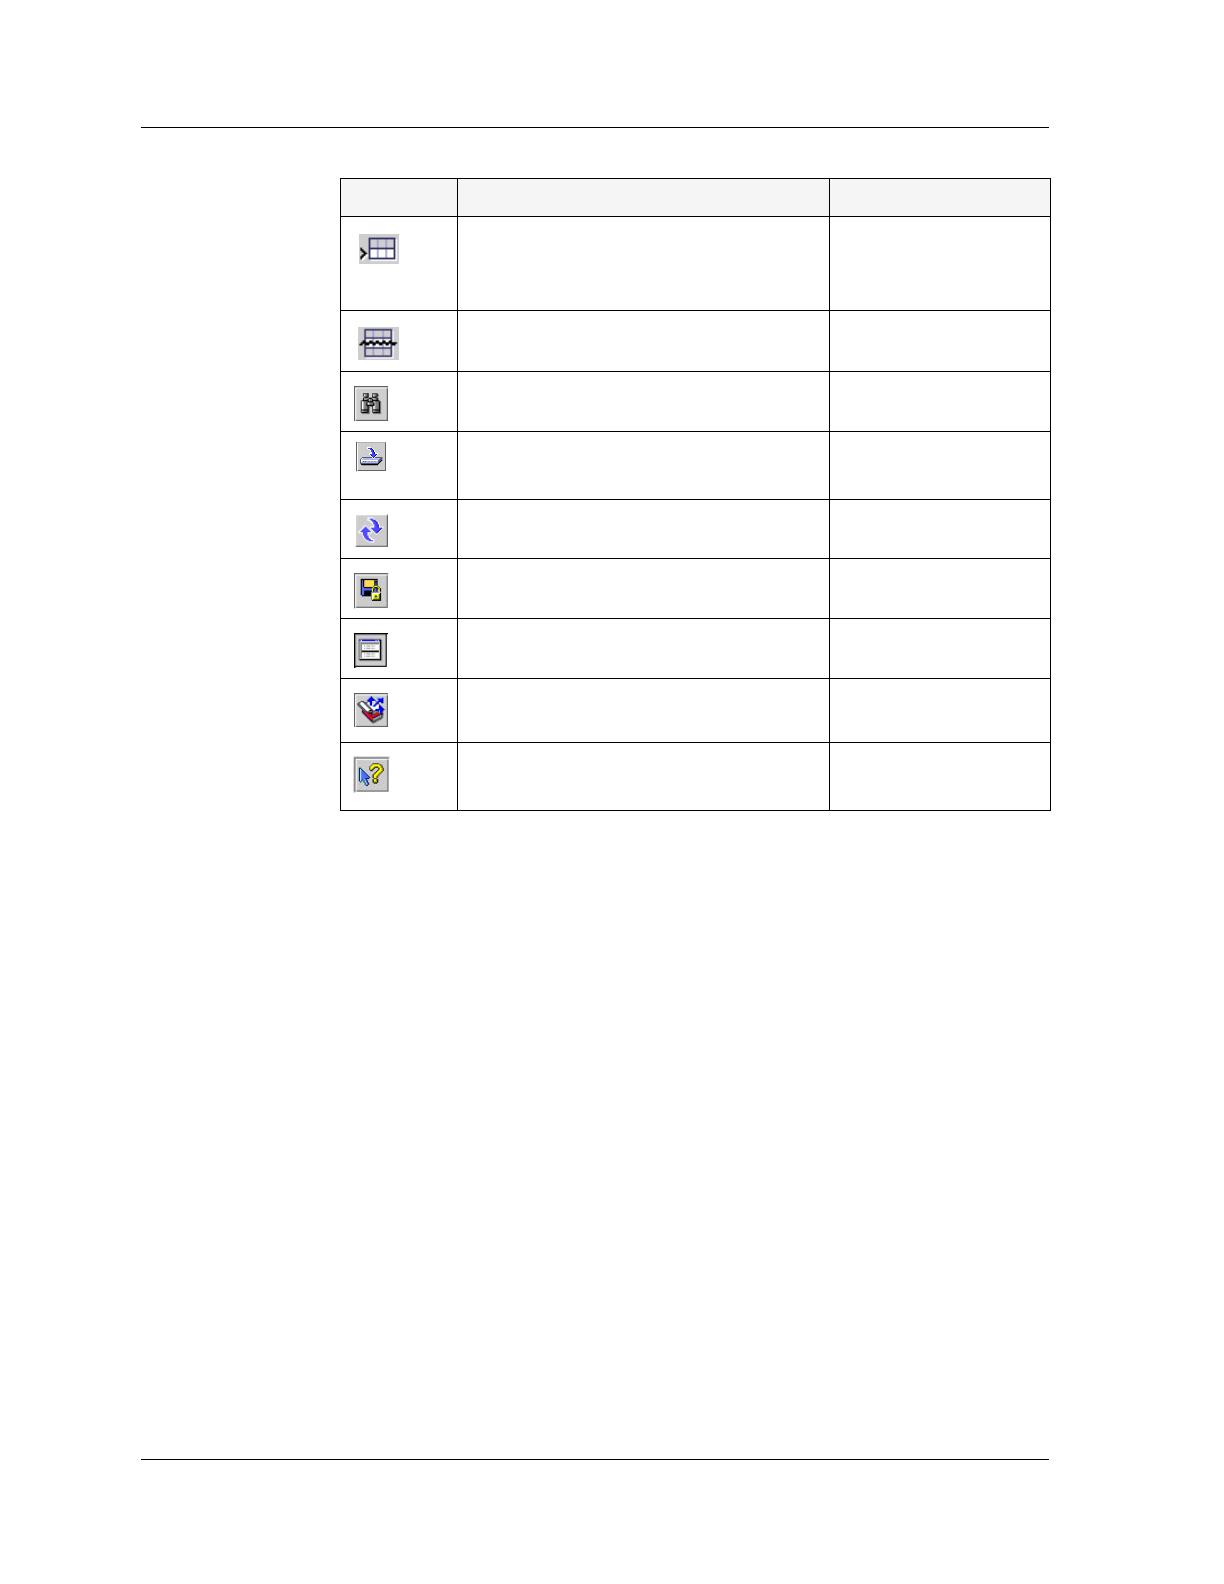
Adds a new QoS or ACL policy or
rule.
File > New List > QoS
List
,
ACL List
, or
Combined List
Deletes a policy or rule.
Edit > Delete
Opens the Find dialog box.
Edit > Find
Applies the changes in a table to
the device.
Refreshes the Tree View.
View > Refresh
Saves policies to the module.
File > Commit
Opens IP Simulate.
Actions > Simulate
Activates the Deployment Wizard.
Actions >
Deployment Wizard
Provides context-sensitive on-line
help.
Help > Help On
Table 2-1. Toolbar Buttons (Continued)
Buttons Description Menu Item

Avaya QoS Manager User Guide 9
Getting Started with Avaya QoS Manager
The highest level of the Tree View represents the entire network. The
lower levels represent stacks, devices, modules, and policies. For more
information on viewing information in the Tree View, refer to
Using the
Tree View on page 15.
Table V ie w
The Table View displays information associated with the item selected in
the Tree View. For example, if you select a device in the Tree View, the
policy lists associated with the device, and device configuration
properties appear in the Table View. To select items in the Table View,
click a row of the table. For more information on viewing information in
the Table View, refer to
Using the Table View on page 16.
Form View
The area below the Table View is where IP Simulate and the Deployment
wizard open. This area is resized by dragging the horizontal splitter bar
with the mouse. When IP Simulate or the Deployment Wizard are not
open, the Form View disappears and the Table View expands to take its
place. For more information on IP Simulate, refer to Chapter 6,
IP
Simulate. For more information on the Deployment Wizard, refer to
Chapter 5,
Deployment Wizard
.
Status Line
The Status Line shows the IP of the device where the currently selected
list in the Tree View is applied, and the list number. The status line also
displays a progress bar when the Avaya QoS Manager opens, and when a
Refresh Discovery process is implemented by selecting the Network icon
and refreshing the screen. There is also an icon in the right corner of the
Status Line displaying if a policy is read only or read/write.
The table below shows the possible read/write statuses with their
corresponding graphics, and gives a short explanation for each status.
Table 2-2. Read/Write Statutes
Graphic Status Description
Read/Write The policy is not currently active and can
be modified.
Chapter 2
10 Avaya QoS Manager User Guide
Too l tips
Tooltips provide information about a policy or rule.
If the cursor is placed on a policy, a tooltip appears with detailed
information about the policy, including if the policy is active.
If the cursor is placed on a rule, a tooltip appears with detailed
information about the rule including the rule definition. If the rule is
invalid, then the tooltip displays an error message, stating the reason for
the rule not being valid.
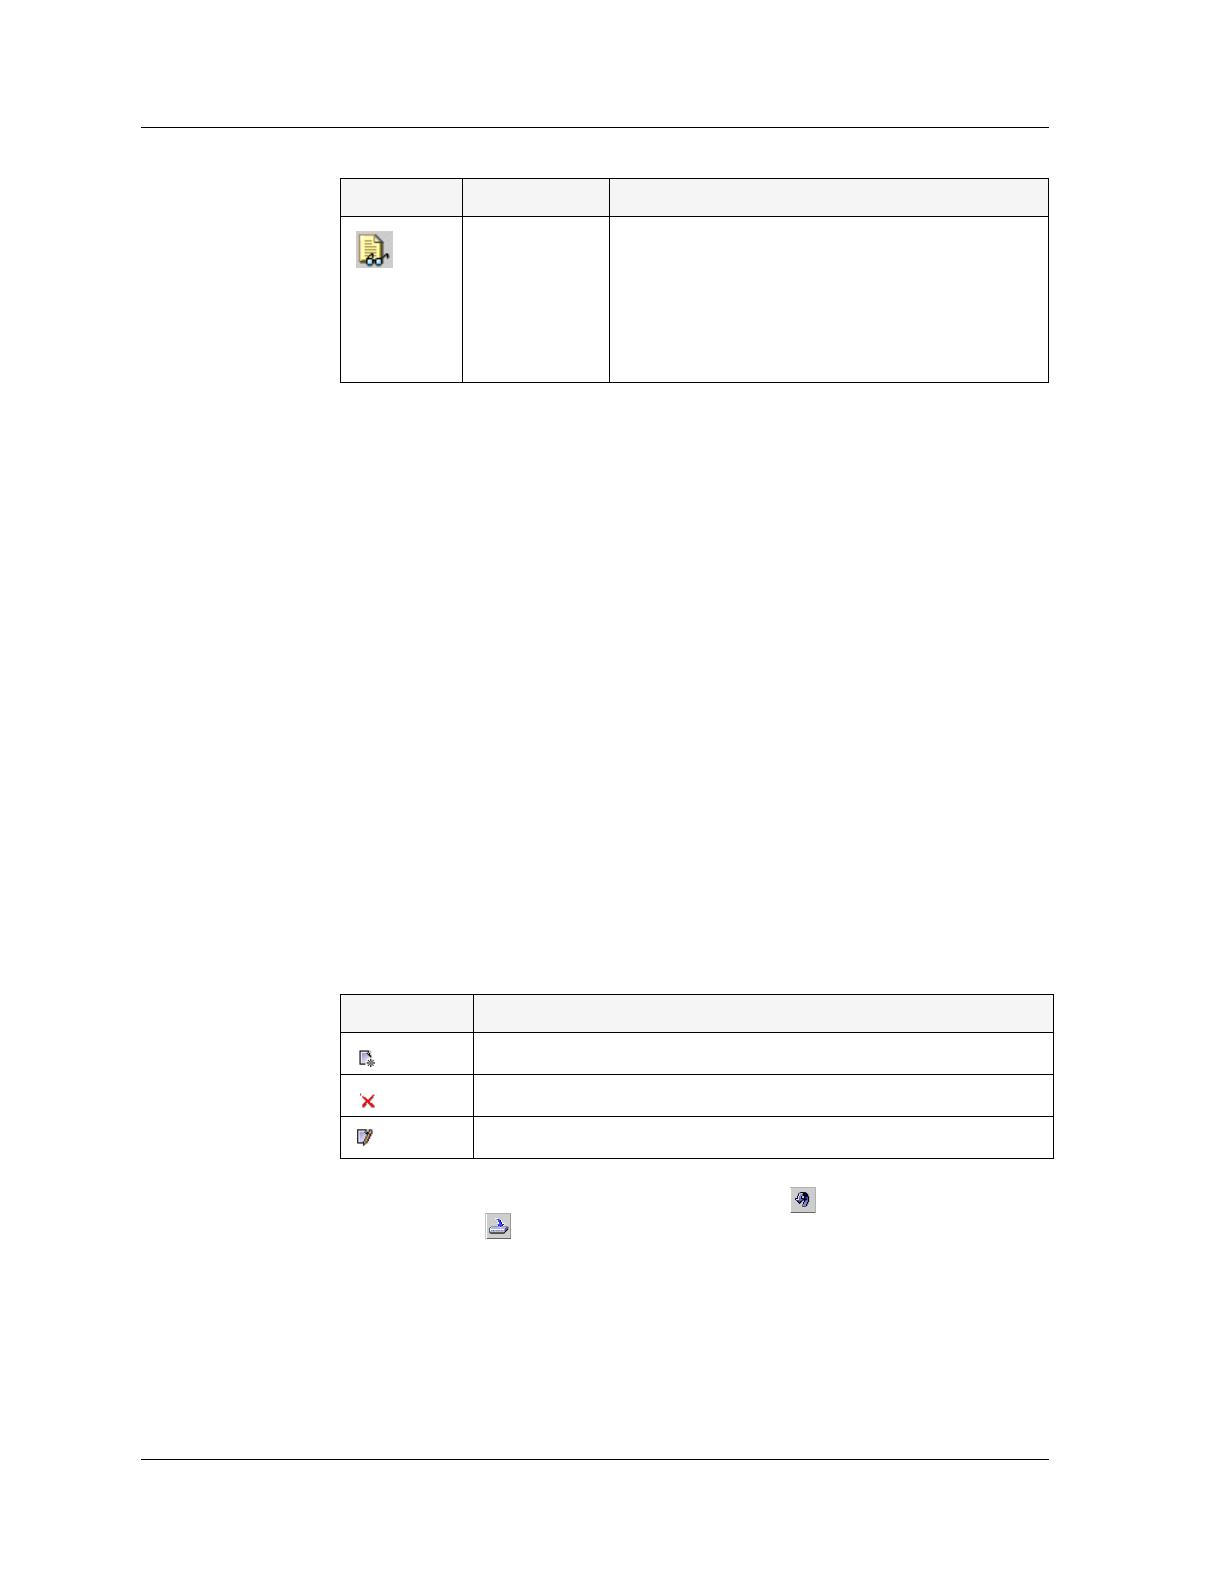
Managing Tables
The Avaya QoS Manager interface displays the status of each row in a
table. The following table shows symbols that appear at the start of a
row, with their corresponding explanations.
To undo all the changes made to a table, click . When all changes are
finalized, click to apply the changes. After you have applied the
changes the table is refreshed.
Read Only The policy cannot be modified. Possible
causes for this are:
The policy is currently active.
Avaya Policy Manager is managing
the module.
Table 2-2. Read/Write Statutes
Graphic Status Description
Table 2-3. Row Status
Symbol Explanation
The row is a new entry.
The row is to be deleted.
The row has been modified.

Avaya QoS Manager User Guide 11
Getting Started with Avaya QoS Manager
Saving Configuration Changes
Policies are stored on the modules for which they were created. There
are two levels of applying policy changes to Avaya QoS Manager:
Running Changes
- Changes are applied to the Policy, but are
not saved.
Committed Changes
- Changes are saved to the module.
Running Changes
After finalizing all changes to the Policy, the changes must be applied to
the Policy List.
To apply the changes to the module, click . The configuration
changes are applied to the module.
The changes will remain in effect until the module is reset. When the
module is reset, it is configured with the last saved configuration. All
changes that are applied, but not saved, are lost.
Committed Changes
To make configuration changes permanent, the changes must be
committed (saved) to the module.
To commit the configuration to the module:
Click .
Or
Select
File > Commit
. The changes are saved to the module.
* Note: The commit operation may take up to 20 seconds. Avoid
running other operations while committing polices to the
module.
* Note: Commit can only be used when a specific module is selected
in the Tree View.

Chapter 2
12 Avaya QoS Manager User Guide
Searching for Avaya QoS Manager Components
Avaya QoS Manager allows you to search for devices and modules in the
Tree View.
To search for an Avaya QoS Manager component:
1. Enter the IP address of the device for which to search.
2. Click
Find
. Avaya QoS Manager searches for the item.
If the requested device or module is found, the view with the desired
element is opened and the element is selected in the Tree View. If there is
no reaction to the search then the requested device or module was not
found.
Using Avaya QoS Manager Help
This section explains how to use the on-line help in Avaya QoS
Manager, and contains the following sections:
Opening the Help to the Contents Page
Opening the Help to a Topic of Interest
The on-line help can be opened to the contents page or directly to a topic
of interest.
Opening the Help to the Contents Page
To open the help to the contents page, select
Help > Contents
. The
on-line help opens to the contents page.
Opening the Help to a Topic of Interest
To open the help directly to a topic of interest:
1. Click .
Or
Select
Help > Help On
. The cursor changes to the shape of an
arrow with a question mark.
2. Click on a point of interest in Avaya QoS Manager. The help opens
to a topic explaining the clicked feature.

Avaya QoS Manager User Guide 13
Getting Started with Avaya QoS Manager

Avaya QoS Manager User Guide 14
3
Avaya QoS Manager Views
This topic describes the views in Avaya QoS Manager and how to use
them to add, modify, and delete policies and rules. It includes the
following sections:
Avaya QoS Manager Views Overview
- An overview of the
different views in Avaya QoS Manager.
Using the Tree View
- A detailed description of the Tree View
including how to navigate between the different levels of the tree.
Using the Table View
- A detailed description of the Table View
including a description of the table fields, instructions on adding,
modifying, and deleting policies and rules, and a description of
the different tabs and options.
Using Address Wildcards
- A description of address wildcards,
and instructions on how to use them in Avaya QoS Manager.
Avaya QoS Manager Views Overview
Avaya QoS Manager has two main views. These views provide you with
information about the network, as well as, an area for managing policies
and rules.
Avaya QoS Managers two main views are:
The Tree View - Provides a hierarchical view of the device types
in the network, the IP addresses of the devices in the network,
the modules in the devices, and the existing policies. This view is
discussed in
Using the Tree View on page 15.
The Table View - Provides information about the contents of the
elements in the Tree View. You can add, modify, and delete
policies, composite actions, and rules in the Table View. In
addition, for X330WAN expansion modules, the Table View
displays interfaces. This view is discussed in
Using the Table
View on page 16.
Page is loading ...
Page is loading ...
Page is loading ...
Page is loading ...
Page is loading ...
Page is loading ...
Page is loading ...
Page is loading ...
Page is loading ...
Page is loading ...
Page is loading ...
Page is loading ...
Page is loading ...
Page is loading ...
Page is loading ...
Page is loading ...
Page is loading ...
Page is loading ...
Page is loading ...
Page is loading ...
Page is loading ...
Page is loading ...
Page is loading ...
Page is loading ...
Page is loading ...
Page is loading ...
Page is loading ...
Page is loading ...
Page is loading ...
Page is loading ...
Page is loading ...
Page is loading ...
Page is loading ...
Page is loading ...
Page is loading ...
Page is loading ...
Page is loading ...
Page is loading ...
Page is loading ...
Page is loading ...
Page is loading ...
Page is loading ...
Page is loading ...
Page is loading ...
Page is loading ...
/