AIPTEK DV4100 User manual

Category
Camcorders
Type
User manual

This manual is also suitable for

WELCOME
SAFETY NOTICE
Dear user, thanks for purchasing this product.
Much investment in time and effort has gone into its development, and
it is our hope that it will give you many years of trouble-free service.
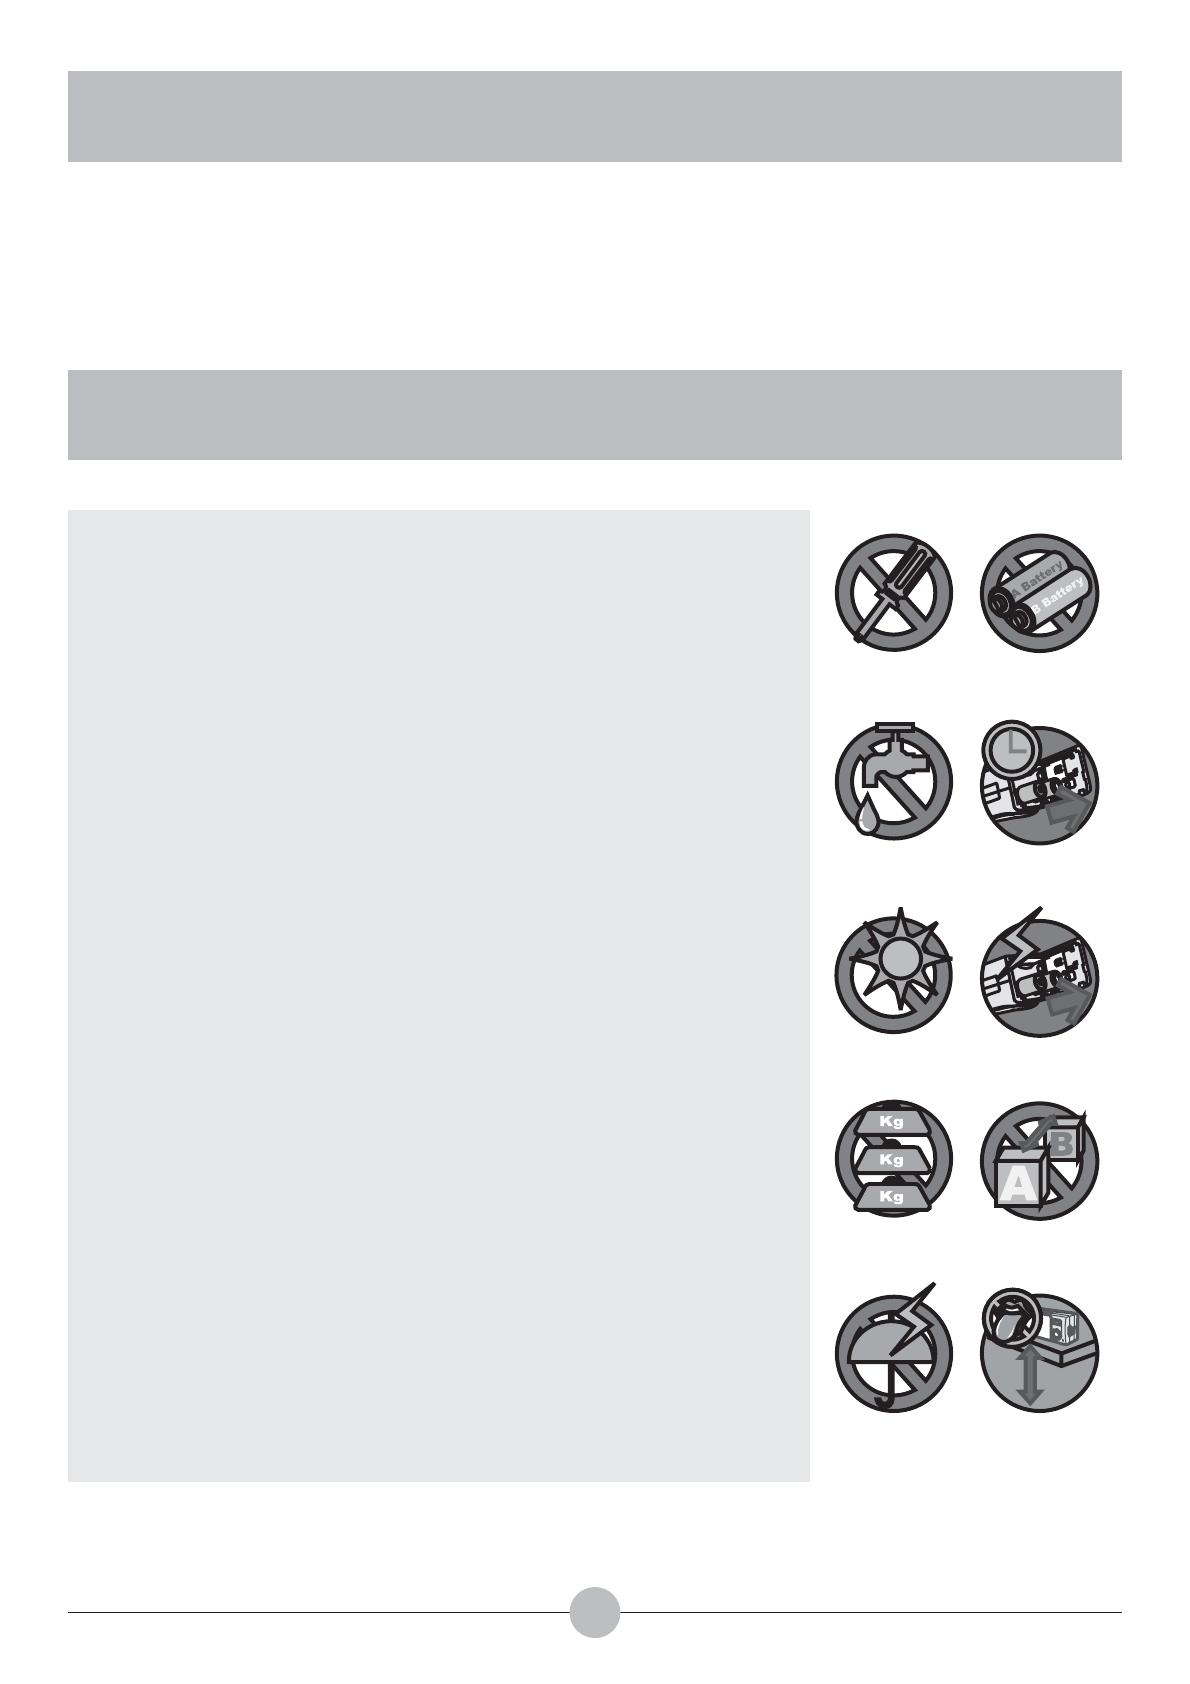
1. Do not drop, puncture or disassemble the camera;
otherwise the warranty will be voided.
2. Avoid all contact with water, and dry hands before
using.
3. Do not expose the camera to high temperature or leave
it in direct sunlight. Doing so may damage the camera.
4. Use the camera with care. Avoid pressing hard on the
camera body.
5. For your own safety, avoid using the camera when
there is a storm or lightning.
6. Avoid using batteries of different brands or types at the
same time. This may lead to the potential for serious
damage.
7. Remove batteries during long periods between usage,
as deteriorated batteries may affect the functionality of
the camera.
8. Remove batteries if they show signs of leaking or
distortion.
9. Use only the accessories supplied by the manufacturer.
10. Keep the camera out of the reach of children.
1
Table of Contents
WELCOME 1
SAFETY NOTICE 1
C
AMERA PARTS 4
G
ETTING STARTED 5
Loading the batteries 5
Inserting the CF card (optional) 6
Attaching the wrist strap (optional) 7
How to open the connector cover 8
How to hold your camera 8
Using the tripod (optional) 9
BASIC OPERATIONS 10
Turning on your camera 10
Turning off your camera 10
Setting the language 11
Recording a video clip 12
Taking a still picture 13
Using the flash strobe (optional) 14
Recording a voice clip 15
Playing back your recordings 16
Playing back your recordings- Thumbnails 17
Connecting the camera to your TV 18
ADVANCED OPERATIONS 19
Changing video resolution 19
Setting video quality 20
Setting video compress method 21
Changing picture resolution 22
Setting picture quality 23
Setting self timer 24
Setting flash strobe 25
2
3
Deleting files 26
Viewing file information 27
CAMERA SETTINGS 28
Switching to Settings mode 28
Setting power auto-off 28
Setting AV output mode 29
Setting language 29
Setting timestamp 30
Setting date 30
Setting time 31
Format media 31
COPYING FILES TO YOUR PC 32
Installing the driver to your PC 32
Installing the driver to your PC (continued) 33
Connecting the camera to your PC 34
Copying files to the PC 35
Copying files to the PC (continued) 36
Viewing/Playing files on your PC 37
File location 38
TROUBLESHOOTING 39
A
DDENDA 41
CAMERA PARTS
4
12
13
15
16
17
1
2
3
4
5
6
7
8
9
10
11
18
19
20
21
22
23
25
24
14
15
16
17
18
19
20
21
22
23
24
25
Power Button ( )
Shutter Button ( )
Mode Dial
Record Button ( )
Back LED
4-Way Buttons ( )
Enter Button ( )
Menu Button ( )
Connector Cover
Card Eject Button ( )
LCD Display
Lens
Front LED
Microphone
Tripod Socket
CF Card Slot
Zoom Lever
Battery Release Lever
Strap Holder (1)
Battery Compartment Cover
Strap Holder (2)
TV-out Connector
Speaker
USB Connector
1
2
3
4
5
6
7
8
9
10
11
12
13
Flash Strobe
14
GETTING STARTED
5
Loading the batteries
Push the battery release lever to the
unlock position, and then pull the
battery compartment cover downward
and lift the cover up to remove the
cover.
Do not use batteries of different types or brands at the same time.
Alkaline batteries or rechargeable NiMH batteries are recommended for high perfor-
mance.
-
-
!
Place the batteries into the compart-
ment. Note that the positive(+) and
negative(-) ends cannot be reversed.
After the batteries are properly
installed, replace the battery compart-
ment cover.
+
_
_
+
+
_
_
+
6
Inserting the CF card (optional)
In addition to 16MB (128Mbits) of
built-in fl ash memory, your camera
can store data on a Compact Flash
(CF) card or a microdrive. The sup-
ported memory size ranges from
8MB to 1GB (1024MB).
To insert a CF card, gently push
the card as indicated until the card
reaches the end of the slot.
To remove the card, fi rst make sure
that the power is off. Then open
the LCD panel, and push the card
eject button to pop out the card or
microdrive.
Do not remove the CF card when the camera is powered on.
When a CF card is inserted, the camera will use the card as the main storage media.
Files stored in the camera’s built-in memory will become inaccessible until the CF card
is removed.
If the CF card cannot be identifi ed by your camera but is usable on other device, it is
probably because of incompatible format. Please see the Troubleshooting section for
more information.
-
-
-
7
Attaching the wrist strap (optional)
Unfold and spread the wrist strap as
illustrated.
!
Follow the instructions as illustrated to
thread and fasten the wrist strap.
Fold the wrapping cover to secure the
wrist strap.
1
2
3
8
8
How to hold your camera
Please put your hand through the wrist strap and fi rmly hold the camera as
illustrated. While taking still pictures or recording video clips, avoid blocking the
lens to retain the best result.
How to open the connector cover
When you want to connect the camera to your PC, TV or earphone, you need
to open the connector cover. Please open the cover gently in the sequence as
illustrated below.
9
9
Using the tripod (optional)
Use a tripod to minimize camera movement and ensure optimal image quality,
especially while shooting self-portraits or having video conference.
BASIC OPERATIONS
10
Turning on your camera
Press and hold down the Power ( )
button for 1 second to turn on the
camera.
Turning off your camera
Press and hold down the Power ( )
button for 1 second to turn off the
camera.
If the camera is not turned on after pressing the power button, please check:
1. There are four AA batteries installed in the camera.
2. The batteries have enough power left.
3. The polar(+ -) directions of the installed batteries are correct.
-
The LED will light up.
The LED will go out.
11
Setting the language
When you power on the camera for the fi rst time, the LCD
display may not be shown in your local language. You can
set the LCD display language using the method below:
Set the Mode Dial to the Settings
( ) mode, and the Settings menu will
display on the screen.
!
Use the Up or Down ( ) button to
highlight the LANGUAGE item.
When the LANGUAGE item is
highlighted, press the Enter ( )
button to enter the sub-menu. In the
sub-menu, use the Up or Down ( )
button to select a suitable language,
and then press the Enter ( )
button to adopt.
"
After all settings are done, you are
ready to use the camera. Set the
Mode Dial to other modes according
to your purpose.
AUTO OFF
A/V OUT
LANGUAGE
TIMESTAMP
DATE
10 MIN
NTSC
ENGLISH
OFF
01/01/2004
LANGUAGE
ENGLISH
DEUTSCH
12
Recording a video clip
Set the Mode Dial to Digital Video
Camcorder ( ) mode. The LCD
display will show the screen below:
!
Press the Record ( ) button to start
recording.
While recording, you can use the
Zoom Lever to zoom in or zoom out
the screen.
"
Press the Record ( ) button again to
stop recording.
Mode
icon
Preview area
Zoom
ratio
1.0X
VGA
00:00:10
Storage media:
: internal memory
: CF card or Microdrive
Resolution
Recording
Time
13
13
Taking a still picture
Set the Mode Dial to Digital Still
Camera ( ) mode. The LCD display
will show the screen below:
!
Before shooting, you can use the
Zoom Lever to zoom in/zoom out the
screen and then choose the best view.
If the lighting condition is not good,
you can press the Left ( ) button to
set the fl ash strobe. Please refer to
page 14 for more information.
"
Press the Shutter ( ) button to take
a still picture.
Mode
icon
Remaining
capacity
Preview area
Zoom
ratio
999
1M
1.0X
Storage media:
: internal memory
: CF card or Microdrive
Resolution
Flash status
Self-timer
14
14
Using the flash strobe (optional)
Before taking a still picture, you can set to use the
ash strobe if the lighting is not suffi cient for your
shooting environment.
Pressing the Left ( ) button repeatedly
will switch the fl ash mode:
On ( ): The fl ash is enabled regardless
of the lighting condition.
Off ( ): The fl ash is disabled.
Auto ( ): The fl ash automatically fi res
when the lighting is insuffi cient.
NFOV FOUFS
15
15
Recording a voice clip
Set the Mode Dial to Voice Recording
( ) mode. The LCD display will show
the screen below:
!
Press the Record ( ) button to start
recording.
Press the Record ( ) button again to
stop recording.
003/004
IMAG0001.WAV
IMAG0002.WAV
IMAG0003.WAV
IMAG0004.WAV
Mode
icon
Current fi le
/Total fi les
File name
Sound
Volume
Storage media:
: internal memory
: CF card or Microdrive
16
16
Playing back your recordings
Set the Mode Dial to Playback ( )
mode. The last recorded fi le will be
displayed in the LCD screen:
!
Press the Left or Right ( ) button to
shift between fi les. ASF, AVI, and WAV
les can be played back by pressing
the Record ( ) button. JPG pictures
are reviewed as they are showed on
the screen.
In Playback ( ) mode, the available
function buttons are as illustrated on
the right:
Play/Pause*
Volume up
Next fi le/Fast wind*
Volume down
Thumbnail
Menu/Stop*
Previous fi le
available while playing fi les
*
ASF
005/010
IMAG0005.ASF
01/01/2004 18:00
461K
Mode
icon
Current fi le
/Total fi les
File
type
File name*
Date & Time*
File size*
Storage media:
: internal memory
: CF card or Microdrive
available when the INFORMATION
option is enabled.
*
Sound
volume
17
17
Playing back your recordings- Thumbnails
In Playback mode, if you press the
Enter ( ) button, the full-screen
display will switch to thumbnails view,
as illustrated on the right:
!
In thumbnails view, you can press
the Up or Down ( ) button to scroll
pages. In the same page, you can use
the Left and Right ( ) buttons to
shift between the fi les.
If you want to play a fi le in thumb-
nails view, please press the Record
( ) button or Enter ( ) button to
switch to full-screen view. Then press
the Record ( ) button to play the fi le.
The available function buttons are as
illustrated on the right:
ASF
001/010
Full-screen view
Page up
Next fi le
Page down
Full-screen view
Menu
Previous fi le
Video
Video Audio
AV Mode
TV
Connecting the camera to your TV
Connect your camera and TV via an AV cable for real-time display. You
can display your video clips, still pictures, and audio recordings directly on
your TV screen to share them with your friends and family members.
18
18
1
2
3
4
5
Turn on your TV and switch to AV mode.
Connect the audio and video ends of the AV cable to your TV.
Open the connector cover of your camera.
Connect the other end of the video cable to your camera.
Turn on the camera.
For more details on selecting the A/V options, please refer to page 29.
-
ADVANCED OPERATIONS
19
Changing video resolution
While in Digital Video Camcorder ( )
mode, press the Menu ( ) button.
!
A menu as illustrated on the right
will appear. Press the Up or Down
( ) button to highlight the SIZE item.
Once the SIZE item is highlighted,
press the Enter ( ) button.
A sub-menu will appear as illustrated
on the right. Press the Up or Down
( ) button to select an item and
then press the Enter ( ) button
to apply.
The available options are:
VGA: The resolution of the video clip
is 640x480.
QVGA: The resolution of the video
clip is 320x240.
Before recording a video clip, you can change the resolution to suit your
viewing preferences:
SIZE
QUALITY
COMPRESS
QVGA
HIGH
MPEG4
SIZE
QVGA
VGA
Press the Menu ( ) button to cancel the action or exit the menu.
-
  • Page 1 1
  • Page 2 2
  • Page 3 3
  • Page 4 4
  • Page 5 5
  • Page 6 6
  • Page 7 7
  • Page 8 8
  • Page 9 9
  • Page 10 10
  • Page 11 11
  • Page 12 12
  • Page 13 13
  • Page 14 14
  • Page 15 15
  • Page 16 16
  • Page 17 17
  • Page 18 18
  • Page 19 19
  • Page 20 20
  • Page 21 21
  • Page 22 22
  • Page 23 23
  • Page 24 24
  • Page 25 25
  • Page 26 26
  • Page 27 27
  • Page 28 28
  • Page 29 29
  • Page 30 30
  • Page 31 31
  • Page 32 32
  • Page 33 33
  • Page 34 34
  • Page 35 35
  • Page 36 36
  • Page 37 37
  • Page 38 38
  • Page 39 39
  • Page 40 40
  • Page 41 41
  • Page 42 42
  • Page 43 43
  • Page 44 44

AIPTEK DV4100 User manual

Category
Camcorders
Type
User manual
This manual is also suitable for

Ask a question and I''ll find the answer in the document

Finding information in a document is now easier with AI