12
MUSIC Media
8
6
4
9
7
MP3 File Playing Operation
- Purchased MP3/music files may contain copy
right restrictions.
1. Press the USB button and then use
F / G button to select the Music.
2. Press the OK button.
3. Press the D / E / F / G button to select
folder and desired music file.
4. Press the GII (alternative play) or
OK (single play)button. Then the
music starts.
5. Press the USB button to exit or press the
/ESC button to stop or return to the USB
menu.
Using the remote control
Notes :
1. MP3 compatibility with this player is limited as follows:
- Sampling frequency :within 8 -48 KHz
- Bit rate :32 -384 Kbps, Support all variable bit rates
- TV can not read an MP3 file that has a file
extension other than “.mp3”
- File name should have a maximum of 8
letters and must incorporate an .mp3 extension.
- Total number of files on the USB memory
device should be less than 1200.
2.This TV mp3 player requires mp3 files to meet
certain technical standards (ISO/IEC
111723,ISO/IEC 13818-3.2)in order to achieve
optimal playback quality.
3.There are many different types of MP3
encoders and these require certain pre-existing
conditions above to ensure compatible play back.
4.The navigation key can be shifted only up and
down during MP3 file play and cannot switch to
other folder.
5.In order to play a file in other folder, stop the
file being played, and move cursor to another folder.
6.In case of VBR(Variable Bit Rate)MP3,
estimated playing time may not correct as
actual playing.
To increase or decrease volume level
for the Music.
Press the button to jump previous music.
Press the button to jump next music.
Moved the Folders in menu. (at music list)
Stop playing music. (when playing music)
Press the button to jump backforward.
Press the button to jump forward.
To pause playback.(when playing music)
Play music in sequence (at music list)
Play music selected by cursor.
1
2
VOL.+
VOL.-
4
6
5
/ESC
8
7
9
OK
ENTER
/ESC/ESC
<G-AUDIO>
D-FILE
AUD -1A.MP3
AUD -1B.MP3
AUD -1C.MP3
AUD -3A.MP3
AUD -3B.MP3
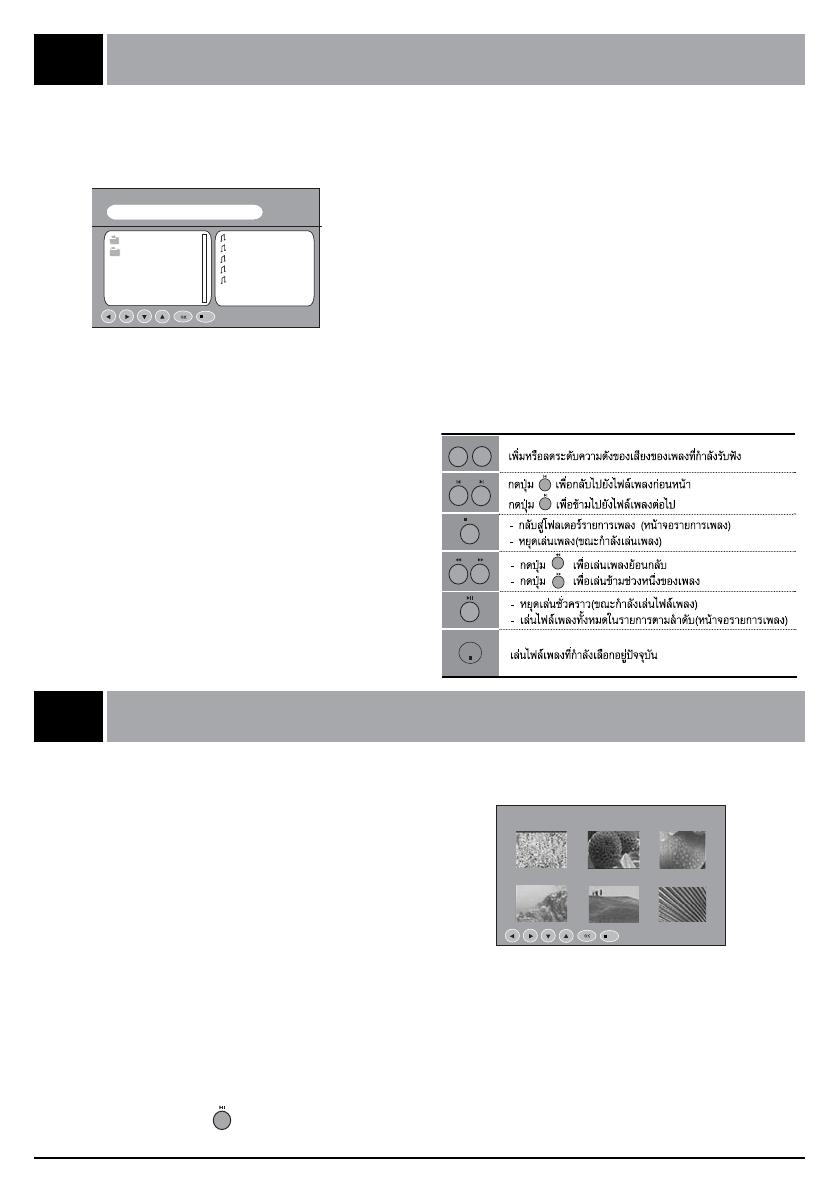
PHOTO Media
JPEG File Viewing Options
- When you select Photo in entry menu, you will
now see a screen filled with thumbnail photo
media.
1. Press the USB button and then use
F / G
button to select the Photo.
2. Press the OK button.
3. Press the D / E / F / G button to select
photo file.
4. Press the OK button for 1 picture display
and press 8 for slide show.
5. Press the USB button to exit or press the
/ESC button to stop slide show or return to
thumbnail file list, USB main menu.
Slide Show
1. Press the D / E / F / G button to select
JPEG file and then press the button. Slide
show starts.
2. You can choose the slide show effect,
frequency and play mode in the USB Setup.
3. Press the GII button to pause the current
image.
4. Press the USB button to exit or press the
/ESC button to stop slide show return to the
USB menu.
/ESC
K-REA-1. JPG 81K 720x576
1. K-REA-1<81K>
2. A-NLTM-<154K>
3. B-RED<43K>
4. K-REA-1 <81K>
5. A-NLTM-1<154K>
6. B-RED <43K>
G-AUDIO
12
MUSIC Media
8
6
4
9
7
MP3 File Playing Operation
- Purchased MP3/music files may contain copy
right restrictions.
1. Press the USB button and then use
F / G button to select the Music.
2. Press the OK button.
3. Press the D / E / F / G button to select
folder and desired music file.
4. Press the GII (alternative play) or
OK (single play)button. Then the
music starts.
5. Press the USB button to exit or press the
/ESC button to stop or return to the USB
menu.
Using the remote control
Notes :
1. MP3 compatibility with this player is limited as follows:
- Sampling frequency :within 8 -48 KHz
- Bit rate :32 -384 Kbps, Support all variable bit rates
- TV can not read an MP3 file that has a file
extension other than “.mp3”
- File name should have a maximum of 8
letters and must incorporate an .mp3 extension.
- Total number of files on the USB memory
device should be less than 1200.
2.This TV mp3 player requires mp3 files to meet
certain technical standards (ISO/IEC
111723,ISO/IEC 13818-3.2)in order to achieve
optimal playback quality.
3.There are many different types of MP3
encoders and these require certain pre-existing
conditions above to ensure compatible play back.
4.The navigation key can be shifted only up and
down during MP3 file play and cannot switch to
other folder.
5.In order to play a file in other folder, stop the
file being played, and move cursor to another folder.
6.In case of VBR(Variable Bit Rate)MP3,
estimated playing time may not correct as
actual playing.
To increase or decrease volume level
for the Music.
Press the button to jump previous music.
Press the button to jump next music.
Moved the Folders in menu. (at music list)
Stop playing music. (when playing music)
Press the button to jump backforward.
Press the button to jump forward.
To pause playback.(when playing music)
Play music in sequence (at music list)
Play music selected by cursor.
1
2
VOL.+
VOL.-
4
6
5
/ESC
8
7
9
OK
ENTER
/ESC/ESC
<G-AUDIO>
D-FILE
AUD -1A.MP3
AUD -1B.MP3
AUD -1C.MP3
AUD -3A.MP3
AUD -3B.MP3
PHOTO Media
JPEG File Viewing Options
- When you select Photo in entry menu, you will
now see a screen filled with thumbnail photo
media.
1. Press the USB button and then use
F / G
button to select the Photo.
2. Press the OK button.
3. Press the
D / E / F / G button to select
photo file.
4. Press the OK button for 1 picture display
and press 8 for slide show.
5. Press the USB button to exit or press the
/ESC button to stop slide show or return to
thumbnail file list, USB main menu.
Slide Show
1. Press the D / E / F / G button to select
JPEG file and then press the button. Slide
show starts.
2. You can choose the slide show effect,
frequency and play mode in the USB Setup.
3. Press the GII button to pause the current
image.
4. Press the USB button to exit or press the
/ESC button to stop slide show return to the
USB menu.
/ESC
K-REA-1. JPG 81K 720x576
1. K-REA-1<81K>
2. A-NLTM-<154K>
3. B-RED<43K>
4. K-REA-1 <81K>
5. A-NLTM-1<154K>
6. B-RED <43K>
G-AUDIO
"8" อักษร
1200
8
12
MUSIC Media
8
6
4
9
7
MP3 File Playing Operation
- Purchased MP3/music files may contain copy
right restrictions.
1. Press the USB button and then use
F / G button to select the Music.
2. Press the OK button.
3. Press the D / E / F / G button to select
folder and desired music file.
4. Press the GII (alternative play) or
OK (single play)button. Then the
music starts.
5. Press the USB button to exit or press the
/ESC button to stop or return to the USB
menu.
Using the remote control
Notes :
1. MP3 compatibility with this player is limited as follows:
- Sampling frequency :within 8 -48 KHz
- Bit rate :32 -384 Kbps, Support all variable bit rates
- TV can not read an MP3 file that has a file
extension other than “.mp3”
- File name should have a maximum of 8
letters and must incorporate an .mp3 extension.
- Total number of files on the USB memory
device should be less than 1200.
2.This TV mp3 player requires mp3 files to meet
certain technical standards (ISO/IEC
111723,ISO/IEC 13818-3.2)in order to achieve
optimal playback quality.
3.There are many different types of MP3
encoders and these require certain pre-existing
conditions above to ensure compatible play back.
4.The navigation key can be shifted only up and
down during MP3 file play and cannot switch to
other folder.
5.In order to play a file in other folder, stop the
file being played, and move cursor to another folder.
6.In case of VBR(Variable Bit Rate)MP3,
estimated playing time may not correct as
actual playing.
To increase or decrease volume level
for the Music.
Press the button to jump previous music.
Press the button to jump next music.
Moved the Folders in menu. (at music list)
Stop playing music. (when playing music)
Press the button to jump backforward.
Press the button to jump forward.
To pause playback.(when playing music)
Play music in sequence (at music list)
Play music selected by cursor.
1
2
VOL.+
VOL.-
4
6
5
/ESC
8
7
9
OK
ENTER
/ESC/ESC
<G-AUDIO>
D-FILE
AUD -1A.MP3
AUD -1B.MP3
AUD -1C.MP3
AUD -3A.MP3
AUD -3B.MP3
PHOTO Media
JPEG File Viewing Options
- When you select Photo in entry menu, you will
now see a screen filled with thumbnail photo
media.
1. Press the USB button and then use
F / G
button to select the Photo.
2. Press the OK button.
3. Press the D / E / F / G button to select
photo file.
4. Press the OK button for 1 picture display
and press 8 for slide show.
5. Press the USB button to exit or press the
/ESC button to stop slide show or return to
thumbnail file list, USB main menu.
Slide Show
1. Press the D / E / F / G button to select
JPEG file and then press the button. Slide
show starts.
2. You can choose the slide show effect,
frequency and play mode in the USB Setup.
3. Press the GII button to pause the current
image.
4. Press the USB button to exit or press the
/ESC button to stop slide show return to the
USB menu.
/ESC
K-REA-1. JPG 81K 720x576
1. K-REA-1<81K>
2. A-NLTM-<154K>
3. B-RED<43K>
4. K-REA-1 <81K>
5. A-NLTM-1<154K>
6. B-RED <43K>
G-AUDIO
6
4
9
7
1
2
VOL.+
VOL.-
4
6
5
/ESC
8
7
9
OK


