

2
3
This chapter contains important information on safe and efficient operation. Please read this
information before using the device.
Exposure To Radio Frequency (RF) Energy
The device contains a transmitter and a receiver. When it is ON, it receives and transmits RF energy.
Please use the device appropriately.
Specific Absorption Rate Data
The highest SAR value for this device when tested for use at the ear is 0.626 W/kg.
Road Safety
Check the laws and regulations on the use of phones in the area where you drive. Do NOT use this
device unless you use hands-free operation while driving or riding.
Potentially Explosive Atmospheres
Turn off your phone prior to entering any area with a potentially explosive atmosphere such as gas
stations, explosive chemicals, or flammable objects.
Aircraft Safety
While in flight, switch the device to flight mode (turn off phone or wireless functions). When instructed
to do so, turn off your phone when on board an aircraft.
Facilities
Turn off the device in any facility where posted notices instruct you to do so. These facilities may
include hospitals or health care facilities that may be using equipment that is sensitive to external RF
energy.
Approved Accessories & Batteries
Use only original or manufacturer approved accessories, batteries and chargers.
Safety Information
All mobile products by GIGA-BYTE Communications mentioned in this document, including the
device, accessories, software, text, music, and pictures, are owned by, or authorized by original
manufacturers to GIGA-BYTE Communications. Reproduction, transfer, distribution, or storage of
part or all of the contents in this document in any form without the prior written permission of GIGA-
BYTE Communications Inc. is prohibited.
GIGA-BYTE Group, GIGA-BYTE Communications Inc.
2 0 0 6
g-Smart i Copyright

4
5
This chapter contains important information on safe and efficient operation. Please read this
information before using the device. Ignorance of the following notices may lead to violations of the
law.
Before using the device, please make sure you have fully charged the battery.
Do NOT remove the battery from the device during charging.
Before inserting SIM card into the device, make sure that the device is switched off.
Do NOT attempt to dissemble the device on your own. This should be done by an authorized
person.
Use the device in accordance to instructions when in public facilities.
In some countries, it is a violation against the law to record phone conversations. Always ask
permission of the other party when you are going to record a conversation.
General Information
Chapter 1 Getting Started with g-smart i .............................................8
1.1 Getting to Know Your Device
08
1.2 Key Definition
10
1.3 Install and Charge Battery
11
1.4 Using Stylus
11
1.5 Screen Alignment and Settings
12
1.6 Time and Date Settings
12
1.7 Power On/Off, Sleep Mode
13
1.8 My Information Setup
13
1.9 Password Setup
14
1.10 Device Lock
14
1.11 System Reboot & Reset
15
1.12 Protect Your Screen
15
1.13 Maintenance
15
1.14 Traveling Advice
16
Chapter 2 Using the Mobile Device ......................................................17
2.1 Today Screen
17
2.2 Start Menu List
18
2.3 Applications
18
2.4 Settings
19
2.5 Input Method
21
Chapter 3 Phone Functions ..................................................................23
3.1 Insert and Remove A SIM Card
23
3.2 Making a Call
23
3.3 How to Use Your Phone
24
3.4 Volume Adjustment
24
3.5 Contacts
25
3.6 Create a New Contact
25
3.7 Call History
26
3.8 Set Ringtone and Password
26
3.9 Copy SIM Card Contacts
27
3.10 Sending Messages
27
3.11 Block List
27
Chapter 4 Personal Settings ................................................................29
4.1 Easy-Touch Menu
29
4.2 Pocket Ghost
29
4.3 Shutdown Animation
29

6
7
4.4 Handset Applications
29
4.5 Change Settings
32
4.6 Hints or Alert
33
4.7 Power Setup
33
4.8 Backlight
33
4.9 Search for a File or Information
34
4.10 Pop-Up Menu
34
4.11 Shortcut Key
34
4.12 Phone Settings
35
4.13 Voice Commander Settings
36
Chapter 5 ActiveSync Synchronization Tool ........................................39
5.1 Install And Use ActiveSync
39
5.2 Synchronize via Bluetooth
39
Chapter 6 Connections .........................................................................40
6.1 Internet access
40
6.2 GPRS Connection Settings
40
6.3 Activating GPRS Connection
40
6.4 GPRS Wizard
41
6.5 Connecting With Your Personal Computer
41
6.6 Bluetooth Wireless Transmissions
41
6.7 Modem Connection
41
6.8 WI-FI
42
6.9 USB
42
Chapter 7 Receive And Send Message ................................................43
7.1 E-mail and Message
43
7.2 Synchronously Process Email
43
7.3 Directly Connect to Email Server
44
7.4 Establish Email Services
44
7.5 Use Email and Message
45
7.6 How to use Push Email
46
7.7 How to use MMS
47
Chapter 8 Using Bluetooth ...................................................................50
8.1 Bluetooth Connection Settings
50
8.2 COM Ports
50
Chapter 9 Multimedia ...........................................................................52
9.1 TV
52
9.2 Radio
53
9.3 Camera
54
9.4 Video Mode
55
9.5 Recorder
56
9.6 Photo Editor
57
9.7 Pictures & Videos
57
9.8 Voice Command
57
9.9 JAVA
58
Chapter 10 Embedded Programs .........................................................59
10.1 Calendar
59
10.2 Contacts
60
10.3 Tasks
61
10.4 Notes
62
10.5 Word Mobile
63
10.6 Excel Mobile
64
10.7 PowerPoint Mobile
65
10.8 Windows Media Player
65
10.9 Internet Explorer
66
10.10 Magnifier
67
10.11 Zip
67
10.12 Calculator
68
10.13 Game
68
10.14 STK (SIM Tool Kit)
69
Chapter 11 Device Maintenance ..........................................................70
11.1 Memory Management
70
11.2 Memory
70
11.3 Add or Remove Programs
71
Chapter 12 Specifications ....................................................................73
Chapter 13 FAQ .....................................................................................75

8 9
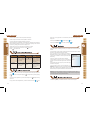
This chapter introduces you to the hardware of the device and its function keys.
1.Power On / Off:
Press and hold the power button for a few seconds to turn on / off your device.
2.LED Indicator:
The LED Indicator indicates the status of your device by showing different colors.
Blue: Bluetooth is activated
Orange:
Wi-Fi is activated
White:
indication and alert
Green:
mobile network detected
3.Receiver:
You can hear caller’s voice through receiver.
4.Screen:
Display screen.
5.Left Function Key:
Perform Menu or program command displayed on the
down-left corner of the screen.
6.Call Key:
You can make or answer a call by pressing call
key.
7.Windows Flag Key(Flag Key):
Press the flag key to open “ Start ” menu options.
8.Right Function Key:
Perform the function of menu or program command displayed on the down-right corner
screen.
9.End Key:
Press this key to end a call.
10.OK Key:
Press this key to execute or terminate a selected function or application.
11.Navigation Key:
Use up, down, left and right directions to navigate. Press the center key to execute the
selected function or application.
12.Microphone:
Receive your voice and conversation.
13.Mini USB1.1 / Charging Slot:
Connect a charger adaptor to this slot to start charging. This slot is also a USB slot. You
may connect the device to computers or other devices with USB cable and transfer files
between the device and that device.
14.TV / FM Antenna Headset plug:
You can watch TV on the device or listen to FM radio and music via antenna headset.
15.Mini SD Card Slot:
You can insert your Mini SD card here to save data in your card.
16.Reset Button:
Press the reset button to reboot your device.
17.Camera Key:
Press and hold camera key to launch camera function.
18.Volume Key
Slide this key upwards or downwards to adjust volume.
Press this key to launch Voice Commander.
19. Loudspeaker:
You may play music / voice through speaker.
20.Flash:

10
11
Support Auto Flash / Forced Flash On / Forced Flash Off mode.
21.Stylus :
Use the stylus to touch the screen panel.
22.Battery Lock:
Pull down the battery lock to remove a battery or to
install a SIM card.
23.Battery
24.Camera Lens:
Capture a photo or film a video through this lens.
25.Macro Mode Switch
Key Function
5-Way Navigation Key - Up Move cursor up
5-Way Navigation Key - Down
Move cursor down
5-Way Navigation Key - Left Move cursor to the left
5-Way Navigation Key - Right Move cursor to the right
5-Way Navigation Key - Center
Execution
Call key Press: enter phone function.
End Key Press: return to Today screen.
Power On / Off
Press: power saving mode
Press and hold: power off Press: power saving mode
Press and hold: power off
Flag Key Press: Display/hide the “Start” menu.
Press and hold: Display the Easy-Touch Menu.
OK Key Press: execute the function of the top-right screen
(OK or X)
Press and hold: switch screen display to portrait/
landscape.
Left Function Key On Today screen, press to view Call history.Press and
hold to launch Windows Media Player.
Right Function Key On Today screen, press to view Contacts. Press and
hold to enter File Manager.
Camera Key Press and hold : Camera mode
Volume Key Slide up: increase volume.
Slide down: decrease volume.
Press: activate voice command.
Press and hold: activate voice note.
Reset Key Reboot your device.
When using the device for the first time, please make sure the battery is installed and fully
charged.
1.Insert a battery to the battery slot.
2.Plug your charger into an outlet and plug the other end to your device. The device will
start charging automatically.
3.It takes 3 hours to fully charge your battery with a traveler charger for the first time. On
a deskstand, it takes 6-8 hours to fully charge your battery for the first time. Unplug the
device from the charger when charging is complete, and you may now use the device.
4.When the End Key flashes in white, it means the battery is charging.
5.When the End Key backlight goes out, it means the charging is complete.
6.The battery icon on task bar on Today screen shows the battery status. You may also
check the battery status in “ Start ” > Settings
> System Tab > Battery Tab.
Note: When the device is not charged for a long period of time, or the battery power
has been completely used up, the charging process will enter a pre-charge mode which
takes around 30 minutes. During pre-charge, the LED light will light up solid and you will
not be able to turn on the device. When the LED light starts flashing again, you may turn
on the device.
Use the stylus to touch or write on your screen. Using stylus can avoid damaging your

12
13
screen. There are 2 ways to use your stylus:
1.Tap:
softly tap on a desired item by your stylus, and lift the pen from the screen.
2.Press: touch and hold your stylus on a desired item for a few seconds until a blue
dotted circle appears. This indicates that a pop up Menu is going to be activated.
When using the device for the first time, screen alignment is required. If you find that the
device does not accurately respond to your stylus taps, or you have performed a system
reset, you need to align your screen.
1.Tap ” Start ” >
Settings
> System Tab >
Screen
> General Tab.
2.Tap { Align Screen } on your screen.
3.On the align screen, use your stylus to touch the crosses on the screen accurately.
4.Tap “ OK ” to exit.
You can also choose your screen display in Portrait or Landscape.
1.Press and hold OK any time when the device is on to switch your screen display between
Portrait and Landscape.
You can also change the default screen display by following the steps below:
1.Tap“Start”>
Settings
> System Tab >
Screen
> General Tab.
2.On General Tab screen, select your desired orientation. Portrait, Landscape Right-
Handed, Landscape Left - Handed.
3.Tap “ OK ”, the screen will change accordingly.
When using the device for the first time, you are required to set your time zone, time, and
date. You can also tap on the clock icon on Today’s screen to setup time and date.
1.Tap“Start”>
Settings
> System Tab > Clock & Alarms > Time Tab.
2.Select { Home } or { Visiting }.
3.Select your time zone.
4.Select AM / PM.
5.Use the up and down arrow aside hour, minute and second to adjust the highlighted time
unit.
6.Tap the down arrow aside the date to open a calendar,and select a desired month, date,
and year.
7.Tap“ OK ”, a pop - up window will appear on your screen to confirm to “ Save Changes to
the clock settings ”.
8.Tap “ Yes ” to save the changes, and exit.
Press Power On / Off key on the top of the device to turn on the device.
Sleep Mode
1.Sleep Mode is a power saving mode designed to reserve battery power. After idling for a
period of time, the device automatically enters Sleep Mode. You may also manually enter
Sleep mode by pressing power On / Off key shortly. The backlight of the screen will turn
off and the device will go into Sleep mode. When in Sleep mode, your device will show no
response to any operation or touches on the screen and keypad.
2.Press the power On / Off key again to exit Sleep mode.
3.You may set the time to activate Sleep mode. The device will automatically enter Sleep
mode when no operation is done within that time.
˙
Tap “ Start ” > Settings
> System Tab >
Power
> Advanced Tab.
˙
Check “ Turn off device if not used for ” Please select“ On battery power” or “On
external power”.
˙
Select your desired time period.
˙
Tap“OK”to complete this setting.
Power Off
To turn off the device, press and hold Power On / Off Key on the top of the device for about
5 seconds while the power is on.

14
15
You can input your personal information to the device in Owner Information.
1.Tap “ Start ” >
Settings
> Personal Tab >
Owner Information
> Identification Tab.
2.Tap on “
Name ” field and input your name.
3.Tap on a desired input field and input your information.
4.Tap on the
Notes tab to input other information you would like to display on your device.
5.If you want your information to be displayed on the starting screen, tap on the
Options
tab, and check both “ Identification Information ”and “ Note ”.
6.Select “ OK ” to finish setup and save it.
You can set your own password to prevent unauthorized use of your device.
1.Tap “ Start ” >
Settings
> Personal Tab >
Lock
> Password Tab.
2.On Password tab screen, check “ Prompt if device unused for ”.
3.Select an appropriate time.
4.Select a password type in “ Password Type ” field.
5.Input your password in the “ Password ” field and reconfirm the password in “ Confirm”.
6.Tap “ OK ”, a pop - up window will appear to confirm “ Do you want to save password
settings changes?”.
7.Tap “ Yes ” to finish settings and save the changes; “ No ” to cancel.
8.You may also input password hint message under the Hint tab screen.
9.Tap “ OK ” to save your inputs.
Note: If you forget your password, you need to perform system default, which will lose
all your data and settings.
On “ Today ” screen, tap { Device unlocked } to lock your device. When the device is
locked, the device will not respond to touches on screen nor will it react to any input on the
keypad.You can enable device lock after entering Sleep mode by pressing the power key.
To enable this setting, please follow the steps below:
˙Tap “ Start ” > [Programs] > Phone Applications > Settings Tab.
˙Check “Lock device when in sleep mode”.
Unlock device:
1.Tap { Unlock } on the bottom left of the screen, or press the left function key.
2.Tap the { Unlock } button on the newly appeared screen and the device is unlocked.
Reboot System:
When you reboot the device, all running programs will stop and you will lose all unsaved
information. Please make sure that all information has been saved before performing
system reboot.
1.Reset key is located on the bottom right side of your device.
2.Use the stylus to softly poke the reset key on the lower right side of the device to reboot
your system.
System Reset:
When executing system reset, you are performing a clean boot on the device. It will remove
the programs you have installed on this device, and reset all settings and information back
to factory defaults.
1.Turn off the device.
2.Press the Call key and End key at the same time, and press power key while still
holding Call key and End key.
3.This device will restore to system defaults and reboot.
To avoid damaging your device screen and camera lens, please do not drop, smash, or
place pressure on the device.

16 17
To maintain the device in the best condition, please follow the suggestions below:
1.Please avoid exposing your device to extreme environment (too hot / too old / high
humidity).
2.Please keep the device away from rain and water.
3.Please keep the device away from direct exposure to the sun and ultraviolet rays.
4.Place the device in the case when you are not using it.
Please follow the suggestions below when you are traveling with the device:
1. Back up your data.
2.Copy your data in a mini SD card.
4.Remove all other connected device.
5.Bring your charger.
6.Place your the device in the case.
7.If you are in an air plane, please make sure that you have turned your device into the
flight mode.
8.Make sure you have brought a specific adapter for the country you are traveling.
1.Start Menu : Tap to open the start menu list.
2.Battery Status :
Shows the current battery status.
3.Connection Status : Shows the connection status of
the device.
4.SIM Card Status : Shows SIM card status.
5.Volume : Tap to adjust the speaker or phone volume.
6.Time : Shows time and the latest appointment.
7.Today Screen : Shows all important information of
today.
8.Call History : Tap to enter Call History.
9.Contacts : Tap to view your Contacts.
Icon Description
All sound alerts are on.
Sound alerts off.
No SIM card.
Main battery power is full.
Low Battery. Please recharge.
Charging.
You have one or more MSN messages.
You have one or more email, messages, or voicemail messages.
Magnifier is running in the background.
Recorder is recording.
You have new messages in answer machine.
Headset is plugged in.
You have missed calls.

18
19
Tap this icon to reveal all status icons.
Mobile phone is off (Flight mode).
Mobile phone is on.
GPRS is available.
GPRS is disconnected.
GPRS is connected.
Bluetooth is activated.
1.The applications in this block are fixed for some Microsoft applications.
2.The applications in this block are the last 5 programs that you have used.
3.Tap on Programs, to enter the programs screen.
4.Tap on
Settings, to enter the settings screen.
5.Tap on
Help, to see detail information about your device.
You will see many application icons on your Programs screen. From the Programs
screen, you may touch on the application icon that you desired to use to execute the
application.
Icon Program Description
Multimedia
Camera
,
FM Radio
,
Photo Editor
Pictures & Videos
,
Recorder
,
TV
,
Voice Command
,
JAVA
Tools
Magnifier , Zip , Easy-Touch Menu
Phone Manager
Block List
,
Modem Link
,
SIM Contacts
,
Download Agent
Games Bubble Breaker , Solitaire
ActiveSync
Transmit data between your computer and the
device.
Pocket MSN Perform MSN functions.
Excel Mobile
Execute Excel files.
PowerPoint Mobile
Execute PowerPoint files.
Word Mobile Execute Word files.
Calculator Perform basic calculations.
Notes
Write notes, memo, or drawings.
Search
Search for all data, programs, and files.
Terminal Services Client
Setup your server information.
Learn about what you can do with Settings:
Select “ Start ” > Settings > Personal Tab
Program Description
Buttons You may assign programs to hard keys.

20
21
Handset Applications
Activate/deactivate Answering Machine, Background Effects, and
Phone Recorder, and related phone settings.
Input You can set your preferred input method.
Lock You may set a personal password for the device.
Menus Select the programs to be displayed in Start menu.
MSN Options You may set MSN password, account, and other details.
Owner Information You may input your personal information.
Phone Settings for phone functions.
Shutdown Animation Settings for shutdown screen.
Sounds & Notifications Settings for alarm sound and notification.
Today
Settings for screen appearance and display items.
Select “ Start ” > Settings > System Tab
Program Description
About Contains information of the device.
Backlight Settings for backlight.
Certificates
Identifies the device to others to prevent unauthorized
access.
Clock & Alarms Settings for time and alarms.
GPS Settings for using GPS function.
Memory Memory status and running programs.
Power Power status and wireless signals.
Regional Settings Settings for region, number, currency, time, and date.
Remove Programs Remove programs from your device.
Screen Screen orientation, screen alignment, and text size.
TV You may set your region and channel range.
Voice Commander Settings
Settings for voice command. You may record voice tags
here.
Select “ Start ” > Settings > Connections Tab
Program Description
Beam You can choose to receive all incoming beams.
Bluetooth Settings for Bluetooth function.
Connections Settings and management for modem connections.
GPRS Wizard Basic settings for GPRS connection.
Network Cards Configurations for network adapters.
USB Use the device as a mini SD card reader.
Wireless Manager Turn on/off Bluetooth, flight mode.
Screen Keyboard
You can input data by using screen keyboard. Tap on the keyboard icon on your screen
to open the screen keyboard. Follow the following steps below to input your data:
1.On your screen keyboard, tap
Shift
or
CAP
key to input a Capitalized letter or
some common symbols. You can also double-tap on Shift to enter capital letters.
2.Tap the
key on your screen keyboard to delete.
3.To close the screen keyboard, tap the keyboard icon again on your screen to hide the
screen keyboard.
Letter Recognizer
1.On your screen keyboard, tap the arrow icon next to the keyboard icon for more input
methods. On the pop-up list, tap Letter Recognizer.
2.Write letters and numbers in a corresponding field on your Letter Recognizer screen. The
device will display the letters / numbers that you had just input in the Letter Recognizer
fields.
3.Tap the
key to delete an input.
Block Recognizer
1.On your screen keyboard, tap the arrow icon next to the keyboard icon for more input
methods. On the pop - up list, tap Block Recognizer.
2.Write letters and numbers in a corresponding field, the system will display the letters/
numbers identified of your handwriting.
3.Do not write letters / numbers continually to prevent recognition error.
4.Do not write letters outside of the input fields.
Transcriber
1.On your screen keyboard, tap the arrow icon next to the keyboard icon for more input
methods. On the pop-up list, tap Transcriber.
2.Position the cursor where you want text to appear.

22 23
3.Use the stylus to write anywhere on the screen. The handwriting will be converted to text
after you lift the stylus from the screen.
Press key, or select “ Start ” > Phone
to enter phone function. Please insert a SIM
card before using phone.
1.Before inserting / removing a SIM card, please make sure that the device is turned off
and is not connected to any power supply by the USB cable or charger.
2.Remove the battery from the battery slot.
3.Insert / Remove the SIM card from the SIM card slot.
4.Replace the battery back to the battery slot.
1.After entering the phone function, you can dial a number using the dial keypad or the
keypad on your screen.
2.To delete an error input, use
key on your screen.
3. Press Key to make a call.
4. Press Key to end the call.
Speed Dial
You can set ten phone numbers in your speed dial list.
1.After entering phone function, press Menu > Speed Dial to enter your Speed Dial List.
2.On your Speed Dial List screen, you can select a contact on your list to see the contact’s
detailed information.
3.On Speed Dial List screen, tap {Menu} on the bottom right corner of the screen. You can
perform {New}, {Edit}, or {Delete} contacts on your Speed Dial List.
4.To make a call, press the corresponding number on your keypad to call the contact on
your speed dial list.
5.You can also use the navigation key to select a contact you want to call on the speed dial
screen, and then press Call Key to call.
6.Press End Key to end the call.
Smart Dial

24
25
Use this function to search a contact or a specific number quickly.
1.Press Call key to enter Phone, and then tap Menu > Smart Dial.
2.The smart dial screen will display all contacts in this device .
3.After inputting the first number/letter, the smart dial screen will display only the matching
phone number and contacts on the screen. For example: after inputting 0, the smart dial
screen will only display phone numbers which begins with 0.
4.When there is an input error, press the right navigation key to delete.
5.Select a number or contact you want to call, press Key to call.
6.Press Key to end the call.
Option Operation Answer Or Hang Up H e a d s e t Vo l u m e
Adjustment
Using Handheld Call Pla c e th e ha n dse t
close to your ear and
the microphone close
to your mouth.
P r e s s
K e y t o
answer, and pre s s
Key to hang up.
You may adjust the
v o l u m e us i n g t h e
vol um e ke y a t th e
side of this device
during a call.
Using Headset Place t he h ead s et
into your ears and
aim the microphone
at your mouth.
P r es s th e ke y o n
headset to answer or
hang up.
You may adjust the
v o l u m e us i n g t h e
vol um e ke y a t th e
side of this device
during a call.
Tap the icon on screen and the volume adjustment window will appear. Adjust the
volume of alert tone for all programs tapping on
, and adjust the ring volume by tapping
on .
1.Press the volume adjustment key on the side manually or tap >
to adjust incoming
call volume.
2.If you press the volume adjustment key on the side of this device or tap
> icons
during a call, you may adjust the in - call volume of the phone. You can only adjust it when
during a call.
3.When you select
Vibrate
, the icon will change to icon.
4.When you select
Off
, the icon on screen will change to icon.
Under phone function screen,tap { Contacts } on the bottom left of the screen to enter
Contacts.
1.Enter the contact or phone number you intend to search into the search field, the device
will search for the contacts that match this condition.
2.Push and hold the 5 way navigation key upwards or
downwards to browse contacts by initial letters in Contacts.
(This function is available for contacts synchronized from
Outlook only.)
3.Tap on any contact to view that contact’s information.
4.Under contacts list screen, tap { Call } on the bottom left
of screen or press the left function key to make a call to that
person.
5.Under contacts list screen, tap { Menu } on the bottom right
of screen for more options.
If you would like to make a call using telephone, go to
Contacts and highlight the person you would like to make a call to. Tap Menu > Sounds
DTMF; then aim the device to the telephone receiver. Your telephone will dial out to the
desired contact upon reception of the DTMF sounds from the device.
Note: You may choose to display contacts in your SIM card by tapping { Menu } > “
Show SIM Data ”. The SIM contacts are indicated by a SIM card icon on the right side of
the contacts. (See also 3.9 Copy SIM Card Contacts.)
In Contacts, Tap { New } on the bottom left of screen. A blank record will appear.

26
27
1.You may set photos in photo field for this contact, by which the contact’s photo will
display as an incoming call photo ID.
2.You may also tap ringtone field to set different incoming call ringtones for your contacts.
3.Tap“OK”on the upper right screen to save the new contact and exit.
Call History contains all outbound calls, incoming calls and missed calls. You may choose
to display all or only display highlighted items.
1.Under Today screen, tap {Call History} on bottom left of
screen.
2.Tap {Menu} on the bottom right of screen.
3.Select a desired function to perform. You may change
call history display method by selecting {Filter}; or select
{Call Timers} to check incoming call numbers, call time and
manage incoming call history.
4.Under {Call History} screen, select the icon on the upper
left side of main screen to redial this number at once.
5.Under {Call History} screen, tap and hold on a phone
number to open drop down menu for more options.
Tap Phone in { Start } menu, then select { Menu } on the bottom left of the screen. Select {
Options } > Phone tab from unfolded options.
1.You may select preferred ringer method.
2. f you want to download ringtones, please use ActiveSync program in computer and copy
the ringtone file to Application Data / Sounds folder in this device. The ringtone files
will be added as the options.
3.You can set keypad tone for dialing.
4.You can set personal password to prevent unauthorized use from others.
Use this function to copy the contacts in SIM card to this device.
1.Select “ Start ” > Programs > Phone Manager > SIM Card Contacts .
2.All contacts in SIM card will show on the screen.
3.Select { Copy Now }, and your new contacts in SIM card will be copied to “ Contacts ” in
this device.
4.Select “ X ” to exit without copying SIM card data to the device.
To sent a text message, select “ Messaging ” on Today screen to enter message function
screen; or tap ” Start ” > Messaging.
1.Select “ Inbox ” on upper left screen, and then select files from message categories.
2.Select “ Text Message ” folder.
3.Select { New } on the bottom left of screen to create a new text message.
4.Input the phone number of recipient into recipient field, or select a recipient from { Menu
} > { Add Recipient } on the bottom right corner of screen.
5.Input your message into content filed.
6.Tap “ OK ” on the top right of screen. You may select whether to save this message
in draft and send it out later, or directly tap { Send } on the bottom left of screen to send
message.
You can choose to block specific numbers or block all unknown calls. When a blocked
number calls, the screen will display incoming call alert and ring but will automatically hang
up within 5 seconds.
Select “ Start ” > Programs > Phone Manager > Block List
1.Check “ Block all unknown calls ” or tap { Menu } and select { Add Block List } to add a
number you would like to block.

28 29
2.Select “ OK ” to save the settings.
Alternatively, tap { Contacts} on Today screen, highlight the contact you would like to block
and tap { Menu }. Select “ Set to Block List ”. You may also block numbers in Call History,
or create new blocked numbers in Block List.
You may set your personalized settings by preference.
Press and hold Flag key for about 3 seconds, and then release, to open Easy-Touch Menu.
You can easily close programs, adjust backlight brightness, or apply profiles.
You can create backup of your personal settings and data, and restore the data later.
1. “Start” > Programs > Tools > Pocket Ghost.
2. Select Pocket Ghost, then select “Create Backup” to create system backup. Select
“Restore image” to restore the settings and data. When you select to create a backup or
restore an image, the device will need to reboot.
1.Select “ Start ” > Settings
> Personal Tab > Shutdown Animation
2.Select your preferred Animation File, Sound File, Show Time. Tap User Define in “
Animation File ” to set your own file as shutdown animation.
3.Select “ Preview ” to view your settings.
4.Tap “ OK ” to save and exit.
Handset Applications contains additional handset related settings.
1.Tap “ Start ” >
Settings
> Personal Tab > Handset Applications
2.Answer Machine Tab: You may enable / disable Answer Machine, choose file location,
set recording time, set hold on time before activating answer machine, or set your own
greeting.
3.Background Effects Tab: You may enable / disable Background Effect, choose preferred
background effect sound, or adjust volume.

30
31
4.Phone Record Tab: You may turn on / off phone recording, or choose a file location.
5. Settings Tab: You may change phone related settings.
Note: When Answer Machine is activated, Background effects and Phone Recorder will
not operate.
Answer Machine
This function is different from voicemail, you may use answer machine in this device to
directly save caller’s message to this device, which allows you to listen to message more
easily and also save call expenses.You can even choose to apply a specific greeting to an
incoming call by tapping the icon appeared when an incoming call is ringing.
Select “ Start ” >
Settings
> Personal Tab > Handset Applications > Answer Machine
tab.
1.Check“Enable Answer Machine”to activate answer machine function.
2.Select“Save In”to select a storage location for messages.
3.Select“Recording Time”to set the time length for a caller message.
4.Select“Activate Time”to set how many seconds that your answer machine will wait before
answering an incoming call.
5. Select a greeting from {Greeting setup} to apply on incoming calls. To apply your own
recordings as the greeting, select “User Define” from the pull down menu.
6.Tap “ OK ” to save setup and return to System tab screen.
You will find callers’ messages in “ My Answer Machine ” folder.
Greeting Setup:
Tap { Greeting Setup } to set default answer machine greeting or record your own greeting.
Press the play button to listen to the current greeting.
1.Select a style to be your greeting message.
2.Tap the record button to record your own greeting.
3.Tap the play button to listen to greeting recorded.
4.Tap “ OK ” to validate the settings and exit.
Note:
1.Your answer machine will stop recording as caller ends the call. After activating answer
machine, you may press { Stop } to stop recording without interrupting the conversation.
After activating answer machine, it will interrupt conversation and end recording by
pressing Key.
2.When Caller 1 is leaving a message, the incoming call from Caller 2 will become call
waiting and will be recorded in the message of Caller 1.You may select to answer or
reject call waiting. If you select to answer call waiting,the message of Caller 1 will stop;
if you select to reject call waiting, the call waiting from Caller 2 will continue to ring until
Caller 2 enters voice mail.
3.If you have checked “ Auto Answer ” in Phone, Answer Machine will automatically be
deactivated. See Settings in this Chapter. .
Background Effects
You may use background effects to create the call environment you desire.
1.Select “ Start ” >
Settings > Personal tab > Handset Applications >Background
Effects tab.
2.Check “ Enable Overdub ” to activate background mixed sound function.
3.Tap { Background sound } to unfold special sound effect and select a special effect.
4.You may use { Background sound volume } bar on screen to adjust the volume of special
effect.
5.Press “ OK ” to validate the settings and exit.
You may also use the files you have recorded as background effects. To do so, save the
files under My Background Sounds in My Documents, then repeat step 1 to 5.
After activating background effects, when an incoming call rings, tap { Answer } to answer
with the background sound you have selected, or tap on the
icon and choose “ Off
” from the drop down menu to answer without the background sound.You can also tap
the
icon and choose a different background sound from the drop down menu to be
applied to this particular call.Once you select the sound to be applied, it will automatically
answer the phone and apply the newly selected special effect to that call.
Phone Recording
You may use phone recording function to record your call contents.
1.Select “ Start ” >
Settings
> Personal tab > Handset Applications > Phone Record

32
33
tab.
2.Check “ Activate Phone Recording ” to activate phone recording function.
3.Select “ Save In ” to select the storage location for your phone recording.
4.Press “ OK ” to validate the settings and exit.
You may find the recorded files in “ My Phone Recording ” folder.
When phone recording is activated, press Camera key to start in - call recording. Pressing
Camera key again will cancel the recording. By the end of a call or by pressing stop
recording key, the recording function will stop. During recording, the device will vibrate to
indicate that the recording has started/stopped.
Note: If Background Effects is activated, the background special effect will be recorded
during phone recording.
Settings:
Select “ Start ” > Settings > Personal tab > Phone > Settings.
- Auto Answer: The phone will automatically pick up incoming calls by the time period you
defined.
- Play individual ringtone on Call-waiting: Play caller’s ring tone during call-waiting to help
you recognize the incoming caller.
- Turn off touch screen during call to save power when hands-free is not in use: Temporarily
turn off touch screen when you are in a call and are not in hands-free mode.
- Lock device when in sleep mode: When the device enters Sleep mode, it will
automatically enable device lock.
Select “ Start ” > Settings
> and select Personal or System tab on the bottom of screen.
You may change the following settings:
˙
“ Clock & Alarms ” : change time or set alarm.
˙
“ Menus ” : personalize your Start menu by selecting the items to be shown in the menu..
˙
“ My Information ” : input your contact information.
˙
“ Password ” : restrict access to your data.
˙
“ Power ” : extend battery lifetime.
˙
“ Today ” : personalize “T oday Screen ” appearance and information. When you change
your Today theme in Today > Theme tab, your Today background, phone skin, and theme
color, will all change accordingly.
If you have already scheduled appointments in Calendar, job deadlines in Task bar, or
alarm setup in Clock & Alarms, then this device will alert you according to your settings.
You may select the following alert methods:
˙
Display message dialog on screen
˙
Play specified sound
˙
Flashing
˙
Vibration
If you want to select alert types and sounds, select “ Start ” >
Settings
> Personal tab >
Sounds & Notifications > Notifications tab.
Select “ Star t” > Settings > System tab > Power
Battery tab:
displays the power status.
Advanced tab: enable auto power off of the device.
Others tab:
enable / disable short press power key to lock device, USB fast charging.
Note: USB fast charging through PC will speed up the charging process and shortens
the time needed. However, it may cause system instability to some notebooks.
1. Select “ Start ” > Settings > System tab > Backlight to set backlight functions.
2. Battery Power tab: set the turn on method and turn off time for backlight when using

34
35
battery power.
3. External Power tab: set the turn on method and turn off time for backlight when using
external power.
4. Extended tab: adjust the brightness of backlight.
“ Search ” function may help you to rapidly find the information you desire.
1. Select “ Start ” > Programs > Search
2. Input the text you want to search in search field.
3. You may also select proper file type in type field to search the file you want.
4. Tap { Search } on the bottom left of screen to start searching the file.
You may also use
File Explorer to search for files.
1. Select “ Start ” > File Explorer
2. Select the arrow on the top left corner of the screen to change a folder.
3. Select “Date” to change the order of file display.
4. Select a folder to view the files in that folder.
5. Tap and hold a file or on any blank space of the screen to open pop - up Menu.
To move files using
File Explorer , select and hold the items you want to move, then
select { Cut } or { Copy } from Menu and then select { Paste } after switching to proper
directory.
Through pop - up Menu, you may easily select a desired item for execution. The pop-up
Menu provided in each program is different. Tap and hold and then lift the stylus to open a
pop - up Menu. Select an item from the Menu to execute. If you do not want to execute any
item, tap anywhere outside the Menu to cancel.
You may set certain keys as the activation keys for your most common used programs.
1. Select “ Start ” > Settings > Personal tab > Buttons > Program Buttons tab.
2. Under Program Buttons tab screen, select desired function key.
3. In specified program field, select the program you want to set.
4. Tap “ OK ” to save and return to Personal
tab screen.
Default assignments are:
Left Function Key (Press & hold): Windows Media Player.
Right Function Key (Press & hold): File Manager.
Flag Key (Press & hold): Easy-Touch Menu.
Volume Side Key (Press & hold): Voice Note.
OK Key (Press & hold): Landscape/Portrait display.
You may make settings for Phone, Services, Network and other phone related settings.
Select “ Start ” > Settings > Personal tab > Phone
Phone
tab: Settings include ring type, ring tone, keypad tone and security PIN.
Services
tab: Settings include Call Barring, Caller ID, Call Forwarding, Call waiting,
Voice Mail and Text Messages, and Fixed Dialing.
Network
tab: Settings include current network, preferred networks, and network
selection.
Information
tab: This tab provides device related phone information.
Services:
1.Select “ Start ” > Settings > Personal tab > Phone > Services tab.
2.Check the items you want to select.
3.Tap “ OK ” to save settings and return to Personal tab screen.

36
37
Note: All services in Ser vices are provided by operators. Please contact your
operator for enquiries regarding these services.
Network:
Select “ Start ” > Settings > Personal tab > Phone > Network
˙
Under
Current network
,tap “ Find Network ” to automatically search for the network
in use.
˙
Under
Network Selection
, select “ Automatic ” or “ Manual ” to select network
automatically or manually.
˙
Under
Preferred networks
, tap “ Set Networks ” to set your preferred order of
network.
You may record voice tags under Voice Commander Settings, or train you the way of
number speaking under “ Digit Training ” and set the length and sensibility of dial number.
Contacts
tab:
1.Select “ Start ” >
Settings
> System tab > Voice Commander Settings > Contacts
tab.
2.Select a contact from contacts list.
3.Press key to play system pronunciation method.
4.Press voice tag to record your own pronunciation method.
5.Press delete key to delete voice tag.
Application
tab:
1.Select “ Start ” >
Settings > System tab > Voice Commander Settings > Application
tab.
2.Select an application from applications list.
3.Press key to play system pronunciation method.
4.Press voice tag to record your own pronunciation method.
5.Press delete key to delete voice tag.
Music
tab:
If you have MP3 files in the device or mini SD card, you may record voice tags for these
MP3 files.
1.Select “ Start ” > Settings > System tab > Voice Commander Settings >Music tab.
2.Select an application from applications list.
3.Press key to play system pronunciation method.
4.Press voice tag to record your own pronunciation method.
5.Press delete key to delete voice tag.
Digit Training
tab:
1.Select “ Start ” >
Settings > System tab > Voice Commander Settings >Digit
Training tab.
2.Press record key and say the numbers next to the red arrow.
3.After recording a series of numbers, system will play the newly recorded part and ask
you whether it is correct.
4.After confirming its correctness, system will continuously train remaining number model.
5.Check Use adapted model and the system will apply the voice tags you have recorded
as voice identification standard in the future.
Advanced Settings
tab:
1.Select “ Start ” >
Settings
> System tab > Voice Commander Settings > Advanced
Settings tab.
2.Select the desired sensitivity.
3.Select the length of phone number.
Press ” OK ” to save Settings and return to System tab screen.
You may use Microsoft ActiveSync to synchronize data in this device with personal
computer.
˙
You can synchronously update Outlook data in this device and in your personal
computer.
˙
You can synchronize Microsoft Word and Microsoft Excel files in this device and in your
personal computer. The files will automatically convert to the compatible version.
The default of ActiveSync is not to automatically synchronize all data. If you would like to
change the default, you may activate or disable the synchronization function for specific

38 39
data in ActiveSync Option.
ActiveSync may also be used for the following purposes:
˙
Backup or restore saved data in this device.
˙
Copy files between this device and personal computer.
˙
Synchronize while connecting to your personal computer or selecting synchronization
command.
˙
Synchronize specific types and range of files. For example, you may choose to
synchronize appointments of the past few weeks.
Note: Before installing ActiveSync, do not connect your device to the computer. You
may only connect the device to the computer by using the USB cable AFTER ActiveSync
is installed.
1.ActiveSync Installation:
use the enclosed CD to install Microsoft ActiveSync in your personal computer. This device
already has built-in ActiveSync.
2.Hardware Installation:
connect this device with your personal computer by using the USB cable.
3.Use ActiveSync Program:
After completing installation, setup wizard will lead you step by step. Please follow the
instructions to make setup basing on your demand.
After connecting this device with your personal computer by using the USB cable,the
computer screen will display “ Connected ” upon successful connection.A green icon
representing “ connected ” will appear on the task bar of your computer screen.
Select the Browse button of ActiveSync program of your personal computer, to view the
files in this device. You may manage several files in the device simultaneously.
Instead of using a USB cable, you may also synchronize data via Bluetooth.Select “ Start
”> Programs
>
ActiveSync > {Menu},then select { Connect via Bluetooth } and
tap ” Synchronize ” in this device to process synchronization. For descriptions regarding
synchronization through Bluetooth device, please refer to Synchronizing Your Information
> Connect to a PC via Bluetooth in device Help.
Page is loading ...
Page is loading ...
Page is loading ...
Page is loading ...
Page is loading ...
Page is loading ...
Page is loading ...
Page is loading ...
Page is loading ...
Page is loading ...
Page is loading ...
Page is loading ...
Page is loading ...
Page is loading ...
Page is loading ...
Page is loading ...
Page is loading ...
Page is loading ...
Page is loading ...
-
 1
1
-
 2
2
-
 3
3
-
 4
4
-
 5
5
-
 6
6
-
 7
7
-
 8
8
-
 9
9
-
 10
10
-
 11
11
-
 12
12
-
 13
13
-
 14
14
-
 15
15
-
 16
16
-
 17
17
-
 18
18
-
 19
19
-
 20
20
-
 21
21
-
 22
22
-
 23
23
-
 24
24
-
 25
25
-
 26
26
-
 27
27
-
 28
28
-
 29
29
-
 30
30
-
 31
31
-
 32
32
-
 33
33
-
 34
34
-
 35
35
-
 36
36
-
 37
37
-
 38
38
-
 39
39


Ask a question and I''ll find the answer in the document
Finding information in a document is now easier with AI
Related papers
-
Gigabyte GSmart User manual
-
-
-
-
-
-
-
-
-