Page is loading ...

).3425#4)/.
-!.5!,
&/2
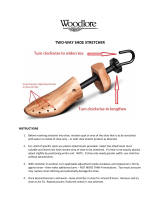
No. 514 Mini-Stretcher
with Seam Repair Attachment
.O
,/#+).'(%!$
,/#+/./&&+./"

1
(/74/53%9/52#2!).-).)342%4#(%2
The No. 514 features a heavy-duty aluminum frame and dual powerheads,
ensuring dependable and trouble free operation. The unique swivel design
allows directional stretching for correction of bow, skew, and pattern
elongation as well as compression of gapped seams for alignment and
repair. Remove the swivel powerhead, add the tail blade, and the unit
becomes a mini-power stretcher for tackstrip installations.
/0%2!4).').3425#4)/.3
■
When used as a pattern matching stretcher, it works by anchoring itself onto
the carpet with the front nap grip head and pulling the back nap grip head
forward, thus moving the carpet pattern. You may have to repeat this action
moving the Mini-Stretcher forward after each action (crab walking).
&IGURE
&IGURE
&IGURE
&IGURE
■
Use the Nap Grip head dial to properly adjust pin penetration into only
the carpet backing and not into the carpet padding. This will reduce
the risk of carpet damage and ensure proper stretching.
■
The tool allows you to “crab walk” the carpet pattern into proper alignment.
As pattern distortion can vary in every piece of carpet, it will be necessary
to “crab walk” the pattern in multiple locations across the breadth of the
distortion to achieve proper pattern alignment.
&IGURE
&IGURE

2
■
Cuts should be arranged so the longest pattern is installed first. Make
sure carpet is dry laid prior to applying adhesive. Pre-stretch carpet
only enough to match pattern closely. Apply adhesive with proper
notched trowel, set carpet into adhesive wet, to aid the ability to move
the carpet into pattern alignment. ./4% Only apply the amount of
adhesive that can be covered and pattern alignment achieved before
adhesive starts to tack up. After pattern alignment is achieved the use
of stay nails is required to hold carpet until the adhesive is fully cured.
■
Match the pattern at the midpoint of the seam’s length. Work from the
seam’s midpoint to the seams ends. Bring the pattern into register
using the stretcher.
■
After the carpet has been properly aligned into the wet adhesive, the
use of stay nails is required to hold the carpet alignment until the carpet
adhesive is fully cured. 24-36 hours.
,/#+).'(%!$/0%2!4)/.
The No. 514 can be used in either the “automatic
locking” or conventional method by setting the
Lock Control as shown below. The automatic
locking mechanism locks the stretcher in position
approximately each
1
/
4
” (6.55 mm) of travel. The
stretcher will hold this position and will not open. This
enables the user to make “hands-off” seam repairs,
as it is not necessary to hold the handle in position.
■
For “automatic locking”, open the stretcher, then set
the Control Knob on the “O” mark (see figure 11).
■
For “non-locking”, set the lock control on the “I”
marked as shown below ( see figure 12).
&IGURE
&IGURE
&IGURE
&IGURE
&IGURE
&IGURE

3
3%!-2%0!)2
Simply straddle the seam and adjust the position of the dual heads to
properly close the seam gap. Apply latex or adhesive. Allow adhesive
to achieve full bond before removing the Mini-Stretcher, or use stay nails
until cured. Be careful not to get adhesive on the face yarns of the carpet.
Failure to properly seal seam edges often results in edge ravel, edge
delamination, tuft loss or seam separation.
).34!,,).'4(%3%!-2%0!)2!44!#(-%.4
#!2%/&9/52342%4#(%2
■
To keep your Mini-Stretcher operating smoothly and to minimize wear,
all moving parts should be kept clean. Lubrication is not necessary
because the tool has built-in lubrication in its precision bushings.
■
Protect your Mini-Stretcher against damage when not in use. The tool
comes complete with a carrying case. Keep your Mini-Stretcher in the
case when not in use.
■
If additional lubrication is desired, use paraffin wax to avoid getting oil
spots on the carpet.
■
Before disassembling your Mini-Stretcher, locate the end of all Pivot
Pins which show the three holdings grooves. Remove pins by driving
the grooved end of the pins outward. When reassembling, install Pivot
Pins from opposite side of casting.
1. On the underside of the Pattern Matcher is a
black Allen screw holding a “cup” washer and the
powerhead in place. Remove the black Allen screw
with the Allen wrench provided.
2. Remove the cup washer and powerhead.
3. Position seam attachment so that the blade is
pointing outward.
4. Invert the cup washer (the cup part of the washer
should be facing the frame assembly).
5. Tighten Allen screw.
6. Reverse this procedure when replacing the second
power head. When replacing the powerhead, be
sure the “cup” of the cup washer is facing away
from the frame assembly.
&IGURE
&IGURE
&IGURE

4
#/--/.490%3/&-!.5&!#452).'
$)34/24)/.3
#OMMON
.AME $ESCRIPTION
Bow A visible distortion or wave of
the pattern across the width or
berth of the carpet.
Skew/Bias A pattern distortion of the
pattern not being square with
either edges of the carpet.
Pattern Elongation An increase or decrease
of cumulative pattern
measurements, from one
breadth of carpet to the next.
Edge Deviation A visible wavy or crooked
pattern, running parallel from the
edge of the carpet.
Tolerances: Although individual manufacturers have
tolerances to which their patterned products must
conform, THERE ARE NOT INDUSTRY STANDARDS
FOR CARPET PATTERN VARIATION. Call the carpet
manufacturer for their tolerances.
Note: Do not install carpet if a defect is visible, or
if the distortion exceeds the tolerances specified by
the carpet manufacturer.
Distortion drawings courtesy of CFI

5
2%0,!#%-%.40!243!.$/2$%2).').&/2-!4)/.
/RDER.O $ESCRIPTION
1512-A Pin Plate
1505-K Gripper Inserts (3)

#2!).
7!22!.49
This Crain Stretcher is guaranteed to be free of defects in workman-
ship or quality of materials for a period of ONE YEAR.
Any parts of tools found defective subject to guarantee will be re-
placed at no charge. Credit in full or part cannot be extended by the
distributor. New tools will not be given as replacements for those
pending a warranty adjustment.
All merchandise returned subject to this warranty must be ac-
companied with same. All merchandise returned must be F.O.B.
Milpitas, California, and must be in complete, assembled units. No
consideration will be given to unassembled parts. All disputes will
be up to the consideration of CRAIN CUTTER CO., INC. and their
decision will be final.
Please fill out and mail this card to validate
your CRAIN guarantee.
NAME
ADDRESS
CITY
STATE ZIP
TOOL PURCHASED:
-INI3TRETCHERW3%!-!44
PURCHASED FROM:
DATE PURCHASED:
PLEASE CHECK:
INDIVIDUAL FLOORING INSTALLER
WORKROOM
FLOORING DEALER
INSTALLATION CONTRACTOR
OTHER
•
•
•
•
•

Printed by: HF 3/06 Form F1514-0306
#RAIN#UTTER#O)NC
1155 Wrigley Way
Milpitas, CA 95035-5426
PLACE
STAMP
HERE
/