
Xtant1.1i
Amplifier
Owner’s Manual

xtant.com
Xtant1.1i Amplifier Owner’s Manual
WELCOME TO XTANT
Congratulations on your Xtant amplifier purchase. The concept is simple—a more carefully engi-
neered amplifier to produce superior sound. That is our passion—to exceed your expectation of
the automotive listening experience. We are driven by it. To accomplish this lofty goal, it takes
the finest engineering talent in the business, combined with a dedication to superior materials.
We add in a multitude of features, unique cosmetics, and creative system integration.
Xtant products are only available through the finest, most highly-specialized mobile audio retailers.
Your authorized Xtant retailer was chosen because of their passion for excellence and their commit-
ment to expanding their expertise. Please remember, exceptional audio requires professional
installation. Your Xtant retailer will optimize your system to meet your personal tastes.
With your purchase of Xtant mobile audio, you publicly confirm your status as a connoisseur of
fine music. We salute you and welcome you to our family.
Welcome to Xtant!
INSTALLING YOUR XTANT AMPLIFIER
All Xtant amplifiers and accessories are intended to be installed by an Xtant-certified professional
mobile audio installation specialist. It is the recommendation of Xtant Technologies that your
new Xtant product(s) and all of your mobile audio products be installed by your Authorized
Xtant retailer.
In the event you decide to install your new Xtant product(s), please take the time to read this
Owner’s Manual in its entirety. Installation and/or use of your amplifier in applications or methods
other than those specified in your Xtant amplifier owner’s manual may result in a reduction of the
overall performance capability of the amplifier. Any such installation or usage renders the prod-
uct warranty void. The following guidelines are designed to assure a safe and properly installed
Xtant Mobile Audio System.
We strongly recommend that you acquaint yourself with your Xtant amplifier’s available features
and spend some time designing a system most suitable for you. Consider the components you
have now, those you have and plan to upgrade, and those you plan to add in the future.
SPECIFICATIONS
XTANT1.1I
Frequency Response: 17 Hz-21 kHz +0,-.2dB
Number of Channels: 1
Watts per Channel @ 4Ω: 100
Watts per Channel @ 2Ω: 100
Recommended Load: ≥2Ω
Distortion (THD): ≤1%
Signal to Noise Ratio A-weighted: ≤ -100dB
Input Sensitivity:
Unbalanced 100 mV-8.5 V RMS
Balanced 200 mV-17 V RMS
Balanced Line: On-board
Power Supply: Fully Regulated, PWM
Operational Voltage: 10-16 Volts
Fusing Requirement: 10 Amp
Size (L x W x H): 6.5" x 5.81" x 1.63"
165.1mm x 147.64mm x 41.28mm
Warranty: Limited 4 Year Parts
and Labor
3
FRANÇAIS PG 11
ESPAÑOL PG 19
DEUTSCH PG 27

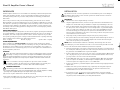
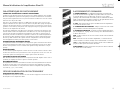
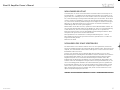
CONNECTIONS & CONTROLS
1. BALANCED INPUT – Xtant1.1i amplifiers feature RCA type input connec-
tions. Source units with an output signal level of 100mV–17V may be used. The
balanced input serves two purposes. First, it helps eliminate noises being
induced into the signal path by isolating the signal ground from amp chasis.
Second, it allows use of any source unit.
2. GAIN – This feature is used to fine-tune the input sensitivity of the
amplifier to the source unit’s output level.
3. SPEAKER CONNECTION – These output terminals are individually labeled
for proper speaker connections.
4. POWER TERMINALS – This is the main power connection for the amplifi-
er. The power and ground wire size should be the same gauge.
GND – The ground wire from this connection must be attached
to bare metal on the vehicle.
REM – To turn the amplifier on/off, this terminal must be connected
to the source unit’s "remote or electric antenna" wire.
+12V – The power wire from this connection must be attached
to an inline fuse, then to the positive side of the vehicle battery.
WARNING: An outboard fuse must be installed in-line with the power wire within
18 inches of the battery.
5xtant.com
Xtant1.1i Amplifier Owner’s Manual
PERFORMANCE FEATURES
AUDIOPHILE FULL SPECTRUM CLASS D TECHNOLOGY
The Xtant1.1i adds local and global multiple nested feedback loops with premium MOSFETs and
OPAmps for switching stability and audio signal accuracy within the full range spectrum. This
results in an extremely high switching speed—over 1MHz.
Because the switching speed is over 1MHz, we are able to set the output filter frequency high
enough to avoid any phase related distortion within the higher frequency range of the audio sig-
nal. This enhances the musical reproduction by ensuring the higher frequencies (cymbals and
the like) compliment the entire frequency range to bring new realism to the Class D amplifier
sound experience.
The Audiophile Full Spectrum Class D Technology with Xtant’s attention to detail results in a
Class D amplifier that sounds better than many audiophile Class A/B amplifiers. It exhibits an
extremely low noise floor eliminating the “hiss” common to many Class D amplifiers. The
improved dynamic range enables the accurate reproduction of every loud and quiet passage
within the musical range. This makes the amplifier exceptionally suited for musical and theater
applications.
FULLY REGULATED PWM POWER SUPPLY
Xtant amplifiers feature a Fully Regulated, Pulse Width Modulated power supply. This power
supply technology provides high efficiency and consistent output performance even when
battery voltage is less than optimum.
BALANCED INPUT
The Balanced input circuit increases common mode noise rejection and eliminates ground loop
noise while allowing for 100mv to 17 volts of signal input. This circuit also makes interfacing
with any factory head-unit easy.
ADVANCED PROTECTION CIRCUITRY
Both Thermal and Overcurrent protection are incorporated into Xtant amplifiers. In the event of
a problem, the amplifier will reduce its power to maintain operation.
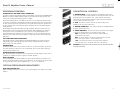
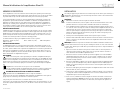
SMALL FOOTPRINT
These small footprint mono-block amplifiers are ideal for vehicles that have limited space and
allows for unlimited installation creativity in any application. The mono-block concept also allows
for easy audio and/or video system configuration (2-, 3-, 4-, 5-, 6-, or 7-Channel).
OPTIONAL PERFORMANCE ENHANCEMENTS
HIGH LEVEL ADAPTER (HLA)
High Level Adapters allow you to connect a source unit with speaker level outputs to your Xtant
amplifier.
4
3
2
1

xtant.com
Xtant1.1i Amplifier Owner’s Manual
SAFEGUARDS
All Xtant amplifiers and accessories are intended to be installed by an Xtant-certified professional
mobile audio installation specialist. It is the recommendation of Xtant Technologies that your
new Xtant product(s) and all of your mobile audio products be installed by your Authorized
Xtant retailer.
In the event you decide to install your new Xtant product(s), please take the time to read this
Owner’s Manual in its entirety. Installation and/or use of your amplifier in applications or methods
other than those specified in your Xtant amplifier owner’s manual may result in a reduction of the
overall performance capability of the amplifier. Any such installation or usage renders the prod-
uct warranty void. The following guidelines are designed to assure a safe and properly installed
Xtant Mobile Audio System.
WIRING REQUIREMENTS
Your Xtant power amplifier is designed for use with a 12 Volt, negative ground system. Installation
of your Xtant amplifier in a vehicle with a POSITIVE ground system will result in severe damage to
the amplifier, other audio components and/or the vehicle’s electrical components. If your vehicle
uses a positive ground system, please consult your authorized Xtant retailer or specialty install shop.
Xtant1.1i amplifiers have minimum wire gauge requirements for:
Power - 10 gauge Ground - 10 gauge Speaker cables - 14 gauge
FUSING REQUIREMENTS
Xtant1.1i amplifiers are not fuse protected! A 10 amp fuse must be installed in-line with the
power wire at the battery, no further than 18" from battery. For safety, an outboard fuse should
be added close to the amplifier. For fuse requirements for a single amplifier, refer to page 3 of
this manual. In the case of a multi-amp system, use a fuse value equal to the combined value of
all system amplifier’s power fuses.
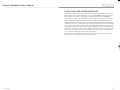
LOCATION
A firm, flat surface with minimum vibration is ideal. Your Xtant amplifier may be mounted
horizontally or vertically on a flat surface. The amplifier should NEVER be mounted upside
down. This ill-advised configuration can increase internal operating temperatures, decrease the
amplifier’s ability to dissipate heat and speed up the amplifier’s automatic thermal shut down
mechanism.
Under no circumstances should your amplifier be exposed to moisture and water.
To ensure adequate ventilation, the ideal location for your Xtant amplifier is an area away from
any heat source, with at least 2 inches of clearance above and around the amplifier.
COMMON OVERSIGHTS
• The battery ground should remain DISCONNECTED at all stages of installation.
• Do not begin drilling until you have put your Xtant amplifier aside. Using the amplifier as a drilling
guide may cause irreparable damage to the amplifier and void your warranty.
• Do not route any wires underneath or outside the vehicle body.
• Route signal wires (RCAs from source unit, speaker wires, etc.) away from power wires (power,
ground, etc.) to avoid ground loops and other sources of noise.
INSTALLATION
Any deviation from the connection specifications recommended may cause serious damage to
the amplifier, speakers and/or vehicle electrical system. Please double-check the connections
before turning the system on.
PROCEDURE
1. Disconnect the vehicle’s negative battery connection.
2. Using the supplied allen wrenches, remove the four (4) screws from the annealed stainless steel
amplifier cover. Put this aside until your installation is complete to prevent damage to the cover.
3. Place your Xtant amplifier at the predetermined mounting location. Using a felt pen, mark
the exact position of the mounting holes on the mounting surface. Set your Xtant amplifier
aside. Use a sharp, precise blade to cut small circles in the carpet and padding around the
four marks denoting your mounting holes to expose the metal underneath. Use a center
punch to make an indentation in the metal to ensure that you drill the exact position for the
screws. Drill the four holes as marked.
4. Temporarily mount your Xtant amplifier using the four (4) long screws provided.
5. Run a power cable from the vehicle’s battery through the firewall and through the interior of
the vehicle connecting one end to your Xtant amplifier’s B+ terminal and connecting the
other end to the positive post on the battery.
NOTE: Install a circuit breaker/fuse within 18" of the battery. This effectively lowers the risk of
severe damage to your vehicle should a short circuit ever occur in the audio system. Do not install
the fuse in the fuse holder until all installation steps have been completed.
6. Find a good ground spot on the vehicle’s chassis and remove the paint to reveal bare metal at
the contact point. Attach the ground wire to that contact point and connect the other end of
the ground wire to the GND terminal of your Xtant amplifier.
7. Connect a Remote Turn-on wire from your source unit to your Xtant amplifier’s REM terminal
(14 or 16 gauge wire). If your source unit does not have a dedicated Remote Turn-on lead,
you may connect to the source unit’s Power Antenna lead.
8. Connect RCA cables from your source unit to your Xtant amplifier’s RCA input jacks. If RCA
(low) level output is not available, use Xtant’s High Level Adapters (HLA—not included) to
connect the speaker level (high level) wires to a set of RCA cables.
9. Connect your speakers to your Xtant amplifier’s speaker terminals using 14 gauge minimum
speaker cable.
10. Double-check all the previous installation steps, in particular, the wiring and component
connections. Securely mount the amplifier. Remove the protective film and screw the
annealed stainless steel cover back onto the amplifier.
11. If everything is in order, reconnect the vehicle’s negative battery connection and begin
adjusting your amplifier.
NOTE: Be sure that the Gain Level on the amplifier is turned all the
way down (counter clockwise) before proceeding with adjustments.
7

xtant.com
Xtant1.1i Amplifier Owner’s Manual
GAIN CONTROL ADJUSTMENT
1. Turn the Gain control all the way down (counter-clockwise)
2. Set the volume control of the source unit to approximately
2
⁄3 of its
maximum output
3. Turn the balance control of the source unit to its center position
4. Leave the tone (bass/treble) controls at their usual position
5. Play a CD or tape track with wide dynamic range
6. To locate the optimum input sensitivity setting, turn the
Gain control clock-
wise until audible distortion starts to develop. Turn the sensitivity control counter-
clockwise slightly to minimize the distortion.
7. If you often switch between sources (CD, tape, radio, etc.) you will need further adjustment
since radio output level differs from that of CD or tape. In this case, you need to locate a balanced
sensitivity setting which is best for the output level of your sources.
9
TROUBLESHOOTING
SYMPTOM: No power
SOLUTION: Check connections to the amplifier’s Ground, B+ & Remote terminals. Check con-
nection at “+” terminal of the battery. Check the remote turn-on terminal. Ensure it receives
power when the source is turned on (or when the switch is turned on). Refer to the Installation
Section. Check the power line fuse: if fuse is blown, replace it; if fuse continues to blow, check
the power wire and also the amplifier for a short. If the short is in the power wire, fix it; if the
short is in the amplifier itself, see your Xtant dealer.
Check the voltage at the amplifier, and the remote ON/OFF lead. The voltage should measure
between 11 V - 15 V. If the measurement is beyond this range, have the source unit checked out
by an authorized dealer.
SYMPTOM: Power without sound with red power indicator on
SOLUTION: Turn the amplifier off, and Check all input & output signal cables and connections.
Check the speakers for short with a VOM (volt meter) or by connecting them to another audio
system. After making sure everything is normal, turn the amplifier on again.
SYMPTOM: No sound
SOLUTION: Check balance control. Check speaker connections. Check signal input connection.
SYMPTOM: Very low sound from both radio & other source
SOLUTION: Check your radio’s fader control. Check the amplifier’s Input Sensitivity Level.
SYMPTOM: Frequent automatic amplifier shut down
SOLUTION: This indicates that the amplifier is operating continually at an exceedingly high
internal temperature. High operating temperature caused by inadequate ventilation: Refer to the
sub-section titled LOCATION for better amplifier location.
High operating temperature caused by an excessively low impedance load, say below 2 ohms
stereo: Check for bad speakers and/or electronic crossover, proper passive crossover compo-
nents; if difficulty persists, please consult your local authorized Xtant retailer.
High operating temperature can be caused by an incorrect input sensitivity level: refer to sub-
section titled GAIN CONTROL ADJUSTMENTS for correct setting.
SYMPTOM: “Motorboating”: The amplifier power indicator going off repeatedly when the
audio system is on
SOLUTION: Check the amplifier’s connection to the battery.
Check battery voltage. If low,
recharge or replace battery. Check all ground connections.
Page is loading ...
Page is loading ...
Page is loading ...
Page is loading ...
Page is loading ...
Page is loading ...
Page is loading ...
Page is loading ...
Page is loading ...
Page is loading ...
Page is loading ...
Page is loading ...

XTANT FOUR YEAR LIMITED WARRANTY
Xtant Amplifiers purchased in the United States from an authorized Xtant dealer are guaranteed
against defects material and workmanship for a period of FOUR YEARS from the date purchased
by the end user if the product is installed by an authorized Xtant dealer, and ONE YEAR if
installed by the consumer. This warranty limited to the original retail purchaser of the product.
Product found to be defective during that period will be repaired or replaced by Xtant at no
charge. This warranty is void if it is determined that unauthorized parties have attempted repairs
or alterations of any nature. Warranty does not extend to cosmetics or finish. Before presuming a
defect is present in the product, be certain that all related equipment and wiring is functioning
properly. Xtant disclaims any liability for other incurred damages resulting from product defects.
Any expenses incurred in the removal and reinstallation of products are not covered by this war-
ranty. Xtant's total liability will not exceed the purchase price of the product. If a defect is pres-
ent, your authorized Xtant dealer may be able to effect repairs.
Proof of purchase is required when requesting service, so please retain your sales receipt and
take a moment to register your warranty on line @ xtant.com.
35xtant.com
Xtant1.1i Amplifier Owner’s Manual

7676 South 46th Street • Phoenix, AZ 85042
602.431.8686 • fax 602.431.8600 • xtant.com
XTT001425 RevA 9/02 NDM232
© 2002 Xtant Technologies. All rights reserved. Xtant is a registered trademark of Mitek Corporation.
Due to continual product development, all specifications are subject to change without notice.
-
 1
1
-
 2
2
-
 3
3
-
 4
4
-
 5
5
-
 6
6
-
 7
7
-
 8
8
-
 9
9
-
 10
10
-
 11
11
-
 12
12
-
 13
13
-
 14
14
-
 15
15
-
 16
16
-
 17
17
-
 18
18
-
 19
19


Ask a question and I''ll find the answer in the document
Finding information in a document is now easier with AI
in other languages
- français: Xtant 1.1I Manuel utilisateur
- español: Xtant 1.1I Manual de usuario
- Deutsch: Xtant 1.1I Benutzerhandbuch
Related papers


Other documents
-
Vox AV30/AV60 Auto Power Off Owner's manual
-
MTX Audio th902 Owner's manual
-
JL Audio JX500 Owner's manual
-
JL Audio JX250/1D Owner's manual
-
FOCAL NAIM Deutschland FDS1.350 User manual
-
Jensen Jensen JPA1150M User manual
-
-
MTX Thunder404 User manual
-
MTX Stereo Amplifier 502 User manual
-