Page is loading ...
Page is loading ...
Page is loading ...
Page is loading ...
Page is loading ...
Page is loading ...

CZ
6
CZ
7
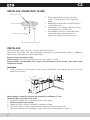
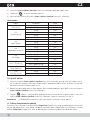
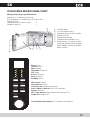
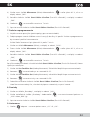
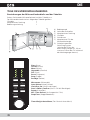
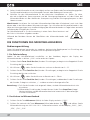
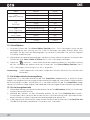
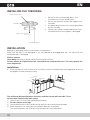
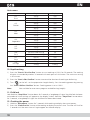
SESTAVENÍ MIKROVLNNÉ TROUBY
Názvy částí trouby a příslušenství
Vybalte troubu a veškeré příslušenství.
Trouba je dodávána s následujícím příslušenstvím:
Skleněný talíř 1
Zkompletovaný unášecí kroužek 1
Návod k obsluze 1
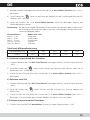
A) Ovládací panel
B) Osa unášecího talíře
C) Zkompletovaný unášecí kroužek
D) Skleněný talíř
E) Pozorovací okénko
F) Zkompletovaná dvířka trouby
G) Bezpečnostní uzamykací systém
(Vypne přívod elektrické energie,
pokud dojde k otevření dvířek
během vaření.)
Pizza
Fisch
Meat
Soup
Vegetable
Porrige
Clock/
Pre-Set
Mikrowave
W.T./
Time Defrost
Stop/Clear
Start/+30 Sec./
Confirm
Auto Reheat
Potato
Pasta
Chicken
T
i
m
e
r
•
W
e
i
g
h
t
•
A
u
t
o
M
e
n
u
Pizza (Pizza)
Chicken (Kuře)
Meat (Maso)
Vegetable (Zelenina)
Fish (Ryby)
Pasta (Těstoviny)
Soup (Polévka)
Porridge (Kaše)
Microwave (Mikro)
Auto Reheat (Ohřát)
Clock/Pre-Set (Hodiny/Nastavení)
Start/+30Sec./Confirm (Start/+30 s/Potvrdit)
Potato (Brambory)
W.T./Time Defrost (Rozmrazování Hmotnost/čas)
Stop/Clear (Stop/Zrušit)
Timer Weight Auto Menu (Čas Hmotnost Auto Menu)
Page is loading ...
Page is loading ...
Page is loading ...
Page is loading ...
Page is loading ...
Page is loading ...
Page is loading ...
Page is loading ...
Page is loading ...
Page is loading ...
Page is loading ...
Page is loading ...
Page is loading ...

SK
20
SK
21
ZOSTAVENIE MIKROVLNNEJ RÚRY
Názvy častí rúry a príslušenstva
Vybaľte rúru a všetko príslušenstvo.
Rúra je dodávaná s nasledujúcim príslušenstvom:
Sklenený tanier 1
Skompletizovaný unášací krúžok 1
Návod na obsluhu 1
A) Ovládací panel
B) Os unášacieho taniera
C) Skompletizovaný unášací krúžok
D) Sklenený tanier
E) Pozorovacie okienko
F) Skompletizované dvierka rúry
G) Bezpečnostný uzamykací systém
(Vypne prívod elektrickej energie,
pokiaľ dôjde k otvoreniu dvierok
počas varenia.)
Pizza
Fisch
Meat
Soup
Vegetable
Porrige
Clock/
Pre-Set
Mikrowave
W.T./
Time Defrost
Stop/Clear
Start/+30 Sec./
Confirm
Auto Reheat
Potato
Pasta
Chicken
T
i
m
e
r
•
W
e
i
g
h
t
•
A
u
t
o
M
e
n
u
Pizza (Pizza)
Chicken (Kura)
Meat (Mäso)
Vegetable (Zelenina)
Fish (Ryby)
Pasta (Cestoviny)
Soup (Polievka)
Porridge (Kaša)
Microwave (Mikro)
Auto Reheat (Ohriať)
Clock/Pre-Set (Hodiny/Nastavenie)
Start/+30Sec./Confirm (Štart/+30 s/Potvrdiť)
Potato (Zemiaky)
W.T./Time Defrost (Rozmrazovanie Hmotnosť/Čas)
Stop/Clear (Stop/Zrušiť)
Timer Weight Auto Menu (Čas Hmotnost Auto Menu)
Page is loading ...
Page is loading ...
Page is loading ...
Page is loading ...
Page is loading ...
Page is loading ...
Page is loading ...
Page is loading ...
Page is loading ...
Page is loading ...
Page is loading ...
Page is loading ...
Page is loading ...
Page is loading ...
Page is loading ...
Page is loading ...
Page is loading ...
Page is loading ...
Page is loading ...
Page is loading ...
Page is loading ...
Page is loading ...
Page is loading ...

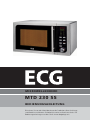
MIC ROWAVE OVEN
MTD 230 SS
OPERATING MANUAL
Always read the safety&use instructions carefully before
using your appliance for the first time. The user´s manual
must be always included.

EN
45
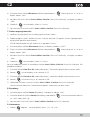
SAFETY INSTRUCTIONS
Read carefully and save for future use!
Warning: The safety measures and instructions, contained in this manual, do not include all conditions
and situations possible. The user must understand that common sense, caution and care are factors
that cannot be integrated into any product. Therefore, these factors shall be ensured by the user/s using
and operating this appliance. We are not liable for damages caused during shipping, by incorrect use,
voltage fluctuation or the modification or adjustment of any part of the appliance.
To protect against a risk of fire or electric shock, basic precautions shall be taken while using electrical
appliances, including the following:
1. Make sure the voltage in your outlet corresponds to the voltage provided on the appliance label
and that the socket is properly grounded. The outlet must be installed according to valid safety
instructions.
2. Do not operate the oven of the door is damaged, it does not function correctly or the power cord
is damaged. All repairs or adjustments including cord replacements shall be performed by
a professional service centre! Do not remove protective covers of the appliance, risk of
electric shock!
3. Protect the appliance against direct contact with water and other liquids, to prevent potential
electric shock. Do not immerse cord or plug in water!
4. Do not leave the oven running unattended.
5. Leaving the oven cord connected to outlet unattended is not recommended. Disconnect the cord
from the electrical outlet prior to performing maintenance. Do not pull the cord from the outlet by
yanking the cable. Unplug the cable from the outlet by grasping the plug.
6. Do not use the oven outdoors or in moist environments. Do not touch the cord or oven with wet
hands. Risk of electric shock.
7. Close supervision is necessary for operating the oven near children!
8. Do not allow the cord to touch hot surfaces or lead the cord over sharp edges.
9. Keep the oven away from hot surfaces and sources of heat (for example, hot plates).
10. Prevent fires inside the oven by observing the following:
a) Do not overheat food.
b) Remove any clips from paper or plastic bags before placing them into the oven.
c) Do not heat frying oils or greases in the oven, for oil temperatures cannot be regulated.
d) Wipe the door, door seal and inside of the oven dry using a damp cloth with detergent. All
stains, greases and food residue are removed this way.
WARNING: The oven should not be operated, if the door or door seal is damaged, until
repaired by a trained individual.
The accumulated grease can overheat and could result in smoke or fire.
Do not use abrasive cleaning agents.
e) If smoke begins to come out of the food being heated or the food catches fire, leave the door
open, turn off the oven and unplug the cord from the outlet.
f) Do not leave the oven unattended when using disposable containers made of plastic, paper or
other flammable materials.
11. Limit the risk of explosion or sudden boil by observing the following:
WARNING: Do not put hermetically sealed containers into the oven. Baby bottles with
screw-on caps or pacifiers are also considered as sealed containers. This could lead to an
explosion.

EN
46
EN
47
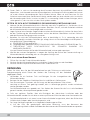
a) Use a container with a wide nozzle for heating liquids. After heating the liquid, leave it stand
for 20 seconds to prevent an erupting boil.
b) Eggs in shells, hard-boiled eggs, water containing grease or oil and closed glass containers
shall not be heated in the microwave oven because they can explode. Potatoes, frankfurters or
chestnuts shall be peeled or pricked before inserting them into the oven.
c) Do not remove liquids from the oven directly after heating. Wait a few seconds before removing
liquids to prevent them from boiling over.
d) Stir or shake and check the temperature of baby bottles and canned baby food prior to serving
to protect against burning.
12. Containers are very hot after being heated. Use oven mitts when removing containers from oven.
Be careful not to burn your face and hands by coming into contact with hot steam.
13. Always lift the furthest edge of the lid or food wrap. Open popcorn bags and baking bags at a
sufficient distance away from the face.
14. Protecting the turntable against breaking:
a) Let the turntable cool down before cleaning.
b) Do not place hot food or containers on a cold turntable.
c) Do not place frozen food or cold containers on a hot turntable.
15. Make sure the containers do not touch the inside walls of the oven during the heating process.
16. Do not store food or other objects inside the oven. The oven can be switched on spontaneously if
the network is struck by lightning
17. Do not use the oven if it does not contain any food or liquids. This may cause damage to the oven.
Do not cover or block any openings on the microwave oven.
18. Use the microwave oven only in accordance with the instructions given in this manual. This
microwave is intended only for domestic heating or cooking. The manufacturer is not liable for
damages caused by the improper use of this appliance.
19. This appliance shall not be used by persons (including children), whose physical, sense or mental
inability or insufficient experience and skills prevent him from safely using the appliance, if they are
not supervised or if they have not been instructed regarding the use of the appliance by a person
responsible for their safety. Child supervision is essential to prevent them from playing with the
appliance.
DO NOT EXPOSE YOURSELF TO EXCESSIVE MICROWAVE ENERGY.
1. Do not attempt to operate the microwave oven if the door is open. By doing so, you can become
exposed to harmful microwave energy. Do not attempt to break or hold safety locks on the oven
door.
2. Do not insert foreign objects between the oven door. Make sure dirt or residue from cleaning
agents are not left on the door seal or sealing elements of the oven.
3. Do not use the oven if damaged. The oven door should perfectly tightly upon closing and should
not be damaged. Examples of damage caused to the oven door:
a) DENTING the oven door.
b) Loose or broken door HINGES or SAFEGUARDS.
c) DOOR SEAL OR SEALING AREAS ON THE OVEN FRAME FRONT.
Adjustments or repairs to the microwave oven should only be performed by a qualified person.
4. As with the majority of appliances intended for baking, strict supervision is necessary to reduce the
risk fire around the oven.
In case of fire:
1. Do not open oven door.
2. Turn off the oven and unplug cord from socket.
3. Turn off the master power switch.

EN
46
EN
47
CLEANING
Make sure you unplugged the oven from the outlet by disconnecting the plug from
the outlet.
1. Use a damp cloth and clean the inside of the oven.
2. Clean accessories as usual in soap water.
3. Clean the door frame, seal and neighbouring parts carefully using a damp cloth
dipped into dishwashing detergent and wipe dry.
The microwave oven must be grounded. The plug should be connected only to a
properly grounded outlet.
Refer to a qualified electrician or service technician if you have any doubts regarding proper wiring or
experience malfunctioning.
1. The microwave oven is equipped with a short cord to reduce the risk of tripping or tangling.
2. Long extension cords must meet the following requirements:
a) With respect to electric load, the rated values of the extension cord and outlet should comply
with the rated values of the microwave oven.
b) The extension cord must be three-wire and the plug must be equipped with a grounding pin.
c) The cord must be sufficiently hidden, not hanging over the kitchen counter, to prevent against
tripping over the cord or being pulled out by children.

EN
48
EN
49
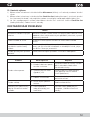
UTENSILS AND DISHES
CAUTION
Risk of injury
Tightly closed containers can explode when heated. Closed containers must be opened prior to cooking
and plastic containers shall be pierced, see Materials to find out what material can and can not be used
in the microwave oven. Some non-metal material may not be safely used for oven heating. If you are
not sure whether or not the material is safe for oven heating, proceed as follows:
Test the container:
1. Fill the container, to be heated in the microwave oven, with cold water (250 ml).
2. Heat for 1 minute at maximum cooking power.
3. Check the temperature of the tested container carefully. If the tested container is warm, do not use
it for oven heating.
4. Do not cook more than 1 minute.
Material that can be used in the microwave oven
Containers Notes
Aluminium foil Only to cover small parts of food. Covering small amounts of meat or
poultry with foil prevents overcooking or burning the food. The foil must
be at least 2.5 cm away from the inner oven surface (the foil can bend if
too close).
Baking trays. Follow the instructions of the manufacturer. The bottom of the baking
container must be at least 5 mm above the turntable. Improper handling
can lead to cracking the turntable.
Plates. Use only plates and dishes specified for microwave oven use. Follow
the instructions of the manufacturer. Do not use cracked or otherwise
damaged bowls.
Glass jars and jugs. Always remove the cover. Only heat the food. Do not cook! Most glass jugs
and jars are not resistant to high temperatures and can crack.
Glass baking dishes. Use only those glass baking dishes resistant to high temperatures.
Make sure the bowl does not have a metal border or other metal objects.
Do not use cracked or otherwise damaged bowls.
Baking bags. Follow the instructions of the manufacturer. Do not close using metal clips.
Leave the bag slightly opened enabling the free release of hot steam.
Paper trays. Suitable only for heating, or short cooking. Do not leave the oven
unattended while cooking.
Paper towels. Use these to cover food or remove melted grease.
Use only for short-term cooking. Do not leave unattended while cooking.
Parchment paper. Use for covering food, packing food for stewing and as protection against
spattering.

EN
48
EN
49
Containers Notes
Plastic material. Use only plates and dishes specified for microwave oven use. Follow the
instructions of the manufacturer. Plastic material, suitable for microwave
oven use, should be equipped with a specific label: “Suitable for microwave
oven use.” Some plastics become soft when exposed to high temperatures
for a long period of time. “Boiling bags” and baking sacks must be
cut, pieced or otherwise vented according to the food manufacturer's
instructions.
Plastic packing foil. Use only plates and dishes specified for microwave oven use. Use for
covering food and to maintain food moist while cooking. Make sure the
plastic foil does not touch the food being prepared.
Thermometers. Use only thermometers suitable for microwave oven use. (Thermometers
for meat, bread products and candy).
Wax paper. Use for covering food, as protection against spattering and to maintain
food moist while cooking.
Material, which may not be used for oven heating.
Utensils and dishes Notes
Aluminium platters
and trays.
Risk of bending. Move the food to a container suitable for microwave oven
use.
Food and cardboard
boxes with metal
holders.
Risk of bending. Move the food to a container suitable for microwave oven
use.
Metal dishes and
dishes with metal
objects.
Metal prevents the penetration of microwave energy. Metal borders can
bend.
Wired closing rings. Risk of bending and fire inside the oven.
Paper bags. Risk of catching fire. Risk of fire inside the oven.
Foam material. Plastic foam can melt at high temperatures and spoil food.
Wood. Wood dries and can crack when cooked.

EN
50
EN
51
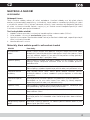
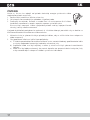
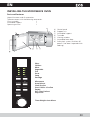
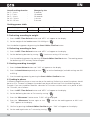
INSTALLING THE MICROWAVE OVEN
Parts and features
Unpack the oven and all accessories.
The oven comes with the following accessories:
Glass turntable 1
Assembled support 1
Operating manual 1
A) Control panel
B) Support axis
C) Assembled support
D) Turntable
E) Viewing window
F) Assembled oven door
H) Safety lock system (Switches off
power if the door is opened while
cooking.)
Pizza
Fisch
Meat
Soup
Vegetable
Porrige
Clock/
Pre-Set
Mikrowave
W.T./
Time Defrost
Stop/Clear
Start/+30 Sec./
Confirm
Auto Reheat
Potato
Pasta
Chicken
T
i
m
e
r
•
W
e
i
g
h
t
•
A
u
t
o
M
e
n
u
Pizza
Chicken
Meat
Vegetable
Fish
Pasta
Soup
Porridge
Microwave
Auto Reheat
Clock/Pre-Set
Start/+30Sec./Confirm
Potato
W.T./Time Defrost
Stop/Clear
Timer Weight Auto Menu

EN
50
EN
51
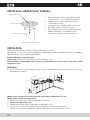
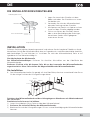
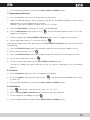
INSTALLING THE TURNTABLE
Charge (bottom side)
Turntable
Support axis
Assembled support
1. Do not lay the turntable face down. The
turntable must always rotate freely.
2. Do not use the oven without the support and
turntable.
3. All food and containers must always be placed
on the turntable.
4. Contact your nearest authorized service if the
turntable cracks or the support is damaged.
INSTALLATION
Remove all packaging material and take out all accessories.
Make sure the oven is not damaged in any way (dented or damaged door etc.). Do not install the
microwave oven if damaged.
Kitchen counter
Oven body: Remove all protective foil from the oven surface.
Do not remove the light brown foil, screwed to the inside of the oven. This foil protects the
oven magnetron.
Installation
1. Place the oven on a flat surface with a sufficient amount of space around the appliance to ensure
the proper function of exhaust vents
Opening
30 cm
7.5 cm
7.5 cm
The minimum distance between the oven and the closest wall must be 7.5 cm.
At least one side must be open space.
1) Leave at east 30 cm of free space above the oven.
2) Do not remove oven legs.
3) Do not block exhaust vents. Blocking the exhaust vents could cause damage.
4) Place the oven as far away from the radio or television as possible.
The microwave oven can interfere with the television and radio signal.

EN
52
EN
53
2. Connect the oven to a standard electricity network. Make sure the voltage and frequency on the
oven label corresponds with the network voltage and frequency.
ATTENTION: Do not install the oven above or near the kitchen stove, or near another source of heat.
Placing the oven by a heat source could damage the oven and result in losing the warranty.
The microwave oven should be used in an open space and should not be placed in
a cabinet.
The surface of the microwave oven can become hot during operation.
OVEN FUNCTIONS
Operating instructions
This microwave oven uses modern electronic controlling to configure cooking parameters to better
meet your needs.
1. Setting the time
As soon as you plug the microwave oven into the outlet, the oven display will flash “0:00” and a beep
will sound.
1) Press the Clock/Pre-Set button, the two digit number for setting the hours begins to flash.
2) Set the hours between 0-23 via “
”.
3) Press the Clock/Pre-Set button, the two digit number for setting the minutes begins to flash.
4) Set the minutes between 0-59 via “
”.
5) Press the Clock/Pre-Set button to complete the time setting process. The colon " : " will begin to
flash and the time you set will appear.
Note: 1) The oven will not function properly without the time begin set.
2) You can press the Stop/Clear button at any moment during the time setting and the
oven will return to its previous state.
2. Cooking in the microwave oven
1) Press the “Microwave” button once. “P100” will be displayed.
2) Press the “Microwave” button several times or turn “
” and select the cooking power from
100% to 10%. The display will successively show “P100”, “P80”, “P50”, “P30”, “P10”.
3) Confirm by pressing the Start/+30Sec./Confirm button.
4) Set the cooking duration by turning “
” (time interval ranges between 0:05-95:00).
5) Start the cooking process by pressing the Start/+30Sec./Confirm button.
Note: When setting the cooking duration, the step between values from seconds to minutes
changes depending on the overall time. See the following:

EN
52
EN
53
Overall cooking duration Changes by the
for 5 – 10 min. : 5 seconds
for 1 – 5 min. : 10 seconds
for 5 – 10 min. : 30 seconds
for 10 – 30 min. : 1 minute
for 30 – 95 min. : 5 minutes
Cooking power table
Cooking power 100% 80% 50% 30% 10%
Display P100 P80 P50 P30 P10
3. Defrosting according to weight
1) Press the W.T./Time Defrost button and “dEF1” will appear on the display.
2) Set the weight of the food between 100-2000g via “
”.
Start the defrosting process by pressing the Start/+30Sec./Confirm button.
4. Defrosting according to time
1) Press the W.T./Time Defrost button and “dEF2” will appear on the display.
2) Set the defrosting duration by turning “
” (maximum setting is 95 minutes).
3) Start the defrosting process by pressing the Start/+30Sec./Confirm button. The cooking power
for defrosting is P30 and may not be changed.
5. Heating according to weight
1) Press the Auto Reheat button and “200” will appear on the display.
2) Press the Auto Reheat repeatedly or turn “
” to set the food weight (available settings are 400
or 600 g).
3) Start the cooking process by pressing the Start/+30Sec./Confirm button.
6. Cooking in phases
2 different preparation phases at most can be set for cooking. Defrosting as one of the phases should
be set as first. The oven will beep at the end of one phase and continues with the following phase.
Example: If you want to defrost food for a duration of 5 minutes and then cook it at a power of 80%
for 7 minutes; set as follows:
1) Press the W.T./Time Defrost button and “dEF2” will appear on the display.
2) Set the defrosting duration to 5 minutes by turning “
”.
3) Press the “Microwave” button once. “P100” will be displayed.
4) Press the “Microwave” button again or turn “
” and set the cooking power to 80% until
“P80” appears on the display.
5) Confirm by pressing the Start/+30Sec./Confirm button. “P80” will appear on the display.
6) Set the cooking duration to 7 minutes by turning “
”.

EN
54
EN
55
7) Start the cooking process by pressing the Start/+30Sec./Confirm button.
7. Programming function
1) First set the precise time (see instructions for setting the time).
2) Select the cooking program. Up to two phases can be set. The defrosting process should not be
applied when using the programming function.
Example: If you want to cook at a power of 80% for 7 minutes.
a. Press the “Microwave” button once. “P100” will be displayed.
b. Press the Microwave button again or turn “
” and set the cooking power to 80% until “P80”
appears on the display.
c. Confirm by pressing the Start/+30Sec./Confirm button. “P80” will appear on the display.
d. Set the cooking duration to 7 minutes by turning “
”.
After going through these steps, do not press the Start/+30Sec./Confirm button any more. Perform
the following:
3) Press the Clock/Pre-Set button. The two digit number for setting the hours begins to flash.
4) Set the hours between 0-23 via “
”.
5) Press the Clock/Pre-Set button, the two digit number for setting the minutes begins to flash.
6) Set the minutes between 0-59 via “
”.
7) Confirm the settings by pressing the Start/+30Sec./Confirm button.
The oven will beep twice upon reaching the time set and will automatically start the cooking
process.
8. Potatoes
1) Press the Potato button and “200” will appear on the display.
2) Press the “Potato” button several times or turn “
” and select the cooking power either “400”
or “600” (g).
3) Start the cooking process by pressing the Start/+30Sec./Confirm button.
9. Auto menu
1) Turn “ ” to the right - select one menu from “A-1” to “A-8”;
2) Press the Start/+30Sec./Confirm button to confirm the menu selection.
3) Set the weight of the food by turning “
”.
4) Start the cooking process by pressing the Start/+30Sec./Confirm button.

EN
54
EN
55
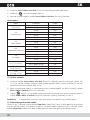
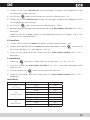
Auto menu
Menu Weight Display
A-1
Pizza
200 g 200
400 g 400
A-2
Chicken
200 g 200
400 g 400
600 g 600
800 g 800
A-3
Meat
250 g 250
350 g 350
450 g 450
A-4
Vegetable
200 g 200
300 g 300
400 g 400
A-5
Fish
250 g 250
350 g 350
450 g 450
A-6
Pasta
50 (with water 450 g) 50
100 (with water 800 g) 100
A-7
Soup
200 ml 200
400 ml 400
A-8
Porridge
550 g 550
1100 g 1100 g
10. Rapid cooking
1) Press the “Start/+ 30 s/Confirm” button to start cooking at 100% for 30 seconds. The cooking
duration is extended by another 30 seconds with each press of this button. The maximum setting
is 95 minutes.
2) Press the “Start/+30 s/Confirm” button to extend the duration of cooking or defrosting.
3) Turn “
” to the left - set the preparation length directly. Start the cooking process by pressing
the “Start/+30 Sec./Confirm” button. Cooking power is set at 100%
Note: Not available for auto menu programs and defrosting (weight).
11. Child lock
Lock Hold the “Stop/Clear” button down for 3 seconds, a long beep will signal the child lock has been
activated and a time settings will appear on the display. Unlock: Hold the “Stop/Clear” button down
for 3 seconds, a long beep will signal the child lock has been deactivated.
12. Checking the power
1) Hold the “Microwave” button for 3 seconds while cooking to display the current power.
2) Press the “Clock/Pre-Set” button while cooking to display the current time. The time will flash for
3 seconds until the exact time will again appear on the oven display.

EN
56
EN
57
3) Press the “Clock/Pre-Set” button, during the programming phase, to display the current time. The
time will be displayed for 3 seconds.
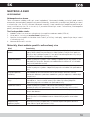
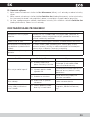
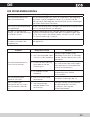
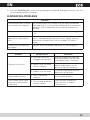
ELIMINATING PROBLEMS
Common
The microwave oven interferes
with the television reception.
The microwave oven can interfere with the radio and television
when operating. It is similar to the interference of small electrical
appliances such as the blender, vacuum cleaner and electrical
ventilator.
The light in the oven dims. The light in the oven cavity can dim when a lower cooking power
is set.
Steam is accumulated on the
door, hot air is coming from
vents.
Steam can be released from food while cooking. Most of the
steam is released through the exhaust vents, though some can
accumulate in a cooler place, such as the door. This effect is
normal.
The oven was started empty
by accident.
The oven should not be operated empty. It is very dangerous.
Problem Possible cause Correction
The oven will not start.
(1) The cord is not firmly
plugged into the outlet.
Unplug the cord from the outlet.
Plug the cord back into the outlet
after approximately 10 seconds.
(2) Blown fuse or switched
off circuit breaker.
Replace the fuse or reset the circuit
breaker (repaired by a service
technician from our company).
(3) Problem with the outlet.
Try connecting another electrical
appliance into the outlet.
The oven does not heat.
(4) Door is not closed
correctly.
Close the door properly.
The turntable makes noises
when the microwave oven
is operating.
(5) The turntable or bottom
of oven are dirty.
Clean the oven according to
the instructions in chapter
“Maintenance.”

EN
56
EN
57
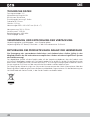
TECHNICAL INFORMATION
Capacity 23 l
Microwave output power 800 W
95 minutes timer
Power settings 5 levels
Turntable Ø 270 mm
Weights 13.2 kg
Dimensions 485 x 410 x 287 mm (w x h x d)
Nominal voltage: 230 V~ 50 Hz
Nominal input power: 1000 W
Operating frequency: 2450 MHz
Noise level: 60 dB
USE AND DISPOSAL OF WASTE
Wrapping paper and corrugated paperboard – deliver to scrapyard.
Packing foil, PE bags, plastic elements – throw into plastic recycling containers.
DISPOSAL OF PRODUCTS AT THE END OF LIFETIME
Disposal of electric and electronic equipment (valid in EU member countries and other
European countries with an implemented recycling system)
The represented symbol on the product or package means the product shall not be treated as domestic
waste. Hand over the product to the specified location for recycling electric and electronic equipment.
Prevent negative impacts on human health and the environment by properly recycling your product.
Recycling contributes to preserving natural resources. For more information on the recycling of this
product, refer to your local authority, domestic waste processing organization or store, where you
purchased the product.
Page is loading ...
Page is loading ...
Page is loading ...
Page is loading ...
Page is loading ...
Page is loading ...
-
 1
1
-
 2
2
-
 3
3
-
 4
4
-
 5
5
-
 6
6
-
 7
7
-
 8
8
-
 9
9
-
 10
10
-
 11
11
-
 12
12
-
 13
13
-
 14
14
-
 15
15
-
 16
16
-
 17
17
-
 18
18
-
 19
19
-
 20
20
-
 21
21
-
 22
22
-
 23
23
-
 24
24
-
 25
25
-
 26
26
-
 27
27
-
 28
28
-
 29
29
-
 30
30
-
 31
31
-
 32
32
-
 33
33
-
 34
34
-
 35
35
-
 36
36
-
 37
37
-
 38
38
-
 39
39
-
 40
40
-
 41
41
-
 42
42
-
 43
43
-
 44
44
-
 45
45
-
 46
46
-
 47
47
-
 48
48
-
 49
49
-
 50
50
-
 51
51
-
 52
52
-
 53
53
-
 54
54
-
 55
55
-
 56
56
-
 57
57
-
 58
58
-
 59
59
-
 60
60
-
 61
61
-
 62
62
-
 63
63
-
 64
64


Ask a question and I''ll find the answer in the document
Finding information in a document is now easier with AI
in other languages
- Deutsch: MTD 230 Benutzerhandbuch
- slovenčina: MTD 230 Používateľská príručka
- čeština: MTD 230 Uživatelský manuál
Other documents
-
ECG MTD 250 GSS Operating instructions
-
ECG MTM 2073 GWE User manual
-
-
ECG MTD 231 S User manual
-
-
-
-
-
Whirlpool AMW 1401 IX User guide
-
eta 205 Instructions For Use Manual