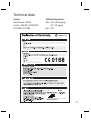
GD510
Benutzerhandbuch
P/N : MMBB0356713 (1.1)
DEUTSCH
FRANÇAIS
ITALIANO
ENGLISH
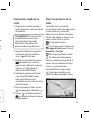
Allgemeine Anfragen
<LG Informationscenter für Kunden>
Service Hotline Österreich: 0810 144 131 (zum Ortstarif)
Service Hotline Schweiz: 0848 543 543 (zum Ortstarif)
* Vergewissern Sie sich, dass diese Rufnummer korrekt ist, bevor Sie anrufen.
Informations générales
<Centre d’information clientèle LG>
Austriche: 0810 144 131
Suisse: 0848 543 543
* Avant d’appeler, vérifi ez que le numéro est correct.
Informazioni generiche
<LG Customer Information Center>
Austria: 0810 144 131
Svizzera: 0848 543 543
* Verifi care che il numero sia corretto prima di effettuare la chiamata.
General Inquiries
<LG Customer Information Center>
Austria: 0810 144 131
Switzerland: 0848 543 543
* Make sure the number is correct before making a call.
This manual is used 35% of recycled paper and printed with soy inks.
www.lgmobile.com
H
GD510
Benutzerhandbuch
ELECTRONICS INC.

Bluetooth QD ID B015736
Page is loading ...
Page is loading ...
Page is loading ...
Page is loading ...
Page is loading ...
Page is loading ...
Page is loading ...
Page is loading ...
Page is loading ...
Page is loading ...
Page is loading ...
Page is loading ...
Page is loading ...
Page is loading ...
Page is loading ...
Page is loading ...
Page is loading ...
Page is loading ...
Page is loading ...
Page is loading ...
Page is loading ...
Page is loading ...
Page is loading ...
Page is loading ...
Page is loading ...
Page is loading ...
Page is loading ...
Page is loading ...
Page is loading ...
Page is loading ...
Page is loading ...
Page is loading ...
Page is loading ...
Page is loading ...
Page is loading ...
Page is loading ...
Page is loading ...
Page is loading ...
Page is loading ...
Page is loading ...
Page is loading ...
Page is loading ...
Page is loading ...
Page is loading ...
Page is loading ...
Page is loading ...
Page is loading ...
Page is loading ...
Page is loading ...
Page is loading ...
Page is loading ...
Page is loading ...
Page is loading ...
Page is loading ...
Page is loading ...
Page is loading ...
Page is loading ...
Page is loading ...
Page is loading ...
Page is loading ...
Page is loading ...
Page is loading ...
Page is loading ...
Page is loading ...
Page is loading ...
Page is loading ...
Page is loading ...
Page is loading ...
Page is loading ...
Page is loading ...
Page is loading ...
Page is loading ...
Page is loading ...
Page is loading ...
Page is loading ...
Page is loading ...
Page is loading ...
Page is loading ...
Page is loading ...
Page is loading ...
Page is loading ...
Page is loading ...
Page is loading ...
Page is loading ...
Page is loading ...
Page is loading ...
Page is loading ...
Page is loading ...
Page is loading ...
Page is loading ...
Page is loading ...
Page is loading ...
Page is loading ...
Page is loading ...
Page is loading ...
Page is loading ...
Page is loading ...
Page is loading ...
Page is loading ...
Page is loading ...
Page is loading ...
Page is loading ...
Page is loading ...
Page is loading ...
Page is loading ...
Page is loading ...
Page is loading ...
Page is loading ...
Page is loading ...
Page is loading ...
Page is loading ...
Page is loading ...
Page is loading ...
Page is loading ...
Page is loading ...
Page is loading ...
Page is loading ...
Page is loading ...
Page is loading ...
Page is loading ...
Page is loading ...
Page is loading ...
Page is loading ...
Page is loading ...
Page is loading ...
Page is loading ...
Page is loading ...
Page is loading ...
Page is loading ...
Page is loading ...
Page is loading ...
Page is loading ...
Page is loading ...
Page is loading ...
Page is loading ...
Page is loading ...
Page is loading ...
Page is loading ...

GD510GD510 User Guide
Some of the contents in this manual may
differ from your phone depending on
the software of the phone or your service
provider.

Co
Gett
Insta
Char
Mem
Usin
To
C
o
Your
Th
Calls
Ma
Ma
An
Sp
Ma
Vie
Us
Us
Ch
set
Mess
Se
En
T9
Ha
Se
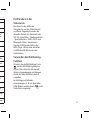
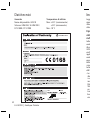
Disposal of your old appliance
1 When this crossed-out wheeled bin symbol is attached to
a product it means the product is covered by the European
Directive 2002/96/EC.
2 All electrical and electronic products should be disposed of
separately from the municipal waste stream via designated
collection facilities appointed by the government or the local
authorities.
3 The correct disposal of your old appliance will help prevent
potential negative consequences for the environment and
human health.
4 For more detailed information about disposal of your old
appliance, please contact your city o ce, waste disposal service
or the shop where you purchased the product.
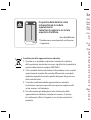
Solar cell battery cover is available and
sold separately.
Please contact the shop where you
purchased the phone.
www.lgmobile.com
* It may not be available in all shops based upon
availability.

3
Contents
Getting to know your phone .............5
Installing the SIM and battery ...........6
Charging your phone ............................7
Memory card ............................................7
Using your touch screen ......................8
Touch screen tips ....................................8
Control the touch screen .....................8
Your home screen ..................................9
The status bar ........................................ 10
Calls .......................................................... 12
Making a call .......................................... 12
Making a call from your contacts ... 12
Answering and rejecting a call ........ 12
Speed dialling ....................................... 12
Making a second call .......................... 13
Viewing your call logs ........................ 13
Using call divert ................................... 13
Using call barring ................................. 13
Changing the common call
setting ...................................................... 14
Messaging .............................................. 15
Sending a message ............................. 15
Entering text ......................................... 15
T9 mode .................................................. 15
Handwriting recognition .................. 15
Setting up your email ........................ 16
Retrieving your emails ....................... 16
Sending an email using your new
account .................................................... 16
Changing your email settings ......... 16
Message folders ................................... 17
Changing your multimedia message
settings ................................................... 17
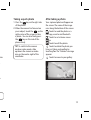
Camera .................................................... 18
Getting to know the view nder ..... 18
Taking a quick photo .......................... 19
After taking a photo............................ 19
Video camera ........................................ 20
Getting to know the view nder ..... 20
Making a quick video ......................... 21
After making a video .......................... 21
Your photos and videos .................... 22
Viewing your photos and videos .. 22
Viewing your photos as a slide
show ......................................................... 22
Setting a photo as wallpaper........... 22
Multimedia............................................. 23
Using an image .................................... 23
Moving or copying an image .......... 23
Using a sound .......................................23
Music ........................................................ 24
al
vice
nd
om
on

4
LG GD510 | User Guide
Ge
Sm
• A
c
• Go
Pow
• Lo
• Sh
w
fu
Contents
Transferring music onto your
phone ....................................................... 24
Creating a playlist ................................ 24
FM Radio ................................................. 25
Searching for stations ........................25
Organiser ................................................ 26
Adding an event to your calendar . 26
Adding a memo ................................... 26
Setting your alarm .............................. 26
Voice recorder ....................................... 27
Recording a sound or voice ............ 27
Using your calculator .......................... 27
Converting a unit ................................ 27
Adding a city to your World clock .. 28
Using the stopwatch .......................... 28
Getting to know the Eco tree ......... 28
Getting to know the Eco
calculator ............................................... 28
PC Sync .................................................... 29
Installing LG PC Suite on your
computer ................................................ 29
Connecting your phone and PC ..... 29
Backing up and restoring the
information on your phone ............. 29
Viewing phone les on your PC ...... 29
Synchronising your contacts ........... 30
Synchronising your messages ......... 30
Using your phone as a Music Sync
device ....................................................... 30
The web .................................................. 31
Accessing the web ............................... 31
Adding and accessing your
bookmarks ............................................. 31
Saving a page ........................................ 31
Accessing a saved page ..................... 31
Viewing your browser history ......... 31
Settings ................................................... 32
Personalising your pro les ............... 32
Changing your screen settings ....... 32
Changing your phone settings ....... 32
Changing your connectivity
settings .................................................... 33
Using memory manager ................... 34
Sending and receiving your les
using Bluetooth .................................... 34
Changing your Bluetooth
settings: .................................................. 35
Pairing with another Bluetooth
device ....................................................... 35
Using a Bluetooth headset ............... 35
Software Upgrade ...............................36
Technical data ....................................... 37
Guidelines for safe and e cient use
.. 38

5
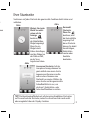
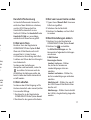
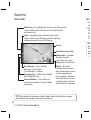
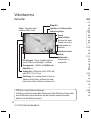
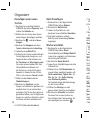
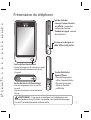
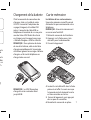
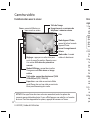
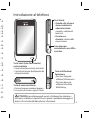
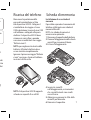
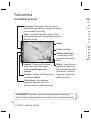
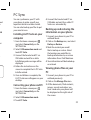
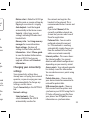
Getting to know your phone
Smart key
• Accepts and ends a call.
• Goes to home screen directly.
Power/Lock key
• Long press for power on/off.
• Short press to turn on/off the screen.
WARNING: Placing a heavy object on the phone or sitting on it
while it is in your pocket can damage the phone’s LCD and touch screen
functionality.
Side keys
• When the screen is at the
Home screen: Ring tone
and key tone volume.
• During a call: Earpiece
volume.
Charger, cable and
handsfree connector
Camera/Multi-tasking key
• Long press to use the
camera.
• Short press to use multi-
tasking.
nc
.... 30
... 31
.... 31
.... 31
.... 31
.... 31
.... 31
... 32
.... 32
.... 32
.... 32
.... 33
.... 34
.... 34
.... 35
.... 35
.... 35
.... 36
... 37
e
.. 38

6
LG GD510 | User Guide
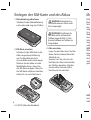
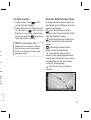
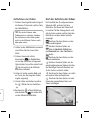
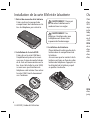
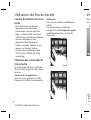
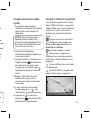
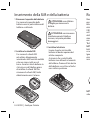
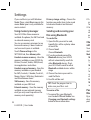
Installing the SIM and battery
1 Remove the battery cover
Slide the battery cover towards the
bottom of the phone and away
from it.
2 Install the SIM card
Slide the SIM card into the SIM card
holder making sure that the gold
contact area on the card is facing
downwards. Please make sure the
battery is removed from the phone
before installing the SIM card. To
remove the SIM card, pull it gently
outwards.
3 Install the battery
Insert the left side of the battery
into the top edge of the battery
compartment first.
Ensure that the battery contacts
align with the phone’s terminals.
Press the right side of the battery
until down it clicks into place.
WARNING: Do not remove
the battery when the phone is
switched on, as this may damage
the phone.
WARNING: Do not use your
ngernail to remove the battery.
Ch
Rem
on t
h
the T
inclu
cable
a pow
be ch
mess
NOT
charg
lifeti
full”
char
g
NOT
8GB

7
y
y
s
s.
ry
ge
r
y.
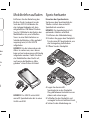
Charging your phone
Memory card
Remove the charger socket cover
on the side of your GD510. Connect
the Travel Adapter (Charger) and the
included USB cable. Connect the USB
cable into the phone and plug it into
a power socket. Your GD510 must
be charged until the “Battery full“
message appears on the screen.
NOTE: The battery must be fully
charged initially to improve battery
lifetime. Disregard the first “Battery
full” message and keep the phone on
charge overnight.
NOTE: The GD510 will support up to a
8GB memory card.
Installing a memory card
You can expand the memory space
on your phone by using a MicroSD
memory card.
NOTE: A memory card is an optional
accessory.
1 Remove the battery cover.
2 Push the microSD card slot to
release lock.
3 Flip up the slot.
4 Put the microSD card on the card
tray. Make sure the gold colour
contact area is facing downwards.
5
Flip down then push the slot to lock.
6 Replace the cover.

8
LG GD510 | User Guide
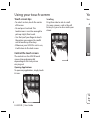
Using your touch screen
Touch screen tips
• To select an item, touch the centre
of the icon.
• Do not press too hard. The
touchscreen is sensitive enough to
pick up a light, firm touch.
• Use the tip of your finger to touch
the option you require. Be careful
not to touch any other keys.
• Whenever your GD510 is not in use,
it will return to the lock screen.
Control the touch screen
The controls on the GD510 touch
screen change dynamically
depending on the task you are
carrying out.
Opening Applications
To open any application, simply touch
its icon.
Scrolling
Drag from side to side to scroll.
On some screens, such as the call
history list, you can also scroll up or
down.
Yo
You c
TIP
be
ri
g
A

9
or
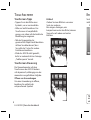
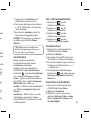
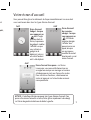
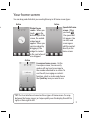
Your home screen
You can drag and click what you need right away in all home screen types.
Widget home
screen - When you
touch
on the
bottom right of the
screen, the mobile
widget panel
appears. When you
register widget by
dragging it, the
widget is created
in the spot where it
was dropped.
Speed dial home
screen - When
you touch
, the speed dial
list appears. You
can call, send
a message or
edit the contact
directly in this
home screen.
Livesquare home screen - On the
Livesquare screen, You can easily
make a call and send a message to
the number allocated to an avatar. To
use the call, messaging or contacts
function, select an avatar and choose
the Quick key icon you want to use.
TIP! The User Interface is based on three types of Homescreen. To swap
between the home screens just wipe quickly over the display from left to
right, or from right to left.
Active Active
Active

10
LG GD510 | User Guide
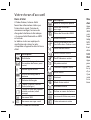
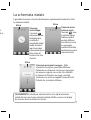
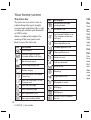
The status bar
The status bar uses various icons to
indicate things like signal strength,
new messages and battery life, as well
as telling you whether your Bluetooth
or GPRS is active.
Below is a table which explains the
meaning of the icons you’re most
likely to see in the status bar.
Icon Description
Multitasking
Network signal strength
(number of bars will vary)
No network signal
Remaining battery life
Battery empty
Solar cell cover is attached
(Gray Sun)
Solar cell charging is in use
(Orange Sun)
New text message
New voice message
Message inbox is full
Message sending failed
Icon Description
Multimedia message
sending failed
An alarm is set
Customised Profile in use
(The number in the icon
will vary)
Normal profile in use
Outdoor profile in use
Silent profile in use
Headset in use
Calls are diverted
EDGE in use
Roaming
Flight mode is on
Bluetooth is active
BGM play
BGM pause
Memory card is enabled
for use
Your home screen
Cha
the
Touc
open
the c
Batte
Mem
statu
type
dea
c
Usin
func
Press
to op
here
that
one
t
Whe
runn
a gam
appe

11
e
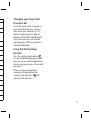
Changing your Status from
the status bar
Touch the centre of the status bar to
open the Status Summary. It shows
the current Time, Network, SVC ID,
Battery, Handset memory, External
Memory, Profile, MP3s and Bluetooth
status. Here you can set the Profile
type, play/pause MP3s and activate/
deactivate Bluetooth.
Using the Multi-tasking
function
Press the multi-tasking hard key
to open the Multitasking menu. From
here you can view all the applications
that are running and access them with
one touch.
When you have an application
running in the background (e.g.
a game or the FM radio),
will
appear in the status bar.

12
LG GD510 | User Guide
Making a call
1 Touch to open the keypad.
2 Key in the number using the
keypad.
3 Touch
to initiate the call.
4 To end the call, press the Smart key.
TIP! To enter + for making
an international call, press and
hold
.
TIP! Press the power key to lock
the touchscreen to prevent calls
being made by mistake.
Making a call from your
contacts
1 From the home screen touch to
open the Contacts.
2 Tap the Name field box on the top
of the screen and enter the first few
letters of the contact you would like
to call using the keypad.
3 From the filtered list, touch the Call
icon next to the contact you want
to call. The call will use the default
number if there is more than one
for that contact.
4 Or, you can touch the contact name
and select the number to use if
there is more than one for that
contact to use. You can also touch
to initiate the call to the default
number.
Answering and rejecting a call
When your phone rings, touch the
Smart key to answer the call.
To mute the ringing, slide up the
cover. This will unlock the phone if it
is locked, then tap
. This is useful
if you forgot to change your profile to
Silent for a meeting. Touch Reject to
reject an incoming call.
Speed dialling
You can assign a frequently-called
contact to a speed dial number.
1 Select Contacts in the
COMMUNICATION tab and select
Speed dials.
2 Your voicemail is already set to
speed dial 1. You cannot change
this. Touch any other number to
assign it a speed dial contact.
3 Your Contacts will open. Select the
contact you want to assign to that
number by touching their phone
number once. To find a contact,
tap the Name field box and enter
Calls
th
c
o
Mak
1 Du
an
to
2 T
o
3 Bo
ca
loc
4 To
he
5 To
an
H
TIP
log
an
NOT
call y
View
Touc
COM
TIP
cal
tim

13
ch
fault
call
e
f it
eful
e to
to
ct
e
o
the
hat
e
er
the first letter of the name of the
contact required.
Making a second call
1 During your initial call, touch
and type the number you want
to call.
2 Touch
to connect the call.
3 Both calls will be displayed on the
call screen. Your initial call will be
locked and the caller put on hold.
4 To change between the calls, touch
or press the number of the
held call.
5 To end one or both calls press
and select End followed by All,
Held or Active.
TIP! Touch any single call
log entry to view the date, time
and duration of the call.
NOTE: You will be charged for each
call you make.
Viewing your call logs
Touch Recent history in the
COMMUNICATION tab.
TIP! Touch any single
call log entry to view the date,
time and duration of the call.
Using call divert
1 Touch Call settings in the SETTINGS
tab.
2 Touch Call divert.
3 Choose whether to divert all voice
calls, when the line is busy, when
there is no answer or when you
cannot be contacted.
4 Enter the number you want to
divert to.
5 Touch Request to activate.
NOTE: Charges are incurred for
diverting calls. Please contact your
network provider for details.
TIP! To turn o all call
diverts, select Deactivate all from
the Call divert menu.
Using call barring
1 Touch Call settings in the SETTINGS
tab.
2 Touch Call barring.
3 Choose any or all of the six options:
All outgoing
Outgoing international
Outgoing international calls
except home country
All incoming
Incoming when abroad
Deactivate all

14
LG GD510 | User Guide
4 Enter the call barring password.
Please check with your network
operator about this service.
TIP! Select Fixed dial
numbers from the Call settings
options to turn on and compile
a list of numbers which can be
called from your phone. You’ll
need your PIN2 code from your
operator. Only numbers included
in the xed dial list can be called
from your phone.
Changing the common call
setting
1 Touch Call settings in the SETTINGS
tab.
2 Scroll and touch Common settings.
From here you can adjust the
settings for:
Call reject - Slide the switch to
ON to highlight the Reject list. You
can touch the text box to choose
from all calls, specific contacts or
groups, or those from unregistered
numbers (those not in your
contacts) or with no caller ID. Touch
Save to change the setting.
Send my number - Choose
whether your number will be
displayed when you call someone.
Auto redial - Slide the switch left
for ON or right for OFF.
Answer mode - Choose whether to
answer the phone using the send
key or any key.
Minute minder - Slide the switch
left to ON to hear a tone every
minute during a call.
BT answer mode - Select Hands-
free to be able to answer a call
using a Bluetooth headset, or select
Handset to press a key on the
handset to answer a call.
Save new number - Select Ye s to
save a new number.
Calls Me
Mes
You r
into
men
Sen
1 To
CO
Ne
a n
2 To
vid
3 To
th
T
h
ev
4 To
or
wi
l
to
ch
a
Ente
Ther
Keyp
Scre
Han
d

15
one.
eft
er to
nd
ch
s-
elect
to
Messaging
Messaging
Your GD510 combines SMS and MMS
into one intuitive and easy-to-use
menu.
Sending a message
1 Touch Messaging in the
COMMUNICATION tab. And touch
New message to begin composing
a new message.
2 Touch Insert to add an image,
video, sound, template and so on.
3 Touch Recipient at the bottom of
the screen to enter the recipients.
Then enter the number or touch
to select a contact. You can
even add multiple contacts.
4 Touch Send when ready.
WARNING: If an image, video
or sound is added to an SMS it
will be automatically converted
to an MMS and you will be
charged accordingly.
Entering text
There are five ways to enter text:
Keypad, Keyboard, Handwriting-
Screen, Handwriting-Box,
Handwriting-Double Box.
You can choose your input method by
tapping
and Input method.
Touch
to turn on T9 mode. This
icon is only shown when you choose
Keypad as the input method.
Touch
to choose the writing
language.
Touch
to change between
numbers, symbols and text input.
Use Shift key to change between
capital or lowercase input.
T9 mode
The T9 mode uses a built-in dictionary
to recognise the words you’re writing
based on the sequence of keys you’ve
touched. It predicts the word you are
inputting and suggests alternatives.
Handwriting recognition
In Handwriting mode you simply write
on the screen and your GD510 will
convert your handwriting into your
message. Select Handwriting-Screen
or Handwriting-Box according to
your preferred view.

16
LG GD510 | User Guide
Setting up your email
Touch E-mail in the COMMUNICATION
tab.
If the email account is not set up, start
the email set up wizard and finish it.
You can check and edit settings by
selecting
. You can also check the
additional settings that were filled in
automatically when you created the
account.
Retrieving your emails
You can automatically or manually
check your account for new emails. To
check manually:
1 Touch E-mail in the
COMMUNICATION tab.
2 Touch the account you want to use .
Sending an email using your
new account
1 Touch New e-mail and a new email
will open.
2 Complete the message.
3 Touch Send and your email will
be sent.
Changing your email settings
1 Touch E-mail in the
COMMUNICATION tab.
2 Touch
and select
E-mail
settings
and then you can adapt
the following settings:
Email accounts
Preferred e-mail
Allow reply e-mail - Choose
to allow the sending of read
confirmation messages.
Request reply e-mail - Choose
whether to request read
confirmation messages.
Retrieve interval - Choose how
often your GD510 checks for new
email messages.
Retrieve amount - Choose the
number of emails to be retrieved at
any one time.
Include message in Fwd. & Reply
- Choose to include the original
message in your reply.
Include attachment - Choose to
include the original attachment in
any reply.
Auto retrieval in roaming - Choose
whether to retrieve your messages
automatically when abroad
(roaming).
Messaging
N
w
em
Si
an
Pr
of
M
m
E-
w
se
Mes
Ther
men
Inb
o
are p
Draf
mess
done
Outb
folde
Sent
have
My f
your

17
ngs
pt
w
ew
ed at
ply
o
t in
oose
ges
New e-mail notification - Choose
whether to be alerted to new
emails.
Signature - Switch this feature ON
and create an email signature.
Priority - Choose the priority level
of your email messages.
Mail sending size - Set the
maximum size of sending mail.
E-mail counter - Input the date you
want. You can check emails you
sent during that period.
Message folders
There are five folders in Messaging
menu
.
Inbox - All the messages you receive
are placed into your inbox.
Drafts - If you do not finish writing a
message, you can save what you have
done in this folder.
Outbox - This is a temporary storage
folder while messages are being sent.
Sent items - All the messages you
have sent are placed in this folder.
My folders - Create folders to store
your messages.
Changing your multimedia
message settings
Touch Messaging in the
COMMUNICATION tab. Scroll and
choose Settings and Multimedia
message. You can make changes to:
Retrieval mode - Choose between
Home network or Roaming network.
If you then choose Manual you will
receive only notifications of MMS
and you can then decide whether to
download them in full.
Delivery report - Choose to request
and/or allow a delivery report.
Read reply - Choose to request and/or
allow a reply.
Priority - Choose the priority level of
your MMS.
Validity period - Choose how
long your message is stored at the
message centre.
Slide duration - Choose how long
your slides appear on the screen.
Creation mode - Choose your
message mode.
Delivery time - Choose how long to
wait before a message is delivered.
Multi msg centre - Choose one from
the list or add a new message centre.

18
LG GD510 | User Guide
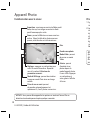
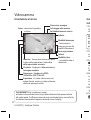
Camera
TIP! You can bring up the options by tapping the screen. They automatically
turn o after a few seconds.
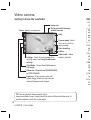
Getting to know the viewfinder
Back
Taking a photo
Video mode - Slide
down this icon to switch
to video mode.
Gallery -This enables
you to access your
saved photos from
within the camera
mode. Simply touch,
and your gallery will
appear on the screen.
Settings - Touch this icon to open
the settings menu. See Using the
advanced settings.
View mode - Choose from Full
screen or Full image.
Continuous mode - This enables you
to take 3/6/9 shots automatically in
very quick succession.
Exposure - A low contrast image will
appear foggy, whereas a high contrast
image will appear much sharper.
Zoom - zoom in or zoom out. This
function is enabled depending on the
picture size you take.
Tak
1 Pr
o
f
2 W
y
o
rig
a p
th
p
h
TIP
mo
up
ico
vie
Page is loading ...
Page is loading ...
Page is loading ...
Page is loading ...
Page is loading ...
Page is loading ...
Page is loading ...
Page is loading ...
Page is loading ...
Page is loading ...
Page is loading ...
Page is loading ...
Page is loading ...
Page is loading ...
Page is loading ...
Page is loading ...
Page is loading ...
Page is loading ...
Page is loading ...
Page is loading ...
Page is loading ...
Page is loading ...
Page is loading ...
Page is loading ...
Page is loading ...
Page is loading ...
-
 1
1
-
 2
2
-
 3
3
-
 4
4
-
 5
5
-
 6
6
-
 7
7
-
 8
8
-
 9
9
-
 10
10
-
 11
11
-
 12
12
-
 13
13
-
 14
14
-
 15
15
-
 16
16
-
 17
17
-
 18
18
-
 19
19
-
 20
20
-
 21
21
-
 22
22
-
 23
23
-
 24
24
-
 25
25
-
 26
26
-
 27
27
-
 28
28
-
 29
29
-
 30
30
-
 31
31
-
 32
32
-
 33
33
-
 34
34
-
 35
35
-
 36
36
-
 37
37
-
 38
38
-
 39
39
-
 40
40
-
 41
41
-
 42
42
-
 43
43
-
 44
44
-
 45
45
-
 46
46
-
 47
47
-
 48
48
-
 49
49
-
 50
50
-
 51
51
-
 52
52
-
 53
53
-
 54
54
-
 55
55
-
 56
56
-
 57
57
-
 58
58
-
 59
59
-
 60
60
-
 61
61
-
 62
62
-
 63
63
-
 64
64
-
 65
65
-
 66
66
-
 67
67
-
 68
68
-
 69
69
-
 70
70
-
 71
71
-
 72
72
-
 73
73
-
 74
74
-
 75
75
-
 76
76
-
 77
77
-
 78
78
-
 79
79
-
 80
80
-
 81
81
-
 82
82
-
 83
83
-
 84
84
-
 85
85
-
 86
86
-
 87
87
-
 88
88
-
 89
89
-
 90
90
-
 91
91
-
 92
92
-
 93
93
-
 94
94
-
 95
95
-
 96
96
-
 97
97
-
 98
98
-
 99
99
-
 100
100
-
 101
101
-
 102
102
-
 103
103
-
 104
104
-
 105
105
-
 106
106
-
 107
107
-
 108
108
-
 109
109
-
 110
110
-
 111
111
-
 112
112
-
 113
113
-
 114
114
-
 115
115
-
 116
116
-
 117
117
-
 118
118
-
 119
119
-
 120
120
-
 121
121
-
 122
122
-
 123
123
-
 124
124
-
 125
125
-
 126
126
-
 127
127
-
 128
128
-
 129
129
-
 130
130
-
 131
131
-
 132
132
-
 133
133
-
 134
134
-
 135
135
-
 136
136
-
 137
137
-
 138
138
-
 139
139
-
 140
140
-
 141
141
-
 142
142
-
 143
143
-
 144
144
-
 145
145
-
 146
146
-
 147
147
-
 148
148
-
 149
149
-
 150
150
-
 151
151
-
 152
152
-
 153
153
-
 154
154
-
 155
155
-
 156
156
-
 157
157
-
 158
158
-
 159
159
-
 160
160
-
 161
161
-
 162
162
-
 163
163
-
 164
164
-
 165
165
-
 166
166
-
 167
167
-
 168
168
-
 169
169
-
 170
170
-
 171
171
-
 172
172
-
 173
173
-
 174
174
-
 175
175
-
 176
176
-
 177
177
-
 178
178
-
 179
179
-
 180
180
-
 181
181
-
 182
182
-
 183
183
-
 184
184


Ask a question and I''ll find the answer in the document
Finding information in a document is now easier with AI
in other languages
- italiano: LG GD510.ATMBPP Manuale utente
- français: LG GD510.ATMBPP Manuel utilisateur
- Deutsch: LG GD510.ATMBPP Benutzerhandbuch