Andis RBC Operating instructions

Category
Pet hair clippers
Type
Operating instructions
15. Do not disassemble charger. Incorrect reassembly may result in a risk of
electric shock or fire. When repair is required, send or take it to an Andis
Authorized Service Station.
16. The battery in this clipper is designed to provide maximum trouble-free life.
However, like all batteries, it will eventually wear out. Do not disassemble
battery pack and attempt to replace battery.
17. Batteries can be harmful to the environment if disposed of improperly. Many
communities offer recycling or battery collection. Contact your local
government about disposal practices in your area.
18. When discarding old batteries, cover battery terminals with heavy duty
adhesive tape to prevent short circuits. WARNING: Do not attempt to
destroy or disassemble battery pack or remove any of its components.
Also, never touch both terminals with metal objects and/or body parts, as
short circuit may result. Keep away from children. Failure to comply with
these warnings could result in fire or serious injury.
19. Keep the appliance dry.
SAVE THESE INSTRUCTIONS
Please read the following instructions. Give this fine precision built instrument the care
it deserves, and it will give you years of service.
THIS APPLIANCE IS INTENDED FOR TRIMMING PURPOSES ONLY.
BEFORE USING YOUR CLIPPER
Plug cord into electrical outlet, operate 100-240 volt, 50 cycle AC electrical current or as noted on unit.
UNIVERSAL AC/DC POWER ADAPTER
The unit/charging stand may be equipped with a universal AC/DC power adapter. Three interchangeable
input plugs are included for use in most countries around the world (Diagram A).
REMOVING INPUT PLUG:
1. Unplug AC/DC power adapter from wall outlet.
2. While pressing down on button located on input plug, gently push
up on plug until it releases from power adapter (Diagram B).
REPLACING INPUT PLUG:
1. To replace input plug, align ribs on the AC/DC power adapter with
slots on input plug.
2. Gently push input plug into power adapter until it snaps into place
(Diagram C).
IMPORTANT SAFEGUARDS
When using an electrical appliance, basic precautions should always be
followed, including the following: Read all instructions before using the Andis
clipper. This product not for use by children.
DANGER: To reduce the risk of electric shock:
1. Do not reach for an appliance that has fallen into water. Unplug immediately.
Never use clipper near water.
2. Do not use while bathing or in a shower.
3. Do not place or store appliance where it can fall or be pulled into a tub or
sink. Do not place in, or drop into, water or other liquid.
4. Except when charging, always unplug this appliance after use.
5. Unplug this appliance before cleaning, removing, or assembling parts.
WARNING: To reduce the risk of burns, fire, electric shock, or injury to
persons:
1. An appliance should never be left unattended when plugged in.
2. This appliance can be used by children aged from 8 years and above and
persons with reduced physical, sensory or mental capabilities or lack of
experience and knowledge if they have been given supervision or instruction
concerning use of the appliance in a safe way and understand the hazards
involved.
3. Children shall not play with the appliance.
4. Use this appliance only for its intended use as described in this manual. Do
not use attachments not recommended by Andis.
5. NEVER operate this appliance if the cord or plug is damaged, if it is not
working properly, if it has been dropped or damaged, or dropped into water.
Return the appliance to an Andis Authorized Service Station for examination
and repair.
6. Keep cord away from heated surfaces.
7. Never drop or insert any object into any clipper or charger opening.
8. Do not use outdoors, or operate while aerosol (spray) products are being
used, or where oxygen is being administered.
9. Do not use this appliance with a damaged or broken comb or blade. Injury
to the skin may result.
10. To disconnect, remove plug from wall outlet.
11. Plug charger directly into an AC outlet. Do not use an extension cord.
12. WARNING: During use, do not place or leave appliance where it may be (1)
damaged by an animal or (2) exposed to the weather.
13. Oil blades frequently. Blades may become hot during use.
14. Use of a charger not sold by Andis may result in risk of fire, electric shock,
or injury to person.
2
ENGLISH
3
Europe Plug
Generally used in Continental Europe
SAA Plug
Generally used in Australia
UK Plug
Generally used in Great Britain
Diagram A
PUSH
Diagram B
4 5
CONNECTING THE CHARGER BASE
1. Remove the wall adapter and charger from the carton.
2. Note the charger comes standard with a universal AC voltage wall adapter and accessory plugs for the
United States and worldwide use. Make sure the proper input plug is attached to the wall adapter.
3. Connect the power cord to the back of the charger and then insert the transformer into an AC outlet.
4. Two or more chargers can be positioned together by sliding the oval shaped tab on one side of a charger
into the matching slot on the side of another, locking them together. This minimizes the counter space
required to accommodate multiple chargers and helps keep the work station orderly (Diagram D).
CHARGING THE BATTERY
1. This battery charger is intended for use with Andis model RBC lithium-ion battery with a rated capacity
of 4.2V
8.4 Wh.
2. Remove the clipper and lithium-ion battery pack from the carton.
3. To remove a battery pack from the clipper, squeeze latches on either side of clipper to release and pull
out battery (Diagram E).
4. Fully charge the battery for one hour before first use. Align the ribs on the front and left back side of
the battery pack with the matching grooves in the charger pocket. Push the battery, contact side down,
firmly into the charging pocket. The button on the front of the charger pops up when the battery pack is
securely inserted in the pocket (Diagram F).
5. The three white lights alongside the charging pocket are charging indicators that display the battery’s
approximate charge level. When all three lights are lit, the charging system has completed fast charge
and switched to a reduced charging rate to completely fill the battery. This maximizes safety and battery
life. All three lights remain on for a few additional minutes during this finishing charge. A fully depleted
battery will charge completely in about one hour. The charging indicator lights turn off when the
battery pack is removed from the charging pocket (Diagram G).
6. To remove the battery pack from the charger, push down on the button to release battery pack. Pull the
battery pack from the charging pocket and insert into clipper, noting the ribs on the battery pack align
with grooves inside the clipper (similar to the charger). The battery pack will “click” into place when fully
inserted into the clipper (Diagram H).
Diagram D
SQUEEZE
SQUEEZE
Diagram E
RIB
RIB
SLOT
BUTTON
SLOT
Diagram F
BATTERY
RELEASE BUTTON
CHARGING
INDICATOR
CHARGING
INDICATOR
LIGHTS
Diagram G
RIB
RIB
SLOT
SLOT
Diagram H
Diagram C
SLOTS
RIBS
Diagram J
SLOT
PIN
LINE UP
Diagram L
BATTERY
INDICATOR
LIGHT
SWITCH LOCK
Diagram I
Diagram K
OPERATING INSTRUCTIONS
USING YOUR ANDIS CLIPPER
1. The start switch has a locking feature to prevent the clipper from being accidentally turned “ON” or
“OFF.” To turn the clipper “ON,” press the small red button on the start switch and slide switch forward.
The switch is textured for a sure grip even with sweaty or oily hands. To turn the clipper “OFF,” press the
small red button and slide the switch back (Diagram I).
2. When switched on, the glowing blue lens on the clipper housing indicates the battery pack has a strong
charge. The blue light turns off when several minutes of power remain. This is simply a caution that the
battery may not have enough remaining charge to finish a large clipping job and may need to be
recharged.
3. If extended clipping continues, the battery pack will shut itself off to prevent the internal lithium-ion
cell from discharging completely. This protects the lithium-ion cell and is entirely normal – not a
malfunction. The battery pack will resume normal operation when recharged.
4. For greater convenience when continuous clipping is desired, consider purchasing an additional battery
pack. Exchange a fully charged battery pack with one in the low battery condition for extended operation.
5. When not in use, rest your clipper – with or without the lithium-ion battery pack attached – in the storage
pocket of the charger. This reduces the chances your clipper will be knocked to the floor and damaged
(Diagram J).
MOUNTING AND DISMOUNTING THE BLADE SET
The blade set can be attached with the start switch in the “OFF” or “ON” position. When removing the
blade, turn the clipper off. Push the blade away from the clipper with your thumb, and the blade will pop
off (Diagram K). To replace or change the blade set, fit the black plastic tab on the blade set into the notch
located at the bottom of the clipper opening. Firmly push the blade onto the clipper housing, and it will
snap into place (Diagram L).
IMPORTANT: Frequently remove accumulated hair from the cavity under the blade set. Remove the blade
set as described above and brush hair from the cavity using a small brush or toothbrush.
6 7
USE GUIDELINES FOR CHARGER AND BATTERY PACK
1. The lithium-ion battery pack included with your clipper does not develop a “memory effect” like a
nickel-metal hydride (NiMH), or nickel cadmium (NiCd) battery. You can return the battery to the charger
at any time for a full charge, or even use the battery before a charge cycle is complete. Like most
rechargeable batteries, lithium-ion batteries perform best when used frequently.
2. For maximum battery life, store the lithium-ion battery pack in a partially discharged condition if the
unit will be unused for several months. To discharge the battery, run the clipper just until the blue light
turns off.
3. If the battery pack is left in the charger for several days without use, it is normal for the topmost of the
three white lights on the charger to repeatedly turn off and back on again. This is not a malfunction.
The charger will occasionally check the battery and maintain a full charge.
4. The charger works most effectively when battery packs are at, or close to, room temperature. A
lithium-ion battery pack returned to the charger unusually hot or cold may take more than an hour to
completely recharge.
5. Avoid locating the charger near heat vents, radiators, or in direct sunlight. Optimum charging will result
where the temperature is stable. Sudden increases in temperature can result in the battery pack receiving
less than a full charge.
6. Many factors influence lithium-ion battery pack life. A battery pack that has received heavy use or is
more than a year old may not give the same run-time performance as a new battery pack.
7. New lithium-ion battery packs, or packs unused for a period of time, may not accept a full charge. This is
normal and does not indicate a problem with the battery or charger. The battery will accept a full charge
after several cycles of clipper use and recharging.
8. Disconnect the charger from the AC outlet if extended periods of non-use are anticipated.
SAFETY RULES FOR CHARGER AND BATTERY PACK
1. Do not insert metallic objects into the battery pocket of the charger base (unless servicing your charger
as described under “User Maintenance–Care and Servicing of the Battery System”).
2. Do not expose the charger to excessively dirty locations. If the storage or charger pockets become
clogged with dust or hair, unplug the charger and gently remove hair or other debris with a soft brush or
vacuum cleaner.
3. To clean external parts of the charger, use a soft brush or damp cloth. Do not use harsh abrasives,
detergents, or solvents.
4. Do not use the charger designed for this Andis clipper to attempt to charge any other battery.
5. The battery pack contains an overload protection feature. In extreme cases, overload protection may
cause the battery pack to become inoperable. Do not attempt to power any product other than the Andis
cordless clipper with this lithium-ion battery pack.
6. Do not allow the exposed metal contacts on the battery pack to make contact with any conductive
material (metal combs, scissors, paper clips, etc.).
7. For maximum battery life, do not store battery or charger under 50°F or over 104°F.
8. Do not expose the charger base or battery pack to excessively damp conditions.
9. Take care not to drop the charger base and the battery pack. Do not attempt to use a damaged battery
pack or charger.
USER MAINTENANCE
Cleaning and user maintenance shall not be made by children without
supervision.
CARE AND SERVICING OF YOUR ANDIS CLIPPER BLADES
The internal mechanism of your clipper is permanently lubricated at the factory. Other than the
recommended maintenance described in this manual, no other maintenance is needed or should be
performed, except by an Andis Authorized Service Station. Depending upon use, the blade set of your
Andis clipper will deliver 6 months of service before it needs to be replaced.
1. To prevent injury, always replace broken or nicked blades.
2. Andis clippers operate at high speeds. For greater convenience,
purchase an additional blade set to substitute for a hot blade set.
Check often for blade heat, especially when the blade housing is
adjusted for close cutting. To cool, dip the hot BLADES ONLY into
Andis Blade Care Plus, or apply Andis Cool Care Plus. After using a
coolant, be sure to lubricate the blade with Andis Clipper Oil, as
spray coolants do not contain enough lubricant for extended clipping
(Diagram M).
3. To get the maximum run time from your lithium-ion battery, oil
clipper blades before, during, and after each use. Blades that leave
streaks or slow down may need oil. Place a few drops of oil on the
front and side of the cutter blades. Thoroughly wipe excess oil off
blades with a soft, dry cloth to prevent oil from dripping down into
the clipper housing.
4. Clean the blade using a small brush or toothbrush. Periodically, clean
blades by immersing the BLADES ONLY into a shallow pan of Andis
Clipper Oil, while the clipper is running. Excess hair and dirt that has
accumulated between the blades should release.
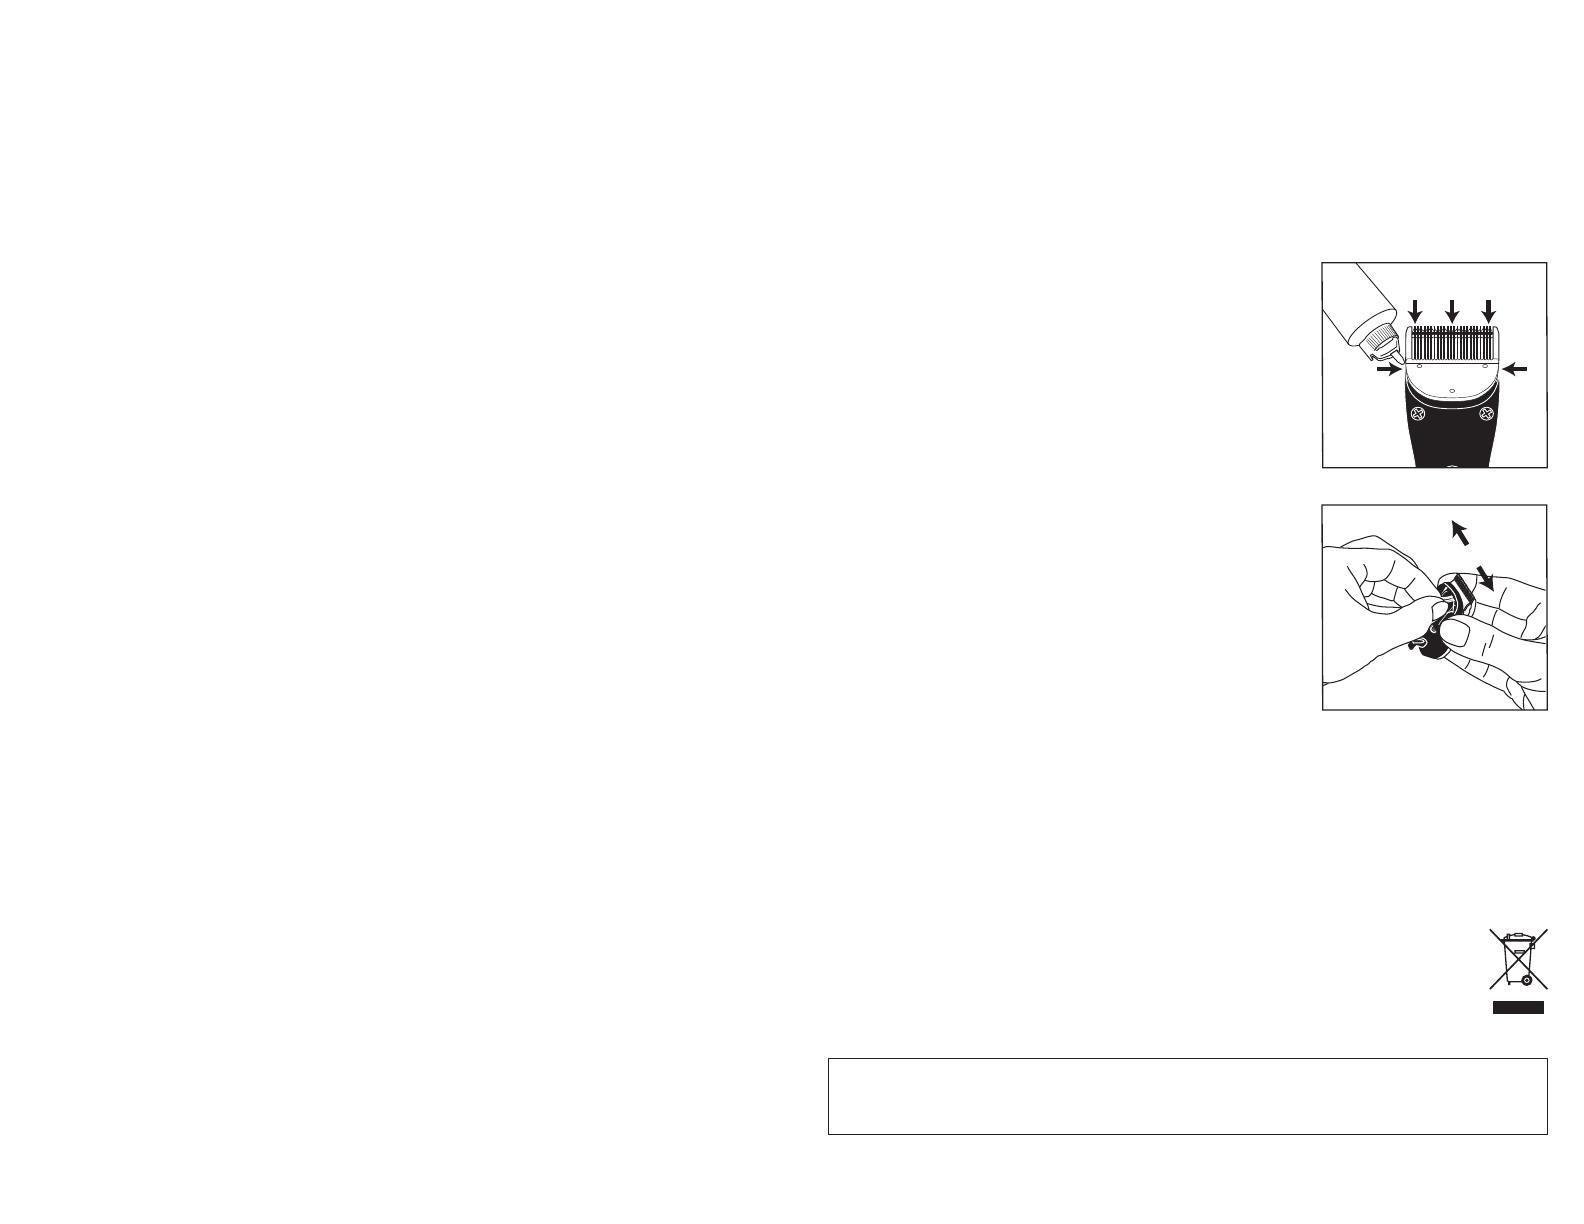
5. After cleaning, turn your clipper off and dry blades with a clean, dry
cloth and resume clipping. If after cleaning, blades will still not cut, a
few, fine pieces of hair may be trapped between the upper and lower
blades. Remove the blade set from the clipper as described earlier.
Hold the blade set in one hand, and slide the blade from side-to-side
to remove any trapped hair or debris (Diagram N).
CARE AND SERVICING OF THE BATTERY SYSTEM
Your clipper, battery pack, and charger are an integrated electrical system. Good electrical contact must be
maintained for the motor to deliver full power and lithium-ion battery to charge properly. Limited or erratic
performance caused by dirt or age can be corrected in the majority of cases.
CORRECT DISPOSAL OF THIS PRODUCT
This marking indicates that this product should not be disposed with other household wastes
throughout the EU. To prevent possible harm to the environment or human health from
uncontrolled waste disposal, recycle it responsibly to promote the sustainable reuse of material
resources. To return your used device, please use the return and collection systems or contact
the retailer where the product was purchased. They can take this product for environmental safe
recycling.
CAUTION: Do not hold clipper under running water to clean blades. There is danger of electrical shock and
damage to the clipper. ANDIS COMPANY is not responsible for injury or product damage that results from
this method of cleaning.
SLIDE
Diagram N
OIL
Diagram M
8 9
ANDIS AUTHORIZED FACTORY REPAIR SERVICE
If your clipper needs to be serviced, pack carefully and mail it to the company or to an Andis Authorized
Service Station either Parcel Post insured or UPS. To find an Andis Authorized Service Station near you,
log on to www.andis.com.
PROBLEM SOLUTION
Clipper motor starts and stops as if there is
a loose electrical connection.
Charger does not fully charge battery.
Charger does not function.
Charger indicator lights flash on and
off as battery pack is moved side to
side in charger pocket.
Squeeze latches on sides of clipper housing to release
and remove battery pack from clipper. Locate the two
sets of motor contacts within the bottom of the
clipper. Gently squeeze metal sides of individual
contacts together until they are about 1/16" apart
using needle nose pliers or a similar tool (Diagram O).
DO NOT squeeze sides of contacts completely
together or the battery pack will not re-insert.
1. Note that a fully depleted battery will take about one
hour to charge fully.
2. UNPLUG CHARGER and wait approximately one
minute. Re-align charger contacts at bottom of
charging pocket by gently squeezing metal sides of
individual contacts together until they are about
1/16" apart using needle nose pliers or a similar
tool (Diagram P). DO NOT squeeze sides of
contacts completely together or the battery pack
will not re-insert. Remove hair or other debris that
has accumulated in the charging pocket with a soft
brush or vacuum cleaner.
1. Be sure to use only AC adapter provided by Andis.
2. Check that the wall adapter is plugged into a
powered AC outlet, and the adapter cord is
connected securely to the charger.
1/16 INCH
APART
CLIPPER
BATTERY
OPENING
Diagram O
1/16 INCH
APART
Diagram P
F R A N Ç A I S
MISES EN GARDE IMPORTANTES
Pendant l'utilisation d'un appareil électrique, il faut toujours suivre certaines
règles de sécurité ; notamment, il faut lire toutes les instructions avant
d'utiliser la tondeuse Andis. Ce produit ne doit pas être utilisé par un enfant.
DANGER : Pour réduire le risque d’électrocution :
1. Ne pas tenter de récupérer un appareil électrique qui est tombé dans l'eau.
La débrancher immédiatement. Ne jamais utiliser la tondeuse près de l'eau.
2. Ne pas utiliser cet appareil dans le bain ou sous la douche.
3. Ne pas déposer ni ranger l'appareil à un endroit d'où il pourrait tomber dans
une baignoire ou un lavabo. Ne pas mettre ou laisser tomber l'appareil dans
l'eau ou dans un autre liquide.
4. Sauf en cours de recharge, toujours débrancher l'appareil après utilisation.
5. Débrancher l'appareil avant de le nettoyer, de le déplacer ou d'installer une
pièce.
AVERTISSEMENT : Pour réduire les risques de brûlure,
d’incendie, d’électrocution et de blessure :
1. Ne jamais laisser un appareil branché sans surveillance.
2. Cet appareil peut être utilisé par des enfants âgés de 8 ans minimum et des
personnes présentant un handicap physique, sensoriel ou mental ou un
manque d'expérience et de connaissances à condition d'avoir fait l'objet de la
supervision ou reçu les instructions concernant l'utilisation de l'appareil de
manière sûre et d'en comprendre les dangers.
3. Cet appareil n'est pas un jouet à laisser entre les mains.
4. Utiliser cet appareil seulement pour l'usage prévu décrit dans ce manuel.
Utiliser uniquement les accessoires recommandés par Andis.
5. Ne JAMAIS utiliser l’appareil si son cordon ou sa fiche de branchement est
endommagé, s’il ne fonctionne pas correctement, s’il est tombé par terre,
s’il est endommagé ou s’il est tombé dans l’eau. Le retourner à un centre de
réparation agréé par Andis pour examen et réparation.
6. Garder le cordon à l'écart des surfaces chaudes.
7. Ne jamais faire tomber ni insérer un objet dans une ouverture quelconque
de la tondeuse ou du chargeur.
8. Ne pas utiliser l’appareil à l’extérieur, dans un endroit où des aérosols sont
employés ou encore dans un endroit où l’on administre de l’oxygène.
9. Ne pas utiliser cet appareil avec un guide de coupe ou une tête de coupe
abîmé(e). Il y aurait risque de lésions cutanées.
10. Pour débrancher, retirer la fiche de la prise secteur.
11. Brancher directement le chargeur sur une prise secteur (c.a.). Ne pas
utiliser de rallonge électrique.
12. AVERTISSEMENT : Pendant l’utilisation, ne pas mettre l’appareil à un
endroit où il risque d'être (1) endommagé par un animal ou (2) exposé aux
intempéries.
Model RBC (100/240V, 50 Hz)
©2014 Andis Company
1800 Renaissance Blvd., Sturtevant, WI 53177 U.S.A.
1-262-884-2600 www.andis.com [email protected]
KEEP THIS FOR YOUR RECORDS
CONSERVER CETTE NOTICE
GUARDE ESTAS INSTRUCCIONES
DIESE ANLEITUNG AUFBEWAHREN
CONSERVARE PER USI FUTURI
BEWAAR DEZE GEBRUIKSAANWIJZING
GUARDE ISTO EM SEUS ARQUIVOS
请保留此说明书作为记录
Printed in U.S.A.
Form #100327
To find an Andis Authorized Service Station or access this manual
online go to www.andis.com
Si vous souhaitez trouver un point de service authorisé Andis ou
encore consulter ce guide en ligne, rendez-vous sur www.andis.com
Para encontrar un centro de servicio autorizado de Andis o para
acceder a este manual en línea, visite www.andis.com
Rufen Sie die Website www.andis.com auf, um von Andis autorisierte
Kundendienststellen oder die Online-Version dieser
Betriebsanleitung zu finden.
Per trovare un centro di assistenza autorizzato Andis, o per visualizzare
questo manual online, visitare il sito www.andis.com
Om een door Andis erkend servicenter te zoeken of deze handleiding
online te openen, gaat u naar www.andis.com
Para encontrar um serviço técnico autorizado perto de você ou ver
este manual on-line, acesse o site www.andis.com
如需查找 Andis 授权的维修站或访问在线阅读手册,请访问
www.andis.com
  • Page 1 1
  • Page 2 2
  • Page 3 3
  • Page 4 4
  • Page 5 5
  • Page 6 6
  • Page 7 7
  • Page 8 8
  • Page 9 9
  • Page 10 10
  • Page 11 11
  • Page 12 12
  • Page 13 13
  • Page 14 14
  • Page 15 15
  • Page 16 16
  • Page 17 17
  • Page 18 18
  • Page 19 19
  • Page 20 20
  • Page 21 21
  • Page 22 22
  • Page 23 23
  • Page 24 24
  • Page 25 25
  • Page 26 26
  • Page 27 27
  • Page 28 28
  • Page 29 29
  • Page 30 30
  • Page 31 31

Andis RBC Operating instructions

Category
Pet hair clippers
Type
Operating instructions

Ask a question and I''ll find the answer in the document

Finding information in a document is now easier with AI