

ENGLISH
2
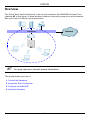
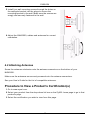
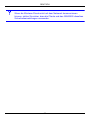
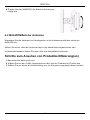
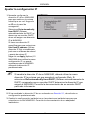
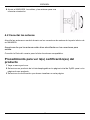
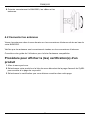
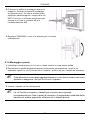
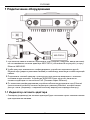
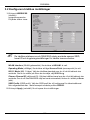
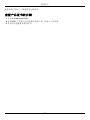
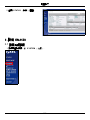
Overview
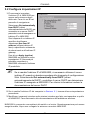
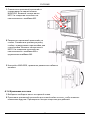
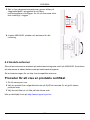
This Quick Start Guide shows how to set up and configure the NWA3550 Access Point
(marked AP in the figure) to allow wireless clients to securely access your wired network.
See your User’s Guide for more information.
" You may need your Internet access information.
This guide shows you how to:
1 Connect the Hardware
2 Access the Web Configurator
3 Configure the NWA3550
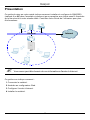
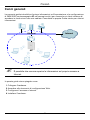
4 Install the Hardware
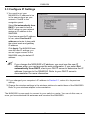
Internet
AP
Ethernet
ENGLISH

ENGLISH
3
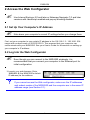
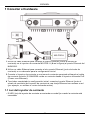
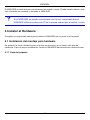
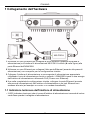
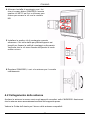
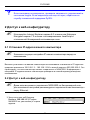
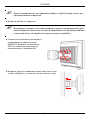
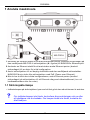
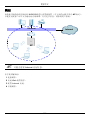
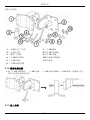
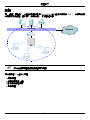
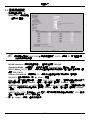
1 Connect the Hardware
1 Use an Ethernet cable to connect the Ethernet port (opposite the power socket) on the
included MS-POE-IJ power injector (A in the figure) to the NWA3550’s Ethernet port.
2 Use an Ethernet cable to connect the other Ethernet port (next to the power socket) to
a computer for initial configuration.
3 Connect the power injector to a proper power source using the included power cord.
The NWA3550 receives it's power from the power injector using PoE (Power over
Ethernet).
4 After you have completed the initial configuration, connect the Ethernet port (next to the
power socket) of the power injector to an Ethernet jack with network access (for
example, a broadband modem or router).
1.1 Power Injector Light
• The LED (light) on the power injector shines green steadily when the power is connected.
V If the LED does not turn on, check your connections and inspect the cables
for damage. If the LED is still off, contact your vendor.

ENGLISH
4
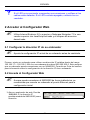
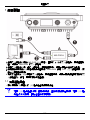
2 Access the Web Configurator
" Use Internet Explorer 6.0 and later or Netscape Navigator 7.0 and later
versions with JavaScript enabled and pop-up blocking disabled.
2.1 Set Up Your Computer’s IP Address
" Note down your computer’s current IP settings before you change them.
First, set your computer to use a static IP address in the 192.168.1.3 - 192.168.1.254
range with a subnet mask of 255.255.255.0. This ensures that your computer can
communicate with your NWA3550. See your User’s Guide for information on setting up
your computer’s IP address.
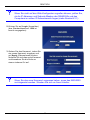
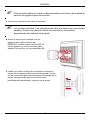
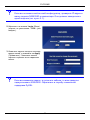
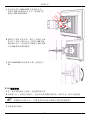
2.2 Log Into the Web Configurator
" Even though you can connect to the NWA3550 wirelessly, it is
recommended that you connect your computer to the Ethernet port for
initial configuration.
1 Launch your web browser. Enter
192.168.1.2 (the NWA3550’s default
IP address) as the address.
V If you cannot access the Web configurator, make sure the IP addresses
and subnet masks of the NWA3550 and the computer are in the same IP
address range (see Section 2.1).

ENGLISH
5
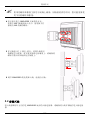
2 Click Login (the default password
1234 is already entered).
3 Change the login password by
entering a new password and
clicking Apply. Be sure to record the
new password and keep it in a safe
place.
V If you change the password and then forget it, you will need to reset the
NWA3550. Contact your vendor.
4 Click Apply to replace the factory
default certificate for added security;
alternatively click Ignore to proceed
if you do not want to change the
certificate now.

ENGLISH
6
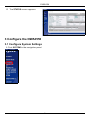
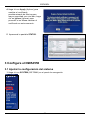
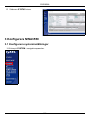
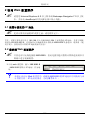
3 Configure the NWA3550
3.1 Configure System Settings
1 Click SYSTEM in the navigation panel.
5 The STATUS screen appears.

ENGLISH
7
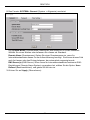
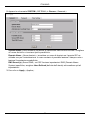
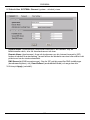
2 The SYSTEM > General screen appears.
System Name is for identifying the NWA3550 on your network. Choose a distinctive
name, or leave this at its default.
Domain Name: Enter a domain name if your ISP requires one for authentication.
Otherwise you can leave it blank or set to whatever may have displayed automatically.
DNS Server(s): if your ISP gave you specific DNS (Domain Name System) settings, select
User-Defined and enter them here. Otherwise, leave these fields at their defaults.
3 Click Apply.

ENGLISH
8
3.2 Configure Wireless Settings
1 Click WIRELESS in the
navigation panel. The
following screen
appears.
" The wireless stations and the NWA3550 must use the same SSID,
channel ID and encryption settings for wireless communication.
WLAN Interface: Ensure that WLAN1 is selected.
Operating Mode: Ensure that Access Point mode is selected.
802.11 Mode: Select the wireless standard you want your network to use. If you are not
sure which to select, select 802.11b+g.
Choose Channel ID: Select the wireless channel you want your network to use. To have
the NWA3550 automatically select a channel, click Scan instead.
SSID Profile: Select the SSID profile you want to configure for network access from the
drop-down list box. This example uses the SSID03 profile.
2 Click Apply to save your settings.

ENGLISH
9
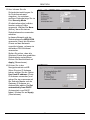
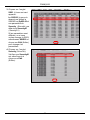
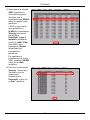
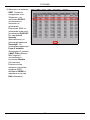
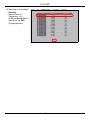
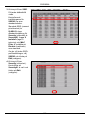
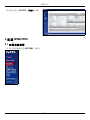
3 Click the SSID tab. The
following screen appears.
Ensure the settings for
SSID03 are at their default
values.
The default SSID (the name
of the network) is ZyXEL03,
its default Security setting is
Security01. Layer 2
Isolation and MAC Filter
are set to Disable by default.
If you want to change the
SSID profile’s settings,
select SSID03 and click
Edit.
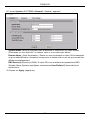
4 Click the Security tab.
Ensure that Security01 is
selected and click Edit.
If you don’t configure
wireless security, anyone
can access your network.

ENGLISH
10
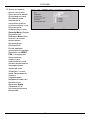
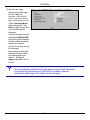
5 This is where you can enter
the security settings for
your wireless network. The
fields you fill in differ
according to the type of
security you select in the
Security Mode field. Select
None if you do not wish to
use wireless security.
This example uses WPA2-
PSK security, in which all
wireless clients must use the
same pre-shared key to join
the network.
Ensure that all your wireless
clients support the type of
security you set. Click Apply
when you have finished.
V If the wireless clients cannot communicate with the network, ensure that
the clients and the NWA3550 are using the same wireless security
settings.

ENGLISH
11
3.3 Configure IP Settings
The NWA3550 is now ready to connect to your switch or router. You can do this now, or
once you have attached the antennas and mounted the NWA3550.
1 You need to set your
NWA3550’s IP address to be
in the same subnet as your
network. Click IP in the
navigation panel.
Select Get automatically from
DHCP if you want to have a
DHCP server on your network
assign an IP address to the
NWA3550.
If you have a specific IP address
to use, select Use fixed IP
address and enter it along with
the subnet mask and gateway
IP address.
Click Apply. The NWA3550 now
uses the new IP settings; you
can no longer connect to the
NWA3550 using the default IP
address.
" If you change the NWA3550’s IP address, you must use the new IP
address when you next access the web configurator. If you select Get
automatically from DHCP, check your DHCP server to determine the IP
address it assigns to the NWA3550. Refer to your DHCP server’s
documentation for more information.
2 If you changed your computer’s IP address in Section 2.1, return it to its previous
setting.
3 Change the wireless settings in the wireless stations to match those of the NWA3550.
Refer to your wireless adapter’s documentation.

ENGLISH
12
V If the NWA3550 cannot communicate with the network, ensure that the
NWA3550 is using an IP address on the same subnet as the switch / router.
4 Install the Hardware
Complete the following procedures to install the NWA3550 on a pole or wall.
4.1 Hardware Mounting
In general, the best location for the access point is at the center of your intended wireless
coverage area. For better performance, mount the NWA3550 high up in an area that is free
of obstructions.
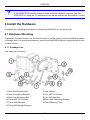
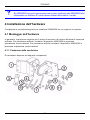
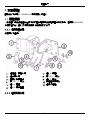
4.1.1 Package List
You need the following:
1 One Wall/Pole Bracket
2 One Articulation Bracket
3 One Pole Mounting Bar
4 Three M8*110 Screws
5 Three M8 Washers
6 Three M8 Spring Washers
7 One M8 Nut
8 Four M5*12 Screws
9 Four M5 Washers
10Four Wall Mounting Screws
11Four Masonry Plugs

ENGLISH
13
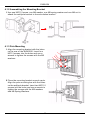
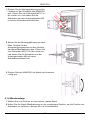
4.1.2 Assembling the Mounting Bracket
1 Use one M8*110 screw, one M8 washer, one M8 spring washer and one M8 nut to
attach the wall/pole bracket to the articulation bracket.
4.1.3 Pole Mounting
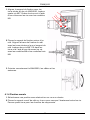
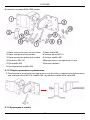
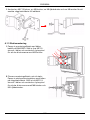
1 Align the mounting bracket with the holes
on the rear of the NWA3550. Insert four
M5*12 screws into the holes and use a
wrench to tighten the screws with the M5
washers.
2 Place the mounting bracket around a pole.
Align the pole mounting bar with the holes
on the wall/pole bracket. Insert two M8*110
screws into the holes and use a wrench to
tighten the screws with the M8 washers
and M8 Spring Washers.

ENGLISH
14
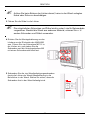
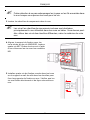
3 Adjust the NWA3550, cables and antennas for correct
orientation.
4.1.4 Wall-mounting
1 Select a position free of obstructions on a sturdy wall.
2 Position the wall/pole bracket on the wall to mark how far apart the screws should be
placed. Drill four holes for the masonry plugs.
" Be careful to avoid damaging pipes or cables located inside the wall when
drilling holes for the screws.
3 Insert the masonry plugs into the wall.
" The included screws and masonry plugs are intended primarily for use with
concrete walls. You may need to use different screws and plugs, depending
on your wall's material.
4 Align the mounting bracket with the holes
on the rear of the NWA3550. Insert four
M5*12 screws into the holes and use a
wrench to tighten the screws with the M5
washers.

ENGLISH
15
5 Install four wall mounting screws through the holes on
the wall/pole bracket into the plugs to secure the
mounting bracket to the wall. Make sure the screws are
snugly and securely fastened to the wall.
6 Adjust the NWA3550, cables and antennas for correct
orientation.
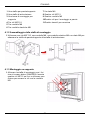
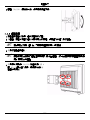
4.2 Attaching Antennas
Screw the antennas clockwise onto the antenna connectors on the bottom of your
NWA3550.
Make sure the antennas are securely screwed onto the antenna connectors.
See your User’s Guide for the list of compatible antennas.
Procedure to View a Product’s Certification(s)
1 Go to www.zyxel.com.
2 Select your product from the drop-down list box on the ZyXEL home page to go to that
product's page.
3 Select the certification you wish to view from this page.
Page is loading ...
Page is loading ...
Page is loading ...
Page is loading ...
Page is loading ...
Page is loading ...
Page is loading ...
Page is loading ...
Page is loading ...
Page is loading ...
Page is loading ...
Page is loading ...
Page is loading ...
Page is loading ...
Page is loading ...
Page is loading ...
Page is loading ...
Page is loading ...
Page is loading ...
Page is loading ...
Page is loading ...
Page is loading ...
Page is loading ...
Page is loading ...
Page is loading ...
Page is loading ...
Page is loading ...
Page is loading ...
Page is loading ...
Page is loading ...
Page is loading ...
Page is loading ...
Page is loading ...
Page is loading ...
Page is loading ...
Page is loading ...
Page is loading ...
Page is loading ...
Page is loading ...
Page is loading ...
Page is loading ...
Page is loading ...
Page is loading ...
Page is loading ...
Page is loading ...
Page is loading ...
Page is loading ...
Page is loading ...
Page is loading ...
Page is loading ...
Page is loading ...
Page is loading ...
Page is loading ...
Page is loading ...
Page is loading ...
Page is loading ...
Page is loading ...
Page is loading ...
Page is loading ...
Page is loading ...
Page is loading ...
Page is loading ...
Page is loading ...
Page is loading ...
Page is loading ...
Page is loading ...
Page is loading ...
Page is loading ...
Page is loading ...
Page is loading ...
Page is loading ...
Page is loading ...
Page is loading ...
Page is loading ...
Page is loading ...
Page is loading ...
Page is loading ...
Page is loading ...
Page is loading ...
Page is loading ...
Page is loading ...
Page is loading ...
Page is loading ...
Page is loading ...
Page is loading ...
Page is loading ...
Page is loading ...
Page is loading ...
Page is loading ...
Page is loading ...
Page is loading ...
Page is loading ...
Page is loading ...
Page is loading ...
Page is loading ...
Page is loading ...
Page is loading ...
Page is loading ...
Page is loading ...
Page is loading ...
Page is loading ...

简体中文
117
3 单击 SSID 选项卡。此时
会显示下列屏幕。
确保 SSID03 的设置均为
默认值。
默认 SSID ( 网络的名称 )
为 ZyXEL03,其默认
Security ( 安全 ) 设置是
Security01。默认情况
下, Layer 2 Isolation (
第 2 层网络隔离 ) 及
MAC Filter (MAC 过滤 )
功能都设置为 Disable (
禁用 )。
如果要更改 SSID 配置的
设置,请选择 SSID03 并
单击 Edit ( 编辑 )。
4 单击安全选项卡。请确保
已选中 Security01,然
后单击 Edit ( 编辑 )。
Page is loading ...
Page is loading ...
Page is loading ...
Page is loading ...
Page is loading ...
Page is loading ...
Page is loading ...
Page is loading ...
Page is loading ...
Page is loading ...
Page is loading ...
Page is loading ...
Page is loading ...

繁體中文
131
3 按一下 SSID 標籤。出
現以下畫面。
確定 SSID03 的設定皆
為預設值。
預設 SSID ( 網路的名
稱 ) 為 ZyXEL03,其
預設 Security (安全)
設定是 Security01。
根據預設,Layer 2
Isolation (第 2 層網路
隔離 ) 及 MAC Filter
(MAC 過濾 ) 功能都設
定為 Disable ( 停用
)。
如果要變更 SSID 設定
組合的設定,請選取
SSID03 並按一下 Edit
(編輯)。
4 按一下 Security (安全
) 標籤。確定已經選取
Security01,然後按一
下 Edit ( 編輯 )。
Page is loading ...
Page is loading ...
Page is loading ...
Page is loading ...
Page is loading ...
Page is loading ...
-
 1
1
-
 2
2
-
 3
3
-
 4
4
-
 5
5
-
 6
6
-
 7
7
-
 8
8
-
 9
9
-
 10
10
-
 11
11
-
 12
12
-
 13
13
-
 14
14
-
 15
15
-
 16
16
-
 17
17
-
 18
18
-
 19
19
-
 20
20
-
 21
21
-
 22
22
-
 23
23
-
 24
24
-
 25
25
-
 26
26
-
 27
27
-
 28
28
-
 29
29
-
 30
30
-
 31
31
-
 32
32
-
 33
33
-
 34
34
-
 35
35
-
 36
36
-
 37
37
-
 38
38
-
 39
39
-
 40
40
-
 41
41
-
 42
42
-
 43
43
-
 44
44
-
 45
45
-
 46
46
-
 47
47
-
 48
48
-
 49
49
-
 50
50
-
 51
51
-
 52
52
-
 53
53
-
 54
54
-
 55
55
-
 56
56
-
 57
57
-
 58
58
-
 59
59
-
 60
60
-
 61
61
-
 62
62
-
 63
63
-
 64
64
-
 65
65
-
 66
66
-
 67
67
-
 68
68
-
 69
69
-
 70
70
-
 71
71
-
 72
72
-
 73
73
-
 74
74
-
 75
75
-
 76
76
-
 77
77
-
 78
78
-
 79
79
-
 80
80
-
 81
81
-
 82
82
-
 83
83
-
 84
84
-
 85
85
-
 86
86
-
 87
87
-
 88
88
-
 89
89
-
 90
90
-
 91
91
-
 92
92
-
 93
93
-
 94
94
-
 95
95
-
 96
96
-
 97
97
-
 98
98
-
 99
99
-
 100
100
-
 101
101
-
 102
102
-
 103
103
-
 104
104
-
 105
105
-
 106
106
-
 107
107
-
 108
108
-
 109
109
-
 110
110
-
 111
111
-
 112
112
-
 113
113
-
 114
114
-
 115
115
-
 116
116
-
 117
117
-
 118
118
-
 119
119
-
 120
120
-
 121
121
-
 122
122
-
 123
123
-
 124
124
-
 125
125
-
 126
126
-
 127
127
-
 128
128
-
 129
129
-
 130
130
-
 131
131
-
 132
132
-
 133
133
-
 134
134
-
 135
135
-
 136
136
-
 137
137


Ask a question and I''ll find the answer in the document
Finding information in a document is now easier with AI
in other languages
- italiano: ZyXEL NWA-3550 Manuale del proprietario
- français: ZyXEL NWA-3550 Le manuel du propriétaire
- español: ZyXEL NWA-3550 El manual del propietario
- Deutsch: ZyXEL NWA-3550 Bedienungsanleitung
- русский: ZyXEL NWA-3550 Инструкция по применению
- svenska: ZyXEL NWA-3550 Bruksanvisning
Related papers
Other documents
-
Linksys WRT54G(EU/LA) User manual
-
Longshine IEEE802.11n AP/Router/Client User manual
-
 ZyXEL Communications P-335WT Quick start guide
-
Trendnet TEW-653AP Quick Installation Guide
-
Axis M1011-W Network Camera, 10-pack/bulk Installation guide
-
-
Approx appR300V2 Installation guide
-
Cisco X2000 User manual
-
Asus 54Mbps Pocket Wireless Access Point WL-330g User guide
-
