19Installation
Nortec EL
2582302_D_EN_2008_Nortec-EL_IM
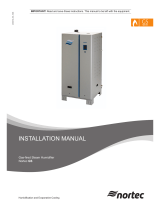
Note2: The drain line should have a minimum internal diameter of 7/8 in (22 mm), with a constant mini-
mum downslope of 1 in/48 in (1.2°) to the funnel, and must not touch the side or bottom of the funnel.
Note3: The air gap and trap should be located to the left of the humidier, as shown. A 2-1/2 in to 7/8 in
(63.5 mm to 22 mm) reducer is ideal (option P/N 2522172). The hose must not touch the bottom of the
funnel.
Note4: Water supply should be potable drinking water, with conductivity of 150-1200 micro-siemens/
cm (0-12 gpg). The water supply line should have a minimum diameter of 1/2 in (13 mm) with a shuto
valve. An optional 5 μm lter is also recommended. Water temperature should be 34-104°F (1-40°C).
Pressure should be surge-free and regulated to 30-80 psig (207-550 kPa).
Note5: For remote-mounted blower pack, the condensate line can be routed to either an external drain
or to the ll cup of the humidier. The condensate drain line from the blower pack should have a constant
minimum downslope of 1 in/48 in (1.2°), with no restrictions and a minimum trap height of 4 in (100 mm).
The trap should be located a minimum of 12 in (300 mm) below the condensate port on the blower pack.
5.3 Site Requirements
In preparation for installation of the Nortec EL steam humidier, make sure that the following site require-
ments are satised. Report any discrepancies to the site engineer.
SteamandCondensateLines:
When choosing the location of the humidier, install it as close as possible to the steam distributor
to minimize heat loss through the steam line.
When possible, install the humidier below the steam distributor. Make sure that the selected loca-
tion permits proper routing of steam and condensate lines as described in "Best Practices for Installing
Steam and Condensate Lines" on page 30.
Mounting
Allow adequate clearances around the humidier for ease of maintenance. Although the
Nortec EL steam humidier requires no side clearance, Condair recommends minimum clearances
of 6 in (150 mm) on the side. A 24 in (610 mm) clearance between the humidier and the ground is
required. Observe all local and national installation codes. Condair is not responsible for any instal-
lation code violations.
Do not mount the humidier on hot surfaces, or surfaces that can freeze, or near vibrating compo-
nents, or on the oor. In addition, the mounting surface must be able to withstand temperatures of
140-158°F (60-70°C) that can be generated during operation of the humidier.
The humidier should be mounted on a wall or other suitable surface that oers a suciently high
load-bearing capacity. Refer to Table 15 on page 63 for operating weights.
The Nortec EL steam humidier should be installed in a drip-proof location within buildings, where
the ambient temperature is 41-104°F (5-40°C) and the relative humidity is 5-95% (non-condensing).
Water Supply
The water supply to the humidier must be cold potable drinking water, and not reverse osmosis
(RO) or deionized (DI) water. The water quality requirements are listed in Table 4 below.
Table 4: Water Quality Requirements
Conductivity
(μS/cm)
Hardness
(gpg)
Silica
(ppm)
Alkalinity
(pH)
150-1200* 0-12 0-4 7-7.5
0-3 4-14
* Default humidier conguration supports approximately 330-670 μS/cm.
The water supply should have a minimum ow rate of 0.9 gpm (3.3 L/min), and should be pressure
regulated to 30-80 psig (207-550 kPa), with spike pressure limited to 120 psig (827 kPa).
The water supply should be ltered to 5 μm (optional, but recommended).