
OYAMAHA
DVD/VIDEO CD / CD PLAYER
DVD-S540
OWNER'S MANUAL
V IDEO

RiSKOFELECTRtCSHOCK
DONOTOPEN
CAUTiON_TOREDUCETHERiSKOFELECYRtCSHOCK,
DONOT REMOVE COVER {OR BACK).
NO USER=SERViCEABLE PARTS INSIDE.
REFER SERVICING TO QUALIFJEO SERVICE PERSONNEL.
L_ hls symbol w_ms the user lJlat unlnsu_ate_ voltage
w_in the unit may h_ve su_c_ent magnitude to cause
e_ectri_ shock Therofore, it _Sdal_gerous to make
any kind of contact with ally insi_Jep_lt of this un_
_ Thissymt_ol_ert_euserthatlm_ortantklter_ture
cencernillg _l_e operation _ntt maintenance of th_s
unit has been inclu_ett Therofole, it SlIOUM be read
¢atefukly in order to _voitt ally IlrOblems
WARNING
TO _educe the risk of fire or electric shock, do not
expose this _ppli;mce _o _ain or moistul_e.
CAUTION
Use of controls or adjustments or performance of
procedures other than herein may i_esult in h_zardous
_adiation exposure.
The set complies with the FCC-Rules, Part 15 and
with 21 CFR 1040.10.
IMPORTANT SAFETY INSTRUCTIONS
1, Read these instructions.
2, Keep these instructions.
3, Heed all warnings.
4, Follow all instructions.
_, Do not use this apparatus near water.
6. Cieanonlywithad_y cIoth.
7, Do not block any of the ventilation openings.
Insulant in accordance with the manufacturers
instructions.
8. DO not install near any heat sources _uch as
radiatol s,hea_ legigt_l s, s_ov_ or othel apparatus
(in ludin_ a_plifiers) Lh_ produce I_e_
9. DO not defeat the safety
has _wo blades wi_J1one wider than Plug
the o_he_ A 4rou_ding type plug hastwo blades and a third
glY_unding plying ire wide blade orthe third prollg _
provided _r your safety When the provided plu_ does n_
fr_ into your ¸ ou_l_, consult an electr_ci_l _p replacement of
the ob_lete outlet
10. P_tect the power cord flora being walked on or
pinc_d_ parliculady at plu_ col_e_lence l_ceptacles, and
the pok_ where they exit [rom the apparatus¸
11 .Only use attachments/accesso_es specified by tile
m_factur_
12. _ Use only with a cart, s_and, tnpod, bracket,
or _le sp_ihed by the manufactureP or sold
w_h the apparatus When aca_t is used, use
caution when moving the Car_/app_atus
corn billa_ion _ avoid i_ury f_om tip ovel:
13. Unplug this apparatus dudn_ ligi_ning storms or whe_
ullu_d _l ¸ Ion_ pePiod_ of time
14. Refer all servicing to qualified _r vice pe_onnel
Servicin_ is requil_d whe_ the apparatus ha_ been
damaged in any w_ such as if the powe_supply cord or
plug is dam_ed liquid l_a_been spilled or obiects have
fallell into the appal a_/_,or when the app_ atus has been
exposed _ raill Or moi_ure, does not Operate nomla_l_ Or
has been dropped¸
15. Battery usage CAUTION _ p_eve_ bakery lea_a_e
whid_ may _u_t in bodily i_ury or damage _ the unit:
Iiisl_ll all batteries dor_tly + _nd * as mar_.ed on the ullit
DOno[ mix battelies (old andnew or carbon and
alkaline, _4c)
Remove batteries when the uni[ is no_ used fol a Ion_ time
16. Re sure to allow _paces of at least 25era above, behind a_d
oil b_J_ sides the ullit
17. DO _1ol place the lo lowing obJeCts on this unit:
A vessel wrth water in ff if the vessel laJls by vibrations &rid
w4ter spills, _tmay cau_ damage to the unit, _d/or you
may get an electric thock
EL 6475-E002: 0t/3

FCCINFORMATION(forUScustomersonly)
I IMPORTANTNOTICE:DO NOT MODIFY THIS UNIT!
ThESpredict, whenin$ta_ as indicated inthe instruct_onscontained iRthis manu,_l,meets FCCrequirements Modifeations Rotexpressly
approved by Yamaham_y voidyour autherlty, gtant_ by theFCC, to usethe product
2 IMPORTANTWhen co:lr_cting this product toacc_sor_s ,_r_l/oranelher product useo_ hfgh qu,_lityshEeldedcab_s CableJssuppl_'d withthis
product MUSTbe L_ed Followall installation instruct_ns Failureto follow _nstrJct_nscould voidyour FCCau[horEz,_tEonto usethis product inthe
USA
3 N_TE_Th_sprcducthast`_eentestedandf_undtoc_mp]ywjththereqUiremen_[EstedinFCCReguiatmns_Pa_ti5f_rCIass"B_'djgitaIdevIces
Compli,_ncewiththese requirements provEdesa re,_sonedleleve_of ,_ssurancethat your useofthis productJn,_residential environment willnot
result in harrn_linterfereRcewithother e_gtroqic devices Th_sequipment generates]usesradio fn_queRciesand, _fnot instalJedand used accord-
ing tothe ins_ons found Jnthe uses manL_al,may Causeinterference harmful totheoperatEoRof otherelectnonicdev_es Compliancew_th
FCCregulations doesnot guarantee that interference willnotoccvr in a_Jinstallations If thispt_lt=ct is found to bethe source of interference,
whichcanbe determined byturning the product "OFF*and "ON", please try toeliminate theproblem byusing ona of tha following measun_s:
ReJocateei[herthis produc_orthe device that is beingaffected by the interference
Utilize poweroutlets that are on dffrent branch (drcuit bre,_keror fuse) drcuils or installAC I_neflller/s
IRthecase of radio orTV interference,nek_cate/reede£tthe ,_ntenR_If the antenna lea_J4RJ$300 ohm ribbon_ead,ch,_ngethe leed-into coaxial
type cable
if thesecorrective measures do notproducesatisfactory results,please contact the bcal retailer authoozedto distabuteth_stype Ofproduct¸ If you
can not Ioeatethe ,_£propriateretailer, pleasecontact YamahaElectronics Ccrp, 6600Orangetflorpe Ave Buen,_park CA90_22
The above statementsapplyONLY to thoseproducts_istabutedby YamahaCorporation ofAmedca or _tssubsidiedes
We Want You Listening For A Lifetime
YAMAHA and the Electronic Industries Association*s Consumer Electronics Group want you to get the most out of
your eq_Jipment by playing it at a safe level One that lefe the sound come thro_Jgh loud and clear w_thout annoying
b_ar_ngor distoPJon - and, most importantly, wit he,Jr affecting your sensitive hearing¸
Since hearing damage from _oud sounds is often undetectable unti_ itis too late, YAMAHA and the E_ectronic
industries Association's Consumer E_ectronics Group recommend you to avoid prolonged exposure from excessive ........
volume _evets.
I For Customer Use:
Read carefofly the information located at the rear panel of the
player and enter below Lhe Seria_ No Retain this information for
future reference
Seria_ NO.
Model No
FOR CANADIAN CUSTOMERS
TO prevent elect tic shock, match wide blade of plug 1o wide slot and
rally insert.
This Class 8 digital apparatus complies with Canadian ICES-003.
Thi_ digita_apparatus does no_ excee_ _he C_as$B {imits for radio noise
_'_ission_ from di_al apparatus as_e_o_t in _he Radio _n_erference
Re_ofations of rite Cana/Jia_ Department of Commu nic2,dons
CAUTION
Use of controls or adju sb'aenls or
performance of procedures other than
Lhose spedfied herein may resoft in
haza_ous _dlalJon exposure¸

1 To assure the finest performance, please read
this manual car@ally Keep it in a safe place for
futurereference.
2 InstaEI this unt n a well vent bted, cool, dry dean
place away from direct sunlight, beat sources,
vibrat on, dust, moisture, or cold. In a cabinet,
allow about 2.5cm (1 inch) dfree space ale
around this unt for adequate ventilation.
3 Locate this unit away from other electrical
appliances, motors, or transformers to avoid
bumming sounds.
4 Do not expose this untt to sudden temperature
changes from cold to hot, nor locate tbs untt in
an environment with high humidity (.e., a room
wth a humid fier) to prevent condensation inside
this unit, which may cause an electr cal shock, fi_,
damage to this unit, and/or personal _jury
5 Avoid installing this unit in a location where
foreign obJeCts may fall onto this unit or where
this unt may be exposed to liqud @-ipping or
splashing, On the top of this unit, do not place:
Other components, as they may cause
damage and/or disc@orat on on the surface
of this unit,
Burning objects (i.e,, candles), as they may
cause fire, damage to this unit, and/or
personal inpry
Conta ners wttb Iquid n them, as they may
fall, spilling the liquid and causing an electrical
shock to the user and/or damage to this unit.
6 Do not cover this untt with a newspaper,
tablecloth, curtain, etc, n order not to obstruct
heat rad ation, lfthe temperature nside this untt
rises, it may cause fire, damage to this uni%and/or
personal iniur Y
7 Do not plug in this unit to a wall outlet untl all
connect ons are complete.
8 Do not operate this unit upside-down, It may
overheat, possibly causing damage.
9 Do not use excessive force on switches, knobs
and/or cords,
10 When disconnect}ng the power cord from the
wall outlet, grasp the plug; do not pull the cord.
11 Do not clean th}s un}t wttb chemical solveuts;this
might damage the fin sh, Use a clean, dry cloth,
1 2 Use only the voltage specified on this unit. Using
this un}t wtth a higher voltage than specified is
dangerous and may cause fire, damage to this
unit, and/or personal injuryYAMAHA will not be
held responsible for any damage resulting from
use of this un}t wttb a voltage other than as
specified.
13 To preve_t damage by lightning, disconnect the
power cord from the wall outlet durng an
electrical storm.
14 Do not attempt to modify or fix this unit.
Contact qualifiedYAMAHA service personnel
when any serv ce is needed.The cabinet should
never be opened for- any reason.
15 When not planning to use this unit for long
periods of t}me (i.e., vacation), d sconnect the AC
power plug from the wall outlet.
16 Be sure to read the "TROUBLESHOOTING"
section on common operat}ng errors before
concluding that this unit is faulty
| 7 Before moving this unit, press STANDBY/ON to
set the un}t }n standby mode, then disconnect
the AC power plug from the wall outlet.
WARNING
TO REDUCETHE RISKOF FIREOR ELECTRIC
SHOCK, DO NOT EXPOSETHISUNITTO
RAIN OR MOISTURE
NOTE:
Pictures shown maybe different between countries,
Never make or change connections w}th the power
switched on,
When playing DTS encoded CDs, excessive noise
will be heard from the analog stereo outputs,To
avoid possible damage to the audio system, the
consumer should take proper- precaut ons when the
analog stereo outputs of the player are connected to
an amplification system.To enjoy DTS D gttal
Surround TM playback, an external 5,1 channel DTS
Digital Surround TM decoder system must be
connected to the digital output of the player:
LASER SAFETY
This unit employs a laser: Due to possible eye injury
only a qualified serv ce person should remove the
cover or attempt to service this device,
CAUTION
VISIBLEAND INVISIBLELASERRADIATION
WHEN OPEN,AVOID EXPOSURETO BEAN
(WARNING LOCATION:INSIDE ON LASER
COVERSHIELD ORTHE BACKPLATEOF SET)
LASER
_pe
Wave lenS1]
Output Power
Beam d}vergence
Semiconductor laser GaAlAs
650 nm (DVD)
780 nm (VCD/CD)
7 mW (DVD)
10 mW (VCD/CD)
60 degree

Contents
Introduction
EnvironmentalInformation ......................................2
Suppliedaccessories..................................................2
Notes about discs......................................................2
Cleaning discs..........................................................................2
Symbols Used in this Manual...................................2
Functional Overview
Front and Rear Panels...............................................3
Remote Control .........................................................4
Preparation
General Notes on connections .............................. 5
Digital Connections ................................................... 5
AnaJog Connections .................................................. S
Video Connections .................................................... 6
S Video terrninal <A> .......................................................6
Component Video terminal <B) ...............................6
Composite Video terminal (1, 2) <C ) ...................6
Inserting batteries into the Remote Control .,,,,,7
Using the Remote Control .............................................7
NTSCIPAL Conversion ............................................ 7
Turning on the power ............................................... 7
Smart Power On/Off ................................................. 7
Operation
Basic Playback ............................................................. 8
General Operation .................................................... 8
Video control dunng playback ......................................8
Audio co_trol dunng playback ......................................8
Repeat and Shuffle ...............................................................9
Repeat AB ...............................................................................9
Disc Resume ............................................................................9
OSD (On-Screen Display) ..............................................9
Zoom .......................................................................................10
Special DVD Features ............................................ 10
Playing a Title .......................................................................10
Playing a Chapter ...............................................................10
Camera Angle ......................................................................10
Chang}ng the Audio Language and/or fonT_at...10
Subtitles ...................................................................................10
Special VCD & SVCD Features ............................ 10
Playback Control (PBC) .................................................10
preview Function ...............................................................11
Picture CD & MP3 Playback
General Operation .................................................. 12
MP3 & jPEG Navigator ...................................................12
Play Mode ..............................................................................12
Special JPEG Features .............................................
Function Introduct on ......................................................
Prey ew Function ...............................................................
Zoom picture .......................................................................
Playback wth multi angles ............................................
Wipe Effect ...........................................................................
Special NP3 Features ..............................................
Function Introduction ......................................................
JPEG and MP3 simultaneous playback ................ 13
Setup Menu
Basic Operation ....................................................... 14
General Setup menu ............................................... 14
Disc Lock ................................................................................14
Program (not for Picture CD/MP3) ........................14
OSD language ......................................................................lS
Screen Saver-.........................................................................15
Audio Setup menu ................................................... 15
Speaker Setup ......................................................................1S
Digital Audio Setup ..........................................................16
Equalzer (Sound Mode) ................................................16
3D (Reved> Mode) ...........................................................16
Video Setup menu ................................................... 17
TV Type ..................................................................................17
TV Display .............................................................................17
Closed Capt on ...................................................................18
Progressive .............................................................................18
Picture Setting ......................................................................18
Password Setup ........................................................ 19
Preference Setup menu .......................................... 20
Audio language ...................................................................20
Subtitle language ................................................................20
Disc Menu language .........................................................20
Parental Control .................................................................21
Default Setup .......................................................................21
MR3/jPEG Navigator ........................................................21
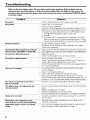
Troubleshooting ........................ 22
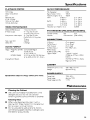
Specifications ............................. 23
Maintenance ............................... 23
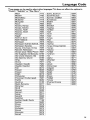
Language Code .......................... 24

Introduction
Thank you forpurchasingthis unit. This Owneds
Manual explainsthe basicoperation of this unit,
The regon code is 1 for U,S,A and
Canada models,
Since it is usual for DVD movies to
be released at differe_t times in
differeI_t regions of the world, all players have
region codes and discs can have an opt onal
region code, This unt can play discs containing the
dentical region code, or mentioned as region
"ALU'. Ifyou load a disc of a different region code
to this unit, you will see the region code notice on
the screen. The disc wll not playback, and should
be unloaded.
Environmental Information
This unLt consists of materials which can be
recycled and reused if disassembled by a
special sed company, Please observe the local
regular ons regarding the disposal of packaging
materials, exhausted battenes and old equ pment.
Supplied accessories
Remote control
Batteries (two AA size) for remote control
Audio/Video cable
Owner+s Manual
Cleaning discs
• When a disc becomes dirty, clean t with a
cleaning cloth. Wipe the disc from the centre out.
Do not wipe in a circular motion.
• Do not use solvents such as benzine, thinnec
commercially available cleaners, or ant}static spray
intended for analog records,
Symbols Used in this Manual
The below symbols appear in some headings and
notes with the following mean ngs:
- Description refers to playback of
DVD*video discs
- Description refers to playback of
_ Video CDs
IC D_ - Description refers to playback of
Audio CDs
SVCDI - Description refers to playback of
SuperVCDs
• Some DVD video discs require specific
functions or allow only limited functions
during playback.
• " _ "may appears on the TV screen
which means that the function is not
available on that specific DVD video disc.
Notes about discs
- This unit is designed for use wi_ DVD video,
Video CD, Super video CD, Audio CD, CD-R, CD-RW
(MP3 Supported), DVD+RW, DVD+R, DVD-R and
DVD-RW.
- CD-R and CD-RW cannot be played unless
finalized.
- Some discs cannot be played depending on the
recording conditions such as PC environment and
application software. The characteristics and
condition of the discs; materials, scratches,
curvature, and etc, may result in failure.
- Be sure to use only CD-R and CD-RW discs made
by reliable manufacturers.
- Do not use anynon standard shaped discs (heart,
etc.)
- Do not use disc with tape, scals, or paste on it,
damage to tile unit may result.
- Do not use a disc printed on its surface by a
commercially available label printer.
Manulbctured under license liorn Dolby Laboratories
"Dolby" and the doubleD symbol am tradema_K_ of
Dolby Laboratories
"DTS" and "DTS D_gltal Out" are trademarks of
Dsg_talTheater Systems, Inc
Thisproduct_nco_po_dtescopyrightp_ot_ction
technologythat _splotected by method rialtosof
ce_ainUS patents and otherintellectualptoperty
rightsownedby MacrowsionCu_po_dnonand other
nghtsowners.Use of thiscopyrightprotection
technologymust be authorizedby Mac_owslon
Co@oration,and isint_n@d {brhomeandother
I_mitedwewsngusesonlyunlessotherwiseauthonzed
by Macrows_onCo@orationReverseenglneenngor
@sassemblyis prohibited
2

Functional Overview
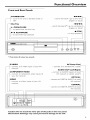
Front and Rear Panels
_ STANDBY/ON
to turn this unit to standby mode or
ON
DiscTray
& OPEN/CLOSE
to open/close the disc tray
If,-!II PLAYIPAUSE
to start/interrupt ptayback
search fomvard +/ go to the next
/
chapter or track I
[44144
search backward _ / go to a previous
chapter or track
• STOP
to stop playback
_Ii_!_+i!I_+!_:+i!I_+!iii!I_+!iii!I_+!iii!I_+!iii!I_+!iii!I_+!iii!I_+!iii!I_+!iii!I_+!iii!I_+!iii!I_+!iii!I_+!iii!I_+!iii!I_+!iii!I_+!iii!I_+!iii!I_+!iii!I_+!iii!I_+!iii!I_+!_iill!¸¸_!_!__!+i!!_i!_+i!I_+!_:+i!I_+!iii!I_+!iii!I_+!iii!I_+!iii!I_+!iii!I_+!iii!I_+!iii!I_+!iii!I_+!iii!I_+!iii!I_+!iii!I_+!iii!I_+!iii!I_+!ii_
* Pressbutton for about two seconds.
_ S-VIDEO
connect to S-Video input of your AV
rece vet
COMPONENTVIDEO
connect to component video inputs of
your AV receiver
l VIDEO
connect to Video inputs of your AV
rece ver
AC Power Cord
connect to a standard AC outlet l
AUDIO OUT (Left/Right) |
connect to AUDIO nputs of you+-
AV receiver or stereo system /
OPTICAL 1
connect to DIGITAL iNPUT of your
connect to DtOTAL iNPUT of you+-
AV receiver _
Caution: Do not touch the inner pins of the jacks on the rear panel.
Electrostatic discharge may cause permanent damage to the unit.

Functional Overview
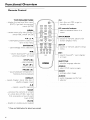
Remote Control
TOP MENU/RETURN I
display the top level dsc menu
L_
(DVD) / go back to previous
menu (VCD) _
MENU L
access menu of a disc (DVD) /
switch PBC on/off (VCD) L_
_tern in the menu
ENTER/OK
acknowledge menu selection
search backward* / go to
previous chapter or trac
STOP ( • )
stop playback
PLAY(_-)
start playback
PAUSE ( II )
pause playback temporarily /
frame-by frame playback
REPEAT
repeat chapter, track, title, disc /
shuffle chapter, track
A-B
repeat a specific segment
SCAN
preview the content of a track
or whole disc (VCD) / play the
first 6 seconds or less of each
track (CD)
MUTE
disable or enable sound output
(Z) GD (Z)
CD GD GD
(3D (Z) GD
_GD
OOO
_OOO
®11
turn ths unit ON or go to
standby-on mode
0-9 numeric buttons
select numbered items in a
menu
ON SCREEN
access or remove player's On
Screen Display menu
SETUP
access or remove player's setup
menu
search fox.Yard ÷ / next chapter
or track
SUBTITLE
subtitle language selector
ANGLE
select DVD camera angle
ZOOM
enlarge video image
AUDIO
audio language and for-mat
selector-
* Press and hold button for about two seconds.
4

Preparation
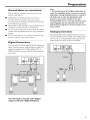
General Notes on connections
Never make or change connections with the
power sw tched on,
• Depending on the equipment you wish to
connect, there are various ways you could
connect this unit, Possible connections are shown
n the following draw ngs.
• Please _fer to the manuals of other equipmeut as
necessa_ 7 to make the best connections.
• DonotconnectthJsuntviayourVCRThevideo
qualty could be distorted by the copy protection
system.
• Do not connect th s unit's audio out jack to the
phono in iack of your audio system,
Digital Connections
This unit has COAXIAL and OPTICAL digital out
jacks. Connect one or both of them to your AV
recever equipped with Dolby digtal, DTS, or
HPEG decoder using each specific cable (separate
purchase),
Note:
- If theaudio format of thedigital output doesnot
match thecapabilitiesof yourreceiver,the receiver
willproducea strong,distortedsoundor nosoundat
al!.Make sure to selecttheappropriate audio
format at menu screenincludedonthe disc.
PressingAUDIO onceor moremay changenotonly
audiolanguagesbut alsoaudioformats, and the
selectedformat appearsfor severalsecondsontile
status window.
Analog Connections
Use aud o/v deo cable suppled with this untt to
connect AUDIO OUT L (left) and R (right) jacks
of this unit to con-esponding input jacks of your
audo equipment such as Stereo ampl Fief,
You will need to set this unit's digital
output to All (see 'Digital Output').

Preparation
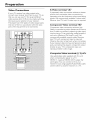
Video Connections
If your AV receiver has vdeo output jacks,
connect your receiver (and then to your TV) so
that you can use one TV for several d ffierent
video sources (LD, VGR etc,) by simply swrtching
the input source selector of your receiver
The player has th neetypes of video output jacks.
Use one of them in accordance with the input
jacks of the equipment to be connected,
S-Video terminal <A>
S (separate) video connect on achieves a dearer
picture than composite video connect on by
sepJat ng color- and luminance when transmitting
signals, Use commercially available S-video cable.
Receiver (and TV) w}th S-video }nput is required,
Component Video terminal <B>
Component video connection achieves high
fidelLty in reproducing colol_s (better perfon_ance
than Svdeo connect on), separating video signal
into luminance (Y, termina] color-coded as green),
and color difference (Pb, blue/Pr, red). Use
commercially avalable coaxial cables. Receiver
(and TV) wtth component input is required.
Observe the color of each jack when connect}ng.
If your receiver does not have compone_t output
jacks, connecting the player's component output
directly to your TV's component input can
reproduce better video image,
Composite Video terminal (1, 2) <C>
Use aud o/v deo cable suppled with this unit
when connecting the player to a TV.
VIDEO 1, 2 jacks of VIDEO OUT output the
same signal You can connect one to your
receiver's input using supplied Audio/Video cable,
and the other to another receiver or a TV.
6

Preparation
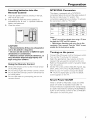
Inserting batteries into the
Remote Control
| Open the batter 7 cover by pressing in the t_b,
then lift off the coven
2 insert batteries with the correct poladty as
ndicated by the q- and -- symbols inside the
batte_7 compartment
3 Close the cover,
CAUTION!
- Remove batteries if they are exhausted or
not to be used for a long time.
- Do not use old and new or different types
of batteries in combination.
- Batteries contain chemical substances, so
they should be disposed off properly and
kept away from children.
Using the Remote Control
• Direct the remote control at the remote sensor
of the DVD player,
• Do not drop or £}ve the remote coutrol a shock.
• Do not leave the remote control }n extremely hot
or humid places.
• Do not spill water or- put anything wet on the
remote control
NTSC/PAL Conversion
This player is equipped with a NTSC/PAL
conversion featu re to convert the video output of
the dsc to match your TV system. The
conversions supported are as below, To activate
the conversion, refer to "TV Type":
NTSC NTSC PAL NTSC
DVD
PAL NTSC PAL _AL
NTSC NTSC PAL NTSC
VCD
PAL NTSC PAL _AL
Notes:
- "Multi" can only beselected when using a TV that
has both the NTSC and PAL systems.
- Slight picture distortions may occur due to this
conversion. This is normal. Thus, the "Multi" is most
suitable for the best picture quality.
Turning on the power
| ConnecL the AC power cord to tlTe power outlet.
2 Tum on the TV and your AV receiver.
3 Select the appropnate input source at the AV
receiver that was used to connect to this unit.
Refer to the equ}pment owner's manual for detail.
4 Tum this unit on,
5 Set the TV to the correct Video IN channel, (eg.
EXTI, EXT2, AV1, AV2, AUDIO/VIDEO, etc.
(Refer to your- TV owner's manual for- detail)
"_ The fi-ont display lishts up and the default
screen appes_s on the TV,
Smart Power On/Off
When in STOP or NO DISC mode, the DVD
player will sw_tch to standby mode after 15
minutes w_thout any operations for- saving energy,
k s easily reactivated by pressing the POWER or
PLAY on the remote control or the STANDBY/
ON button on the front panel,

Operation
Basic Playback
1 Press STANDBY/ON on the front panel to turn
on the DVD playen
2 Press • (OPEN/CLOSE) on the front panel to
open disc load ng tray,
3 Place the chosen disc in the tray, with the label
facing up,
4 Press • (OPEN/CLOSE) again to close the tray.
.4_ After recognizing ths disc, the player begin to
playback automatically,
Notes:
- DVDs may have a region code. Your player will
not play discs that have a region code different from
the region code of your player.
- If'Disc Lock'is set to LOCK and the disc inserted
is not authorized, the 6-digit code must be entered
and/or tile disc must be authorized (see 'Disc Lock').
General Operation
Note:Al! instructionsset out belowrefer to the
remotecontrol, unlessotherwisestated.
Video control during playback
STOP DV_ VC_ SV¢_._
You can resume the play from the poi_ at which
you stopped last tree, if you just press STOP
once. It will start from the beginning fyou press
STOP twice to stop playback,
PAUSE/STEP DV_ C_2 C_CO
| To get a still picture, press PAUSE during
playback.
2 To step forward to the next frame picture, press
PAUSE _gain,
3 To resume nomyal playback, press PLAY.
SKIP
1 Pressl_<or•_bdeflyduringplaybacktogoto
the next chapter/track or to return to the
beginning of the cumect chapter/tlack
respect@ely,
2 Press _ twice briefly to step back to the
previous chapter/track.
To go directly to any chapter/track, enter the
chapter/track number using the numenc buttons
and press ENTER/OK.
Note:Longpressof the I_< or •1_ tillswitch on
backwardor forward search.
SEARCH V_._ VCd._V_)C_._ SV_
1 To search the contents in fast speed, press • or
for fast folwal_/baclovard searching.
2 Press • or < again to increase the speed for
searching.
3 Press PLAY to return to normal playback
Slow Motion
To get a slow motion effect dunng playback, press
AorV,
Press • or • again, you can get different playback
forward/backward speeds.
Press PLAY to return to normal play back.
1 To get a slow motion effect dunng playback, press
2 Press • _gain, you can get different playback
forward speeds,
3 Press PLAY to return to normal play back.
Note:The SLOW BACKWARDfunction is not
availablefor VCD/SuperVCDdiscs.
Audio control during playback
MUTE DV_ C_C_ C_._SV.V_
1 Press HUTE to disable the sound output.
2 Press MUTE again to deactivate the mute,
2
3
Audio channel selection
Super VCD has two stereo audio channels which
ar_eused for playing karaoke or the audio language
selection. ( for- instance, you can choose one
channel for only the music background of the
song while you play the karaoke,)
Press AUDIO to select the aud}o channels you
want.
VCD has only one stereo audio channel, you can
select STEREO, HQNO LEFT, MONO RIGHT or
PflX-MONO by pressing AUDIO.
-l_ Stereo: Output the left and r_ght aud}o
channels of the disc through the left and right
audio jacks accordingly.
-l_ Mono Left: Output the left audio channels of
the d}sc through the left and right audio jacks.
8

Operation
Mono Right: Output the right audio channels
of the disc through the left and nght audio iacks.
-4_ MIX Hono: each of the audoiacks can output
the same audio effect as stereo.
Repeat and Shuffle
• Each time you press REPEAT, the RepeatJShuffle
mode changes as follows;
_ Chapter Repeat* _ Title Repeat _
Repeat/Shuffle Off _ Shuffle Repeat _ Shuffle
* This feature may not be available with some
discs,
Wth PBC OFF,
• Each time you press REPEAT, the RepeadShuffle
mode changes as follows;
Track Repeat _ Disc Repeat
_'RepeatiShuffle Off _ Shuffle Repeat 4- Shume_
Repeat A-B V___vc_ Cd___
DVD-Video Discs: repeat a sequence n a title
Video and Audio CDs: repeat a sequence n a
track
| Press Repeat AB at your chosen startng po}nt.
2 Press Repeat AB again at your- chosen end po}nt,
-4_ The repeat sequence begins,
3 To exit the sequence, press Repeat AB,
Disc Resume OV_ C__._D.._SV¢_ _
This player can resume playback of the last S discs,
even f the disc was qected or the power
swttched off,
l Load one disc, which is one of the last S discs.
2 Press PLAY when DVD player- is recognizing the
disc, If the information of this disc has been stored
}n the memor 7 of DVD player, tt will be played
back fl'om the stop po}nt last t}me.
OSD (On-Screen Display)
This function will provide some information about
your playingdisc on the screen.
• PressON SCREEN,
The Statuswindow appears on the TV,
TitlelChaptetiTrack selection DV_._ C___
1 PressAY to select"Title" or "Chapter" (DVD) or
"Track" (VCD),
2 PressENTER/OK
3 Select atitle, chapter-or track number usingthe
numeric buttons,
Time Search DV_ C_.._
1 Press AT to select "TF Time" or "CH
Time"(DVD) or "Track Time" or "Disc
Time"(VCD).
-IP "Tr Time" refers to the total t}me of the
current title, and the "CH T_me" refers to the
total time of the cumeut chapter.
2 Press ENTER/OK
3 Enter hours, minutes and seconds from left to
right using the numenc buttons. (e.g. 0:34:27)
Audio/SubtitlelAngle V_
You can change "Audio", "Subtitle" or "AngW' if
available on the disc you are playing.
| Press A_P"to select "Audio", "Subtitle" or "Angle".
2 Press ENTER/OK
3 For Audio and Subtitle,
Press AY to highlight your" select on and press
ENTER/OK.
0r
For Angle,
Select an angle using the numeric buttons.
Repeat/Time Display DVc__._VCcV._
1 Press AY to select "Repeat" or- "Tme Disp.',
2 Press ENTER/OK
3 Press AT to highlight your select on and press
ENTER/OK.
Time display
Each time you press ON SCREEN, the time
display changes as follows;
Total Elapsed _ Total Remain
"Single Remain _ Single ElapsZd_

Operation
Zoom Sv 9
The Zoom function allows you to change the
mage size,
1 Press ZOOM to actvate the function,
-_ Use AV4 I_ to yew other parts of the
zoomed picture,
"_ Playback will continue.
2 Press ZOOM repeatedlyto return to the odginal
size.
Special DVD Features
Playing a Title V_
A DVD disc maT haveone or more titles. This
depends on the content (a move, video clips,a
drama sedes,etc.) on the disc.
• After you load adisc, information about the
content shows on the sa_en warringfor your
selection.You canalsopressTOP MENU to turn
backto the t_tlemenu dunng playback,
-_ Pressthe appropriate numeric buttons or
AV41_ to highlightyour selection,
-_ PressENTER/OK to confimy.
Playing a Chapter
When you have selected atitle, it may include one
or more chapter_,
• Any tme you want to watch another chapter
during playback, press MENU to rum backto the
chapter menu (If disc has chapter menu).
-_ Press the appropmte numenc buttons or
AY4 I_ on the remote contrx)l to highl}ght your
selection.
-_ Press ENTER/OK.
-_ After a chapter has been selected, you also
can press _ or I_1_ to make a change.
Camera Angle v_
Some discs contain scenes which have been shot
simultaneously from various angles,
This DVD player allows you to select the desired
camera angle.
• Press ANGLE on your remote control.
Note: The function is available only for the DVD
discs which have several angles recorded.
1
2
Changing the Audio Language and/or
format
PressAUDIO repeatedly to selectthe different
languages.
Note:Thefunction wil!be activatedonlyif the DVD
isrecorded with multi-languageaudio tracks.
Subtitles DV_ _._
PressSUBTITLErepeatedlyto selectthe different
subtitles.
Note:Thefun_on willbea_vated, onlyif the DVD
or SuperVCDis recordedwithmulti-subtitles.
Special VCD & SVCD Features
Playback Control (PBC)
PBC function allows you to enter the index menu
which is used to select a track after loading the
VCD & SVCD disc,
If you waist to act}vate the function dudng the
playback or after pressing STOP twice,
Press MENU to set the PBC On,
-Ip Pay atte_tion to the hint on the sa_en,
Use 1_ or I_1_ to select the page you Ike.
-Ip Ifthe items of the index menus are numbered,
press the appropnate numenc buttons.
Press ENTER/OK.
Press RETURN to enter the index menu during
the playback.
Notes:
- Thecontent of the indexmenu dependson the
disc.Pleaserefer to thedisc'sinstructionsfor details.
- If the disc doesn'tincludethe PBCinformation,
thisfunction will haveno effect.
If you want to skip the index menu and
playback directly from the beginning,
PressMENU to sw}tch offthe [unction,
10

Operation
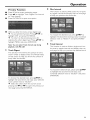
Preview Function
• Press SCAN to enter previewing menu.
• Press AV to highlight Track Digest, Disc Intewal
or Track I_terval,
• Press ENTER/OK to open one option,
2 Disc Interval
This function is used to divide a dsc into six parts
by regular intervals and display them on one p_e
to help you preview the whole disc.
• After you enter the menu of any dgest type,
-_ To quit preview funct on: Press AY4 • to
highlight EXIT and press ENTER/OK,
-_ To return to the preview ng menu for
selecting the other digest type: Press AV41 • to
highlight MENU and press ENTER/OK.
Note: Youcan selectTrack Intervalonly during
playback,withPBCOff.
t Track Digest
This funct on wll m n mize the picture of every
track in order to d splay every six of these track_
on the screen to help you know the content of
evel7 track on the disc.
- To choose the desired track, press AV4 • to
highlight the second line and input your numencal
selection next to "SELECT" and press ENTER/
OK
3 Track Interval
This funct on is used to divide a single track into
six parts by regular nter_zals and d splay them on
one page to help you preview the selected track.
- To choose the desired track, press AV4 • to
highlight the second Ine and input your selected
track number next to "SELECT".
-1_ Select the others from the current six by
pressing the 1414or ••l to open the previous or
next page and press ENTER/OK
- To choose the desired track, please press AW4 •
to highlight the second Ine and input your
numencal selection next to "SELECT" and press
ENTER/OK.
11

Picture CD & MP3 Playback
This playercanplaybackjPEGfore,at p cturesand
MP3 files on a personallyi_corded CD R/RW
disc or commercial CD, and s compatible with
Kodak Picture CD.
• Playbackpictures or songsone by one
automatically,
• Album and track selection.
• Repeat(disc/album/track/picture).
• Select any music or pictures fi-om the disc to
playbackthem together,
• Maximum files numbers inone folder s 500.
• Maximum files Programmable is100,
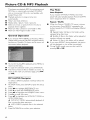
General Operation
• ffyouchooseW[THMENU nthe%tupMenu
(Please refer tothe MP3 &jPEG navigator below),
the Picture CD/MP3 CD menu will be shown on
the screen before playback,
Play Mode
Auto Playback
If you choose WITHOUT MENU, the DVD
player w IIautomatically playback Picture CD/MP3
CD in sequence when it is loaded.
Repeat / Shuffle
• When the Picture CD/MP3 CD menu is shown
on the screen, Press REPEAT repeatedly, the
button beside PLAY MODE will display different
option,
Repeat Folder: All files n this folder wll be
replayed time after tree.
-l_ Shuffle: All files n this folder will be played at
random without any repeat.
-_ Folder: All files in this folder will be played,
• If you press REPEAT dudng playback, the option
w}ll be displayed on the screen accordingly,
• Dudng Shuffle mode, you can skip tracks by
pressing _1_1or- I_l_t.
• AtanytimeduringjPEGplayback, pressMENUto
return to the menu.
• To open the selected foldec press ENTER/OK_
• The menu shows six files or folder's_t atime. To
move to the next (or previous) page, pressIH_
(or _<).
MP3 & JPEG Navigator
To select a different playback method, follow the
steps below,
1 At STOP mode, press SETUP to open the setup
menu.
2 Press < I_ to highlght PREFERENCE }con,
3 Press • to open the PREFERENCE menu.
4 Press A• to highlight the MP3/jPEG NAV menu,
5 Press !l_ to enter the menu,
6 Press A• to highlight the WITHOUT MENU or
WITH MENU item.
WITHOUT MENU: automatically playback all
flies in according date sequence.
WITH MENU: playback files }n the selected
folden
7 Press ENTER/OK to confim7 your- selection,
12

Picture CD & MP3 Playback
Special JPEG Features
Function Introduction
Picture CD is a disc wtth a collection of jPEG
format pictures, and all extension filenames
should end with ']PG'. The CD can be recorded
on any corn purer, and pictures may be from digital
camera or scanner if the customers prefer, they
can make this CD become a Digital Album.
You can choose any general function _troduced
n General Operation, besides, you also can,
• Display the thumbnails of 12 pictures.
• Zoom the picture.
• Rotatethe picture.
• R}p the picture vert cally or- horizontally.
• Scan pictures by different effects.
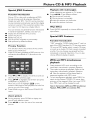
Preview Function
This funct on shows the content of the current
folder or the whole disc.
Press STOP dunng playback ofjPEG pictures. You
will see the thumbnails of 12 pictures on the
screen,
2 Press _141or •1_ to display the other pictures on
the next or the previous page.
3 Press AV4 • to highlight one of them and press
ENTER/OK to playback, or,
Move the cursor- to highlight _ on the
bottom of the page to start playback from the firat
picture on the current page.
4 Press MENU to go to the Picture CD/blP3 CD
menu,
Playback with multi-angles
When d splaying one Dcture on TV screen
Press AY4 • to get diffel_nt effects,
A: Flip the picture vertically.
V: Flip the picture honzontaily,
4: rotate the p cture anti clockwise,
• : rotate the picture clockwise.
Wipe Effect
• Press ANGLE repeatedly to choose d fFerent
wipe effects.
Special MP3 Features
Function Introduction
"MP3" stands for "MPEG Audio Layer- 3". and is a
part of the MPEG standard. A CD can store up to
I0 hours of MP3 audo, which is nearly 10 bmes
as much as an Audio CD. Each song _srecorded
as a file, You can choose any general function
introduced n General Operation. You can also
choose different playback speeds.
JPEG and MP3 simultaneous
playback
1 Firstly playback MP3 music accordng to the
instruct ons introduced n playback Selection.
2 Then select a picture to playback. ReFer to the
instructions introduced }n playback Selection,
-1_ Now the pictures will be played back }n
sequence together- wth MP3 music.
3 To quit simultaneous playback, prz'ss MENU to
return to the Picture CD/MP3 CD menu, then
pictures will be stopped. After that, press STOP,
then MP3 music wiil be stopped as wdl,
Note:InthefunctionofJPEGandMP3 Simultaneous
Playback,_1_1and•_ are invalidfor MP3.
Zoom picture
• Dunng playback_ press ZOOM to display the
picture with different scales,
• Press AV41 • to view the rest of the zoomed
picture.
13

Setup Menu
Basic Operation
I P_ss SETUPin Lhe_S_FQPmode to enLerLhe
Setup Menu
2 P_ss ENTER/OK to go LoLhenexLlevelsubmenu
or"conFml your"_lection.
3 P_ss 4 i_ to enLer"the submenuor _Wrn LoLhe
p_vFous menu,
4 P_ss &V LohighlighLLhedesi_d menu.
5 P_ss SETUPto quiLLheseLupmenu.
'-,1'When you quit the setup menu, LheseLtings
will bestood in the pl&yer'smemory even iFthe
player'is so,'dbshedbopower"Jl:
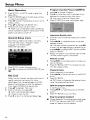
General Setup menu
Some seLLingsneed Lobe m_'.dein Lhismenu.
They arr-_:"Disc Lod,J',' Pr'ogr-am",'QSD
Language;'gnd "Sc_en Saver".
Follow the steps below
I P_ssSETUPto enLerLheseLupmenu.
2 P_ss'4 i_Lochc*:_ theGENEF_,LSETUPicon
Disc Lock
When bhedisc islocked; the [l&yer wil[ store its
spedl'¢ code inLoLhememory For FJture
identiFcatFon.R:_r¸the next playb_:k LheDVD
player v_ll prompt you to en_r LhepasswonJ.
Then, press ENTER]Qk: to load Lhedisc.
| P_ss &V Lohigh[ighL"Disc ½:_ck".
2 EnLer"i_ submenu by pressingI_.
-1' Lode Lock Lhedisc being played
-1' Unlock: unFockthe dsc.
3 P_ss 41to _turn to theGeneral Setup Page.
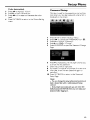
Program (not for Picture CDtMP3)
| press&V LOchoose 'Pr'ogr'grTi;',
2 PressI_ to move Lhecur'sor"to the fieldor the
SubmenuLOchoose Lheitem InpuLmenu.
-_ InpuLmenu: Enter the Progr_m item.
3 PressENTEFB/OKto enLerLhepn:&,ramp_e.
Input your favorite tr_k
I InpuLv'_JidL_ck number by pressingLhenumeric
butLons.
2 Press&V411_¸ Lomove thecu_or LoLhene_t
selecLed_:_iLh:_n
-_ [r"LheL_:k number ismor_ th&n_en;pressI_1_
h:_open the nell page_ndgo on programing, or
pressAV_ I_¸h:_highlighLNEXT buL_on,&nd then
pressENTEPJOI_
3 Repeal Lhissteps h:_input anoLher¸L_:k number¸
unLilthewho[e pn:_n is¢omplet_.
Remove _ trek
| Press_V_I i_ _:_move the cursor _oLheL_:kyou
w&nt _:_r_moye.
2 PressENTE_©I( or PLA_"_oremove this Lr_k
_:_mthe program menu.
Pl_yl_a_l_tracks
_v_en progr_ming is¢omplet_,
| PressAV_I i_ _omove Lhe¢u_or _othe START
button.
2 PressENTEPJOI_
-_ DVD pl&yerwill pl_yb_k the se[ected tr_cks
under¸the p_og_med sequence.
Quit the program pl_yb_k
In LhePn:_gm_mmenu,
I Press&_l I_ _omove thecursor _oLheEXIT
butLon.
2 PressENTEF_/01(to quiLthismenu
Stop the progr.a,rn pla,yba.cE
II Dudng playbackof bhepn:&,r_nr'_edLr_cks,pr'ess
5_FOPThen a0er"you press PLAv, the DVD
playerwill resume normal playback
t4

Setup Menu
Repe_t the program pl_yb_k
II Dur"ng playbackc#the pn:_gr-ammedb',:',d'4pr'ess
REPEAT.The program_Jtr_l,cscan be played
&_ n,
N_: If_u _e_ct Shu_em_debypcessbg_PFA T
_everal_m_, _ DVD l)l_:_r _nce?sprogram
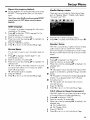
Audio Setup menu
Thee are itemsirm'ludedirTAudio SeLupPage
suchi_"Sped,-.erSetup'; 'DiAitsl Audio SeLup"
"E0uAlizer"arqd"3D".
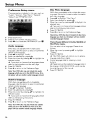
050 language
This OpLiorTiStOs_lecLa]_qgu_gefor'inforTnaLion
displayedon I%j _en.
I P_ss A'_ LohighlighL'OSD Language"in Lhe
Gene_a]SeWpmemJ.
2 EnLer}tssubmenu by pr'essingII..
3 Nove Lhecumor by pre_lng &V Lohighli_hLLhe
selecL'_dlangua,_...e.
4 P_ss FNTEWOK[o i:onrrm.
5 P_r'e_ss.II to _r'e_Wmto the General SeLupP_.ge.
Screen Saver
This RJrtcLiort[SUS_:gtO turn the screensa,',,eron
or or[..
I P_ss .,1,.'__ohighrighL'Sc_ert Saver"in Lhe
Genera] SeWpm¢nu.
EnLer"iLssubmenu by pr'essingII..
3 No're Lhecurs,or by pressing_._ LohighlighLLhe
selecLediLem.
'-,t"On: InSTOP or"No DISC mode, if no&€Lions
_,reperlbrmed wiLhin5-_ minuLes,the screen
_:ver will be _:tivated
orr' Screen saveris disabl_:d.
4 P_ss ENTEPdOK.
£_ss _1to _bJr-nLothe Ge_e_'_ S_[up P_.ge.
I PressSETUPto enLer"LheseLupmenu.
2 Press41I," h:_choos_ LheAUDIO SETUPicon
Speaker Setup
This r_enui:ontains£e[up optior_gr'o_your an_]o_
audio ouLpuL,such_s "Downm]<",' D.R.C."
(Dynamic RangeOsmpress[on) eL€.which rnak_
Lhesetup _vsLemrepn:_ui:@highquglily surr_:iund
,_:_und.
Downmix
I Press&V LohighlighLLhe"DownrniZ;
2 EnLer'i_ submenu bv pr-_sing Ib'.
3 Hove Lhecursor by pressing.i._ LohighlighLLhe
selecLediLem.
II LTiRT
-I, _his opLion should be us_:donly [ryour"DVD
player iscorTnecLedLoa Dolby Prolog[cdecoder.
-I' q_iSoptii.m \_,,itld_nm& Do[by D[gi_ _ignals
• VirLualSutt'ound
-_ Thisopdon wi[lreproducethesum:_und
channds"virtually,
4 PressENTEPdO14
5 Press_1to ReWmto theAudio SeWp Page.
D.R.¢, (D,/nar_c R_n_ Cor_r_ssion)
The DVD playem_ll compress the_mar_i¢ _,_q_e
of T_sound ouLpu__:_rlaLemighLlistening
I Press&V Lohig..hlighL'D.P-.C".
'2 EnLer'iL'_submenu by pressingI_.
3 Ho',,e Lhecursor by pressing.I,V _ohighlighLLhe
selecLediLem.
-I, On: EnableD.R.C.
-I. O_ Disable DR,C.
4 PressENTEPdO_
5 Press41to _r'e_Wrnto the Audio SeWp Page.
15

Setup Menu
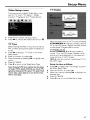
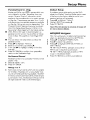
Digital Audio Setup
In Lhismenu, you c_n seLup LhedigiLalaudio
ouLpuLsignalFromLhedigiLaliack-s,suchascoaxial
eLc.
Digital Output
I P_ss &v Lohigh[ighLDigi[_l OuLpuL
2 EnLer.iL_submenu b'_pr'essingI_.
3 P_ss &'q" LohighlighLLheselecLed}Lem.
AIhOHgin_.]digi[31sign_.]souLpuL InLhismode,
all audio seL_in__epL MUFE _ in_.lid.
PCPI Orfly: Vyour receiver'isPCP1-
compatible, or"your.r_ceiver c_n no_decode
1"-'1PEG-2,Dolby Digital,or D,TS_audio choose bhis
opLion.
4 P_ss ENTEBTOK
5 P_ss 41and _urn _oLheAudio SeLupPage.
exc_ MUTE o_ei_v_sl_d.
LPCM Output
In Lhismenu, you c_n sel_cLPCM digi_ ouLpuL
beLween 4%Vz and %kH-"
I P_ss _'_ LohighlighLLheLPCM OuLpuL
2 EnLer"iLssubmenu by pr'essingI_.
3 Move Lhecur'sor by preying _'q" LohighlighLLhe
selecLediLem.
-I, 481( 961,-Hz('r&v&ilableon disc) PCM d_[:_
@'earn,,rill be i:onver'LedLo4_],.H-'.
-I, 961( IFLhe961,.Hzdisc iscopy proLecLed,Lhe
disi[:d ouLpu],will bemu_:d _ocomply wiLh _he
s_.dards,
4 P_ss ENTER!OK
5 P_rT,8_SS_1LO_rT,8_Wm_OLheAudio SeLupPage.
Equalizer (Sound Mode)
The "Equalizer allow you to selecLfrom v_r_ous
preseLmodes Lh_LconLPo]LheIrequenl_ bandsoF
_:_undLoopLimizece_[_irTmusicalsb_e¢
ILgr'_d enhancesLhee×ciLemerTLand enjo_merTL
of your _vour_Lemusic.
I Press_'_ LohighlighLLhe"Equ_li-'e¢',
2 EnLer'iLssubmenu "Sound Mode" by pressingI_.
3 PressI_.
4 Move Lhecursor by pressing,I,V LohighlighLLhe
selecLediLem.
-I, None: PlaybackLhedisc under Lheorigin_]
,93_und erl_i:_,
5 PressENTEB!OI_
6 Press_1_o_rT-3Wm_O_heAudio SeWp Page.
3D (Reverb Mode)
The "3D;' c_n simulate Lheechoes and
Irequeno/r'_._ponseo[some particular pl_cesso
as Lom_e you Feellike personallyon Lhepl_'.ce,
I Press_'_ LohighlighLLhe"3D",
2 EnLer"iLssubmenu "Reverb Mode'; by p_ssing i_
3 PressI_.
4 Move Lhecursor by pressing,I,V LohighlighLLhe
selecLediLem.
-I, OITPla_;bac],.Lhediscunder Lheoriginal s_:_und
erl_c_
5 PressENTEB!OI(,
Press_1_o_rT-3WmLO_heAudio SeWp Page,
t6
Page is loading ...
Page is loading ...
Page is loading ...
Page is loading ...
Page is loading ...
Page is loading ...
Page is loading ...
Page is loading ...
Page is loading ...
Page is loading ...
-
 1
1
-
 2
2
-
 3
3
-
 4
4
-
 5
5
-
 6
6
-
 7
7
-
 8
8
-
 9
9
-
 10
10
-
 11
11
-
 12
12
-
 13
13
-
 14
14
-
 15
15
-
 16
16
-
 17
17
-
 18
18
-
 19
19
-
 20
20
-
 21
21
-
 22
22
-
 23
23
-
 24
24
-
 25
25
-
 26
26
-
 27
27
-
 28
28
-
 29
29
-
 30
30


Ask a question and I''ll find the answer in the document
Finding information in a document is now easier with AI
Related papers
Other documents
-
Pioneer DV-525 Owner's manual
-
JVC XV-N322S Owner's manual
-
Sony DVP-NS715P Owner's manual
-
Sony DVP-NS725P Owner's manual
-
-
ONKYO DV-S939 User manual
-
Integra DVD Player DPS-9.1 User manual
-
-
Soundstream VIR-8000 Owner's manual
-