Page is loading ...

1
21.5-INCH VALUE TFT-LED
MONITOR
SM-F212

2
CONTENTS
1, General information .................................................................................... 3
1.1 Product description and type of use ..................................................................................... 3
1.1.1 General features ............................................................................................................. 3
1.2 Opening the box ................................................................................................................ 3
1.2.1 Contents of the box ......................................................................................................... 3
1.3 Warnings ........................................................................................................................... 3
1.3.1 Power ............................................................................................................................. 3
1.3.2 Safety precautions. .......................................................................................................... 3
1.3.3 Installation precautions ................................................................................................... 4
1.3.4 Cleaning the device ......................................................................................................... 4
1.3.5 Privacy and copyright ...................................................................................................... 4
2, INTERFACES, CONTROLS & SETTINGS .........................................................5
3, OSD MENU CONTROLS ................................................................................. 8
A. PICTURE .............................................................................................................................. 8
B. PC ...................................................................................................................................... 9
C. SOUND .............................................................................................................................. 10
D. SETTING ........................................................................................................................... 11
4, SPECIFICATION ........................................................................................... 12

3
1. GENERAL INFORMATION
Dear Customer,
Thank you for having purchased this product. This document describes how to install and use the LED
backlit LCD color monitor. Read this manual which contains information for correct, safe use carefully.
Keep this manual at hand so that you can refer to it when needed.
1.1 PRODUCT DESCRIPTION AND TYPE OF USE
The LED backlit LCD color monitor presents a very rugged structure. It is designed for continuous
operation and can be used in closed circuit TV systems without risks of excessive fatigue. The Flat Panel
Display has an active matrix, thin-film transistor (TFT), liquid crystal display (LCD).
1.1.1 GENERAL FEATURES
Ø DC 12V Power Input
Ø Display area
Ø Wall mounting VESA standard100*100mm (Not included bracket)
Ø Socket audio input for PC and BNC
Ø BNC Input
Ø VGA Input video input Interface
Ø HDMI Input video input Interface
Multilingual OSD menu for easy setting and optimization of the display
1.2 OPENING THE BOX
Check that the packing and the contents are not visibly damaged. Contact the retailer immediately if parts
are either missing or damaged. Do not attempt to use the device in this case. Send the product back in
its original packing if it is damaged.
1.2.1 CONTENTS OF THE BOX
Ø Monitor
Ø Remote Control
Ø Power Adapter
Ø Power cable
Ø HDMI cable
Ø User
’
s manual
Important Note: Accessories may be changed without prior notice.
1.3 WARNINGS
1.3.1 POWER
Ø Only use the power unit provided to power the device. Check mains rating before
plugging the power unit in.
Ø Do not pull the cable to unplug the device.
1.3.2 SAFETY PRECAUTIONS
Ø Keep the device away from rain and humidity to prevent risk of fire and electrocution. Do
not introduce material (solid or liquid) inside. If this should accidentally occur, disconnect the device

4
from the mains and have it inspected by qualified personnel.
Ø Never open the device. In all cases, contact the qualified personnel or authorized service
center for repairs.
Ø Keep the device away from children, to prevent accidental damage.
Ø Do not touch the device with wet hands to prevent electrical shock or mechanical
damage.
Ø Do not use the device if it should fall or the external casing is damaged. Risk of
electrocution if the device is used in such conditions. Contact the retailer or authorized installer.
Ø It is advisable to disconnect the power wire if the monitor is not used for a certain time.
1.3.3 INSTALLATION PRECAUTIONS
Ø To prevent overheating the device, arrange it in a position allowing the flow of air
through the slots in the casing. Ensure at least 5 cm of free space when installing inside a rack. For
the same reason, do not install sources of heat, such as radiators or hot air ducts. Keep away from
direct sunlight. Do not install in areas subject to excessive dust, mechanical vibrations or shocks.
Ø Do not arrange this device on an unstable surface, such as a tottering or slanted table.
The device could fall causing injury or mechanical failures.
Ø Do not install the device in a place where it could be exposed to humidity or water. Do
not direct a jet of water onto the device: risk of fire, electrocution or mechanical failure.
Ø Stop using the device if water or other material should penetrate inside: risk of fire and
electrocution. Contact the retailer or authorized installer.
Ø Slots and openings in the cabinet are provided for ventilation. These openings must not
be blocked or covered.
Ø Do not place heavy or heat generating objects on top of the device: this could damage
the casing and/or increase internal temperature causing faults.
Ø Do not cover the device with a cloth while it is running to prevent deforming the external
casing and overheating the internal parts: risk of fire, electrocution and mechanical failure.
Ø Keep magnets and magnetized objects away from the device to prevent faults.
Ø Do not use the device in presence of smoke, vapor, humidity, dust or intense vibrations.
Ø Wait for a while before operating a device immediately after transporting it from a cold
place to a warm place and vice versa. Wait on average for three hours: this will allow the device to
adapt to the new ambient (temperature, humidity, etc.).
Ø The monitor is provided with a plastic base and rubber feet. It can be positioned on a
horizontal surface, such as a desk or a table. Make sure that the device is fastened firmly and that it
is not resting on unstable supports or surfaces. Dropping could cause severe injury and damage the
device.
Ø Remember to adjust the brightness and contrast to obtain a perfect image.
Ø The monitor can also be installed on the wall by means of a bracket (not provided).
1.3.4 CLEANING THE DEVICE
Ø Rub delicately with a dry cloth to remove dust and dirt.
Ø Dip the cloth in neutral detergent if dirt cannot be eliminated with a dry cloth alone.
Ø Do not use volatile liquids (such a petrol, alcohol, solvents, etc.) or chemically treated
clothes to clean the device to prevent deformation, deterioration or scratches to the paint finish.
1.3.5 PRIVACY AND COPYRIGHT
Ø The monitor is a device for CCTV systems. Recording of images is subject to the laws in
force in your country. Recording of images protected by copyright is forbidden.
Ø Product users shall be responsible for checking and respecting all local rules and
regulations concerning monitoring and recording video signals. The manufacturing SHALL NOT BE
LIABLE for use of this product not in compliance with the laws in force.


6
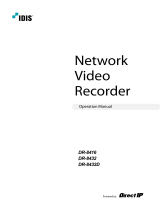
1, Source
Select an input source
2.
Menu
Enter the MENU, save theadjustment
of sub-menu and exit the OSD
3.
Left & Right ◄ (VOL) ►
Change the value on selected menu
4.
Up & Down ▲ ▼
Switch a menu on OSD
5.
Power
Monitor power on / off
6.
LED Indicator
Green color: monitor on
Red color : monitor off
7.
IR Receiver
All picture, sound settings and setup can be adjusted in OSD (On Screen Display) menu.
To adjust the OSD screen:
1. Press the MENU button to enter the OSD MENU.
2. Press the ◄ / ► buttons to select the desired main-MENU. The selected Main-MENU is
highlighted.
3. Press the ▲ / ▼ buttons to select the desired sub-MENU. The selected Sub-MENU
is highlighted.
4. Change the value you wish to adjust by using the ◄ / ► buttons.

7
5. Press the MENU button to confirm the adjustment on sub-MENU.
6. Press the MENU button to exit the sub-MENU and go back to the main-MENU.
7. Press the MENU button to exit the OSD MENU.
No Signal Input, please check with the input Sources of the monitor.
Press 'SOURCE' button on monitor or 'INPUT' button on remote controller.
Press ▲ / ▼ button to change input source and then press ► button to select input source on
monitor.
Press ▲ / ▼ button to change input source and then press 'INPUT' / ► buttons to select input
source on remote controller.
Press◄ / ► buttons to adjust volume on monitor.
Press◄ / ► buttons to adjust volume on remote controller.

8
If you connect any input source, monitor will display current input source resolution and frequency.
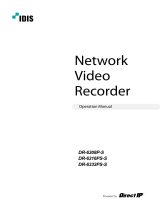
3. OSD MENU CONTROLS
A. PICTURE
Option
Function
Value
Picture Mode
Adjust the image color setting.
See table below
Contrast
Adjust the contrast
0 ~100
Brightness
Adjust the brightness
0 ~100
Color
Adjust the color saturation
0 ~100
Tint
Adjust the tint
0 ~100
Sharpness
Adjust the sharpness
0 ~100
Aspect Ratio
Adjust the video format
16:9, 4:3
Noise Reduction
Reduce noise of the display image
LOW/MIDDLE /HIGH /
DEFAULT / OFF
Color Temperature
Adjust the color setting
See table below
Picture Mode
Standard
Provide standard contrast and sharpness
Soft
Reduce contrast and sharpness
User
Apply user selected values - brightness, contrast, color and hue
Vivid
Provide enhanced contrast and sharpness

9
Color Temperature
Medium
Give the white color a neutral tint
Warm
Give the white color a reddish tint
User
1)
Set custom color temperature
Cool
Give the white color a blueish tint
1) To set custom color temperature (R,G,B values), select "USER" to set color temperature. Keep
pushing 'Down' button on the monitor or there mote controller, then you will see Red, Green
and Blue option.
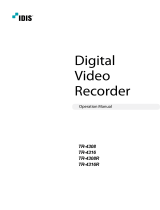
B. PC (only on VGA input interface)

10
Option
Function
Value
Auto Adjust
Fit the image setting automatically
Horizontal Pos.
Adjust the horizontal position of picture
0 ~100
Vertical Pos.
Adjust the vertical position of picture
0 ~100
Size
Adjust the display size
0 ~100
Phase
Reduce video distortion and instability components
0 ~100
C. SOUND
Option
Function
Value
Sound Mode
Select one of the presets
USER / SPORTS / MOVIE / MUSIC / STANDARD
Treble
Adjust the treble level
0 ~100
Bass
Adjust the bass level
0 ~100
Balance
Adjust the balance
-50 ~ +50
Surround Sound
Select sound effect
Surround, Off, SRS True Surround XT

11
D. SETTING
Option
Function
Value
OSD Language
Set the language of the OSD menu
English, Chinese
Restore User Default
Reset the monitor settings to the factory default
No Signal Screen
Show the color when there is
“
No signal
”
Blue, Black
No Signal Standby
Standby power when there is
“
No signal
On, Off
Prevent Burn-in
Set periodic image retention
On, Off
*Prevent-Burn-In Function is an innovative technology to prevent the After Image or Ghost Image
on the LCD while the monitor is running 365/24/7 for CCTV industry.

12
4. SPECIFICATION
Size & Type 21.5
”
LCD
Panel Type 21.5
”
LED Backlit Monitor
Pixel Pitch
0.24825 (H)x
0.24825(V) mm
Brightness (Max) 220cd/m
2
Contrast Ratio 1000:1 (Typ.)
Display Color 16.7 Million Colors
Viewing Angle
R/L: 85°/85°
U/D: 80 /80°
Response Time 5ms
Resolution 1920 (H) * 1080 (V)
Case Type Black Plastic
Active Display Area 476.64(H) x 268.11(V)
Aspect Ratio 16:9
Frequency 30-80KHz (H)/ 50-75Hz(V)
Color Temperature Medium / Warm / Cool / USer
Speaker
3W x 2
Operating Temp.
0~40°C
Weight
Net : 3.8 kg
Gross : 4.8 kg
INTERFACE
CVBS BNC Input *1 / Output*1
VGA*1, Audio Input*1
HDMI (High Definition Multimedia Interface )*1
Safety & EMC
Certification
CE / FCC / RoHS
Electrical Ratings
12V DC, 3A( AC 100-240V, 50/ 60 Hz )
Power Consumption
27W
Accessories HDMI cable, Power Supply & Cable, User
’
s Manual, Remote controller
Important Note: The specification may be changed without prior notice.

13

14

15

For more information, please visit
www.idisglobal.com
IDIS Tower, 344 Pangyo-ro
Bundang-gu, Seongnam-si
Gyeonggi-do
Republic of Korea
801 Hammond St, Ste 200
Coppell, TX 75019
U.S.A.
+82 (0)31 723 5400
+82 (0)31 723 5100
+1 469 444 6538
+1 469 464 4449
IDIS HQ IDIS America
T
F
E
T
F
E
T
F
E
T
F
E
T
F
E
1000 Great West Road
Brentford, Middlesex
TW8 9HH
The United Kingdom
+44 (0)203 657 5678
+44 (0)203 697 9360
IDIS Europe
De Slof 9
5107 RH
Dongen
The Netherlands
+31 (0)162 387247
+31 (0)162 311915
IDIS BeneLux
P.O. Box 341037
D-308, DSO HQ Bldg
Dubai Silicon Oasis
Dubai, UAE
+971 4 501 5434
+971 4 501 5436
IDIS Middle East
/