Page is loading ...


S7111 © 10/22 PAGE 2 OF 3
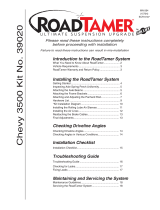
Figure 1
Removal of Stock System
1. Apply penetrating lubricant liberally to all exhaust fasteners, hangers and
rubber insulators.
2. Remove the two flange nuts securing the rear fascia to the trunk floor.
3. Remove the spring hardware from the driver-side muffler assembly.
Refer to Figure 1.
4. Remove the two driver-side muffler hanger assemblies from the frame.
Refer to Figure 2.
5. Remove the driver-side muffler assembly from the last rubber insulator and
carefully remove from the vehicle. It takes some twisting and turning.
6. Remove the two passenger-side muffler hanger brackets from the frame.
Refer to Figure 2.
7. Loosen the front clamps and the connecting bracket bolts at the rear of the
catalytic converters.
Refer to Figure 3.
8. Remove the remaining exhaust assembly from the last rubber insulator and
carefully remove from the vehicle. It takes two people and some twisting and
turning.
9. Remove the factory exhaust bezels from the fascia and re-install the plastic
filler panels.
Refer to Figure 4.
Installation of MBRP Performance Exhaust
1. Using the 2.25” Clamps, install the X-Pipe. The bent inlet pipe goes on
the driver-side. Do not fully tighten until all parts are installed. Mark two
lines on the X-Pipe outlet, one at 2” and one at 3” from the outlet. When the
Mufflers are installed and the system aligned the inlet should be between these
two lines.
Refer to Figure 5.
2. Support the X-Pipe and install the Mufflers, using two 2.5” Clamps.
Place a 2.5” Clamp on each Muffler outlet.
Refer to Figure 6.
Figure 2
Figure 3
Figure 4
Figure 5

S7111 © 10/22 PAGE 3 OF 3
Figure 6
3. Loosely install the Passenger-Side Under-Axle Pipe into the factory
rubber insulator and into the passenger-side Muffler. Place a 2.5” Clamp on
the pipe with the hardware to the front of the vehicle. Repeat for driver-side.
Refer to Figure 7.
4. Transfer the factory muffler hanger assemblies from the factory
muffler assemblies onto the corresponding locations on the MBRP Tail
Pipes. Passenger-side with ground strap shown.
Refer to Figure 8.
5. Place the Tail Pipes onto their corresponding Under-Axle Pipes and,
using the factory hardware, re-attach the factory hanger assemblies to the
frame. Driver-side shown.
Refer to Figure 9.
6. Using 2.5” Band Clamp, loosely install the Driver-Side Tip onto the
Driver-Side Under-Axle Pipe. Repeat for the passenger-side.
Refer to Figure 10.
7. Carefully align the system and tips. All rubber insulators should be on an
angle with the lower end toward the front of the vehicle to allow the system to
lower slightly as it grows with heat. Tighten all hardware and clamps, (do not
forget the connecting bracket at the catalytic converters) starting at the front
and working rearward to secure the system. Check along the full length of the
exhaust system to ensure there is adequate clearance for fuel lines, vent lines,
brake lines, frame, bodywork, suspension and any wiring, etc. If there is any
interference detected, relocate or adjust to provide adequate clearance. Ensure
all clamp connections are secure and components are unable to rotate or slide.
Band clamps require approximately 45 lb-ft (60 N-m) of torque. Verify
clearances, system security and band clamp torque after 30-60 miles (50-100
km) of driving.
Congratulations! You are ready to begin experiencing the improved power,
sound and driving experience of your MBRP Performance Exhaust. We
know you will enjoy your purchase!
Figure 7
Figure 8
Figure 9
Figure 10
/