Page is loading ...

104/237102-802E
Installation Manual
Installation & Appliance Set-Up
INSTALLER: Leave this manual with party responsible for use and operation.
OWNER: Retain this manual for future reference.
NOTICE: DO NOT DISCARD THIS MANUAL
Installation and service of this appliance should be performed by
qualified personnel. Hearth & Home Technologies recommends
HHT Factory Trained or NFI certified professionals.
GIFFORD WOOD INSERT
MODEL NUMBERS:
GIFFORD-CB
GIFFORD-BM
NOTE: To obtain a French translation of this manual, please
contact your dealer or visit www.vermontcastings.com
REMARQUE : Pour obtenir une traduction française de
ce manuel, s’il vous plaît contacter votre revendeur ou
visitez www.vermontcastings.com
• Donotstoreorusegasolineorotherammablevapors
and liquids in the vicinity of this or any other appliance.
• Donotoverre-Ifheaterorchimneyconnectorglows,
youareoverring.Overringwillvoidyourwarranty.
• Comply with all minimum clearances to combustibles
asspecied.
Failuretocomplymaycausehousere.
If the information in these instructions
is not followed exactly, a re may result
causing property damage, personal injury,
or death.
WARNING
HOT SURFACES!
Glass and other surfaces are hot during
operation AND cool down.
WARNING
Hot glass and appliance will cause burns.
• Do not touch glass until it is cooled
• Use leather gloves when reloading fuel
• NEVER allow children to touch glass
• Keep children away
• CAREFULLY SUPERVISE children in same room
as appliance.
• Alert children and adults to hazards of
high temperatures
• High temperatures may ignite clothing or other
ammablematerials.
• Keep clothing, furniture, draperies and other
ammablematerialsaway.
Fire Risk.
For use with solid wood fuel only.
Other fuels may over re and generate
poisonous gases (i.e. carbon monoxide).
WARNING

204/237102-802E
TABLE OF CONTENTS
Vermont Castings is a registered trademark of Hearth & Home Technologies.
1 Important Safety Information
A.InsertSafetyCertication.............................3
B.InsertEmissionsCertication..........................3
C.BTU&EciencySpecications........................3
D. Mobile Home Approved (USA only) .....................4
E. Electrical Rating ....................................4
F.GlassSpecications .................................4
G.Non-CombustibleMaterials ...........................4
H. Combustible Materials ...............................4
I.SleepingRoom .....................................4
J.California-Prop65 ..................................4
2 Getting Started
A
.DesignandInstallationConsiderations .................... 5
B. Draft .............................................5
C. Negative Pressure ..................................6
D. Tools And Supplies Needed ...........................6
E.InspectApplianceandComponents.....................6
F.InstallChecklist.....................................7
3 Dimensions and Clearances
A. Dimensions .......................................8
B. Clearances to Combustibles .........................10
4 Chimney Systems
A. Locating Your Stove & Chimney.......................12
B. Chimney Termination Requirements ...................13
C.2-10-3Rule ......................................13
D. Venting Systems ..................................14
E.Inspections.......................................14
F. Chimney Height / Rise and Run .......................14
G. Securing Chimney Components ......................14
H. Larger Chimneys . . . . . . . . . . . . . . . . . . . . . . . . . . . . . . . . . .15
I.MasonryChimney . . . . . . . . . . . . . . . . . . . . . . . . . . . . . . . . . .15
J. Metal Heat Circulating Masonry . . . . . . . . . . . . . . . . . . . . . . .16
K. Prefabricated Metal Chimney.........................16
L.OvalizingRoundStainlessSteelLiners . . . . . . . . . . . . . . . . .17
M. Altering the Fireplace...............................17
N.Zero-ClearanceFireplace ...........................17
Safety Alert Key:
• DANGER!Indicatesahazardoussituationwhich,ifnotavoidedwill result in death or serious injury.
• WARNING!Indicatesahazardoussituationwhich,ifnotavoidedcould result in death or serious injury.
• CAUTION!Indicatesahazardoussituationwhich,ifnotavoided,could result in minor or moderate injury.
• NOTICE:Indicatespracticeswhichmaycausedamagetotheapplianceortoproperty.
5 Appliance Set-Up
A.OutsideAirKit ........................................................................18
B. Securing Stove Pipe/Liner to Flue Collar ...............................19
C.OptionalOsetAdapter ..........................................................19
D. Securing Appliance to Stove Pipe/Liner ................................. 19
E. Flat Surround .........................................................................20
F. Cast Surround Assembly ........................................................21
G. Power Cord ............................................................................21
H. Surround Panel Extension ....................................................21
I. LevelingBolts........................................................................22
6 Mobile Home Installation ......................................................23
7 Reference Materials
A. Wiring Harness.......................................................................24
B. Firebrick .................................................................................24
C. Service and Maintenance Log ...............................................25
= Contains updated information

304/237102-802E
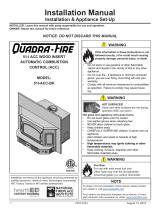
Model Number: GIFFORD-CB&GIFFORD-BM
Laboratory: PFSTECO
Report Number: 21-670
Type: Solid Fuel Type, Listed Room Heater
Standard: UL1482,ULCS628and(UM)84-
HUD, Mobile Home Approved.
EPA Certication
Number: 292-21
EPA Certied Emissions: 1.9 grams per hour
*LHV Tested Eciency: 70%
**HHV Tested Eciency: 65%
***EPA BTU Output: 23,800 to 27,400
****Peak BTU/Hour
Output: 37,400
Vent Size: 6inches
Firebox Size: 1.45cubicfeet
Recommended Log
Length: 18 inches
Fuel Seasoned Cord Wood
*WeightedaverageLHV(LowHeatingValue)eciency
using Douglas Fir dimensional lumber and data collected
during EPA emission tests in accordance with the
requirementsofCSAB415.1.LHVassumesthemoisture
is already in a vapor state so there is no loss in energy
to vaporize.
**WeightedaverageHHV(HighHeatingValue)eciency
using Douglas Fir dimensional lumber and data collected
during EPA emission tests in accordance with the
requirements of CSA B415.1. HHV includes the energy
required to vaporize the water in the fuel.
***ArangeofBTUoutputscalculatedusingHHVEciency
and the burn rates from the EPA tests, using Douglas Fir
dimensional lumber.
**** A peak BTU out of the appliance calculated using
themaximumrsthourburnratefromtheHighEPATest
and BTU content of seasoned cordwood (8600) times
theeciency.
Approved for ZC reboxes.
A. Insert Safety Certication C. BTU & Eciency Specications
NOTE: This installation must conform with local codes.
Intheabsenceoflocalcodesyoumustcomplywiththe
UL1482, (UM) 84-HUD and NPFA211 in the U.S.A. and
the ULC S628-93 and CAN/CSA-B365 Installation
Codes in Canada. NOT APPROVED FOR MOBILE
HOME INSTALLATIONS IN CANADA!
This wood appliance needs periodic inspection and repair
for proper operation. Consult the owner’s manual for further
information.Itisagainstfederalregulationstooperatethis
wood appliance in a manner inconsistent with the operating
instructions in the owner’s manual.
Model Number: GIFFORD-CB&GIFFORD-BM
Laboratory: PFSTECO
Report Number: 21-661
Standard: ASTME2780-10
Can be found at:
www.vermontcastings.com/about-us/epa-certication
B. Insert Emissions Certication
1 1 Important Safety Information
The GIFFORD-CB & GIFFORD-BM is
Certied to comply with 2020 crib wood
particulate emission standards.

404/237102-802E
D. Mobile Home Approved (USA only)
• This appliance is approved for mobile home installations
when not installed in a sleeping room and when an
outside combustion air inlet is provided.
• Thestructuralintegrityofthemobilehomeoor,ceiling,
and walls must be maintained.
• The appliance must be properly grounded to the frame
of the mobile home with #8 copper ground wire, and
chimneymustbelistedtoUL103HToralistedUL-1777
fulllengthsixinch(152mm)diameterlinermustbeused.
• Outside Air Kit, part OAK-ACC must be installed in a
mobile home installation.
E. Electrical Rating
Maximum1.5Amps(blower).96inchCord.
F. Glass Specications
This appliance is equipped with 5mm ceramic glass.
Replaceglassonlywith5mmceramicglass.Pleasecontact
your dealer for replacement glass.
G. Non-Combustible Materials
Material which will not ignite and burn, composed of any
combination of the following:
- Steel
- Plaster
- Brick
- Iron
- Concrete
- Tile
- Glass
- Slate
MaterialsreportedaspassingASTME136,StandardTest
Method for Behavior of Metals, in a Vertical Tube Furnace
of750°C.
H. Combustible Materials
Material made of/or surfaced with any of the
following materials:
- Wood
- CompressedPaper
- PlantFibers
- Plastic
- Plywood/OSB
- SheetRock(drywall)
Any material that can ignite and burn:ameproofedornot,
plasteredornon-plastered.
I. Sleeping Room
When an appliance is installed in a sleeping room an outside
air kit is required and it is recommended that a smoke and/
orCO alarmbe installedin thebedroom.The sizeof the
roommustbeatleast50ft³per1,000Btu/hrstoveinput
J. California - Prop65
This product and the fuels used to operate this product (wood), and the
products of combustion of such fuels, can expose you to chemicals
including carbon black, which is known to the State of California to
cause cancer, and carbon monoxide, which is known to the State of
California to cause birth defects or other reproductive harm. For more
information go to: WWW.P65Warnings.ca.gov
WARNING
Improper installation, adjustment, alteration, service or
maintenance can cause injury or property damage.
Forassistanceoradditionalinformation,consultaqualied
installer, service agency or your dealer.
Hearth&HomeTechnologiesWILLNOTwarrantystoves
that exhibit evidence of over-ring. Evidence of over-
ringincludes,butisnotlimitedto:
• Warped air tube
• Deteriorated refractory brick retainers
• Deterioratedbaeandotherinteriorcomponents
NOTE: Hearth & Home Technologies, manufacturer of
this appliance, reserves the right to alter its products,
theirspecicationsand/orpricewithoutnotice.
• Installationanduseofanydamagedappliance.
• Modicationoftheappliance.
• InstallationotherthanasinstructedbyHearth&Home
Technologies.
• Installation and/or use of any component part not
approved by Hearth & Home Technologies.
• Operating appliance without fully assembling
all components.
• Operatingappliancewithoutlegsattached(ifsupplied
with unit).
• DoNOTOverre-Ifapplianceorchimneyconnector
glows,youareoverring.
Anysuchactionthatmaycausearehazard.
Fire Risk.
Hearth & Home Technologies disclaims any
responsibility for, and the warranty will be
voided by, the following actions:
WARNING

504/237102-802E
2 2 Getting Started
A. Design and Installation Considerations
Before installing, determine the following:
• Type of chimney connector to be used
- Singlewall,6inch(152mm)diameter,stainlesssteel,
or
- Doublewall,6inch(152mm)diameter,stainlesssteel
• Reference Clearance to Combustibles on page 10.
• Power outlet located close by for optional blower
NOTICE: Hearth & Home Technologies assumes no
responsibility for the improper performance of the
appliance system caused by:
• Inadequatedraftduetoenvironmentalconditions
• Down drafts
• Tight sealing construction of the structure
• Mechanical exhausting devices
• Overdraftingcausedbyexcessivechimneyheights
• Idealperformanceiswithheightofchimneybetween
14-16 feet (4.26-4.88m) measured from the base of
the appliance.
B. Draft
Draftisthepressuredierenceneededtoventappliances
successfully. When a appliance is drafting successfully,
all combustion byproducts are exiting the home through
the chimney.
Considerations for successful draft include:
• Preventing negative pressure
• Location of appliance and chimney
To be sure that your appliance burns properly:
• During the burn, the chimney draft (static pressure)
shouldbeapproximately-0.07inchwatercolumn(W.C.)
• MeasuretheW.Cat6inches(152mm)abovethetopof
the appliance after one hour of operation.
Check building codes prior to installation.
• Installation MUST comply with local, regional, state
and national codes and regulations.
• Consultinsurancecarrier,localbuilding,reocials
or authorities having jurisdiction about restrictions,
installation inspection, and permits.
CAUTION
Asphyxiation Risk.
• DoNOTconnectthisunittoachimneyue
servicing another appliance.
• Do NOT connect to any air distribution
duct or system.
Mayallowuegasestoenterthehouse.
WARNING

604/237102-802E
D. Tools And Supplies Needed
Before beginning the installation be sure the following tools
and building supplies are available:
- Reciprocatingsaw
- Framingmaterial
- Pliers
- Hightempcaulkingmaterial
- Hammer
- Gloves
- Phillipsscrewdriver
- Framingsquare
- Flatbladescrewdriver
- Electricdrillandbits
- Plumbline
- Safetyglasses
- Level
- Tapemeasure
- Misc.screwsandnails
- 7/16socketorwrench
- 1/2-3/4in.length,#6or#8self-drillingscrews
E. Inspect Appliance and Components
• Remove appliance and components from packaging and
inspect for damage.
• Vent system components and doors are shipped in
separate packages.
• Report to your dealer any parts damaged in shipment.
• Read all the instructions before starting the installation.
Follow these instructions carefully during the installation
toensuremaximumsafetyandbenet.
C. Negative Pressure
Negative pressure results from the imbalance of air available
fortheappliancetooperateproperly.Itcanbestrongestin
lower levels of the house.
Causes include:
• Exhaust fans (kitchen, bath, etc.)
• Range hoods
• Combustion air requirements for furnaces, water heaters
and other combustion appliances
• Clothes dryers
• Locationofreturn-airventstofurnaceorairconditioning
• ImbalancesoftheHVACairhandlingsystem
• Upper level air leaks such as:
- Recessedlighting
- Attichatch
- Ductleaks
To minimize the eects of negative air pressure:
• Installtheoutsideairkitwiththeintakefacingprevailing
winds during the heating season
• Ensure adequate outdoor air for all combustion
appliances and exhaust equipment
• Ensure furnace and air conditioning return vents are not
located in the immediate vicinity of the appliance
• Avoid installing the appliance near doors, walkways or
small isolated spaces
• Recessed lighting should be a “sealed can” design
• Attic hatches weather stripped or sealed
• Attic mounted duct work and air handler joints and seams
taped or sealed
• Basement installations should be avoided
Asphyxiation Risk.
• Negative pressure can cause spillage
of combustion fumes, soot and
carbon monoxide.
• Appliance needs to draft properly for safety.
WARNING
Fire Risk.
Inspect appliance and components for
damage. Damaged parts may impair
safe operation.
• DoNOTinstalldamagedcomponents.
• DoNOTinstallincompletecomponents.
• DoNOTinstallsubstitutecomponents.
Report damaged parts to dealer.
WARNING
• Installationanduseofanydamagedappliance.
• Modicationoftheappliance.
• InstallationotherthanasinstructedbyHearth&Home
Technologies.
• Installation and/or use of any component part not
approved by Hearth & Home Technologies.
• Operating appliance without fully assembling
all components.
• Operatingappliancewithoutlegsattached(ifsupplied
with unit).
• DoNOTOverre-Ifapplianceorchimneyconnector
glows,youareoverring.
Anysuchactionthatmaycausearehazard.
Fire Risk.
Hearth & Home Technologies disclaims any
responsibility for, and the warranty will be
voided by, the following actions:
WARNING

704/237102-802E
ATTENTION INSTALLER:
Follow this Standard Work Checklist
This standard work checklist is to be used by the installer in conjuction with, not instead of, the instructions contained in this installation manual.
Customer:
Date Installed:
Lot / Address:
Location of Appliance:
Installer:
Dealer / Distributor Phone #:
Serial #:
Model:
WARNING! Risk of Fire or Explosion! Failure to install appliance according to these instructions can lead to a fire or explosion.
Appliance Install
Verified clearances to combustibles.
Appliance is leveled and connector is secured to appliance.
Hearth extension size/height decided.
Outside air kit installed.
Floor protection requirements have been met.
If appliance is connected to a masonry chimney, it should be cleaned and
inspected by a professional. If installed to a factory built metal chimney, the
chimney must be installed according to the manufacturer’s instructions and
clearances.
Chimney
Chimney configuration complies with diagrams.
Chimney installed, locked and secured in place with proper clearance.
Chimney meets recommended height requirements (14-16 feet).
Roof flashing installed and sealed.
Terminations installed and sealed.
Clearances
Combustible materials not installed in non-combustible areas.
Verified all clearances meet installation manual requirements.
Mantels and wall projections comply with installation manual requirements.
Protective hearth strips and hearth extension installed per manual requirements.
Appliance Setup
All packaging and protective materials removed.
Firebrick, baffle and ceramic blanket installed correctly.
All labels have been removed from the door.
All packaging materials are removed from inside/under the appliance.
Manual bag and all of its contents are removed from inside/under the appliance
and given to the party responsible for use and operation.
Hearth & Home Technologies recommends the following:
• Photographing the installation and copying this checklist for your file.
• That this checklist remain visible at all times on the appliance until the installation is complete.
Comments: Further description of the issues, who is responsible (Installer/Builder/Other Trades, etc.) and corrective action needed:
Comments communicated to party responsible ____________________________ by _____________________ on ___________
(Builder / Gen. Contractor) (Installer) (Date)
_________________________________________________________________________________
______________________________________________________________________________
______________________________________________________________________________
________________________________________________________________________
___________________________________________________________________________________
___________________________________________________________________
___________________________________________________________________________________
____________________________________________________________________________________
YES IF NO, WHY?
______________________________________
______________________________________
______________________________________
______________________________________
______________________________________
______________________________________
______________________________________
______________________________________
______________________________________
______________________________________
______________________________________
______________________________________
______________________________________
______________________________________
______________________________________
______________________________________
______________________________________
______________________________________
______________________________________
______________________________________
F. Install Checklist

804/237102-802E
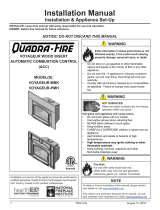
Figure 8.1-TopViewwithMediumSurround(SPG-4331)
2-3/8 in
(60mm)
26-1/2 in (673mm)
24 in (610mm)
15-15/16 in
(405mm)
Figure 8.4-TopViewwithSmallSurround(SPG-3828)
2-3/8 in
(60mm)
26-1/2 in (673mm)
24 in (610mm)
15-15/16 in
(405mm)
A. Dimensions NOTE:FlueCollarsizeis6inch(152mm)diameter(ID)
17-11/16 in
(449mm)
9-3/16 in
(233mm)
43 in (1092mm)
31 in
(789mm)
Figure 8.2-FrontViewwithMediumSurround(SPG-4331)
38-1/4 in (97 mm)
28 in (708 mm) 9-3/16 in
(233 mm)
17-11/16 in
(449 m)
Figure 8.5-FrontViewwithsmallSurround(SPG-3828)
Figure 8.3-SideViewwithMediumFlatSurround(SPG-4331)
15°
12-1/8”
(308mm)
19-3/4”
(502mm)
19”
(483mm)
Figure 8.6 -SideViewwithSmallSurround(SPG-3828)
15°
12-1/8”
(307mm)
19-3/4”
(502mm)
19”
(483mm)
3 3 Dimensions and Clearances

904/237102-802E
2-11/16 in
(68mm)
26-1/2 in (673mm)
24 in (610mm)
15-5/8 in
(397mm)
Figure 9.1-TopViewwithCastSurround
12-7/8”
(328mm)
22-5/8”
(575mm)
Figure 9.7 -SideViewwithCastSurround(MED-SM-CBorMED-
SM-BM)and Optional 15 DegreeAdaptersetat30°(DV-6DLR-
E15ADSS)
Figure 9.6 - Side View with Small or Standard Surround (SPG-
4331 or SPG-3828) and Optional 15 DegreeAdapter set at 30°
(DV-6DLR-E15ADSS)
13-3/16”
(335mm)
22-5/8”
(575mm)
15°
15-5/8”
(397mm)
11-3/4”
(299mm)
19-3/4”
(502mm)
19”
(483mm)
Figure 9.3-SideViewwithCastSurroung(MED-SM-CBor
MED-SM-BM)
38-7/8 in (987mm)
26-1/4 in
(667mm)
Figure 9.2-FrontViewwithCastSurround(MED-SM-CBorMED-
SM-BN)
21-3/8 in
(544mm)
12-3/16 in
(309mm)
Figure 9.4 - Side View with Small or Standard Surround (SPG-
4331orSPG-3828)andOptional15DegreeAdapter(DV-6DLR-
E15ADSS)
11-7/8 in
(302mm)
21-3/8 in
(544mm)
Figure 9.5-SideViewwithCastSurround(MED-SM-CBorMED-
SM-BM)andOptional15DegreeAdapter(DV-6DLR-E15ADSS)

10 04/237102-802E
HEARTH EXTENSION
(MINIMUM EMBER PROTECTION)
SIDE TRIM (3/4” max depth)
SIDE WALL
TOP TRIM (3/4” max depth)
24-1/4 in
(616mm)
23-3/4 in
(603mm)
42-1/2 in
(1080mm)
USA 33-1/2
CANADA 41-1/2 (1054mm)
Figure 10.1
HEARTH EXTENSION
(EMBER PROTECTION)
FIREPLACE FRONT SURFACE
MANTEL
(12” max depth)
44-3/4 in
(1137mm)
44-3/4 in
(1137mm)
USA 16-1/2
CANADA 18-1/2
(470mm)
Figure 10.2
Figure 10.3
C
DA
B
Minimum Opening Dimensions Inches Millimeters
AHeight 19-1/4 489
BFront Width (Steel Surround) 27 686
Front Width (Cast Surround) 27 686
CBack Width 24-1/2 622
DDepth (Steel Surround) 15-15/16 405
Depth (Cast Surround) 15-5/8 397
NOTE: If trim measurement is over 3/4 in (19mm) in
depth use mantle or side clearances to combustibles.
NOTE: Minimum opening dimensions include a 1/4 inch
(6mm)clearancearoundunit.
B. Clearances to Combustibles
In Canada a full length 6 inch (152mm) S635 ue liner
required as per ULC S628.
In USA a minimum 5 ft length (1.82m), 6 inch (152mm)
diameter ue liner is required as per UL 1482.
United States and Canada (UL and ULC)
Fire Risk.
• Comply with all minimum clearances to
combustiblesasspecied.
• Failuretocomplymaycausehousere.
WARNING

11 04/237102-802E
NOTE: Clearances may only be reduced by means
approved by the regulatory authority having jurisdiction
NOTE: Hearth Rug may be used in Suggested Area
0 to 4.5 inches from bottom of unit, thermal
protection required. R value of 2.9.
4.5 inches or more from bottom
of unit, ember protection only
required
Figure 11.1
Material
Thermal Resistance: R value
The R value is a measure of a material’s resistance to
heat transfer.
R value is convenient when more than one material is used
since you can add the R values together, whereas you can
not do this for k value.
The HIGHER the R factor means less heat is being
conducted through the non-combustible material to the
combustible material beneath it.
The R value of a material must be equal or larger then the
required R value to be acceptable.
Fire Risk.
• Comply with all minimum clearances to
combustiblesasspecied.
• Failuretocomplymaycausehousere.
WARNING

12 04/237102-802E
Recommended
Location
Marginal
Location
Location
Not
Recommended
Recommended
Location
Location NOT
Recommended
Multi-level Roofs
Windward
Leeward
Outside Air Kit Termination Cap
Figure 12.1
A. Locating Your Stove & Chimney
Locationoftheapplianceandchimneywillaectperformance.AsshowninFigure 12.1 the chimney should:
• Installthroughthewarmspaceenclosedbythebuildingenvelope.Thishelpstoproducemoredraft,especiallyduring
lightinganddiedownofthere.
• Penetratethehighestpartoftheroof.Thisminimizestheaectsofwindturbulenceanddowndrafts.
• Considertheappliancelocationinordertoavoidoorandceilingatticjoistsandrafters.
• Locate termination cap away from trees, adjacent structures, uneven roof lines and other obstructions.
Your local dealer is the expert in your geographic area and can usually make suggestions or discover solutions that will
easilycorrectyourueproblem.
4 4 Chimney Systems

13 04/237102-802E
C. 2-10-3 Rule
These are safety requirements and are not meant to
assure proper ue draft.
This appliance is made with a 6 inch (152mm) diameter
chimneyconnectorastheuecollarontheunit.
• Changing the diameter of the chimney can aect draft
and cause poor performance.
• It is not recommended to use osets and elbows at
altitudes above 4000 feet above sea level and or when
thereareotherfactorsthataectuedraft.
B. Chimney Termination Requirements
Follow manufacturer’s instructions for clearance, securing
ashing and terminating the chimney (Figure 13.1 and
Figure 13.2).
• Must have an approved and Listed cap
• Must not be located where it will become plugged by
snow or other material
• Must terminate at least 3 feet (91cm) above the roof and
atleast2feet(61cm)aboveanyportionoftheroofwithin
10feet(305cm).
• Must be located away from trees or other structures
NOTICE:
• Chimney performance may vary.
• Trees, buildings, roof lines and wind conditions
aectperformance.
• Chimney height may need adjustment if smoking or
overdraft occurs.
NOTICE: Locating the appliance in a basement or in
a location of considerable air movement can cause
intermittent smoke spillage from appliance. Do not locate
appliance near
• Frequently open doors
• Central heat outlets or returns
3 ft (91 cm)
Minimum
Less than 10 ft (305 cm)
2 ft (61 cm) 3 ft (91 cm)
Minimum
10 ft (305 cm) To Nearest Roofline
2 ft (61 cm)
Figure 13.1
Pitched Roof
Figure 13.2
10 ft. (305cm) or more
3 ft. (91cm) Minimum
Less than 10 ft. (305cm)
2 ft. (61cm) Minimum
3 ft. (91cm) Minimum
Wall or Parapet
Flat Roof

14 04/237102-802E
D. Venting Systems
Chimney Connector - It is also known as ue pipe or
stovepipe.Itmustbe6inches(152mm)minimumdiameter
stainless steel connector pipe.
Chimney - The chimney can be new or existing, masonry
or prefabricated and must meet the following minimum
requirementsasspeciedbelow.
In Canada a full length 6 inch (152mm) S635 ue liner
required as per ULC S628.
In USA a minimum 5 ft length (1.82m), 6 inch (152mm)
diameter ue liner is required as per UL 1482.
E. Inspections
Existing chimneys should be inspected and cleaned by a
qualiedprofessionalpriortoinstallation.Thechimneymust
not have cracks, loose mortar or other signs of deterioration
and blockage. Hearth & Home recommends a NFI or CSIA
certied professional or a technician, under the direction
ofacertiedprofessional,conductaLevelIIinspectionper
NFPA 211.
F. Chimney Height / Rise and Run
This product was designed for and tested on a 6 inch
(152mm) chimney, 14 to 16 feet (420-480cm) high,
(includes appliance height) measured from the base of the
appliance. The further your stack height or diameter varies
from this conguration, the greater the likelihood it may
aectperformance.
Chimneyheightmay need tobeincreasedby2 - 3%per
each1000feetabovesealevel.Itisnotrecommendedto
useosetsorelbowsataltitudesabove4000feetabovesea
levelorwhenthereareotherfactorsthataectuedraft.
LINER CONNECTOR
FLUE
GAS
DIRECTION
CRIMPED
END
TOWARDS
STOVE
Figure 14.1
G. Securing Chimney Components
All joints should be secured with 3 sheet metal screws or
rivets per pipe manufacturers instructions. The sections
must be attached to the insert and to each other with the
crimped (male) end pointing toward the insert (Figure 14.1).
WARNING
Risk of Fire!
Follow venting manufacturer’s clearances
and instructions when installing venting
system.
Fire Risk
InspectionofChimney:
• Chimney must be in good condition.
• Meets minimum standard of NFPA 211
• Factory-built chimney must be 6 inch
(152mm)UL103 HT.
WARNING
Asphyxiation Risk.
• DO NOT CONNECT THIS Appliance
TO A CHIMNEY FLUE SERVICING
ANOTHERAPPLIANCE.
WARNING
• DO NOT CONNECT TO ANY AIR DISTRIBUTION
DUCTORSYSTEM.
Mayallowuegasestoenterthehouse.
Improper installation, adjustment, alteration, service
or maintenance can cause injury or property damage.
Refer to the owner’s information manual provided with
this appliance. For assistance or additional information
consultaqualiedinstaller,serviceagencyoryourdealer.
WARNING
Fire Risk.
Follow venting manufacturer’s clearances and
instructions when installing venting system.
WARNING

15 04/237102-802E
• Must meet minimum standards of NFPA 211.
• Musthaveatleast5/8inch(16mm)reclayliningjoined
with refractory cement (Installations into a clay ue
without a stainless steel liner may reduce draw which
aectsperformance,willcausetheglasstodarkenand
produce excessive creosote).
• The masonry wall of the chimney, if brick or modular
block, must be a minimum of 4 inches (102mm) nominal
thickness.
• A chimney of rubble stone must be at least 12 inches
(305mm)thick.
I. Masonry Chimney
This insert conforms with the UL 1482 and ULC S628
(Canada) in all respects, and is approved to UL &
ULC safety standards for installation and use within
areplacewitha masonry chimneyinaccordancewith
NFPA 211 and CAN/CSA-B365-01.
UL 1777 Insulated Stainless Steel
Liner or Other Approved Lining System
Follow Manufacturer’s Instructions
on Insulation and Support
For Zero or Other Non-Code Clearances,
Follow Approved Liner Manufacturer’s Specific
Insulation Requirements: Different Clearances
May Require Different Specifications
Masonry Chimney Must
Have Structural Integrity
UL 1777 Insulated Stainless Steel
Liner or Other Approved Lining System
Minimum 8 in. (203mm) Masonry
Thickness in Front of Smoke Chamber
Damper Plate Removed or
Fastened in Open Position
Seal with Non-Combustible Material
Minimum Clearance in Accordance
with Insert Listing
Floor Protection in
Accordance with Insert
Listing
Follow Manufacturer’s
Instructions for Maximum
Liner Extension Above
Chimney
Maximum 30 Degrees
Offset in Chimney
Combustible Floor
Figure 15.1-GenericInsertModelShowninIllustration
NOTE:InCanada,thisreplaceinsertmustbeinstalled
with a continuous chimney liner of a 6 inch (152mm)
diameterextendingfromthereplaceinserttothetopof
the chimney. The chimney liner must conform to the
Class 3 requirements of CAN/ULC-S635, Standard for
Lining Systems for Existing Masonry or Factory-Built
Chimneys and Vents, or CAN/ULC-S640, Standard for
Lining Systems for New Masonry Chimneys.
NOTICE: Check with your local building authorities and/
or consult the National Fire Protection Association
(NFPA 211).
H. Larger Chimneys
Itisrecommendedthatchimneyswithlargerdiametersthan
6inches(152mm)berelined.Anoversizeduecanaect
draftandimpairperformanceandwillallowincreasedbuild-
up of creosote.
• Cross-sectional area shall conform to NFPA 211-2006
Section 12.4.5.1.
• Shouldbelinedwitha6inch(152mm)stainlesssteelue
linertoimproveperformanceandreducecreosotebuild-
up.
• An equivalent liner must be a listed chimney liner system
or other approved material.
• No dilution air is allowed to enter the chimney.
a. Securethereplacedamperintheopenposition.If
this cannot be accomplished, it will be necessary to
remove the damper
b. Seal damper area of chimney around chimney
connector with a high temperature sealant or seal
insertagainstthefaceofthereplace.
c. Both methods must be removable and replaceable
forcleaningandre-installation.
• When possible, install an airtight clean-out door to the
rear of the smoke shelf.

16 04/237102-802E
J. Metal Heat Circulating Masonry
This insert conforms with the safety standard UL-1482 and
ULC S628 (Canada) in all respects and is approved to UL
& ULC safety standards for installation and use within a
replacewithmasonrychimney,inaccordancewithNFPA
211,withadirectuecollarconnection.
K. Prefabricated Metal Chimney
The chimney can be new or existing, masonry or prefabricated
and must meet the following minimum requirements:
• Must be minimum 6 inch (152mm) inside diameter of
high temperature chimney listed to UL 103 HT (2100°F)
or ULC S628.
• Must use components required by the manufacturer
for installation.
• Must maintain clearances required by the manufacturer
for installation.
• Refer to manufacturers instructions for installation
• This insert is listed to UL 1482 Standard and is approved
for installation into listed factory-built zero clearance
replaces listed to UL 127 conforming to the following
specicationsandinstructions:
• The original factory-built clearance replace chimney
cap must be re-installed after installing the approved
chimney liner meeting type UL 103 HT requirements
(2100°F)perUL 1777.
• IfthechimneyisnotlistedasmeetingHTrequirements,
orifthefactorybuiltreplacewastestedpriorto1998,a
full height listed chimney liner must be installed from the
applianceuecollartothechimneytop.
• The liner must be securely attached to the insert ue
collar and the chimney top.
• Theairowofthefactory-builtzero-clearancereplace
system must not be altered. The ue liner top support
attachmentmustnotreducetheairowfortheexisting
air-cooledchimneysystem.
Figure 16.1 - GenericInsertModelShowninIllustration
Minimum 8” (203mm) Masonry Thickness
in Front of Smoke Chamber
Damper Plate Removed or
Fastened in Open Position
Seal with Non-
Combustible Material
Minimum Clearance in Accordance with
Insert Listing
Floor Protection in
Accordance with Insert
Listing
Combustible Floor
Airtight Insulated Clean-Out
Stainless Steel Chimney Connector
Must Extend to Flue Liner
Flue Liner with Required Air Space
NOTICE:InCanadawhenusingafactory-builtchimneyit
must be safety listed, Type UL103 HT (2100°F) [1149°C]
CLASS “A” or conforming to CAN/ULC-S629M,
STANDARD FOR 650°C FACTORY-BUILT CHIMNEYS.
NOTE: Refer to chimney liner manufacturer for
recommendationsonsupportingtheliner.Installationinto
replaceswithoutapermitwillvoidthelisting.
• No dilution air is allowed to enter the chimney.
a. Securethereplacedamperintheopenposition.If
this cannot be accomplished, it will be necessary to
remove the damper.
b. Seal damper area of chimney around chimney
connector with a high temperature sealant or seal
insertagainstthefaceofthereplace.
c. Both methods must be removable and replaceable
forcleaningandre-installation.
Fire Risk.
Whenliningair-cooledfactory-builtchimneys:
• Run chimney liner approved to UL 1777
Type HT requirements (2100°F)
• Re-install original factory built chimney
capONLY.
WARNING
• DONOTblockcoolingairopeningsinchimney.
• Blocking cooling air will overheat the chimney.
Table 16.1
Minimum Opening Dimensions Inches Millimeters
AHeight 19-1/4 489
BFront Width (Steel Surround) 27 686
Front Width (Cast Surround) 27 686
CBack Width 24-1/2 622
DDepth (Steel Surround) 15-15/16 405
Depth (Cast Surround) 15-5/8 397

17 04/237102-802E
L. Ovalizing Round Stainless Steel Liners
Ovalizingroundstainlesssteellinerstoaccommodatethe
linerpassingthroughthedamperregionofareplaceisan
allowable and acceptable practice.
Ensure that the ovalization is minimized to the extent
requiredtotthroughthedamper.
M. Altering the Fireplace
The following modications of factory-built replaces
are permissible:
• The replace must not be altered. Cutting any sheet
metalpartsofthereplaceinwhichthereplaceinsertis
to be installed is prohibited per ANSI Z21.88 except that
thedampermayberemovedtoaccommodateadirect-
connect starter pipe or chimney liner,
• External trim pieces which do not aect the operation
ofthereplacemayberemovedprovidingtheycanbe
stored on or within the replace for reassembly if the
insert is removed.
• The permanent metal warning label provided in the
component pack must be attached to the back of the
replace,withscrewsornails,statingthatthereplace
may have been altered to accommodate the insert,
and must be returned to original condition for use as a
conventionalreplace(Figure 17.1).
• Ifthehearthextensionislowerthanthereplaceopening,
the portion of the insert extending onto the hearth must
be supported.
• Manufacturer designed adjustable support kit can be
ordered from your dealer.
• Final approval of this installation type is contingent upon
the authority having jurisdiction.
The following parts may be removed:
Damper SmokeShelforBae
Ember Catches Fire Grate
Viewing Screen/Curtain Doors
N. Zero-Clearance Fireplace
Apermitmayberequiredforinstallations,nalapprovalis
contingent of the authority having local jurisdiction. Consult
insurancecarrier,local building, reocials orauthorities
having jurisdiction about restrictions, installation inspection,
and permits.
Inspecttheexistingreplaceandchimneyforanydamage
orawssuchasburnouts,metalorrefectorywarping.
Inspection to a minimum of NFPA 211 Level II is
recommended. All repairs must be made prior to installing
aninsert.Thereplacemustbestructurallysoundandbe
abletosupporttheweightofthesolid-fuelinsert
Thefactory-builtchimneymustbelistedperUL 127 or ULC
610-M87for all installations.Installthermal protectionper
this appliance listing requirements.
Afullheight6inchdiameterstainlesssteelfullheightlisted
chimneylinermustbeinstalledmeetingtypeHT(2100°F)
requirements per UL 1777 (USA) or ULC S635 with “0”
clearance to masonry (Canada). The full liner must be
attachedtotheinsertuecollarandtothetopoftheexisting
chimney.
Theuelinertopsupportattachmentmustnotreducethe
air ow for the existing air-cooled chimney system. Re-
install original factory-built chimney cap only; see section
on Prefabricated Metal Chimneyonpage16.
To prevent room air passage to the chimney cavity of the
replace,sealeitherthedamperareaaroundthechimney
liner or the insert surround. Circulating air chamber (i.e. in a
steelreplacelinerormetalhearthcirculatory)maynotbe
blocked.Theairowwithinandaroundthereplaceshall
not be altered, blocked by the installation of the insert. (i.e.
no louvers or cooling air inlet or outlet ports may be blocked
by the insert or the insert surround.
See Altering the Fireplace for modications allowed for
factory-builtreplaces.
WARNING
THIS FIREPLACE MAY HAVE BEEN ALTERED
TO ACCOMMODATE AN INSERT. IT MUST BE
RETURNED TO ITS ORIGINAL CONDITION
BEFORE USE AS A SOLID FUEL BURNING
FIREPLACE. 250-2061
Figure 17.1
Asphyxiation Risk.
DONOTconnectthisappliancetoachimney
ueservicinganotherapplianceortoanyair
distribution duct or system.
This may allow ue gases to enter
the house.
WARNING

18 04/237102-802E
Figure 18.1
Figure 18.2
A. Outside Air Kit
A source of air (oxygen) is necessary in order for combustion
to take place. Whatever combustion air is consumed by the
remustbereplaced.Airisreplacedviaairleakagearound
windowsandunderdoors.Inhomesthathavetightlysealed
doors and windows, an outside air source is needed.
Installation Instructions
1. Ensure existing access hole in replace will not be
covered by the appliance. Existing outside air intake hole
maybeunder,attherear,orsideofappliance.Outside
air may also enter down existing chimney chase in some
situations.
2. Remove screws holding outer covers in place. Place
outside air plates in channel as shown (outside air plates
arelocatedincomponentpack).Re-installoutercovers,
Figure 18.2.
3. Level and install appliance. After installing the appliance,
seal the replace opening and trim package with
insulation to prevent air leakage into the room.
5 5 Appliance Set-Up
Fire Risk. Asphyxiation Risk.
Do not draw outside combustion air from:
• Wall,oororceilingcavity
• Enclosed space such as an attic or garage
• Close proximity to exhaust vents
or chimneys
Fumes or odor may result
WARNING
Asphyxiation Risk.
Length of outside air supply duct shall NOT
exceed the length of the vertical height of the
exhaustue.
• Fire will not burn properly
• Smoke spillage occurs when door is
opened due to air starvation.
WARNING
Asphyxiation Risk.
Outside air inlet must be located to prevent
blockage from:
• Leaves
• Snow or ice
• Otherdebris
WARNING
Blockage may cause combustion air starvation. Smoke
spillagemaysetoalarmsorirritatesensitiveindividuals.

19 04/237102-802E
Flue Collar Stove Pipe/Liner
Gasket
Figure 19.1
B. Securing Stove Pipe/Liner to Flue Collar
1. There are 4 already drilled holes in the ue collar 90
degrees apart.Attach the ue collar to the stove pipe/
liner. If the seal is questionable use high temperature
sealant such as stove mastic (Figure 19.1).
2. Attachgaskettobottomsideofuecollarwithathincoat
of silicone.
C. Optional Oset Adapter
OptionaluseofaSimpsonDuravent15°Universal Elbow
PartNumber4615maybepurchaseddirectlythroughyour
local Simpson Duravent Pipe Distributor or from your local
VermontCastingsdealer,PartNumberDV-6DLR-E15ADSS.
Figure 19.2 shows a vertical installation and also how to
createanoptional30°elbowinstallation.
The 15° elbow may be secured directly to the ue collar.
Follow the pipe manufacturer’s instructions for using
screws or rivets for attachment. Most pipe manufacturer’s
6inch(152mm)diameteruelinersmaybeattacheddirectly
tothetopofthe15°elbow.
30°
Vertical
30 Degree
Figure 19.2
5/16 Nuts
Attachment
Bar
5/16 Bolts
Figure 19.3
D. Securing Appliance to Stove Pipe/Liner
1. Onceyouhavetheapplianceinplaceandsecured,reach
upthroughtheueopeningandgrabtheattachmentbar
andpulldowninsideueopening(Figure 19.3).
2. Insert the 5/16 bolts inside the cast ue and through
the chimney mounting bar. Securely tighten the nuts.
Fasteners are provided.
3. Re-install the tube channel assembly, bae board,
ceramicblanketandbaeprotectionchannel.
NOTE: These are generic drawings and may not
representyourspecicmodel.

20 04/237102-802E
Figure 20.4
E. Flat Surround
Overall Dimensions Part Number
Small Size 38” x 28” SPG-3828
Standard Size 43” x 31” SPG-4331
1. Lift surround to front of appliance (Figure 20.1).
Figure 20.1
Sides: through cut outs
on sides and then down
Figure 20.3
Trim Kit
Option
Flat
Surround
Figure 20.5
NOTE:Mayneedtopullapplianceawayfromreplaceto
clearmantleasyouslidethetrimovertheatsurround.
Figure 20.2
Corner Brackets
6. Ifneededpushappliancebackintoreplace.
5. Installtwosteelspringsoneachsideoftheatsurround
towards the bottom and the assembled trim kit (Figure
20.5).
4. Install two steel springs at the top on each side and
betweentheatsurroundandtheassembledtrimkitas
shown in Figure 20.4
3. SlidetrimoveratsurroundasshowninFigure 20.3.
2. Assemble trim as shown in Figure 20.2.
/