Charbroil 08601558 Owner's manual
- Category
- Barbecues & grills
- Type
- Owner's manual
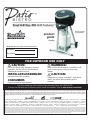
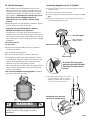
Charbroil 08601558 is a gas grill designed for outdoor use. It features a spacious cooking area, providing ample space to grill a variety of foods for family and friends. The grill is equipped with a durable porcelain-coated grate that ensures even heat distribution and prevents food from sticking. With its simple ignition system, you can easily start grilling with just a push of a button. The adjustable burners allow you to control the heat intensity, making it suitable for both searing and slow cooking.
Charbroil 08601558 is a gas grill designed for outdoor use. It features a spacious cooking area, providing ample space to grill a variety of foods for family and friends. The grill is equipped with a durable porcelain-coated grate that ensures even heat distribution and prevents food from sticking. With its simple ignition system, you can easily start grilling with just a push of a button. The adjustable burners allow you to control the heat intensity, making it suitable for both searing and slow cooking.


-
 1
1
-
 2
2
-
 3
3
-
 4
4
-
 5
5
-
 6
6
-
 7
7
-
 8
8
-
 9
9
-
 10
10
-
 11
11
-
 12
12
-
 13
13
-
 14
14
-
 15
15
-
 16
16


Charbroil 08601558 Owner's manual
- Category
- Barbecues & grills
- Type
- Owner's manual
Charbroil 08601558 is a gas grill designed for outdoor use. It features a spacious cooking area, providing ample space to grill a variety of foods for family and friends. The grill is equipped with a durable porcelain-coated grate that ensures even heat distribution and prevents food from sticking. With its simple ignition system, you can easily start grilling with just a push of a button. The adjustable burners allow you to control the heat intensity, making it suitable for both searing and slow cooking.
Ask a question and I''ll find the answer in the document
Finding information in a document is now easier with AI
Related papers
-
Charbroil 12101550 Owner's manual
-
Charbroil 12101480 Owner's manual
-
-
Char-Broil THE BIG EASY 7101366 User manual
-
-
-
Charbroil 463731008 User manual
-
-
-
Other documents
-
-
-
Thermos 461821707 Owner's manual
-
Thermos 461630208 Owner's manual
-
Char-Broil 11101706 User manual
-
Char-Broil TRU-Infrared Grill2Go X200 User manual
-
-
-
Char-Broil 12701705 Datasheet
-
 Rankam TF2049101-KK-01 Owner's manual
