Canon Powershot SD30 User guide

Category
Bridge cameras
Type
User guide

This manual is also suitable for

Canon PowerShot SD30: Capture stunning images and videos with ease. With its user-friendly features and versatile shooting modes, this compact camera is perfect for everyday photography and special occasions alike. Enjoy high-quality photos and smooth HD movies, thanks to the 14.1-megapixel sensor and 4x optical zoom lens. Explore creative possibilities with Scene Modes, Stitch Assist for panoramas, and My Colors for unique effects.

Canon PowerShot SD30: Capture stunning images and videos with ease. With its user-friendly features and versatile shooting modes, this compact camera is perfect for everyday photography and special occasions alike. Enjoy high-quality photos and smooth HD movies, thanks to the 14.1-megapixel sensor and 4x optical zoom lens. Explore creative possibilities with Scene Modes, Stitch Assist for panoramas, and My Colors for unique effects.

Preparations
Shooting
Playback/Erasing
Menus and Settings
Printing
Downloading Images
to a Computer
CDI-E198-010 XX05XXX
Camera User Guide
Please Read This First
This guide explains how to prepare the camera and use its basic features.
© 2005 CANON INC. PRINTED IN JAPAN
ENGLISH
Basic
Cov-Basic.fm Page 1 Tuesday, June 21, 2005 4:44 PM
The following guides are available. Refer to them as necessary
according to the flowchart below.
Flowchart and Reference Guides
System Map
Basic Camera User
Guide (This Guide)
Read this first.
Advanced Camera
User Guide
Direct Print User Guide
Basic Camera User
Guide (This Guide)
Software Starter Guide
ZoomBrowser EX/
ImageBrowser
Software User Guide
PDF manuals available
on the Canon website.
http://web.canon.jp/
Imaging/information-
e.html
For information on included
items and items sold separately
Preparations
Charging the battery
Installing the battery and memory
card
Setting the date, time and language
Shooting
Playback/Erasing
Menus and Settings
Handling precautions,
references to the various
shooting and playback functions
Printing
• Installing the software
Downloading images to a
computer
• Using the software
In this guide, the Basic Camera User Guide is called the Basic Guide,
and the Advanced Camera User Guide is called the Advanced Guide.
Also, "battery" refers to the battery pack.
170CUGBook(Basic-Advanced).book Page 1 Tuesday, June 21, 2005 10:02 PM
1
1.
Installing the Battery.
1. Slide the memory card slot/battery cover and open it ( ,
).
2. Push the battery lock in the direction of the arrow (
)
, align
the symbol on the battery and inside of the
memory card
slot/battery cover
and insert the battery until it locks into
place (
)
.
To remove the battery, push the battery lock in the direction of
the arrow ( ) and hold it while pulling the battery out.
3. Close the memory card slot/battery cover.
2.
Charging the Battery.
Charge the battery before use under the following circumstances.
When using the battery for the first time.
When the "Change the battery pack" message displays.
Preparations
The bottom of the camera station has non-slip rubber feet.
• The rubber feet are covered with a thin orange plastic film. Carefully
peel the film off before use.
If dirt adheres to the rubber feet, lightly wipe them with a slightly
dampened cloth.
Battery Lock
symbol
Preparations
170CUGBook(Basic-Advanced).book Page 1 Tuesday, June 21, 2005 10:02 PM
2
1. Connect the compact power adapter's DC plug to the DC IN
terminal of the camera station.
Ensure that the symbol on the DC plug is on the top and align
it with the symbol on the camera station.
2. (For CA-DC20)
Draw out the compact power adapter's power plug ( ) and
plug it into a power outlet ( ).
(For CA-DC20E)
Attach the power cord and plug the other end into a power
outlet.
3. Remove the terminal cover from the camera station.
4. Place the camera securely into the camera station.
Do not turn on the camera.
The charge indicator will light orange while the battery in the
camera is charging. It will change to green when the charge is
complete. Charging takes approximately 90 minutes.
After the charge is complete, remove the camera from the
camera station as soon as possible.
To protect the battery and prolong its life, do not charge it
for longer than 24 hours continuously.
See the Advanced Guide: Battery Handling (p. 105)
See the Advanced Guide: Camera Station (p. 15)
CA-DC20 CA-DC20E
Charge Indicator
170CUGBook(Basic-Advanced).book Page 2 Tuesday, June 21, 2005 10:02 PM
3
3.
Inserting the Memory Card.
1. Slide the memory card slot/battery cover and open it.
2. Insert the memory card until it clicks into place.
3. Close the memory card slot/battery cover.
To Remove the Memory Card
Use a finger to push the memory card in until you hear a click, then release
it.
Ensure that the memory card is correctly oriented before
inserting it in the camera. It may damage the camera if
inserted incorrectly.
See the Advanced Guide: Handling the Memory Card (p. 107)
See the Advanced Guide: Formatting Memory Cards (p. 26)
You can use SD* memory cards and MultiMediaCards with this camera.
These cards are collectively called memory cards in this guide.
*SD stands for Secure Digital, a copyright protection system.
Front
Preparations
170CUGBook(Basic-Advanced).book Page 3 Tuesday, June 21, 2005 10:02 PM
4
First Time Settings
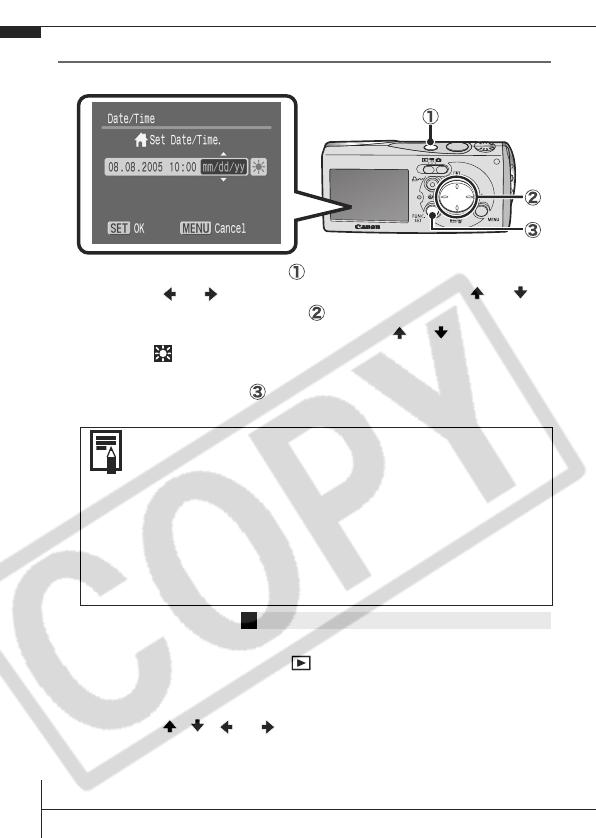
Setting the Date/Time
1. Press the power button ( ).
2. Use the or button to select an item and the or
button to change its value ( ).
To set the daylight saving option, use the or button to
display .
3. Confirm that the correct time is displayed and press the
FUNC./SET button ( ).
The date and time can also be set in the Set up menu (p. 13).
Setting the Display Language
1. Slide the mode switch to (playback).
2. Hold down the FUNC./SET button and press the MENU
button.
3. Use the ,
, or button to select a language and
press the FUNC./SET button.
The display language can also be set in the Set up menu (p. 13).
A rechargeable lithium battery is built into the camera to
save such settings as the date/time. This battery charges
when the main battery is in the camera. When you pur-
chase the camera, place the main battery in it for approx-
imately four hours to charge the lithium battery. It will
charge even if the camera is turned off.
The date/time settings may be lost after approximately
three weeks if you remove the main battery. Reset the
date/time settings if this occurs.
See the Advanced Guide: Setting the World Clock (p. 27).
170CUGBook(Basic-Advanced).book Page 4 Tuesday, June 21, 2005 10:02 PM
5
1.
Press the power button.
The start-up sound will play and the start-
up image will display in the LCD monitor.
Pressing the power button again turns
the power off.
To switch to the setting that mutes all
sounds (except for the warning sound),
press and hold the
MENU
button while
pressing the power button.
2.
Set the shooting mode to (Auto).
1. Slide the mode switch to (Rec.) ( ).
2. Press the FUNC./SET button ( ) and use the or
button ( ) to select (Auto).
3. Press the FUNC./SET button ( ).
3.
Aim the camera at the subject.
Shooting
See the Advanced Guide: Using the LCD Monitor (p. 18)
See the Advanced Guide: Power Saving Function (p. 25)
See the Advanced Guide: Set up Menu (p. 32)
See the Advanced Guide: My Camera Menu (p. 34)
Power button
Shooting
170CUGBook(Basic-Advanced).book Page 5 Tuesday, June 21, 2005 10:02 PM
6
4.
Focus and shoot.
1. Press the shutter button
halfway to focus.
When the camera focuses, the
camera beeps twice and the
indicator lights green.
2. Press the shutter button fully to shoot.
The shutter sound
will play and the
image will record.
The indicator will
blink green while the
image is recorded to
the memory card.
Reviewing an Image Right After Shooting
After a shot is taken, the image appears in the LCD monitor for
approximately 2 seconds.
You can continue to display images regardless of the review duration
setting with the following procedures.
Keeping the shutter button pressed after a shot.
•Pressing the FUNC./SET button while the image is displayed in the LCD
monitor.
To stop displaying the image, press the shutter button halfway.
See Basic Shooting Functions (p. 7).
See the Advanced Guide: Indicator (p. 24).
See the Advanced Guide for the various shooting methods
available.
See the Advanced Guide: Review (p. 31).
Indicator
You can use this as a shutter button
(See Vertical Shutter Release in the
Advanced Guide (p. 43).)
170CUGBook(Basic-Advanced).book Page 6 Tuesday, June 21, 2005 10:02 PM
7
Basic Shooting Functions
Selecting a Shooting Mode
1. Slide the mode switch to (Rec.) or (Movie) ( ).
2. Press the FUNC./SET button ( ) and use the or
button ( ) to select the shooting mode.
For a scene mode (p. 8), select the (default setting) and
press the MENU button to select the desired mode.
3. Press the FUNC./SET button ( ).
Shooting Modes
Still Images
To use the FUNC. menu (p. 12) to make settings, hold the camera
horizontally.
Auto
The camera automatically selects settings.
Manual
Allows you to select settings yourself, such as the exposure compensation, white balance or
photo effect.
Stitch Assist
Allows you to shoot overlapping images that can later be merged
(stitched) to create one panoramic image on a computer. Select
[Stitch Assist] from the [ (Rec.)] menu.
Macro
You can get as close as
10 cm to the subject to
shoot.
Portrait
Blurs the background
and makes a person
stand out.
See the Advanced Guide (p. 46).
Shooting
170CUGBook(Basic-Advanced).book Page 7 Tuesday, June 21, 2005 10:02 PM
8
Landscape
You can shoot wide,
expansive scenes.
Night Snapshot
Allows you to take
snapshots of people
against twilight or night
backgrounds by
reducing the effects of
camera shake even
without using a tripod.
My Colors
Allows you to change the image colors easily with 9 modes.
Scene Mode
By simply selecting one of the following shooting modes, you can shoot
with the most appropriate settings for the scene.
Kids&Pets
Allows you to
capture subjects
that move around,
such as children
and pets, without
missing photo
opportunities.
Indoor
Prevents camera shake
and maintains the
subject's true color when
shooting under
florescent or tungsten
lighting.
Foliage
Shoots trees and
leaves—such as
new growth, autumn
leaves or blos-
soms—in vivid col-
ors.
Snow
Shoots without a blue
tinge and without making
people appear dark
against a snowy
background.
Beach
Shoots without
making people
appear dark near
water or sand where
reflected sunlight is
strong.
Fireworks
Captures fireworks in
the sky sharply and at
optimal exposure.
Underwater
Appropriate for shooting images with All Weather Case AW-DC40
(sold separately). This mode uses an optimal white balance setting
to reduce bluish tones and record images with a natural hue. The
exposure is regulated to use the flash as little as possible.
See the Advanced Guide (p. 58).
170CUGBook(Basic-Advanced).book Page 8 Tuesday, June 21, 2005 10:02 PM
9
Movie
Using the Zoom
1.
Press the or button.
The zoom can be adjusted from 38 – 90 mm (focal length) in
35mm film equivalent terms.
Wide Angle: Zooms
out from the subject.
Telephoto: Zooms in
on the subject.
Movie
Shoots a movie when you press the shutter button.
You can select from three modes: [Standard], [Compact] convenient for e-mail attachments and
[My Colors] which allows you to change color effects.
The shutter speed is slow in mode. Always use a tripod
to avoid camera shake.
In , , , or mode, the ISO speed may
increase and cause noise in the image depending on the
scene being shot.
In mode, shoot with the subject 1 m (3.3 ft.) or more from
the end of the lens.
To shoot underwater, install the camera in All Weather Case
AW-DC40 (sold separately).
We recommend you use All Weather Case AW-DC40 for
shooting at ski resorts or beaches.
See the Advanced Guide (p. 44).
Shooting
170CUGBook(Basic-Advanced).book Page 9 Tuesday, June 21, 2005 10:02 PM
10
Using the Flash
1.
Press the button to cycle through flash settings.
Flash settings cannot be used in some
shooting modes.
Shooting Close-Ups
1.
Select (Macro) from the FUNC. menu (p. 7).
This records flowers and other small objects large and up close.
Image Area at Minimum Shooting Distance from End of Lens to Subject
Maximum wide angle setting: 284 × 210 mm (11 × 8.3 in.)
Minimum shooting distance: 30 cm (1.0 ft.)
Maximum telephoto setting: 44 × 33 mm (1.7 × 1.3 in.)
Minimum shooting distance: 10 cm (3.9 in.)
You are recommended to shoot with the camera attached
to a tripod or other device if the camera shake warning
icon appears.
See the Advanced Guide: Functions Available in Each
Shooting Mode (p. 128).
The exposure may not be optimal when the flash is used in
macro mode in the range of 10 – 30 cm (3.9 in. – 1.0 ft.).
See the Advanced Guide: Functions Available in Each
Shooting Mode (p. 128).
Auto
Auto with red-eye
reduction
Flash on with red-
eye reduction
Flash on
Flash off
Slow Synchro
Red-eye reduction
This feature reduces the effect of light
reflecting back from the eyes and
making them appear red.
Slow synchro
The flash timing is adjusted to a slow
shutter speed, allowing you to shoot
night scenes.
170CUGBook(Basic-Advanced).book Page 10 Tuesday, June 21, 2005 10:02 PM
11
1.
Slide the mode switch to
(playback).
The last recorded image will appear in
the LCD monitor.
2.
Use the or button to dis-
play the image you wish to view.
Use the button to move to the previous image and the
button to move the next image.
Holding the button down advances the images more rapidly, but
shows them less clearly.
1.
In the playback mode,
use the or button
to select an image to
erase ( ) and press
the button ( ).
2.
Confirm that [Erase] is
selected and press the FUNC./SET
button ( ).
To exit instead of erasing, select [Cancel].
Playback
See the Advanced Guide for the various playback methods
available
Erasing
Please note that erased images cannot
be recovered. Exercise adequate
caution before erasing an image.
See the Advanced Guide: Erasing All Images (p. 82).
When you place the camera in the camera station, you can
operate the camera with the wireless controller for playing
back or erasing images (p. 24).
Playback/Erasing
170CUGBook(Basic-Advanced).book Page 11 Tuesday, June 21, 2005 10:02 PM
12
Settings for the shooting or playback modes or such camera settings as
the date/time and sounds are set using the FUNC., Rec., Play, Set up or
My Camera menu.
FUNC. Menu
This menu sets many of the common shooting functions.
Slide the mode switch to or .
Press the FUNC./SET button.
Use the or button to select a menu item.
Some items may not be selectable in some shooting modes.
Use the or button to select an option for the menu item.
You can select further options with the MENU button for some
options.
After selecting an option, you can press the shutter button to
shoot immediately. After shooting, this menu will appear again,
allowing you to adjust the settings easily.
Press the FUNC./SET button.
Menus and Settings
See the Advanced Guide: Menu List (p. 31).
170CUGBook(Basic-Advanced).book Page 12 Tuesday, June 21, 2005 10:02 PM
13
Rec., Play, Set up and My Camera Menus
Convenient settings for shooting or playback can be set with these menus.
Press the MENU button.
Use the or button to switch between menus.
Use the or button to select a menu item.
Some items may not be selectable in some shooting modes.
Use the or button to select an option.
Menu items followed by an ellipsis (...) can only be set after
pressing the FUNC./SET button to display the next menu.
Press the FUNC./SET button again to confirm the setting.
Press the MENU button.
See the Advanced Guide: Menu List (p. 31).
(My Camera) Menu
This example shows the Rec. menu.
In playback mode, the Play menu displays.
You can switch
between menus
with the
or
button when this
part is selected.
(Rec.) Menu
(Play) Menu
(Set up) Menu
Menus and Settings
170CUGBook(Basic-Advanced).book Page 13 Tuesday, June 21, 2005 10:02 PM
14
You can easily print by connecting the camera to a direct print compatible
printer
*1
with a cable and simply pressing the button on the camera
or wireless controller.
1.
Set the camera securely into the camera station.
2.
Connect the camera to a Direct Print compatible printer
and turn on the printer's power.
Slide the mode switch to (playback) mode and turn on the
camera's power.
You can also connect the camera to a TV (Advanced Guide
p.89) and check the images on the TV while printing.
*1 Since this camera uses a standard protocol (PictBridge), you can use it with other
PictBridge-compliant printers in addition to Canon-brand printers.
*2 You can also use card photo printers such as the CP-10/CP-100/CP-200/CP-300.
Printing
Canon Brand Printers
SELPHY CP Series
Compact Photo Printers*
2
PIXMA Series/SELPHY DS
Series Bubble Jet Printers
Interface Cable
Camera Station
Camera
AV Cable
170CUGBook(Basic-Advanced).book Page 14 Tuesday, June 21, 2005 10:02 PM
15
3.
Confirm that , or is displayed in the upper left
of the LCD monitor ( ).
The button will light blue.
The displayed icon will vary according to the printer model.
4.
Use the or button to select an image to print ( ) and
press the wireless controller's or the camera's button
().
The camera's button will blink blue and printing will start.
Î
See the Advanced Guide: Setting the DPOF Print Settings (p. 83).
Î See the Direct Print User Guide
Î See the user guide for your printer
Î See Operating the Wireless Controller (p. 24)
Printing
BasicGuide_E.fm Page 15 Tuesday, June 21, 2005 10:15 PM
16
The following methods can be used to download images recorded by the
camera to a computer. Some methods, depending on the OS used, may
not be available. Please read System Requirements (p. 17) in advance.
Camera to Computer Connection
* Please also see the Windows XP and Mac OS X Users leaflet.
Using a Memory Card Reader
A memory card reader can be used with all the operating systems listed
above. See the Software Starter Guide for details.
Downloading Images to a Computer
Supplied Software Install It Do Not Install It
Downloading Method
Computer
Procedure
Camera
Procedure
Computer
Procedure
OS Windows 98
Second Edition (SE)

Windows 2000

Windows Me

Windows XP

Mac OS X

Computer System
Requirements
Basic Guide (p. 17)
Software Starter Guide
Connecting the Camera to
a Computer
Basic Guide (p. 19)
•Software
Starter Guide*
Downloading Images to
a Computer
Basic Guide (pp. 20–21)
Software Starter Guide
170CUGBook(Basic-Advanced).book Page 16 Tuesday, June 21, 2005 10:02 PM
17
System Requirements
Please install the software on a computer meeting the following minimum
requirements.
Windows
Macintosh
OS
Windows 98 Second Edition (SE)
Windows Me
Windows 2000 Service Pack 4
Windows XP (including Service Pack 1 and Service Pack 2)
Computer Model
The above OS should be pre-installed on computers with built-in USB
ports.
CPU
Pentium 500 MHz or higher processor
RAM
Windows 98 SE/Windows Me 128 MB or more
Windows 2000/Windows XP 256 MB or more
Interface
USB
Free Hard Disk
Space
Canon Utilities
- ZoomBrowser EX 250 MB or more
(Including the PhotoRecord printing program)
- PhotoStitch 40 MB or more
Canon Camera TWAIN Driver 25 MB or more
Canon Camera WIA Driver 25 MB or more
ArcSoft PhotoStudio 50 MB or more
Display
1,024 x 768 pixels/High Color (16 bit) or better
OS
Mac OS X (v10.2–v10.3)
Computer Model
The above OS should be pre-installed on computers with built-in USB
ports.
CPU
PowerPC G3/G4/G5
RAM
256 MB or more
Interface
USB
Free Hard Disk
Space
Canon Utilities
- ImageBrowser 200 MB or more
- PhotoStitch 40 MB or more
ArcSoft PhotoStudio 50 MB or more
Display
1,024 x 768 pixels/32,000 Colors or better
Downloading Images to a Computer
170CUGBook(Basic-Advanced).book Page 17 Tuesday, June 21, 2005 10:02 PM
18
Preparing to Download Images
Items to Prepare
Camera and computer
Camera station (wireless controller)
Canon Digital Camera Solution Disk supplied with the camera
Interface cable supplied with the camera
1.
Install the software.
1. Place the Canon Digital Camera Solution Disk in the
computer's CD-ROM drive.
2. Click the Digital Camera Software
[Install] button and click [NEXT].
3. Select [Easy Installation] as the
setup type and click [Next].
Proceed with the installation while
reviewing installation settings.
4. When the installation is complete,
select [Yes, I want to restart my
computer now.] and click [Finish].
5. Remove the Canon Digital Camera Solution Disk from the
CD-ROM drive after restarting.
Ensure that you install the software first before connecting the
camera to the computer.
Double-click the [Canon Digital Camera Installer] icon
in the CD-ROM window.
When the installation is
finished, click [OK].
170CUGBook(Basic-Advanced).book Page 18 Tuesday, June 21, 2005 10:02 PM
  • Page 1 1
  • Page 2 2
  • Page 3 3
  • Page 4 4
  • Page 5 5
  • Page 6 6
  • Page 7 7
  • Page 8 8
  • Page 9 9
  • Page 10 10
  • Page 11 11
  • Page 12 12
  • Page 13 13
  • Page 14 14
  • Page 15 15
  • Page 16 16
  • Page 17 17
  • Page 18 18
  • Page 19 19
  • Page 20 20
  • Page 21 21
  • Page 22 22
  • Page 23 23
  • Page 24 24
  • Page 25 25
  • Page 26 26
  • Page 27 27

Canon Powershot SD30 User guide

Category
Bridge cameras
Type
User guide
This manual is also suitable for

Canon PowerShot SD30: Capture stunning images and videos with ease. With its user-friendly features and versatile shooting modes, this compact camera is perfect for everyday photography and special occasions alike. Enjoy high-quality photos and smooth HD movies, thanks to the 14.1-megapixel sensor and 4x optical zoom lens. Explore creative possibilities with Scene Modes, Stitch Assist for panoramas, and My Colors for unique effects.

Ask a question and I''ll find the answer in the document

Finding information in a document is now easier with AI