Page is loading ...

GEN8 International Scout II
MAN-GEN8-18-10-22
•Link to the most recent version of this manual with exploded views and parts lists:
www.redcatracing.com/manuals/GEN8_MANUAL.pdf
•Link to electric vehicles manual:
www.redcatracing.com/manuals/ELECTRIC-MANUAL.pdf
MANUAL / QUICK START GUIDE
INTERNATIONAL ®, and other International truck trademarks are licensed by
International Truck Intellectual Property Company, LLC.
Interco, Irok Super Swamper Trademarks are licensed by Interco.
https://www.facebook.com/groups/RedcatRacingGen8

Warnings Advertencias
AGE WARNING!
This radio controlled (RC) vehicle is not a toy. It is the responsibility of the
parents or guardian to ensure that minors receive appropriate guidance and
supervision when operating or working on this product.
It is the buyer’s responsibility to ensure that this product is safely operated. You
must be 14 years of age or older to operate this vehicle.
The buyer assumes all risks associated with the use of this product. Namero
LLC d/b/a Redcat Racing and their retail partners, dealers, distributors,
manufactures and affiliates cannot control the use and operation of this product
and as such shall not be held responsible or liable for any injury, accident or
damage resulting from the use of this product.
Always fully read all instructions, manuals and warnings that come with your
RC vehicle and any accessories required to operate the product.
Never operate your RC vehicles on public roads, near bystanders, children,
pets other animals.
Always leave a safe distance around your RC vehicles when driving so that in
the event you lose control you don’t damage the vehicle, hurt yourself or
others.
Never lose sight of your vehicle while it is in operation and be aware of your
surroundings.
Always keep clear of the wheels or other moving parts on the vehicle and never
attempt to pick up the vehicle if the wheels are in motion.
Always perform a prerun inspection to ensure that there is no damage and that
all screws and wheel nuts are secure. If damage is found, repair or replace
prior to use.
Do not attempt to touch the motor, esc, battery or other electrical components
during or immediately after use as these items will get hot during operation.
Always allow the vehicle time to cool down between runs. Overheating the
electronics can shorten the life of your electronic components.
Never leave the battery connected when not in use and store batteries in
accordance with manufactures instructions.
Never leave a battery unattended while being charged. Never charge batteries
while they are inside of the RC vehicle.
There is a risk of fire and explosion when dealing with batteries. Rechargeable
batteries may become hot and catch fire if left unattended or charged too
quickly.
Always use extra caution when charging LiPo batteries.
Always, only use a LiPo specific chargers when charging LiPo batteries.
Always use a LiPo safe charging pouch when charging LiPo batteries.
Always charge batteries away from flammable materials and in a well ventilated
space.
Never charge at a rate higher than 1C. (2000Mah pack = 2 amp charge rate).
Overcharging can lead to fire and explosion.
Always store battery packs in a cool dry place.
Never use a LiPo battery that has previously overheated and/or shows signs of
damage or swelling. If you suspect the battery to be damaged, immediately
discontinue use and properly dispose of the battery.
Never dispose of a LiPo battery with regular trash. To safely dispose of LiPo
batteries, refer to your local disposal authority or recycling center.
Always check the ESC settings to ensure that they match the battery type
during operation. If using a LiPo battery, the ESC must be set to LiPo or
damage may occur.
Never mix old and new batteries. Do not change or charge batteries in a
hazardous location. Do not mix alkaline, lithium, standard (carbon zinc), or
rechargeable (NiMh, cadmium) batteries.
If you do not agree with or are unable to follow these warnings and are not
willing to accept full and complete liability for the use of this RC product;
immediately return the product to your place of purchase in new and unused
condition.
¡ADVERTENCIA SOBRE LA EDAD!
Este vehículo de radio control (RC) no es un juguete. Es responsabilidad de los
padres o tutores garantizar que los menores reciban la orientación y supervisión
adecuadas cuando manipulen este producto.
Es responsabilidad del comprador asegurarse de que este producto funcione de
manera segura. Debe tener 14 años de edad o más para poder manipular este
vehículo.
El comprador asume todos los riesgos asociados con el uso de este producto.
Namero LLC d/b/a Redcat y sus socios minoristas, vendedores, distribuidores,
fabricantes y afiliados no pueden controlar el uso y el funcionamiento de este
producto y no serán responsables de ninguna lesión, accidente o daño que resulte
por el mal uso de este producto.
Siempre lea absolutamente todas las instrucciones, manuales y advertencias que
vienen con su vehículo RC y los accesorios necesarios para manipular el producto.
Nunca manipule sus vehículos RC en carreteras públicas, cerca de peatones, niños,
mascotas y otros animales.
Deje siempre una distancia segura alrededor de sus vehículos RC al conducir, de
manera de que, en caso de que pierda el control, no dañe el vehículo y nadie salga
herido.
Nunca pierda de vista su vehículo mientras está en funcionamiento y esté atento a
su entorno.
Manténgase alejado siempre de las ruedas u otras partes móviles del vehículo.
Nunca intente levantarlo si las ruedas están en movimiento.
Realice siempre una inspección previa al funcionamiento para asegurarse de que no
haya daños y que todos los tornillos y tuercas de las ruedas estén bien puestos. Si
encuentra algún daño, repárelo o reemplácelo antes de usarlo.
No intente tocar el motor, la esc, la batería u otro componente eléctrico durante o
después de usarlo, ya que estos se calientan mientras funcionan.
Deje siempre que el vehículo se enfríe entre cada viaje. El sobrecalentamiento
puede acortar la vida útil de los componentes electrónicos.
No deje nunca la batería conectada cuando no esté en uso y guárdela como indican
las instrucciones del fabricante.
No deje nunca una batería sin supervisión mientras esté cargando. Nunca cargue la
batería mientras se encuentre dentro del vehículo RC.
Existe un riesgo de incendio y explosión con las baterías. Las baterías recargables
pueden calentarse e incendiarse si se dejan sin supervisión o se cargan muy rápido.
Tenga mucho cuidado cada vez que cargue una batería LiPo.
Solo use cargadores específicos para cargar las baterías LiPo.
Use una bolsa de carga segura Lipo cada vez que cargue las baterías.
Cargue siempre las baterías lejos de materiales inflamables y en un espacio
ventilado.
No cargue nunca la batería con más de 1C. (2000Mah pack = carga de 2 amperios).
La sobrecarga puede provocar incendios y explosiones.
Guarde los paquetes de las baterías en un lugar fresco y seco.
No use nunca una batería LiPo sobrecalentada y/o muestre daños o hinchazón. Si
sospecha que la batería está dañada, deje de usarla inmediatamente y deséchela
de manera adecuada.
No deseche nunca una batería LiPo junto a la basura normal. Para desecharlo de
manera adecuada, consulte a las autoridades locales encargados de la recolección
de basura o al centro de reciclaje.
Verifique la configuración de la ESC para asegurarse de que coincidan con el tipo de
batería durante el uso. Si utiliza una batería LiPo, la ESC debe configurarse en LiPo
ya que, de no hacerlo, ocasionaría daños.
Nunca mezcle baterías viejas y nuevas. No cambie ni cargue las baterías en un
lugar peligroso. No mezcle las baterías alcalinas, de litio, estándar (carbón zinc) o
recargables (NiMh cadmio).
Si no está de acuerdo con estas advertencias o no puede seguirlas y no está
dispuesto a aceptar la responsabilidad total por el uso de este producto RC,
devuelva el producto a su lugar de compra nuevo y sin uso.
WARNINGS • ADVERTENCIAS
!
Redcat Racing
01

CONTENTS
!
Redcat Racing
03
Page 4: Démarrage
Page 7: Commandes Radio De Base
Page 11: Arrêter
Page 36: Radio Guide
Page 38: Guide ESC
Page 40: Guide De L’embrayage
Page 41: Accessoires Supplémentaires Inclus
Page 42: Dépannage
Page 43: Vues éclatées
Page 51: Pièces de rechange
Page 55: Pièces de hayon
Contenu
Seite 4: Inbetriebnahme
Seite 7: Grundlegende Funksteuerungen
Seite 11: Abschalten
Seite 28: Funkanleitung
Seite 30: ESC-Leitfaden
Seite 32: Gleitkupplung Anleitung
Seite 33: Inklusive Optionalem Zubehör
Seite 34: Fehlerbehebung
Seite 43: Teiledarstellung
Seite 51: Ersatzteile
Seite 55: Hop-up-Teile
Inhalt
Paje 24: Manual Del Embrague Deslizante
Paje 25: Incluye Accesorios Opcionales
Paje 4: Inicio
Paje 7: Controles Básicos De Radio
Paje 11: Apagar
Paje 20: Guía De Radio
Paje 22: Guía De ESC
Paje 26: Resolución De Problemas
Paje 43: Vista detallada
Paje 51: Repuestos
Paje 55: Accesorios
Contenido
Page 16: Slipper Clutch Guide
Page 17: Included Optional Accessories
Page 18: Troubleshooting
Page 43: Exploded Views
Page 51: Spare Parts
Page 55: Hop-up Parts
Page 4: Start Up
Page 7: Basic Radio Controls
Page 11: Shut Down
Page 12: Radio Guide
Page 14: ESC Guide
Contents
CONTENIDO • INHALT • CONTENU

START UP
INSTALL CONTROLLER BATTERIES
Do not mix old and new batteries. Do not mix alkaline, lithium, standard (carbon zinc), or rechargeable (nickel-
cadmium) batteries. Do not change or charge batteries in a hazardous location.
Nunca mezcle baterías viejas y nuevas. No mezcle las baterías alcalinas, de litio, estándar (carbón zinc) o recargables
(NiMh cadmio). No cambie ni cargue las baterías en un lugar peligroso.
Mischen Sie keine alten und neuen Batterien. Mischen Sie keine Alkali-, Lithium-, Standard- (Kohle-Zink) oder
wiederaufladbaren (Nickel-Cadmium) Batterien. Wechseln oder laden Sie die Batterien nicht in explosionsgefährdeten
Bereichen.
Ne mélangez pas des batteries neuves et usagées. Ne mélangez pas des batteries alcalines, au lithium, standard
(carbone zinc) ou rechargeables (nickel-cadmium). Ne changez pas et ne chargez pas les piles dans un endroit
dangereux.
2 31
REMOVE BODY
HOOK
& LOOP
Redcat Racing
04
INICIO • INBETRIEBNAHME • DÉMARRER
INSTALAR LAS BATERÍAS DEL CONTROLADOR • EINLEGEN DER BATTERIEN DER
STEUERUNG • INSTALLER LES PILES DE LA MANETTE
RETIRE EL CUERPO • GEHÄUSE ENTFERNEN • ENLEVER LE CORPS

INSTALL FULLY CHARGED BATTERY PACK
Redcat Racing
05
BATERÍA
BATTERIE
BATTERY
LiPo
NIMH
POSICIÓN DEL CLIP DE PUENTE
POSITION DES JUMPER-CLIPS
POSITION DU CLIP DE CAVALIER
Jumper Clip Position
Attention: The ESC is set to LiPo from the factory.
Note: When using a LIPO battery, the ESC jumper clip MUST be set to LIPO or damage to the
battery may occur.
Note: If using a NiMH battery, the ESC jumper clip must be set to NiMH.
Atención: La ESC se establece en LiPo de fábrica.
Nota: Cuando se utiliza una batería LIPO, el clip de puente ESC DEBE estar configurado en LIPO
o puede dañarse la batería.
Nota: Si utiliza una batería de NiMH, el clip de puente de ESC se debe establecer en NiMH.
Achtung: Der ESC ist werkseitig auf LiPo eingestellt.
Hinweis: Bei Verwendung einer LIPO-Batterie MUSS der ESC-Brückerclip auf LIPO eingestellt
sein, da es sonst zu Schäden an der Batterie kommen kann.
Hinweis: Wenn Sie einen NiMH-Akku verwenden, muss der ESC-Brückerclip auf NiMH eingestellt
sein.
Attention: L'ESC est réglé sur LiPo à partir de l'usine.
Remarque: lors de l'utilisation d'une batterie LIPO, le cavalier ESC DOIT être réglé sur LIPO,
sinon la batterie pourrait être endommagée.
Remarque: Si vous utilisez une batterie NiMH, le cavalier ESC doit être réglé sur NiMH.
INSTALE EL PAQUETE DE BATERÍA COMPLETAMENTE CARGADO • LEGEN SIE EINEN
VOLLSTÄNDIG GELADENEN AKKUPACK EIN • INSTALLER LE BLOC DE BATTERIES
ENTIÈREMENT CHARGÉ

POWER ON
HOOK
& LOOP
INSTALL BODY
ON
ENCENDIDO
EINSCHALTEN
MARCHE
2
IMPORTANT! • ¡IMPORTANTES! •
WICHTIG! • ATTENTION!
Be sure the throttle trim knob is set to ZERO. Leave the
throttle trigger in the neutral position when turning on the
radio and vehicle. Wait 3-seconds after turning on the
vehicle before touching the transmitter controls.
Asegúrese de que la perilla de ajuste del acelerador esté
en CERO. Deje el gatillo del acelerador en la posición
neutral cuando encienda la radio y el vehículo. Espere 3
segundos después de encender el vehículo antes de tocar
los controles del transmisor.
Vergewissern Sie sich, dass der Gashebel auf Null steht.
Lassen Sie den Gashebel beim Einschalten von Funk und
Fahrzeug in der neutralen Position. Warten Sie 3
Sekunden nach dem Einschalten des Fahrzeugs, bevor
Sie die Senderbedienung berühren.
Assurez-vous que le bouton de réglage de l'accélérateur
est réglé sur ZERO. Laissez la gâchette d'accélérateur en
position neutre lorsque vous allumez la radio et le
véhicule. Attendez 3 secondes après avoir mis le véhicule
en marche avant de toucher les commandes de l'émetteur.
1
ON
ENCENDIDO
EINSCHALTEN
MARCHE
Redcat Racing
06
ENCENDIDO • EINSCHALTEN • MARCHE
INSTALE EL CUERPO • KÖRPER MONTIEREN • INSTALLER LE CORPS

HOW TO STEER
Redcat Racing
07
BASIC RADIO CONTROLS
CONTROLES BÁSICOS DE RADIO • GRUNDLEGENDE FUNKSTEUERUNGEN •
COMMANDES RADIO DE BASE
CÓMO CONDUCIR • WIE MAN LENKT • COMMENT GÉRER

RCR-2CENR RADIO SYSTEM
HOW TO ACCELERATE
Redcat Racing
08
SPEED
SPEED
SPEED
NEUTRAL
HOW TO BRAKE
AUTOMATIC
BRAKING
NEUTRAL
NEUTRE
VELOCIDAD
GESCHWINDIGKEIT
VITESSE
VELOCIDAD
GESCHWINDIGKEIT
VITESSE
VELOCIDAD
GESCHWINDIGKEIT
VITESSE
NEUTRE
FRENO AUTOMÁTICO
AUTOMATISCHES BREMSEN
FREIN AUTOMATIQUE
CÓMO ACELERAR • WIE MAN BESCHLEUNIGT • COMMENT ACCELERER
CÓMO FRENAR • WIE MAN BREMST • COMMENT FREINER

RCR-2CENR RADIO SYSTEM
HOW TO DRIVE IN REVERSE
Redcat Racing
09
NEUTRAL
REVERSE
REVERSE
REVERSE
HOW TO BRAKE
NEUTRE
REVERSA
RÜCKWÄRTS
SENS INVERSE
REVERSA
RÜCKWÄRTS
SENS INVERSE
REVERSA
RÜCKWÄRTS
SENS INVERSE
NEUTRAL
AUTOMATIC
BRAKING
NEUTRE
FRENO AUTOMÁTICO
AUTOMATISCHES BREMSEN
FREIN AUTOMATIQUE
CÓMO MANEJAR EN REVERSA • WIE MAN RÜCKWÄRTS FÄHRT •
COMMENT CONDUIRE EN INVERSE
CÓMO FRENAR • WIE MAN BREMST • COMMENT FREINER

RCR-2CENR RADIO SYSTEM
RADIO ADJUSTMENTS
Redcat Racing
10
CENTRO
CENTRE
REVERSA
RÜCKWÄRTS
SENS INVERSE
Steering Trim - Steering Neutral
REVERSE FORWARD
Throttle Trim - Throttle Neutral
AVANZAR
VORWÄRTS
VERS L'AVANT
MENOS DIRECCIÓN
WENIGER LENKUNG
MOINS DE DIRECTION
MÁS DIRECCIÓN
MEHR LENKUNG
PLUS DE DIRECTION
Steering D/R - Maximum Steering
CENTER
LESS STEERING
MORE STEERING
AJUSTES DE RADIO • FUNKBEDIENUNG • AJUSTEMENTS RADIO
AJUSTE DE LA DIRECCIÓN - DIRECCIÓN NEUTRAL
LENKUNGSEINSTELLUNG - LENKUNGSNEUTRALITÄT
GARNITURE DE DIRECTION - NEUTRE AU VOLANT
AJUSTE DEL ACELERADOR - ACELERADOR NEUTRAL
GAS EINSTELLUNG - GAS NEUTRAL
GARNITURE D'ACCÉLÉRATEUR - ACCÉLÉRATEUR NEUTRE
DIRECCIÓN D/R - DIRECCIÓN MÁXIMA
LENKUNG D/R - MAXIMALE LENKUNG
DIRECTION D / R - DIRECTION MAXIMALE

POWER OFF
REMOVE BODY
REMOVE BATTERY
SHUT DOWN
HOOK
& LOOP
OFF
APAGADO
AUSSCHALTEN
ARRET
21
Redcat Racing
11
OFF
APAGADO
AUSSCHALTEN
ARRET
APAGAR • ABSCHALTEN • ARRÊTER
RETIRE EL CUERPO • GEHÄUSE ENTFERNEN • ENLEVER LE CORPS
APAGAR • AUSSCHALTEN • ÉTEINDRE
REMOVER BATERÍA • BATTERIE ENTFERNEN • ENLEVER LA PILE

RADIO
Warnings and Compliance
FCC Compliance Statement! The radio included with your vehicle complies with part 15 of the FCC Rules.
Operation is subject to the following two conditions: (1) This device may not cause harmful Interference, and
(2) This device must accept any interference received, including interference that may cause undesired
operations.
Note: This equipment has been tested and found to comply with the limits for a Class B digital device, pursuant to Part 15
of the FCC Rules. These limits are designed to provide reasonable protection against harmful interference in a residential
installation. This equipment generates, uses and can radiate radio frequency energy and, if not installed and used in
accordance with the instructions, may cause harmful interference to radio communications. However, there is no
guarantee that interference will not occur in a particular installation. If this equipment does cause harmful interference to
radio or television reception, which can be determined by turning the equipment off and on, the user is encouraged to try
to correct the interference by one of the following measures:
• Reorient or relocate the receiving antenna.
• Increase the separation between the equipment and receiver.
• Connect the equipment into an outlet on a circuit different from that to which the receiver is connected.
• Consult the dealer or an experienced radio/TV technician for help.
IC ID: 24025 (please note that there maybe additional alpha numeric codes added to this number)
This device complies with Industry Canada licence-exempt RSS standard(s). Operation is subject to the following two
conditions: (1) This device may not cause interference, and (2) this device must accept any interference, including
interference that may cause undesired operations of this device.
WARNING: Any changes or modifications not expressly approved by the party responsible for compliance
could void the user's authority to operate this equipment.
WARNING: While operating the Radio, a separation distance of at least 20 centimeters must be maintained
between the radiating antenna and the body of the user or nearby persons in order to meet the FCC RF
exposure guidelines.
AFHDS (automatic frequency hopping digital system)
AFHDS was developed for Radio control models and offers active and passive anti-jamming capabilities, low power
consumption and high receiver sensitivity.
This radio system works in the frequency range of 2.405 to 2.475GHz. This band has been divided into 141 independent
channels. Each radio system uses 16 different channels and 142 different types of hopping algorithm. By using various
switch-on times, hopping scheme, and channel frequencies, the system is less likely to lose transmission.
Each transmitter has a unique ID. When binding with a receiver, the receiver saves that unique ID and can accept only
data from that unique transmitter. This avoids picking another transmitter signal and dramatically increases interference
immunity and safety.
WARNING: Even with the AFHDS technology, if the radio system is not used in accordance with this manual, it can still
fail and cause serious injury. Be sure to read and understand this entire manual, as well as the manual that came with all
other RC components you are using.
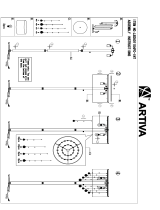
White
Red
Black
CH2 - ESC Plug
Yellow
Red
Black
CH1 - Servo Plug
Wire Colors
Redcat Racing
12
RADIO GUIDE

WIRING DIAGRAM
BINDING PROCESS
Receiver Connections
Redcat Racing
13

WARNING:
To avoid short circuits, ensure that all wires & connections are well insulated and there is good contact at all connections.
Read through the entire manual before operating and ensure all electronics are installed correctly. To avoid accidents, we
recommend setting the vehicle on a stand, with the tires free from any contact, while connecting and adjusting electronics.
Stop usage and unplug the battery immediately if the ESC exceeds 90ºC/194ºF as this may damage both the ESC and
motor. Disconnect the battery after use. The ESC continually draws current from the battery (even if the ESC is turned
off). If left plugged in for long periods of time, the battery will completely discharge, which may result in damage to the
battery or ESC. This WILL NOT be covered under warranty.
FEATURES:
Waterproof and dust-proof for all weather conditions. (Note: Be sure to clean and dry ESC and connections after wet use
to avoid rust.) The ESC is specially programmed for crawlers, guarantees excellent throttle and brake linearity as well as
superior control performance. 3 levels of drag brake: 0%, 50% and 100%, allows users to adjust brake feel for different
terrains and personal preference.
Built-in switching BEC with cont. /peak current of 3A/6A for use with most servos.
Protective features: low-voltage cutoff protection, thermal protection, throttle signal loss protection, and motor lock-up
protection. The ESC is easily programmed using the included jumper caps.
PROTECTIVE FEATURES:
Low-voltage Cutoff Protection. When the “Battery Type” is set to “LIPO”, the cutoff voltage for each battery cell is 3.2V. So
when using a 2S LiPo, the cutoff voltage for the pack will be 6.4V. When using a 3S pack the cutoff voltage will be 9.6V.
When the “Battery Type” is set to “NiMH”, the cutoff voltage (for the pack) is 4.5V. The ESC will cut throttle power output
to 1/2 when it detects the pack voltage has dropped to the cut-off threshold for 2 seconds, and completely cut the throttle
power output off after 8 seconds. The Red LED will blink repeatedly. Turn off the ESC and remove the discharged battery
pack. Wait for the battery to cool before recharging.
Note: Be absolutely sure the “Battery Type” is set properly. If the low-voltage cutoff protection is activated prematurely,
and you are certain the battery type is set correctly, the battery being used may not have a high enough discharge rate, or
is damaged. Try another fully charged battery pack with a higher discharge rate (be sure ESC is set according to the new
battery being used).
Thermal Protection. The ESC will cut off all power output and the Red LED will blink repeatedly when its internal tempera-
ture reaches the value (105ºC/221ºF) preset by the factory. The ESC will return to normal operation when the ESC
temperature falls below 80ºC/176ºF.
Note: If the thermal protection is activated on a regular basis, then there may be an issue with the vehicles power
demand. The motor may be geared too high, the vehicle or load may be too heavy, the drive train may be obstructed or
binding, or an improper motor is being used.
Throttle Signal Loss Protection. The ESC will immediately cut power output and the Red LED will blink rapidly when it
detects that the throttle signal has been lost for 0.1 second.
Model:
Cont./Peak Current:
LIPO/NiMH Cells:
Applications:
Motor Limit 2S LiPO / 5-6 Cells NiMH:
Motor Limit 3S LiPO / 7-9 Cells NiMH:
Built in BEC:
Size / Weight:
WP-1040-BRUSHED-Crawler-V4
40A / 180A
2-3S LIPO / 5-9 Cells NiMH
1/10th Crawlers
540/550 Size Brushed Motor ≥12T
540/550 Size Brushed Motor ≥17T
6V @ 3A (Switch-mode)
46.5mm x 37.5mm x 27.5mm / 67g
Specs:
RCR-2CENR RADIO SYSTEM
ESC
Redcat Racing
14
ESC GUIDE

Programming
OPERATION:
Step 1: Connect all components (as shown in wiring diagram) and recheck all connections before moving to the next step.
Step 2: Set the Throttle Range. This ESC can automatically recognize the neutral position of the transmitter, but you need
to follow the following steps.
1. Turn on the transmitter and move the throttle trigger to the neutral position.
2. With the ESC powered off, connect the motor, battery and other devices.
3. Turn on the ESC and wait at least 3 seconds. The ESC will automatically detect neutral.
Note: The ESC will beep according to the battery type and cell count used. If the ESC is set to
use a LIPO battery, the ESC will sound 2 short beeps if it detects a 2S LIPO, and 3 short
beeps if it detects a 3S LIPO. If the ESC is set to use a NiMH battery, it will beep one short
beep followed by one long beep to indicate self detection is over and the ESC is ready to use.
ATTENTION!
1. After turning on the ESC, you must wait (at least 3 seconds) until the self detection completes. Otherwise, it may not
function properly.
2. After turning on the ESC, if there is no power output and the Red LED flashes rapidly, it means the throttle of the
transmitter is not in the neutral position. If this happens, be sure the “Throttle Trim” on the transmitter is at the “0”
position, fine tune the throttle neutral position until the Red LED stops flashing.
3. To avoid any possible injury, always turn on the transmitter first and the ESC last, and then turn off the ESC first and
the transmitter last. Be sure the transmitter is on anytime the vehicle is on.
Step 3: The Red LED will emit certain flash sequences while running the vehicle. If everything is hooked up correctly and
the vehicle is running normal, the ESC LED should look like this.
1. The Red LED will turn off when the throttle trigger is in the throttle neutral zone.
2. The Red LED flashes rapidly when the vehicle is lightly throttled forward and turns solid Red when full throttle is used.
3. The Red LED flashes rapidly when the vehicle is lightly throttled rearward and turns solid Red when full reverse or
brake is used.
Note: swap the two wires from motor to ESC if you find the motor runs in reverse, but check the Throttle Reverse switch
on the transmitter first.
DRAG BRAKE
100% 50% 0%
BATTERY
LiPo NIMH
Jumper Location
Jumper Location
Note 1: When using a LIPO battery, the ESC MUST be set to LIPO or
damage to the battery will occur.
Note 2:The ESC is set to LiPo from the factory.
Battery Pack
Redcat Racing
15
RCR-2CENR RADIO SYSTEM
ESC

Remove the rubber
cover
Use a 7MM hex driver
to adjust slipper nut
SLIPPER CLUTCH ELIMINATION
RECOMMENDED SLIPPER CLUTCH SETTINGS
ADJUSTING THE SLIPPER CLUTCH
SLIPPER CLUTCH GUIDE
Redcat Racing
16
Your Redcat Gen8 features an adjustable slipper clutch. Out of the box the slipper clutch is set at the factory to
work best for most situations. Follow the steps below to fine tune the slipper clutch.
Remove the rubber dust cover and adjust the slipper by inserting
a 7mm hex driver to turn the slipper nut.
Note: You must hold the drivetrain still during this process.
Note: The slipper is very sensitive to adjustments. In most
cases, half a turn is all that is needed.
The recommended slipper clutch setting is 75% throttle. You can check this by holding the car still on carpet,
with a fully charged battery, and gradually applying throttle. You should hear the slipper clutch begin to slip at
approximately 75% throttle. If the slipper clutch begins to slip before 75% throttle, tighten the M4 nut
approximately ¼ turn and try again. If the slipper clutch begins to slip after 75% throttle, or does not slip at all,
loosen the M4 nut approximately ¼ turn and try again. Please note that over the life of your vehicle, it is
normal for the slipper pads will wear out and will need to be replaced periodically. It is recommended to check
your slipper clutch performance every 4-5 hours of use.
You can eliminate the slipper from the vehicle by removing the slipper pads and spring washers. The images
below show correct assembly of the slipper shaft with a working slipper and eliminated slipper.
Note: Eliminating the slipper increases the potential of drivetrain damage.
Spring washer orientation.
WORKING SLIPPER ELIMINATED SLIPPER
Metal Hexes
Slipper Pads

MAGNETIC BODY MOUNTS - INSTALLATION
STANDARD BODY POSTS - INSTALLATION
SPARE TIRE - INSTALLATION
INCLUDED OPTIONAL ACCESSORIES
Redcat Racing
17
12mm
ø
6.5 mm
89 mm
The Gen8 includes a spare tire with mounting hardware. Follow the steps to
mount the optional spare tire.
Drill a 12mm hole
with a body reamer
1
2 3 4
Screws Screws Screws
The Gen8 has indentions molded into the
fenders for installing optional rare earth
magnets (not included). Indentations will
support up to a 20mm magnet.
1. remove the hook and loop tape from
both the fender and body.
2. Use double sided adhesive tape to
adhere magnets to both the fender and
body.

The ESC will not power on and the
ON/OFF switch was turned ON.
1. No power is being supplied to the
ESC.
2. The ESC switch may be damaged.
1. Check if all ESC & connections are well
soldered and firmly connected.
2. Contact Redcat support.
The vehicle ran backward when you
pulled the throttle trigger towards you.
1. The radio “Throttle Reverse” switch
may be improperly set.
2. The motor-to-ESC wiring is incorrect.
1. Switch the radio “Throttle Reverse”
switch.
2. Swap the two wires (black and red)
from the motor to the ESC.
The motor suddenly stopped working, but
the steering still works.
The LVC protection or the thermal
protection may have been activated.
Check the battery voltage and the ESC
temperature. Let cool and recharge
battery
The motor accelerated suddenly, stuttered
or stopped during the starting-up process.
1. The discharge capacity of the pack is
insufficient.
2. The RPM is too high, the gear ratio or
final drive ratio is incorrect.
3. Gear mesh too tight.
1. Use another pack with better discharge
capability.
2. Use stock motor, stock gearing, and
don’t pull heavy loads.
3. Reset gear mesh.
NiMH battery charge doesn't last as long
as it should
1. ESC is set to LiPo battery
2. NiMH battery is not charged completely
3. NiMH battery is not holding a charge
1. Refer to the ESC Guide to set the ESC
jumper to NiMH battery
2, 3. Completely charge the NiMH battery
with an appropriate NiMH charger.
LiPo battery won't recharge after running
the vehicle
1. ESC is set to NiMH battery and the
LiPo battery was discharged below the
safe level.
2. Bad LiPo battery
1. Refer to the ESC Guide and set the
ESC jumper to LiPo battery. Properly
dispose of the LiPo battery, as it is no
longer safe to use
2. Replace the LiPo battery with a fully
charged, brand new battery. Dispose of
the bad battery in accordance to your
local laws.
Clicking noise while steering 1. Servo gears stripped
2. Servo horn stripped
1. Replace servo
2. Replace servo horn
Vehicle won't steer or move
1. Battery pack not charged
2. Battery wires loose
3. Did not follow proper start-up instruc-
tions
1. Charge battery pack
2. Plug in battery securely
3. Follow Quick Start Guide for proper
start-up sequence
Vehicle turns to the side automatically 1. Steering trim needs adjusting
2. Steering servo horn needs realigning or
replaced
3. Servo gears stripped
4. Too much toe-out in front wheels
1. Adjust transmitter steering trim
2. Check servo horn, replace if worn or
stripped
3. Replace servo
4. Adjust steering linkage to lessen toe
amount
Vehicle moves with no throttle input 1. Throttle trim is not set properly
2. Did not follow proper start-up instruc-
tions
1. Set transmitter throttle trim
2. Follow Quick Start Guide for proper
start-up sequence
Vehicle steers to the left when you steer
to the right
1. Steering reverse switch (on transmitter)
is set incorrectly
2. You are driving towards yourself and it
just seems like it's backwards
1. Flip the steering reverse switch (on
transmitter)
2. Practice driving the vehicle to get used
to steering with different vehicle orienta-
tions. When driving towards yourself, it
just seems like the steering is backwards
The motor spins but the car doesn't move Incorrect slipper adjustment Tighten slipper clutch until vehicle moves.
Slipper should still slip when vehicle is
held still on carpet and given 25% throttle.
See Slipper Clutch Guide Page: 16
Grinding sound 1. Gear mesh too loose
2. Gears worn
1. Reset gear mesh
2. Replace gears
TROUBLE POSSIBLE CAUSE POSSIBLE SOLUTIONS
Redcat Racing
18
RCR-2CENR RADIO SYSTEM
TROUBLESHOOTING
?

SPARE PARTS
Redcat Racing
51
REPUESTOS • ERSATZTEILE • PIÈCES DE RECHANGE
(2pcs)
(1pr)
(2pcs)
RER11320-Chassis Fender Set
RER11321-Rear Shock Towers RER11322-Front Shock Towers RER11323-Body Mounts (2pcs)
RER11324-Bumper Mount
RER11325-Center Skid Plate
RER11326-Bumper Set (F/R)
RER11327-Side Guards (1pr)
RER11328-Rock Sliders (2pcs) RER11329- Receiver Box Set
RER11330-Battery Tray
RER11331-Transfer Case
Housing Set
RER11332-Transmission Case
Housing Set
RER11333-Front Outer Portal
Housing Set (L/R)
RER11334-Rear Outer Portal
Housing Set (L/R)
RER11342-Hub Cover (4pcs)
RER11340-Shackle Hitch
Cover & Pin Set
RER11341-Wheels (2pcs)
(No Beadlocks)
13813-Beadlock Rings (2prs)
13852-Tires W/Inserts (1pr)
RER11345-Frame Rail Set RER11347-Portal Axle Spool
(1pc)
RER11346-Differential Cover
(1pc)
RER11343-Shock Absorbers
(2pcs)
RER11344-Center Drive Shaft
Set
RER11350-Servo Link
(52mm)
(105mm)
RER11352-Panhard Bar
(53mm)
RER11351-Steering Link
RER11348-Front Portal CVA
Shafts w/Couplers
RER11349-Rear Portal
Axle Shafts
RER11338-Body Post Set
Drive Shaft Set
RER11335-Caster Mounts
(L/R)
RER11336-Transfer Case
RER11339-Portal Center
RER11337-Lower Link Mount
Set For Axle
Gearbox Housing

Redcat Racing
52
SPARE PARTS
REPUESTOS • ERSATZTEILE • PIÈCES DE RECHANGE
RER11355-Motor Plate RER11353-Rear Lower
Links (93mm) (2pcs)
RER11354-Rear Upper Links
(88.5mm) (2pcs)
RER11358-Plastic Spur Gear
(45T)
RER11357-Slipper
Pads (2pcs)
13881-2*4mm Button
Head Hex Screw (10pcs)
82045-3*8mm Button Head
Hex Screw (8pcs)
50100-3*10mm Button
Head Hex Screw (8pcs)
4*4
14582-3*14mm Button
Head Hex Screw (10pcs)
13882-3*16mm Button
Head Hex Screw (10pcs)
82046-3*18mm Button
Head Hex Screw (8pcs)
RER11365-Rear Portal Axle
Input Gear (8T) (2pcs)
14586-3*6mm Button
Head Hex Screw (10pcs)
RER11356-Metal Slipper
Plate (2pcs)
RER11359-Transfer Case
Output Gear (25T)
RER11360-Transmission
Output Gear (20T)
RER11361-Transmission
/ Transfer Case Input Gear
(13T) (2pcs)
RER11362-Portal Axle Ring
Gear (32T) (2PCS)
RER11363-Portal Axle Pinion
Gear (11T) (2pcs)
RER11364-Portal Axle Output
Gear (17T) (2pcs)
11177-Brass Motor Pinion
Gear (17T)
(0.8 Module/32P)
RER11367-12*18*4mm
Rubber Sealed Ball
Bearings (2pcs)
RER11368-6*12*4mm
Rubber Sealed Ball
Bearings (6pcs)
RER11369 -7*11*3mm
Rubber Sealed Ball
Bearings (2pcs)
RER11370-6*10*3mm
Rubber Sealed Ball
Bearings (2pcs)
RER11371-4*8*3mm Rubber
Sealed Ball Bearings (6pcs)
RER11372-15*10*4mm
Rubber Sealed Ball
Bearings (6pcs)
RER11373-10*5*4mm
Rubber Sealed Ball
Bearings (6pcs)
RER11366-Front Portal CVA
Input Gears w/Pins (2*12)
RER11420
-Shaft for 17T
Gear
RER11421-Shaft for 11T
Gear (2pcs)
RER11423-Shaft for 20T
Gear (2pcs)
RER11424-Shaft for 45T
Gear
60240-Ball Head Screws
5.8mm (8pcs)
RER11422-Shaft for 25T
Gear
/